


目录
前言&&准备材料
我这里用的控制器是esp32,它的adc采集器分辨率是12位,工作电压是3.3V。因此我们读取到的模拟数值0~4096就是对应的0~3.3V。
这里我的ina240型号是I240A2。也就是说ina240的增益是50V/V。
我的驱动器型号是simplefoc v0.2。采用内置电流采样,具体电流采样电路如下图:
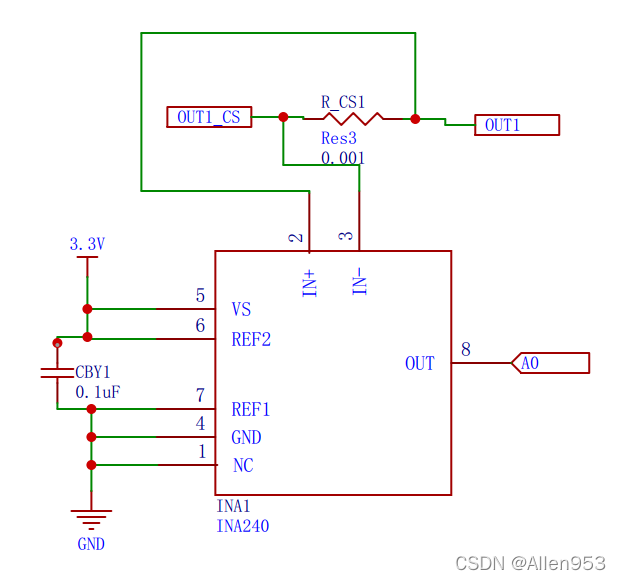
双向
arduino程序
/**
使用电压控制回路的扭矩控制示例。
大多数低端无刷电机驱动器没有电流测量功能,因此SimpleFOC为您提供了一种通过设置电机电压而不是电流来控制电机扭矩的方法。
这使无刷直流电机有效地成为直流电机,您可以以相同的方式使用它。
*/
// IN1 pwm1 9 27
// IN2 pwm2 6 26
// IN3 pwm3 5 25
// INH1 enable1 8 12
// INH2 enable2 7 13
// INH3 enable3 4 14
//in-line current sense - phase 1/A 35
//in-line current sense - phase 1/C 34
#include <SimpleFOC.h>
class LowPassFilte {
public:
LowPassFilte(float Tf);//低通滤波器时间常量
~LowPassFilte() = default;
float operator() (float x);
float Tf; //!< 低通滤波器时间常量
protected:
unsigned long timestamp_prev; //!< 上次执行时间戳
float y_prev; //!< 经过上次执行后过滤到的值
};
LowPassFilte::LowPassFilte(float time_constant)
: Tf(time_constant)
, y_prev(0.0f)
{
timestamp_prev = micros();
}
float LowPassFilte::operator() (float x)
{
unsigned long timestamp = micros();
float dt = (timestamp - timestamp_prev) * 1e-6f;
if (dt < 0.0f || dt > 0.5f)
dt = 1e-3f;
float alpha = Tf / (Tf + dt);
float y = alpha * y_prev + (1.0f - alpha) * x;
y_prev = y;
timestamp_prev = timestamp;
return y;
}
LowPassFilte LF_a(0.01);//原始数据滤波器
LowPassFilte LF_b(0.01);//A相电流滤波器
LowPassFilte LF_c(0.01);//C相电流滤波器
//AS5600编码器支持spi,iic和模拟量三种数据传输方式,这里用iic(同时也是最常用的方式)
// magnetic sensor instance - I2C
MagneticSensorI2C sensor = MagneticSensorI2C(AS5600_I2C);
TwoWire I2Cone = TwoWire(0);
// BLDC motor & driver instance
BLDCMotor motor = BLDCMotor(11);
BLDCDriver3PWM driver = BLDCDriver3PWM(27, 26, 25, 12, 13, 14);
InlineCurrentSense Cs_motor(0.001, 50.0, 35, 36, 34);
// voltage set point variable
float target_voltage = 5.0;
// instantiate the commander
Commander command = Commander(Serial);
void doTarget(char* cmd) {
command.scalar(&target_voltage, cmd);
}
void setup() {
// initialise magnetic sensor hardware
I2Cone.begin(18, 5, 400000);
sensor.init(&I2Cone);
// link the motor to the sensor
motor.linkSensor(&sensor);
// power supply voltage
driver.voltage_power_supply = 12;
driver.init();
motor.linkDriver(&driver);
// aligning voltage
motor.voltage_sensor_align = 5;
// choose FOC modulation (optional)
motor.foc_modulation = FOCModulationType::SpaceVectorPWM;
// set motion control loop to be used
motor.controller = MotionControlType::torque;
// use monitoring with serial
Serial.begin(115200);
// comment out if not needed
motor.useMonitoring(Serial);
// initialize motor
motor.init();
// align sensor and start FOC
motor.initFOC();
// add target command T
command.add('T', doTarget, "target voltage");
Serial.println(F("Motor ready."));
Serial.println(F("Set the target voltage using serial terminal:"));
_delay(1000);
Cs_motor.init();
}
void loop() {
// main FOC algorithm function
// the faster you run this function the better
// Arduino UNO loop ~1kHz
// Bluepill loop ~10kHz
motor.loopFOC();
// Motion control function
// velocity, position or voltage (defined in motor.controller)
// this function can be run at much lower frequency than loopFOC() function
// You can also use motor.move() and set the motor.target in the code
motor.move(target_voltage);
// Cs_motor.getPhaseCurrents();
Serial.print(LF_b((Cs_motor.getPhaseCurrents()).a));
Serial.print(",");
Serial.println(LF_c((Cs_motor.getPhaseCurrents()).c));
// Serial.print(LF_a(analogRead(35)));
// Serial.print(",");
// Serial.print(LF_b((3.3 * ((float)analogRead(35) - 1930) / 4096.0) * 20.0));
// Serial.print(",");
// Serial.println(LF_c((-3.3 * ((float)analogRead(34) - 1930) / 4096.0) * 20.0));
// user communication
command.run();
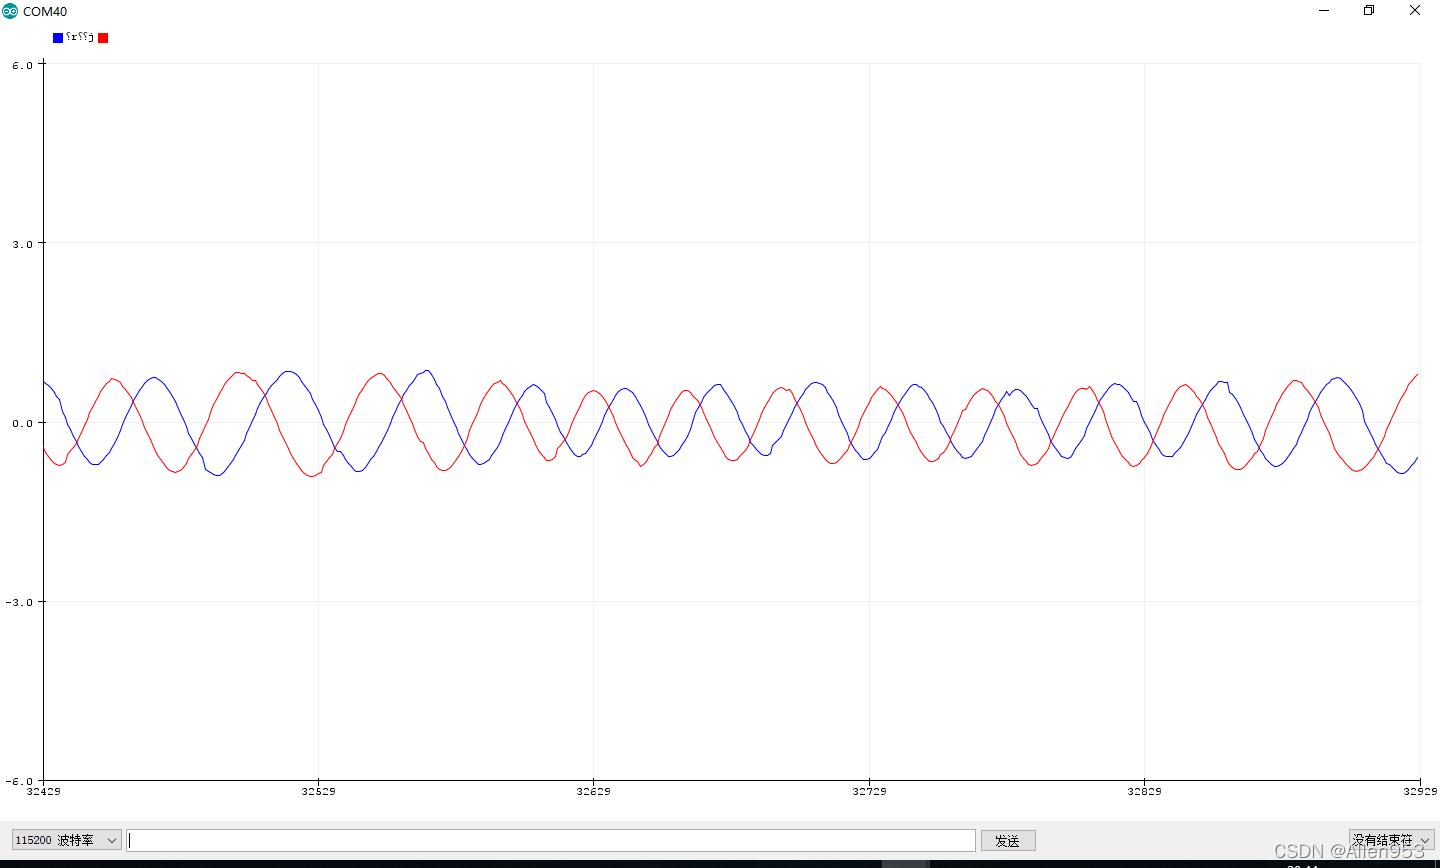
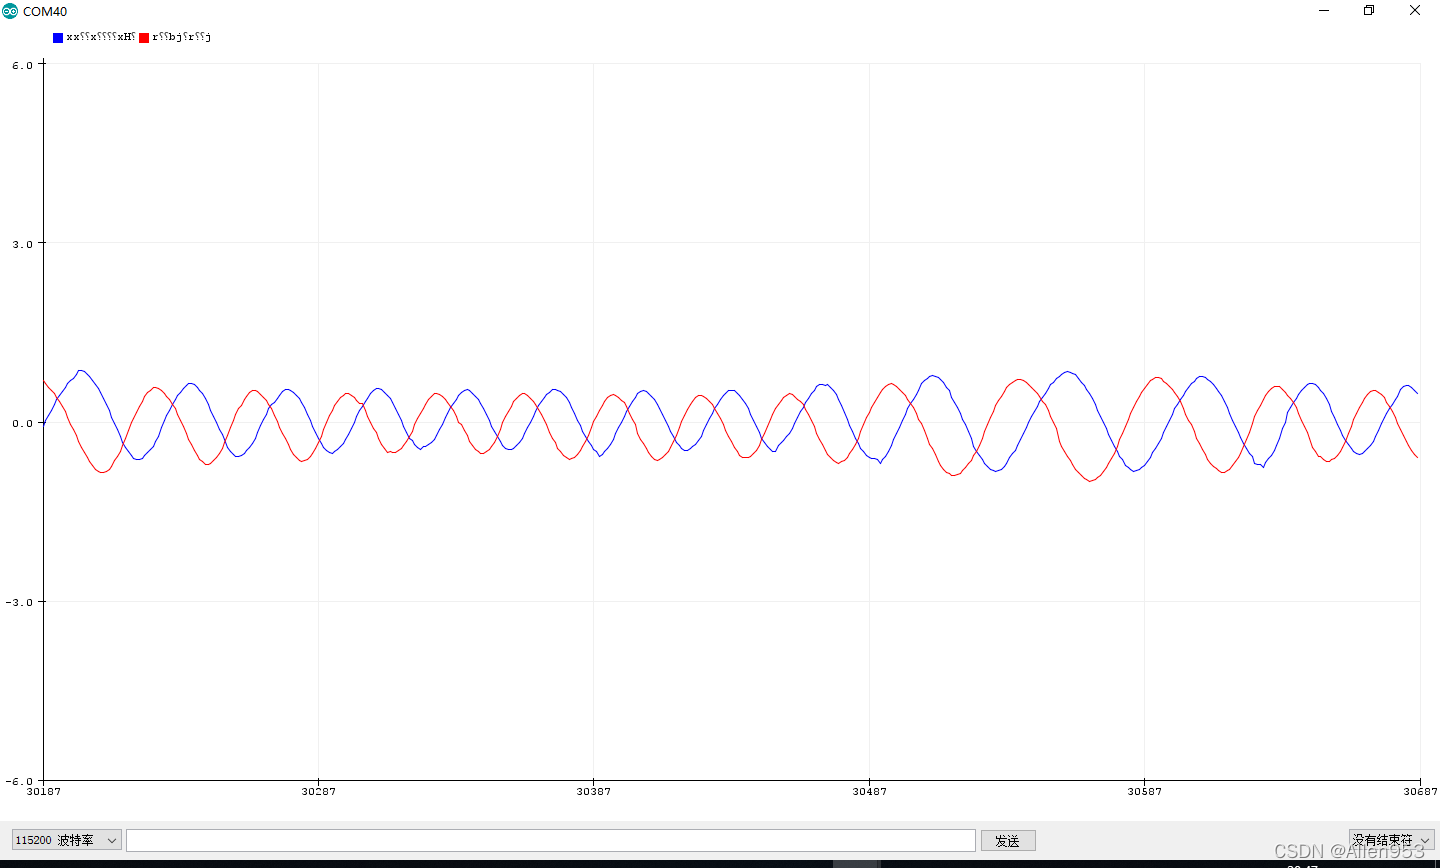
}串口打印效果:
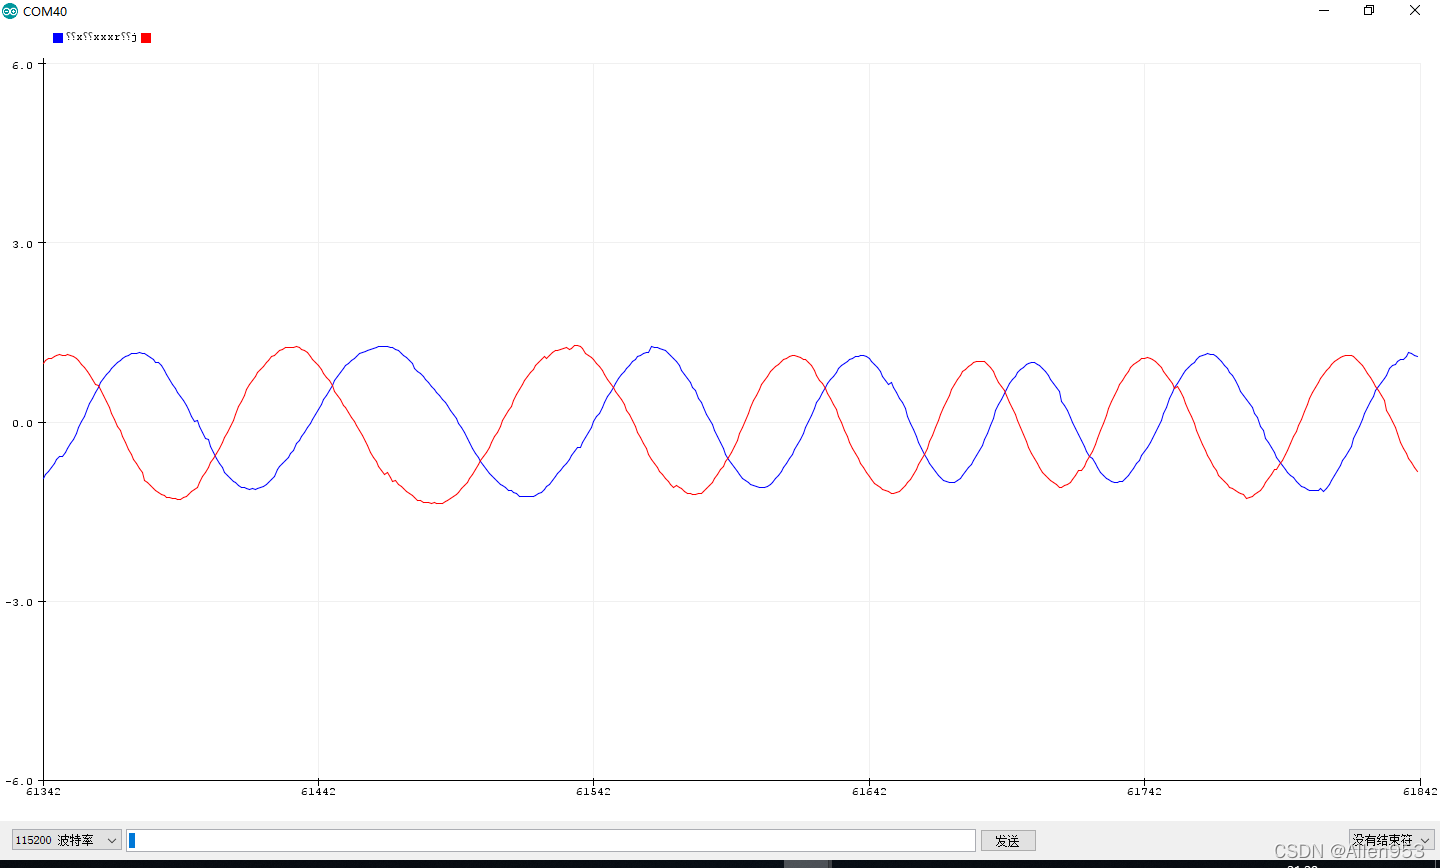
用Baize_Foc的测试代码
/**
   使用电压控制回路的扭矩控制示例。
   大多数低端无刷电机驱动器没有电流测量功能,因此SimpleFOC为您提供了一种通过设置电机电压而不是电流来控制电机扭矩的方法。
   这使无刷直流电机有效地成为直流电机,您可以以相同的方式使用它。
*/
// IN1     pwm1    9  27
// IN2     pwm2    6  26
// IN3     pwm3    5  25
// INH1   enable1  8  12
// INH2   enable2  7  13
// INH3   enable3  4  14
//in-line current sense - phase 1/A 35
//in-line current sense - phase 1/C 34

#include <SimpleFOC.h>

class LowPassFilte {
  public:
    LowPassFilte(float Tf);//低通滤波器时间常量
    ~LowPassFilte() = default;
    float operator() (float x);
    float Tf; //!< 低通滤波器时间常量
  protected:
    unsigned long timestamp_prev;  //!< 上次执行时间戳
    float y_prev; //!< 经过上次执行后过滤到的值
};

LowPassFilte::LowPassFilte(float time_constant)
  : Tf(time_constant)
  , y_prev(0.0f)
{
  timestamp_prev = micros();
}

float LowPassFilte::operator() (float x)
{
  unsigned long timestamp = micros();
  float dt = (timestamp - timestamp_prev) * 1e-6f;

  if (dt < 0.0f || dt > 0.5f)
    dt = 1e-3f;

  float alpha = Tf / (Tf + dt);
  float y = alpha * y_prev + (1.0f - alpha) * x;

  y_prev = y;
  timestamp_prev = timestamp;
  return y;
}

LowPassFilte LF_a(0.01);//原始数据滤波器
LowPassFilte LF_b(0.01);//A相电流滤波器
LowPassFilte LF_c(0.01);//C相电流滤波器


//AS5600编码器支持spi,iic和模拟量三种数据传输方式,这里用iic(同时也是最常用的方式)
// magnetic sensor instance - I2C
MagneticSensorI2C sensor = MagneticSensorI2C(AS5600_I2C);
TwoWire I2Cone = TwoWire(0);

// BLDC motor & driver instance
BLDCMotor motor = BLDCMotor(11);
BLDCDriver3PWM driver = BLDCDriver3PWM(17, 18, 19, 21, 22, 23);


InlineCurrentSense Cs_motor(0.001, 50.0, 34, 35);

// voltage set point variable
float target_voltage = 5.0;
// instantiate the commander
Commander command = Commander(Serial);
void doTarget(char* cmd) {
  command.scalar(&target_voltage, cmd);
}

void setup() {
  // initialise magnetic sensor hardware
  I2Cone.begin(26, 25, 400000);
  sensor.init(&I2Cone);
  // link the motor to the sensor
  motor.linkSensor(&sensor);

  // power supply voltage
  driver.voltage_power_supply = 12;
  driver.init();
  motor.linkDriver(&driver);

  // aligning voltage
  motor.voltage_sensor_align = 5;
  // choose FOC modulation (optional)
  motor.foc_modulation = FOCModulationType::SpaceVectorPWM;
  // set motion control loop to be used
  motor.controller = MotionControlType::torque;

  // use monitoring with serial
  Serial.begin(115200);
  // comment out if not needed
  motor.useMonitoring(Serial);

  // initialize motor
  motor.init();
  // align sensor and start FOC
  motor.initFOC();

  // add target command T
  command.add('T', doTarget, "target voltage");

  Serial.println(F("Motor ready."));
  Serial.println(F("Set the target voltage using serial terminal:"));
  _delay(1000);

  Cs_motor.init();
}

void loop() {

  // main FOC algorithm function
  // the faster you run this function the better
  // Arduino UNO loop  ~1kHz
  // Bluepill loop ~10kHz
  motor.loopFOC();

  // Motion control function
  // velocity, position or voltage (defined in motor.controller)
  // this function can be run at much lower frequency than loopFOC() function
  // You can also use motor.move() and set the motor.target in the code
  motor.move(target_voltage);


  // Cs_motor.getPhaseCurrents();
//  Serial.print(LF_b((Cs_motor.getPhaseCurrents()).a));
//  Serial.print(",");
//  Serial.println(LF_c((Cs_motor.getPhaseCurrents()).c));

//  Serial.print(LF_a(analogRead(35)));
//  Serial.print(",");
  Serial.print(LF_b((3.3 * ((float)analogRead(35) - 1930) / 4096.0) * 20.0));
  Serial.print(",");
  Serial.println(LF_c((-3.3 * ((float)analogRead(34) - 1930) / 4096.0) * 20.0));

  // user communication
  command.run();
}
参考链接:
1.【INA240】产品参数介绍、INA240数据手册、中英文PDF资料下载-TI资料-电子发烧友
2.


 被折叠的 条评论
为什么被折叠?
被折叠的 条评论
为什么被折叠?
 到【灌水乐园】发言


