


1. 简介
在数字化时代,创意与技术的结合不断推动着艺术和媒体的边界。DiffSensei,一个创新的框架,正是这一趋势的前沿代表。它巧妙地融合了多模态大型语言模型(MLLM)与扩散模型,为定制化漫画生成提供了一个强大的工具。DiffSensei不仅能够理解文本提示,还能根据这些提示动态调整角色特征,生成具有丰富细节和一致性的漫画面板。
DiffSensei能将文本描述转化为视觉叙事,同时保持角色之间的互动和场景的连贯性。通过精确控制角色的外观和布局,DiffSensei能够创造出既符合文本描述又具有视觉吸引力的漫画内容。
随着人工智能技术的发展,DiffSensei展示了AI在创意产业中的潜力,尤其是在视觉故事讲述方面的应用。它不仅能够辅助艺术家和设计师,提高创作效率,还能够为观众提供个性化和沉浸式的阅读体验。随着技术的不断进步和完善,我们有理由相信,DiffSensei将在未来的内容创作和媒体展示中扮演越来越重要的角色。
-
目录
项目主页:DiffSensei: Bridging Multi-Modal LLMs and Diffusion Models for Customized Manga Generation
论文地址:https://arxiv.org/abs/2412.07589
权重地址:https://huggingface.co/jianzongwu/DiffSensei/tree/main
数据集地址:https://huggingface.co/datasets/jianzongwu/MangaZero
colab版本:https://colab.research.google.com/drive/1f_VQfHzBGSIBgE9g21GYKGuZSh_SMRpK
-
-
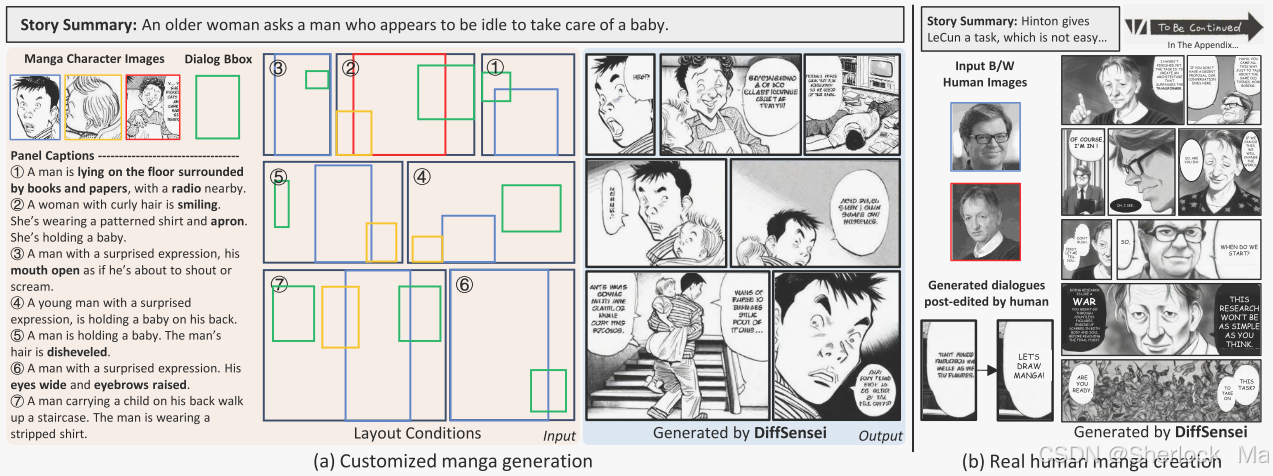
2.效果展示
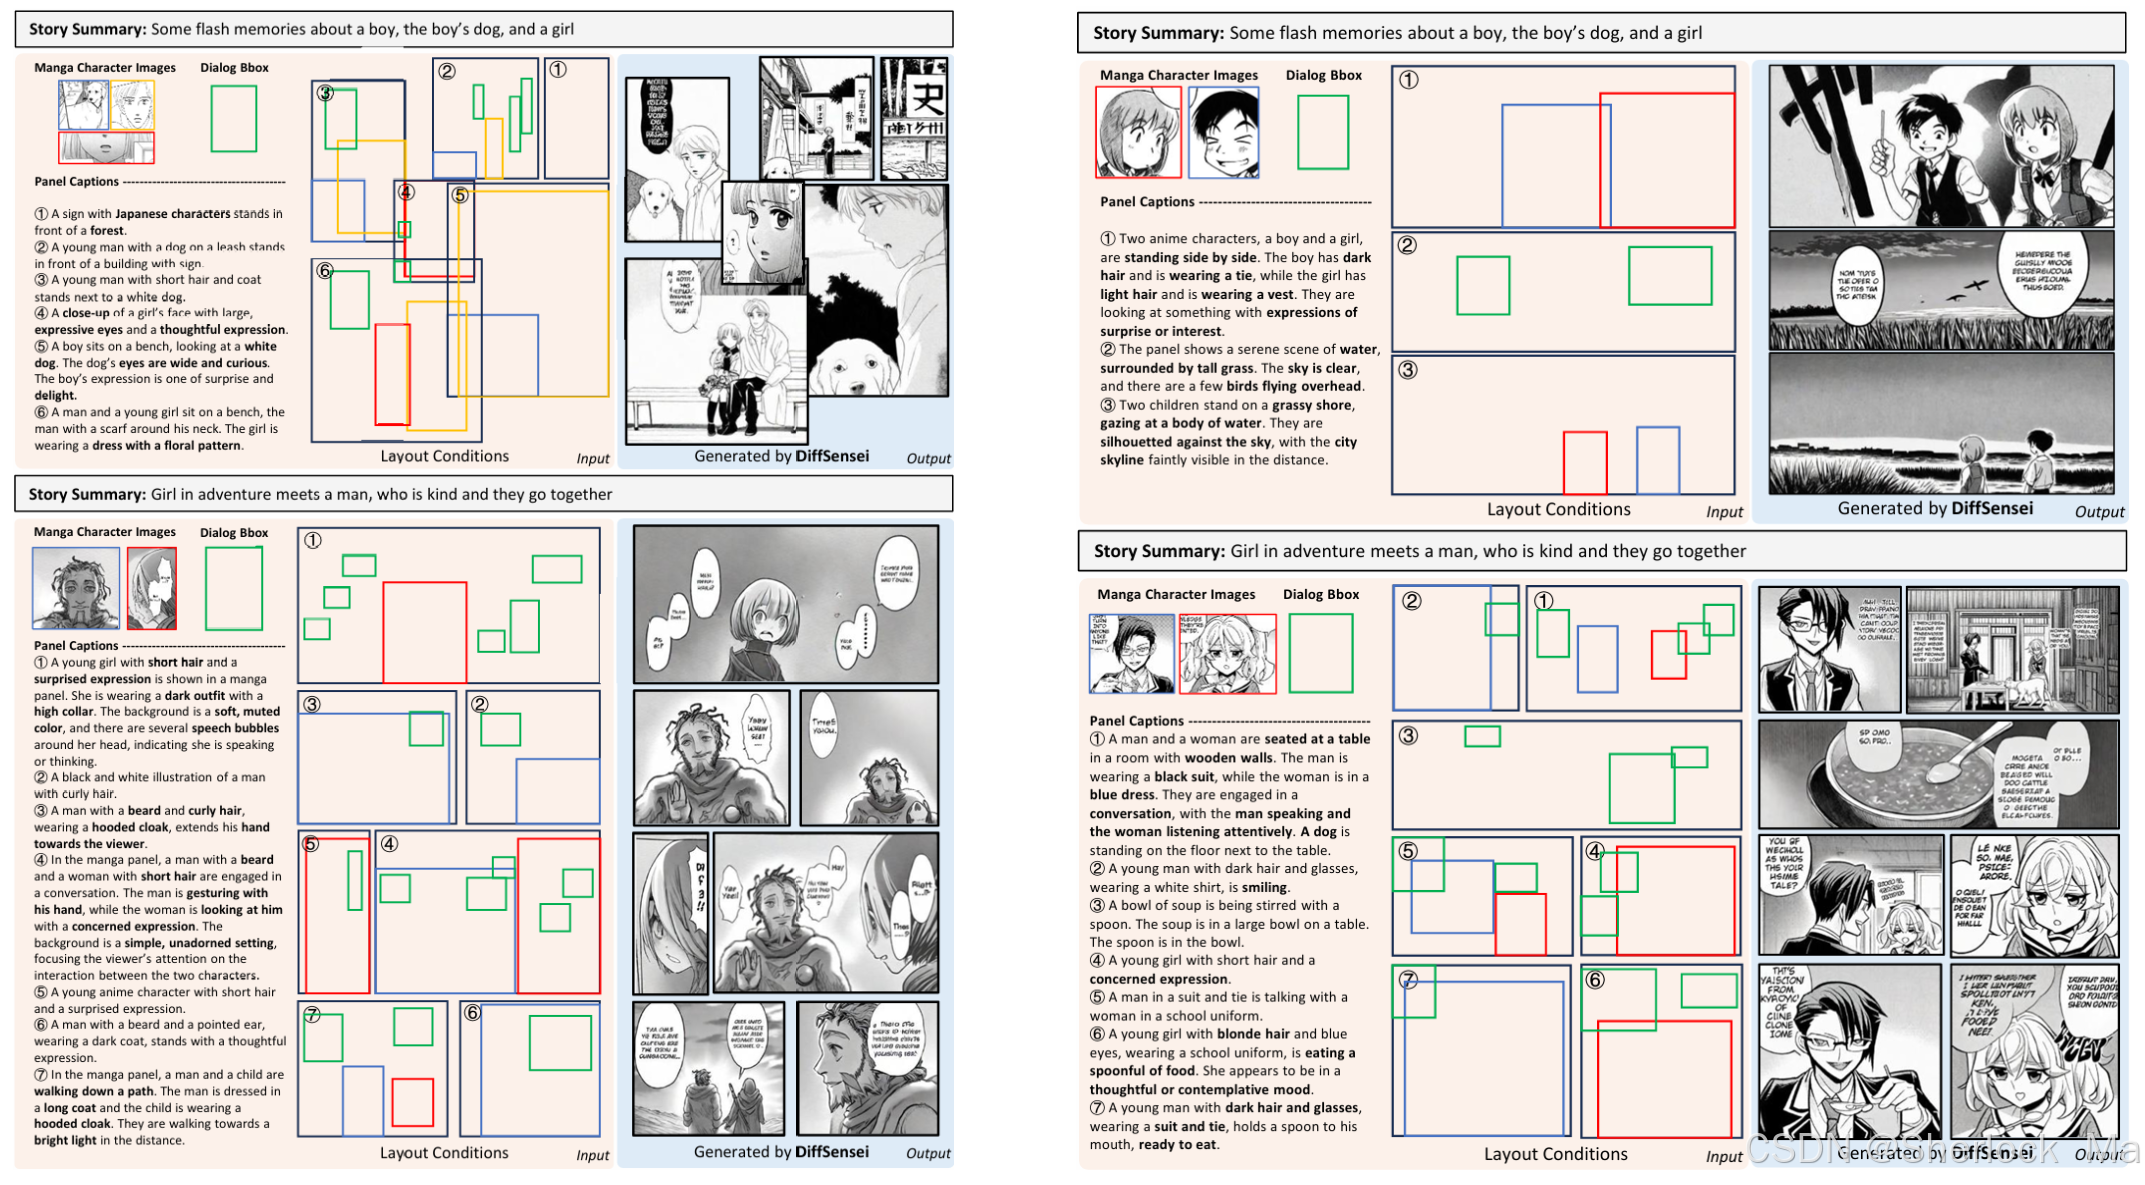

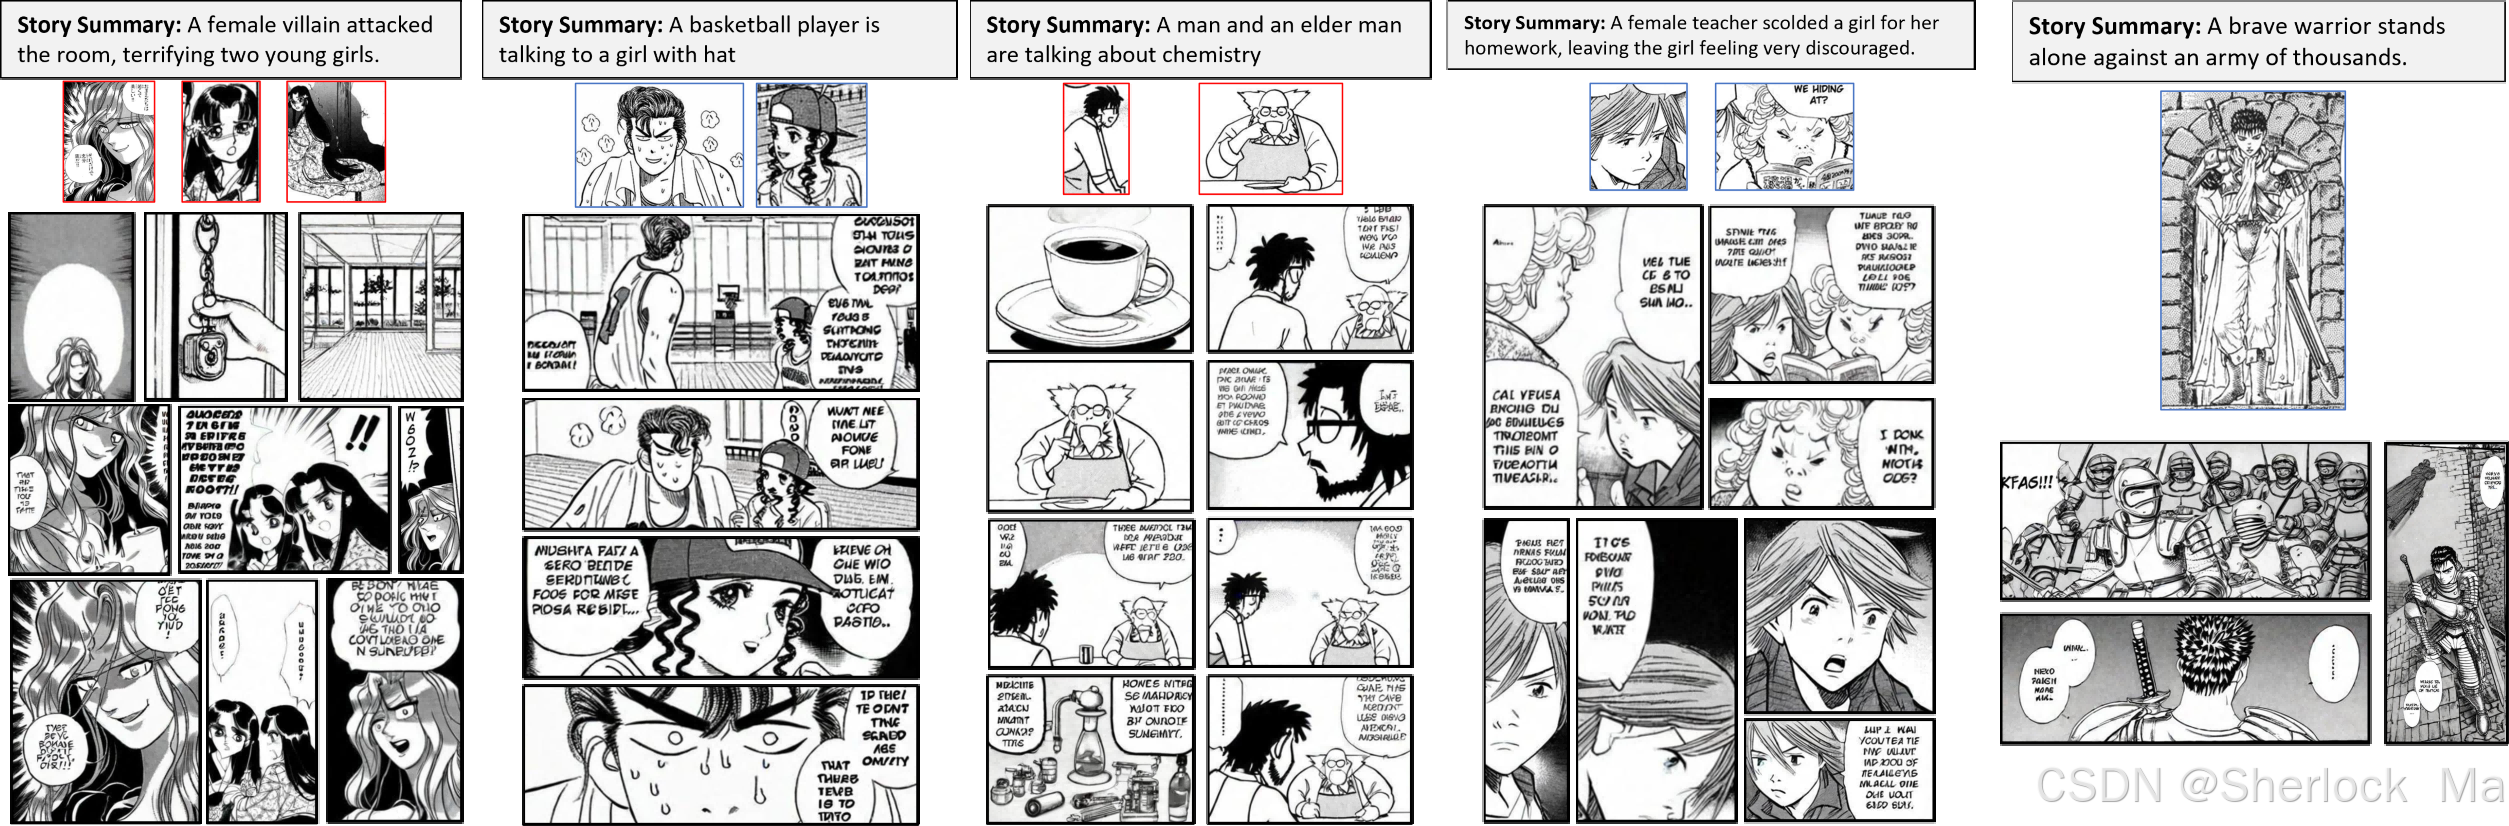

-
-
3.论文解析
介绍
漫画因其流行性和独特的叙事要求而具有特殊的意义,与其他的故事可视化不同,漫画要求跨面板的角色保持一致,还需要定位多个角色的精确布局控制,以及以连贯、视觉上引人入胜的方式无缝地嵌入对话。
目前,漫画生成仍然是一个未充分开发的领域。大多数现有的研究集中在低级别的图像到图像任务,主要是将一般图像转换为漫画风格。虽然这些任务增强了静态图像的视觉吸引力,但它们并没有扩展到从头开始生成完全定制的漫画内容。另一个研究方向探索了zero-shot的角色定制,然而,这些方法往往会导致僵化的“复制粘贴”效果,这限制了表现人物的变化,这种限制主要源于数据集的稀缺性,这些数据集中同一角色在不同表情和姿势中的多次出现,模型难以学到新知识。
这篇论文的贡献:
- 简单来说引入一个新任务:定制漫画生成,重点是生成具有多个人物的漫画图像,每个人物都动态地适应文本提示并根据布局规范定位。
- 推出了MangaZero数据集,这是第一个专门为多角色、多状态漫画生成而设计的大规模数据集,解决了故事可视化训练数据的巨大缺口。该数据集将发布给图像生成社区。
- 推出了DiffSensei,它是第一个将扩散模型和MLLM联系起来的定制漫画生成框架。MLLM作为一个自适应的字符特征适配器,使字符能够动态地响应文本提示。
-
相关工作
故事可视化 Story visualization
故事可视化,即基于给定故事生成视觉叙事的过程,目前正在迅速发展。尽管这一领域最近取得了较大进展,但该领域仍面临着重大限制。大多数现有方法仅从文本和图像级提示生成故事图像,这种方法对角色的控制效果十分有限,降低了故事可视化的灵活性和深度。
一个关键因素是当前的训练数据集缺乏特定的注释。为了应对数据限制,最近的工作探索了使用现有物体保存技术(如IP适配器)的免训练方法进行多角色控制。其他工作试图训练扩散模型以实现多角色定制生成。然而,这些方法通常会导致“复制-粘贴”效应,严重限制了动态故事讲述所需的表达能力和动作的多样性。另外,组合多个模型还显着降低了推理速度。
-
用于个性化图像生成的MLLM
MLLM在个性化图像生成方面表现出了巨大的潜力,特别是对于涉及图像编辑和定制的任务。
然而,MLLM驱动的多角色叙事图像生成仍然是一个开放的挑战,主要是由于在保持人物之间的关系和场景的连续性的困难。我们的框架提出了一个基于MLLM的身份适配器(identity adapter),提高了动态故事的多角色一致性。与以前的作品相比,我们的框架将多角色特征作为输入,并在文本提示后集体编辑这些特征,从而实现跨多个角色的灵活主题编辑。
-
MangaZero数据集
问题定义
为了跨N个面板(panel)生成漫画故事,输入包括:针对每个面板的文本提示,k个角色图像
,每个面板的角色边界框
,以及每个面板的对话边界框
。模型输出表示为
,其中Φ是整个模型函数,θ表示模型的学习参数。
这个任务不同于现有的故事可视化和延续任务。
- 具体来说,在故事可视化任务中,面板是使用
生成的,而在故事延续任务中,面板的生成取决于先前的面板,即
,i > 0。两者都缺乏明确的角色控制(I),而这是讲故事的关键因素。
- 此外,所提出的任务不同于主题驱动(subject-driven)的图像生成方法,因为它要求模型不仅生成准确的角色表示,而且还修改角色的属性以响应面板标题和布局,从而产生变化和连贯的叙事视觉效果。
-
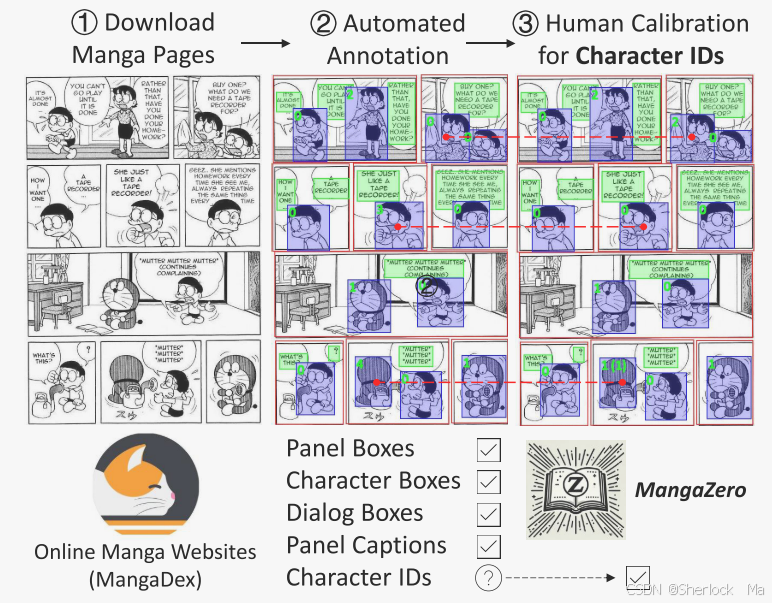
数据集构建
与当前的漫画和故事可视化数据集相比,作者所提出的MangaZero数据集尺寸更大,数据源更新,注释更丰富,漫画系列多样,面板分辨率多样化。与著名的黑白白色漫画数据集Manga 109 相比,Manga Zero数据集包含更多2000年之后出版的漫画系列,这也是它的命名由来。此外,MangaZero还收录了2000年以前的著名系列,而这些系列在Manga109中没有出现,例如哆啦A梦(1974)。
为了构建数据集:
- 作者首先从MangaDex上下载漫画页面。需要注意的是,所有数据仅用于学术研究,而不是商业目的。作者选择了48个漫画系列,每个系列最多下载1,000页,从而生成43264张双页图像。(下图1)
- 然后作者使用最近的漫画理解模型Magi对这些图像进行注释。对于漫画特定的注释,包括面板边界框,角色边界框,角色ID和对话框边界框。应该注意的是,角色ID标签仅在单个页面内是一致的,这足以给连贯的角色生成提供参考。(下图2)
- 一旦获得面板边界框,我们就利用LLaVA-v1.6-34 B为每个面板生成字幕。(下图2)
- 然而,作者观察到角色ID标记的准确性相对较低,这对训练目的构成了重大挑战。为了解决这个问题,人类注释者对机器生成的标签进行了细化,从而产生了准确和干净的注释。(下图3)
- 最后,将96页(每个系列2页)作为评估集,剩余的43168页作为训练集。
-
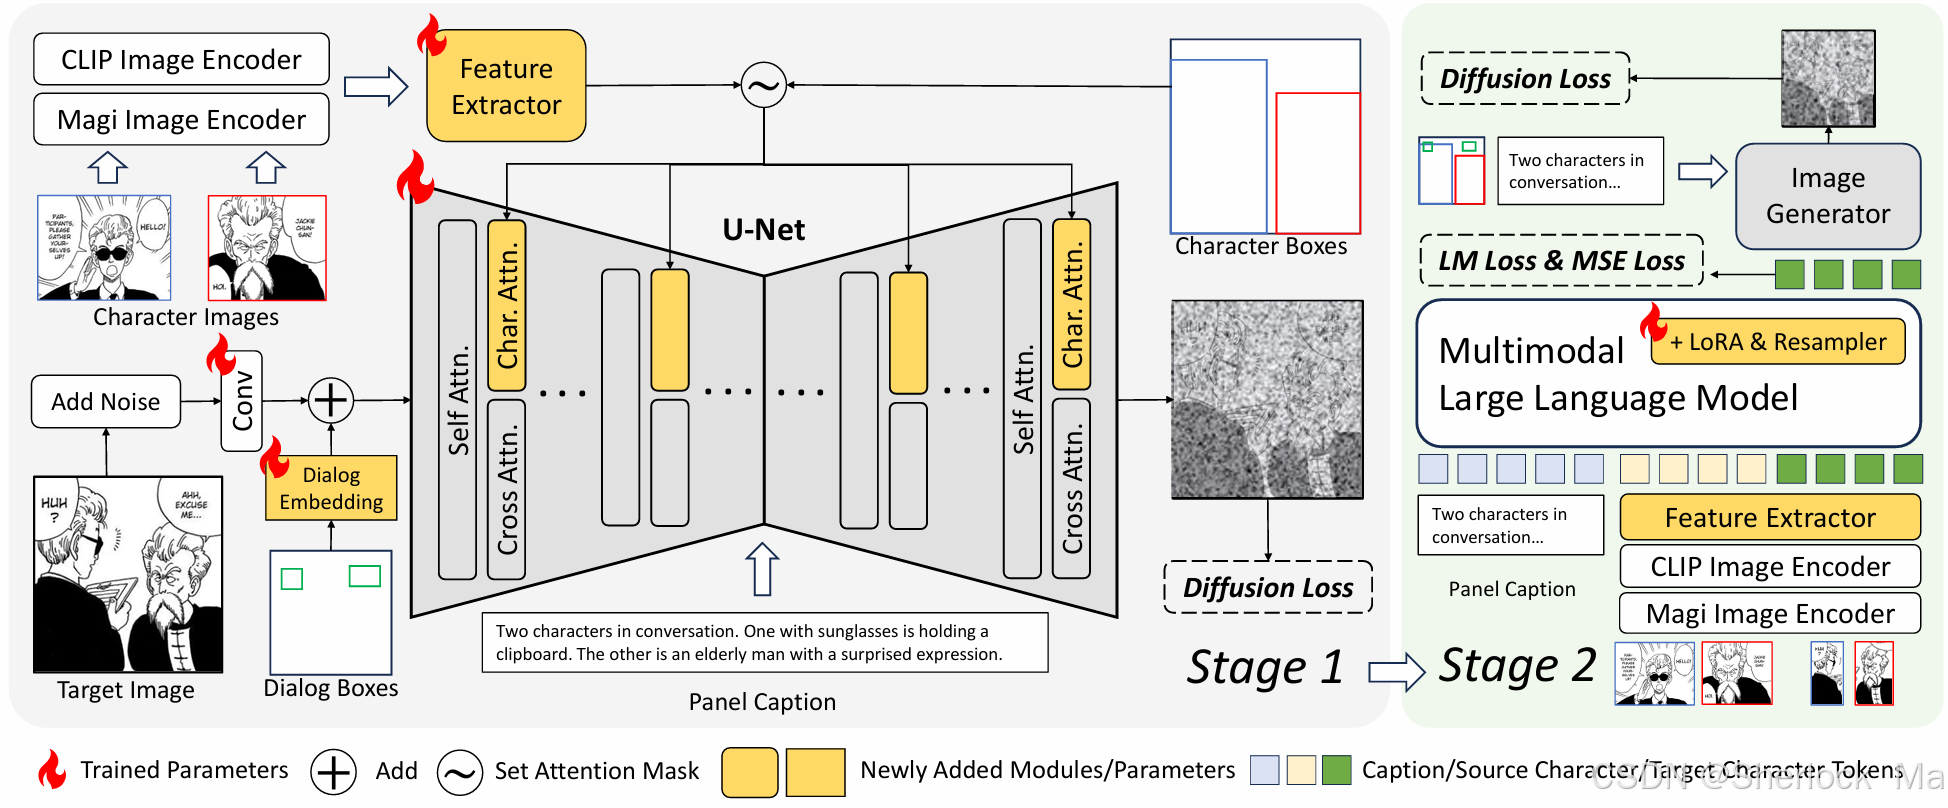
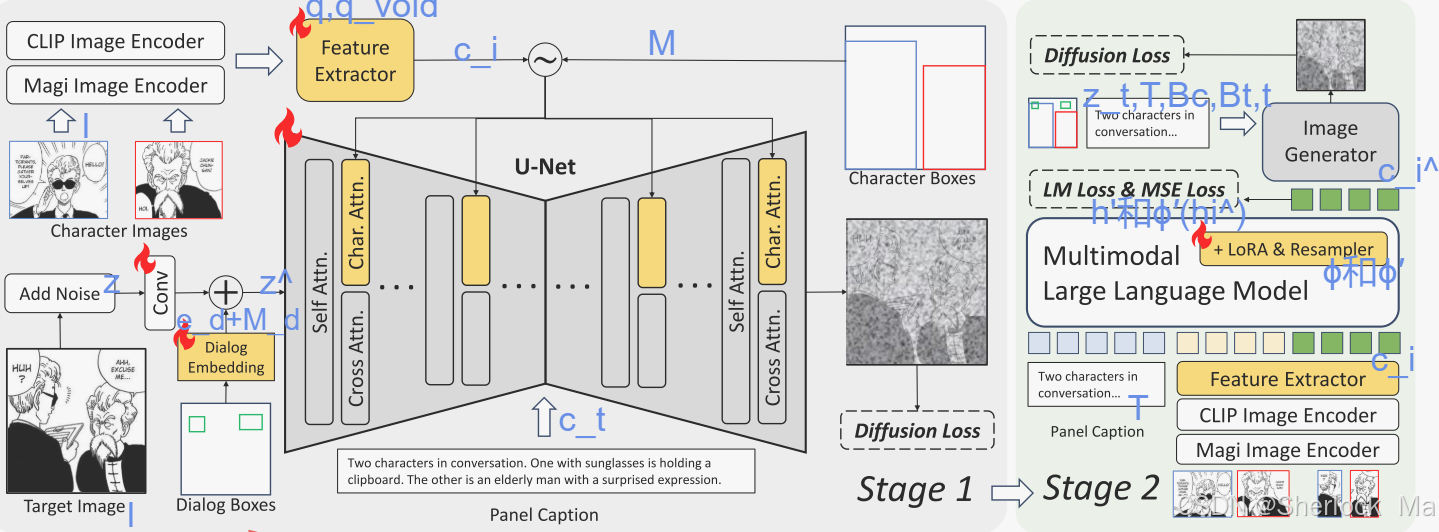
方法
动机
在图像生成过程中定制对象和布局有两个关键问题:
- 在避免直接从源角色图像复制粘贴的同时保持对象的特征;
- 在训练和推理过程中以最小的计算代价确保可靠的布局控制。
为了避免复制粘贴效应,该模型将角色图像特征转换为tokens,避免了直接传递细粒度的像素细节。此外,作者还集成了一个MLLM作为角色图像特征适配器。MLLM适配器接收源角色特征和面板标题作为输入,生成与文本兼容的目标角色特征。
对于布局控制,对角色和对话布局都采用了轻量级掩码技术。
-
多角色特征提取
作者使用CLIP和一种漫画图像编码器(Magi Image Encoder)来提取局部图像特征。获取这两组特征后由特征提取器(即重采样器模块)处理。该过程可以形式化为:其中,
表示漫画图像编码器。q和
分别是有角色和无角色特征的可训练query向量。q将图像特征重新采样到U-Net的交叉注意维度中,而
则在布局中没有角色的区域中引导交叉注意。
是所有角色的输出特征,其中B是批量大小,Nc是每个面板的最大角色数(根据需要填充全零特征),Nq是每个角色的query标记数,C是U-Net的交叉注意维度。
通过将角色图像压缩为几个token,DiffSensei避免将参考图像的细粒度空间特征编码到模型中。这使得能够专注于角色的语义表示,而不是固定的像素分布。
-
掩码交叉注意力
作者通过复制原交叉注意力的key和value矩阵来创建单独的角色交叉关注层。这允许图像query特征独立地关注文本和角色的交叉注意力,然后将来自这两种注意力的结果结合起来。
在角色交叉注意中,作者采用了一种掩码的交叉注意注入机制来控制每个角色的布局。在这里,每个角色特征只关注其指定边界框区域内的query特征。在没有角色的区域中,query特征处理占位符向量。
这可以表示为:,其中
,
,
,
,
。Q是query,
,
,
是文本交叉注意力的query,key和value投影矩阵。
、
是用于角色交叉注意的key和value投影矩阵,从
和
初始化。d是key的维度。ct、ci分别是文本和角色特征。z、
是输入和输出图像特征。α是控制角色注意力权重的超参数。M是一个注意力掩码,用于管理角色的布局。其值定义如下:
其中i表示query tokens的位置,j ∈ {0,1,.,Nc}是角色索引。第Nc个角色特征表示占位符向量。
是第j个角色的边界框。掩码注意力机制确保每个角色只关注其指定的边界框区域,而没有角色的区域关注占位符向量。该技术以最小的计算开销实现了对每个角色的高效和精确的布局控制。
简单来说,角色特征被提取后加上掩码后提供KV,而文本提供KV,噪声加上对话框嵌入和掩码提供Q,角色特征KV和噪声Q计算一次角色交叉注意力,文本KV和噪声Q计算一次交叉注意力。
-
对话框布局编码
带有对话框的面板是漫画图像的显著特征。然而,大多数当前的文本到图像模型都难以生成连贯、可读的文本。虽然最近的一些模型可以产生稳定的文本,但它们在文本长度方面仍然有限。生成扩展文本,如对话,继续构成挑战。
因此,作者建议控制对话框的布局,而不是文本内容。在这种方法中,人类艺术家可以手动编辑对话框中的文本,将图像生成留给模型。
具体来说,作者引入了一个可训练的embedding来表示对话框布局。首先扩展对话框embedding以匹配噪声的空间形状,然后用对话框布局掩码掩蔽其他区域。通过将掩蔽的对话embedding与潜在噪声相加,就可以在图像生成器内对对话位置进行编码。此过程表示为:,其中
是可训练对话嵌入,
是时间步长t中的噪声,Expand是将
扩展到潜在形状的函数,并且
是从输入对话边界框
导出的对话区域掩模。输出结果是一个包含对话框布局信息的潜在噪声。然后将其输入到U-Net中进行噪声预测。对话框嵌入有效地编码了对话框布局,在空间和时间上实现了最小的计算开销。
整个阶段一如图所示:

-
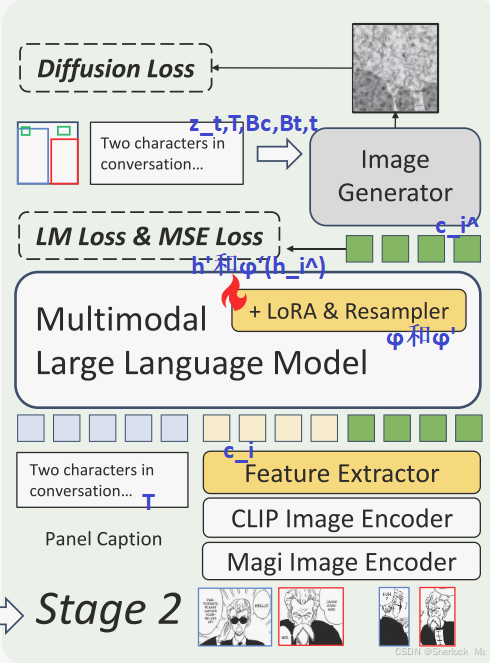
MLLM作为与文本兼容的角色特性适配器
训练图像生成器后,这个模型可以有效地创建符合指定角色外观和布局条件的漫画面板。然而,该模型往往严格遵循输入的角色图像,在调整表情,姿势,或基于面板字幕的运动等方面缺乏灵活性。因此作者建议将MLLM作为一个文本兼容的角色特征适配器。此方法允许基于文本提示动态修改角色状态。
MLLM的训练样本被组织为[面板标题,源角色图像特征,目标角色图像特征]。图像特征由两个特殊的标记<IMG>和</IMG>封装。
为了实现这一点,作者通过特殊token来计算语言模型(LM)损失,以限制输出格式和均方误差(MSE)损失,在特定面板标题的基础上指导目标角色特性。为了确保编辑的角色特征与图像生成器对齐,我们进一步将生成的特征传递到U-Net的角色交叉注意力中并计算扩散损失。在此阶段,仅更新MLLM中的LoRA和重采样器权重。该过程可以形式化为:
对于第一条公式:
- 这里,T是文本提示,ϕ 是输入重采样器,它将外部的图像特征(如源角色图像特征)转换为MLLM内部使用的嵌入格式。
是源角色图像特征经过MLLM的输入重采样器处理后的结果。
- MLLM根据输入的文本提示和角色特征,预测特殊标记的嵌入
和目标角色特征
。
对于第二条公式:
- 这个损失函数计算MLLM预测的特殊标记嵌入
对于第三条公式:
- ϕ′ 是输出重采样器,它执行相反的操作,将MLLM预测的内部嵌入(如目标角色特征
- 这个损失函数计算MLLM预测的目标角色特征
和从特征提取器提取的真实的、目标角色嵌入
之间的均方误差,以指导MLLM根据文本提示调整角色特征。
对于第四条损失:
- 这个损失函数计算预测的噪声ϵ 和模型θ 根据当前时间步 t、文本提示 T、预测的角色特征
生成的噪声
之间的差异。这个损失确保MLLM生成的特征与图像生成器的扩散过程对齐。
- 通过利用MangaZero的角色ID注释,我们可以在不同的面板上从同一个角色中获取特征,从而促进MLLM特征适配器的训练。然后,将适配器提取的角色特征
,以计算扩散损失。
简单来说,MLLM的用途是优化提取的角色特征,然后输入到Diffusion,替换原来的
,进行进一步生成。公式5是关于如何训练MLLM来适应文本提示并生成相应角色特征的描述。
-
训练MLLM的总损失表示如下:
整体如下:
-
其他
图像生成器是在SDXL的基础上构建的。特征提取器的权重使用预先训练的IP-AdapterPlus-SDXL初始化,而MLLM(多模态大语言模型)从SEED-X初始化。其他新引入的参数,包括MLLM的LoRA和重采样器(resampler)权重,被随机地初始化。
作者为第一阶段训练25万步,为第二阶段训练2万步。源角色图像是随机选择的,有50%的概率来自同一页;否则,它们从目标图像中选择。
为了在训练过程中处理不同的图像分辨率,作者采用了之前作品中基于桶(bucket)的方法,即将图像分组到特定分辨率的桶中。对于每个训练批次,从相同的分辨率桶加载图像。第1阶段的批量在8到64之间变化,第2阶段的批量在8到128之间变化。此动态批处理大小调整对于防止内存不足(OOM)问题是必要的,尤其是在处理高分辨率图像时。
-
-
4.代码解析
环境搭建
安装所需包
# Create a new environment with Conda
conda create -n diffsensei python=3.11
conda activate diffsensei

# Install Pytorch and Diffusers related packages
conda install pytorch torchvision torchaudio pytorch-cuda=12.1 -c pytorch -c nvidia
conda install -c conda-forge diffusers transformers accelerate
pip3 install -U xformers --index-url https://download.pytorch.org/whl/cu121

# Install other dependencies
pip install -r requirements.txt

# Third-party repo for running the gradio demo
pip install gradio-image-prompter
下载权重,权重文件夹结构如图所示:
checkpoints
  |- diffsensei
    |- image_generator
      |- ...
    |- mllm
|- ...方案一:使用包含MLLM的版本进行推理(大约40GB显存):
CUDA_VISIBLE_DEVICES=0 \
python -m scripts.demo.gradio \
  --config_path configs/model/diffsensei.yaml \
  --inference_config_path configs/inference/diffsensei.yaml \
--ckpt_path checkpoints/diffsensei方案二:使用不包含MLLM的版本进行推理,如果选择该版本,则可以跳过下载checkpoints中的 MLLM 组件,从而大大减少内存消耗。(可在单个 24GB 4090 GPU 上运行,批量大小=1,适用于中小型面板尺寸)。虽然该版本可能会略微降低文本兼容性,但整体质量基本不受影响。
CUDA_VISIBLE_DEVICES=0 \
python -m scripts.demo.gradio_wo_mllm \
  --config_path configs/model/diffsensei.yaml \
  --inference_config_path configs/inference/diffsensei.yaml \
--ckpt_path checkpoints/diffsensei方案三:也可以使用colab在线版本:https://colab.research.google.com/drive/1f_VQfHzBGSIBgE9g21GYKGuZSh_SMRpK
-
使用方法
要使用 Gradio 演示生成边界框和对话框,请按照以下步骤操作:
- 上传角色图像:首先上传要使用的漫画角色图像。
- 绘制角色边界框:在左侧面板上,绘制角色的边界框(IP 边界框,IP bounding boxes)。确保边界框的数量与上传的角色图像数量一致。
- 点击 "结束绘制 IP 边框“(End Drawing IP Bbox):绘制完所有角色边框后,单击 “结束绘制 IP 边框 (End Drawing IP Bbox)”按钮。这将把字符边框转移到对话框面板(dialog bbox panel)。
- 绘制对话框边框(可选):在对话框边框面板上,根据需要绘制对话框边框。请记住,对话框只能在对话框边框面板上绘制,而不能在角色边框面板上绘制。
- 生成图像:完成所有边界框后,单击 “生成图像 ”(Generate Images)按钮创建输出。
提高质量的技巧:
- 尝试使用提示语和字符
- 使用各种提示和字符图像来实现不同的输出。
- 尝试不同的随机种子
- 尝试使用不同的种子可以极大地影响输出结果,并帮助您找到更好的结果。
- 保持耐心
- 生成高质量样本可能需要多次尝试和微调。
-
报错解决
pydantic.errors.PydanticSchemaGenerationError: Unable to generate pydantic-core schema for <class 'starlette.requests.Request'>. Set `arbitrary_types_allowed=True` in the model_config to ignore this error or implement `__get_pydantic_core_schema__` on your type to fully support it.pydantic与fastapi版本不兼容,降级fastapi为0.112.4即可
pip install -U fastapi==0.112.4-
super().preprocess(x.image) AttributeError: 'dict' object has no attribute 'image'重新安装gradio和gradio_image_prompter,我的版本如下,经测试可以正常使用。另外,作者说自己安装的是最新版本,读者也可以试试。
gradio 4.44.1
gradio_client 1.3.0
gradio_image_prompter 0.1.0
-
gradio_wo_mllm
点击生成generate images,模型就会调用scripts/demo/gradio_wo_mllm.py文件中的main()的子函数generate_blank_image_dict_and_run(),其主要功能是根据输入参数生成图像。
主要流程如下:
- 解包args
- 计算画布尺寸
- 调用result_generation,并返回
def main(args)
    ...
    def generate_blank_image_dict_and_run(*args):
        (
            prompt, height, width, num_samples, seed, ip_images,
            ip_bbox, dialog_bbox, num_inference_steps, guidance_scale,
            negative_prompt, ip_scale
        ) = args
        # ip_bbox:角色框,dialog_bbox:对话框;guidance_scale:放大倍数;ip_scale:图片放大倍数
        canvas_height, canvas_width = calculate_canvas_size(width, height)      # 计算画布的尺寸

        return result_generation(   # 生成结果
            pipeline=pipeline,
            prompt=prompt,
            height=height,
            width=width,
            num_samples=num_samples,
            seed=seed,
            ip_images=load_images(ip_images) if ip_images else [],
            ip_bbox=process_bounding_boxes(ip_bbox, canvas_width, canvas_height) if ip_bbox else [],
            dialog_bbox=process_bounding_boxes(dialog_bbox, canvas_width, canvas_height) if dialog_bbox else [],
            num_inference_steps=num_inference_steps,
            guidance_scale=guidance_scale,
            negative_prompt=negative_prompt,
            ip_scale=ip_scale,
        )
而result_generation()又会调用pipeline,即DiffSenseiPipeline的__call__方法进行生成。
def result_generation(...):
    generator = torch.Generator('cuda:0').manual_seed(seed)

    try:
        images = pipeline(
            prompt=prompt,
            prompt_2=prompt,
            height=height,
            width=width,
            num_inference_steps=num_inference_steps,
            guidance_scale=guidance_scale,
            negative_prompt=negative_prompt,
            negative_prompt_2=negative_prompt,
            num_samples=num_samples,
            generator=generator,
            # manga conditions
            ip_images=ip_images,        # 角色图
            ip_image_embeds=None,
            ip_bbox=ip_bbox.copy(),     # 角色边界框
            ip_scale=ip_scale,
            dialog_bbox=dialog_bbox.copy(),     # 对话框
        ).images
因此我们的重点部分在DiffSenseiPipeline的__call__方法中
-
DiffSenseiPipeline.__call__()
0-2 检查输入并设置超参
没什么好说的,请自行查看
# 0. Default height and width to unet
height = height or self.default_sample_size * self.vae_scale_factor     # 检查 height 或 width 是否未提供
width = width or self.default_sample_size * self.vae_scale_factor

if height % min_size_step != 0 or width % min_size_step != 0:   # 检查 height 和 width 是否能被 min_size_step 整除
    height = (height / min_size_step) * min_size_step
    width = (width / min_size_step) * min_size_step

original_size = original_size or (height, width)        # 检查 original_size 或 target_size 是否未提供
target_size = target_size or (height, width)

# 1. Check inputs. Raise error if not correct
self.check_inputs(
    prompt,
    prompt_2,
    ip_images,
    ip_image_embeds,
    ip_bbox,
)

self._guidance_scale = guidance_scale
self._interrupt = False

# 2. Define hyper-parameters
device = self._execution_device
self.set_ip_scale(ip_scale)     # 设置attn_processor.scale = ip_scale
-
3 编码输入提示词
# 3. Encode input prompt
(
    prompt_embeds,      # [b,max_length,c1+c2]=[b,77,769+1280=2048]
    negative_prompt_embeds,
    pooled_prompt_embeds,   # [b,c2]=[b,1280]
    negative_pooled_prompt_embeds,
) = self.encode_prompt(
    prompt=prompt,
    prompt_2=prompt_2,
    device=device,
    num_images_per_prompt=num_samples,
    do_classifier_free_guidance=self.do_classifier_free_guidance,
    negative_prompt=negative_prompt,
    negative_prompt_2=negative_prompt_2,
)
进入encode_prompt(),首先设置lora
# set lora scale so that monkey patched LoRA
# function of text encoder can correctly access it
if lora_scale is not None and isinstance(self, StableDiffusionXLLoraLoaderMixin):
    self._lora_scale = lora_scale

    # dynamically adjust the LoRA scale
    if self.text_encoder is not None:
        if not USE_PEFT_BACKEND:
            adjust_lora_scale_text_encoder(self.text_encoder, lora_scale)
        else:
            scale_lora_layers(self.text_encoder, lora_scale)

    if self.text_encoder_2 is not None:
        if not USE_PEFT_BACKEND:
            adjust_lora_scale_text_encoder(self.text_encoder_2, lora_scale)
        else:
            scale_lora_layers(self.text_encoder_2, lora_scale)
正向提示词的编码,看着很长,实际上真正起作用的就只有for循环里面的tokenizer和text_encoder:
- 遍历prompt, tokenizer, text_encoder,每个都是两个。其中两个prompt一模一样
- 使用tokenizer处理第一个prompt,获得的向量text_input_ids尺寸为[b,77]
- 使用text_encoder处理第一个text_input_ids,获得的向量prompt_embeds尺寸是[b,77,768]
- 使用tokenizer处理第二个prompt,获得的向量text_input_ids尺寸为[b,77]
- 使用text_encoder处理第二个text_input_ids,获得的向量prompt_embeds尺寸是[b,77,1280]
- 合并两个向量,得到prompt_embeds尺寸是[b,77,2048]
- 另外需要注意的是,pooled_prompt_embeds的尺寸为[b,1280],这个向量用于在时间步嵌入时对时间步进行控制。
处理反向提示词同理。
# Define tokenizers and text encoders
tokenizers = [self.tokenizer, self.tokenizer_2] if self.tokenizer is not None else [self.tokenizer_2]
text_encoders = (       # clip
    [self.text_encoder, self.text_encoder_2] if self.text_encoder is not None else [self.text_encoder_2]
)

if prompt_embeds is None:
    prompt_2 = prompt_2 or prompt
    prompt_2 = [prompt_2] if isinstance(prompt_2, str) else prompt_2

    # textual inversion: process multi-vector tokens if necessary
    prompt_embeds_list = []
    prompts = [prompt, prompt_2]
    for prompt, tokenizer, text_encoder in zip(prompts, tokenizers, text_encoders):
        if isinstance(self, TextualInversionLoaderMixin):
            prompt = self.maybe_convert_prompt(prompt, tokenizer)

        text_inputs = tokenizer(        # tokenization 不足补齐,超过截断
            prompt,
            padding="max_length",
            max_length=tokenizer.model_max_length,
            truncation=True,
            return_tensors="pt",
        )

        text_input_ids = text_inputs.input_ids      # [b,max_length]
        untruncated_ids = tokenizer(prompt, padding="longest", return_tensors="pt").input_ids   # 没使用截断和max_length的tokenization,实际长度  [b,real_length]

        if untruncated_ids.shape[-1] >= text_input_ids.shape[-1] and not torch.equal(   # 检查输入文本是否被截断,满足上述条件,提取被截断的部分文本。
            text_input_ids, untruncated_ids
        ):
            removed_text = tokenizer.batch_decode(untruncated_ids[:, tokenizer.model_max_length - 1 : -1])
            logger.warning(
                "The following part of your input was truncated because CLIP can only handle sequences up to"
                f" {tokenizer.model_max_length} tokens: {removed_text}"
            )

        prompt_embeds = text_encoder(text_input_ids.to(device), output_hidden_states=True)      # CLIP 包含多个参数,

        # We are only ALWAYS interested in the pooled output of the final text encoder
        pooled_prompt_embeds = prompt_embeds[0]     # 最后一层,两个clip的维度不一样 [b,max_length,768]/[b,max_length,1280]
        if clip_skip is None:
            prompt_embeds = prompt_embeds.hidden_states[-2]
        else:
            # "2" because SDXL always indexes from the penultimate layer.
            prompt_embeds = prompt_embeds.hidden_states[-(clip_skip + 2)]

        prompt_embeds_list.append(prompt_embeds)

    prompt_embeds = torch.concat(prompt_embeds_list, dim=-1)        # [b,max_length,768+1280]=[b,max_length,2048]
恢复LoRA层的原始缩放因子,以确保模型状态正确。
if self.text_encoder is not None:
    if isinstance(self, StableDiffusionXLLoraLoaderMixin) and USE_PEFT_BACKEND:
        # Retrieve the original scale by scaling back the LoRA layers
        unscale_lora_layers(self.text_encoder, lora_scale)      # 在编码完成后恢复 LoRA 层的原始缩放因子,确保模型状态正确

if self.text_encoder_2 is not None:
    if isinstance(self, StableDiffusionXLLoraLoaderMixin) and USE_PEFT_BACKEND:
        # Retrieve the original scale by scaling back the LoRA layers
        unscale_lora_layers(self.text_encoder_2, lora_scale)
-
4 设置时间步
步骤如下:
- 设置时间步长:调用 self.scheduler.set_timesteps 方法,根据指定的推理步数 num_inference_steps 和设备 device 设置时间步长。
- 获取时间步长:从调度器 self.scheduler 中获取设置好的时间步长 timesteps。
# 4. Prepare timesteps
self.scheduler.set_timesteps(num_inference_steps, device=device)    # 设置时间步长
timesteps = self.scheduler.timesteps    # 设置时间步长
其中如果num_inference_steps=30,timesteps的结果如下,长度为30
tensor([958., 925., 892., 859., 826., 793., 760., 727., 694., 661., 628., 595.,
        562., 529., 496., 463., 430., 397., 364., 331., 298., 265., 232., 199.,
        166., 133., 100.,  67.,  34.,   1.], device='cuda:0')
-
5 初始化噪声
# 5. Prepare latent variables
num_channels_latents = self.unet.config.in_channels     # 4
latents = self.prepare_latents(     # [b,in_channels,height/vae_scale_factor,width/vae_scale_factor]=[b,4,height/8,width/8]
    num_samples,
    num_channels_latents,       # 默认4
    height,
    width,
    prompt_embeds.dtype,
    device,
    generator
)
默认情况下height=224,width=386,vae_scale_factor=8,生成的latents的输出为[1,4,28,48]。
生成过程如下:
- 通过指定的generator生成噪声
- 在扩散过程的开始,模型需要有一个明确的噪声水平起点。通过将
latents乘以init_noise_sigma,模型确保初始噪声的强度符合预期,为接下来的扩散步骤打下基础。
def prepare_latents(self, batch_size, num_channels_latents, height, width, dtype, device, generator, latents=None):
    shape = (
        batch_size,
        num_channels_latents,
        int(height) // self.vae_scale_factor,   # vae_scale_factor=8
        int(width) // self.vae_scale_factor,
    )

    if latents is None:
        latents = randn_tensor(shape, generator=generator, device=device, dtype=dtype)

    # scale the initial noise by the standard deviation required by the scheduler
    latents = latents * self.scheduler.init_noise_sigma     # 将初始噪声乘以调度器所需的初始噪声标准差。
    return latents
-
6 编码角色参考图和边界框
# 6. Prepare IP image embeddings
negative_image_embeds, image_embeds, negative_ip_bbox, ip_bbox = self.prepare_ip_image_embeds(
    ip_images,      # 角色参考图
    ip_image_embeds,
    ip_bbox,        # 角色边界框
    num_samples,    # 采样次数
)
cross_attention_kwargs = {
    "bbox": torch.cat([negative_ip_bbox, ip_bbox], dim=0),      # [2b,max_ip_num,4]
    "aspect_ratio": latents.shape[-2] / latents.shape[-1]
}
进入prepare_ip_image_embeds(),完整代码如下:
    def prepare_ip_image_embeds(
        self,
        ip_images,
        ip_image_embeds,
        ip_bbox,
        num_samples,
    ):
        max_num_ips = self.unet.config.max_num_ips      # 初始化和截取输入数据
        ip_images = ip_images[:max_num_ips]
        if ip_image_embeds is not None:
            ip_image_embeds = ip_image_embeds[:max_num_ips]
        ip_bbox = ip_bbox[:max_num_ips]
        num_ips = len(ip_images)

        # pad ip_images and ip_bbox     填充不足的数据
        while len(ip_images) < max_num_ips:     # 果输入的图像数量不足 max_num_ips,则用零张量填充嵌入向量。
            ip_images.append(Image.new('RGB', (224, 224), (0, 0, 0)))
        while len(ip_bbox) < max_num_ips:
            ip_bbox.append([0.0, 0.0, 0.0, 0.0])

        # encode ip_images
        clip_ip_images = self.clip_image_processor(images=ip_images, return_tensors="pt").pixel_values      # [max_num_ips, 3, 224,224]
        magi_ip_images = self.magi_image_processor(images=ip_images, return_tensors="pt").pixel_values      # [max_num_ips, 3, 224,224]
        clip_image_embeds = self.image_encoder(clip_ip_images.to(self._execution_device, dtype=self.image_encoder.dtype), output_hidden_states=True).hidden_states[-2].unsqueeze(0)     # [b,4,len,1280]
        magi_image_embeds = self.magi_image_encoder(magi_ip_images.to(self._execution_device, dtype=self.magi_image_encoder.dtype)).last_hidden_state[:, 0].unsqueeze(0)    # [b,4,768]

        # if number of ip_images is less than max_num_ips, pad the image_embeds with all zero tensors   填充不足的嵌入向量
        clip_image_embeds[0][num_ips:] = torch.zeros_like(clip_image_embeds[0][num_ips:])
        magi_image_embeds[0][num_ips:] = torch.zeros_like(magi_image_embeds[0][num_ips:])
        image_embeds = self.image_proj_model(clip_image_embeds.to(dtype=self.image_proj_model.dtype()), magi_image_embeds.to(dtype=self.image_proj_model.dtype()) if magi_image_embeds is not None else None)   # [b,80,2048]

        negative_image_embeds = self.image_proj_model(torch.zeros_like(clip_image_embeds.to(dtype=self.image_proj_model.dtype())), torch.zeros_like(magi_image_embeds).to(dtype=self.image_proj_model.dtype()))     # [b,80,2048]

        ip_bbox = torch.Tensor(ip_bbox).unsqueeze(0).to(self._execution_device)     # [b,4,4]
        negative_ip_bbox = torch.zeros_like(ip_bbox)
首先做截断和补齐,其中max_num_ips=4
- 获取最大图像数量 max_num_ips,并截取输入的 ip_images、ip_image_embeds 和 ip_bbox 到最大数量。
- 填充不足的数据:如果输入的图像数量不足 max_num_ips,则用黑色图像和零值边界框进行填充。
max_num_ips = self.unet.config.max_num_ips      # 初始化和截取输入数据
ip_images = ip_images[:max_num_ips]
if ip_image_embeds is not None:
    ip_image_embeds = ip_image_embeds[:max_num_ips]
ip_bbox = ip_bbox[:max_num_ips]
num_ips = len(ip_images)

# pad ip_images and ip_bbox     填充不足的数据
while len(ip_images) < max_num_ips:     # 果输入的图像数量不足 max_num_ips,则用零张量填充嵌入向量。
    ip_images.append(Image.new('RGB', (224, 224), (0, 0, 0)))
while len(ip_bbox) < max_num_ips:
ip_bbox.append([0.0, 0.0, 0.0, 0.0])- 编码图像:使用 clip_image_processor 和 magi_image_processor 处理图像,使每张图像的尺寸一样,得到 clip_ip_images 和 magi_ip_images
- 然后通过 image_encoder 和 magi_image_encoder 生成嵌入向量 clip_image_embeds ([b,4,257,1280])和 magi_image_embeds([b,4,768])。
- 填充不足的嵌入向量:如果输入的图像数量不足 max_num_ips,则用零张量填充嵌入向量。
- 生成图像嵌入向量:将 clip_image_embeds 和 magi_image_embeds 传递给 image_proj_model 生成最终的 image_embeds。使用全零向量生成和image_embeds形状一样的向量negative_image_embeds。尺寸为[b,80,2048]
- 生成正负样本的边界框,尺寸均为[b,4,4]
# encode ip_images
clip_ip_images = self.clip_image_processor(images=ip_images, return_tensors="pt").pixel_values      # [max_num_ips, 3, 224,224]
magi_ip_images = self.magi_image_processor(images=ip_images, return_tensors="pt").pixel_values      # [max_num_ips, 3, 224,224]
clip_image_embeds = self.image_encoder(clip_ip_images.to(self._execution_device, dtype=self.image_encoder.dtype), output_hidden_states=True).hidden_states[-2].unsqueeze(0)     # [b,4,len,1280]
magi_image_embeds = self.magi_image_encoder(magi_ip_images.to(self._execution_device, dtype=self.magi_image_encoder.dtype)).last_hidden_state[:, 0].unsqueeze(0)    # [b,4,768]

# if number of ip_images is less than max_num_ips, pad the image_embeds with all zero tensors   填充不足的嵌入向量
clip_image_embeds[0][num_ips:] = torch.zeros_like(clip_image_embeds[0][num_ips:])
magi_image_embeds[0][num_ips:] = torch.zeros_like(magi_image_embeds[0][num_ips:])
# 用clip和magi的结果 生成图像嵌入向量
image_embeds = self.image_proj_model(clip_image_embeds.to(dtype=self.image_proj_model.dtype()), magi_image_embeds.to(dtype=self.image_proj_model.dtype()) if magi_image_embeds is not None else None)   # [b,80,2048]
negative_image_embeds = self.image_proj_model(torch.zeros_like(clip_image_embeds.to(dtype=self.image_proj_model.dtype())), torch.zeros_like(magi_image_embeds).to(dtype=self.image_proj_model.dtype()))     # [b,80,2048]
# 生成ip_bbox
ip_bbox = torch.Tensor(ip_bbox).unsqueeze(0).to(self._execution_device)     # [b,4,4]
negative_ip_bbox = torch.zeros_like(ip_bbox)
-
7 引入时间id并为输入diffusion做最后准备
# 7. Prepare added time ids & embeddings
add_text_embeds = pooled_prompt_embeds
text_encoder_projection_dim = self.text_encoder_2.config.projection_dim

add_time_ids = self._get_add_time_ids(      # 准备时间ID
    original_size,
    crops_coords_top_left,
    target_size,
    dtype=prompt_embeds.dtype,
    text_encoder_projection_dim=text_encoder_projection_dim,
)
negative_add_time_ids = add_time_ids

negative_dialog_bbox, dialog_bbox = self.prepare_dialog_bbox(       # 准备对话框边界框
    dialog_bbox,
    num_samples,
)

if self.do_classifier_free_guidance:        # 分类器自由引导,将无条件和条件的嵌入向量、时间ID和图像嵌入向量拼接在一起:
    prompt_embeds = torch.cat([negative_prompt_embeds, prompt_embeds], dim=0)       # [2b,max_length,c]=[2b,77,2048]
    add_text_embeds = torch.cat([negative_pooled_prompt_embeds, add_text_embeds], dim=0)    # [2b,c]=[2b,1280]
    add_time_ids = torch.cat([negative_add_time_ids, add_time_ids], dim=0)      # [2b,6] [224., 386.,   0.,   0., 224., 386.]*2
    image_embeds = torch.cat([negative_image_embeds, image_embeds], dim=0)      # [2b,80,2048]
    dialog_bbox = torch.cat([negative_dialog_bbox, dialog_bbox], dim=0)         # [2b,max_dialog_num,4]

prompt_embeds = prompt_embeds.to(device)        # 移动数据到设备
add_text_embeds = add_text_embeds.to(device)
add_time_ids = add_time_ids.to(device).repeat(num_samples, 1)
prompt_embeds = torch.cat([prompt_embeds, image_embeds], dim=1)
dialog_bbox = dialog_bbox.to(device)
add_time_ids的内容如下:
tensor([[224., 386.,   0.,   0., 224., 386.],
        [224., 386.,   0.,   0., 224., 386.]], device='cuda:0',
       dtype=torch.float16)
其中,prepare_dialog_bbox()核心代码如下,正负对话边界框的尺寸都是[b,8,4]
max_num_dialogs = self.unet.config.max_num_dialogs      # 8
dialog_bbox = dialog_bbox[:max_num_dialogs]     # 超出截断
while len(dialog_bbox) < max_num_dialogs:       # 不足补齐  用零填充对话框边界框
    dialog_bbox.append([0.0, 0.0, 0.0, 0.0])

dialog_bbox = torch.Tensor(dialog_bbox).unsqueeze(0).to(device=self._execution_device, dtype=self.unet.dtype)       # [b,8,4]
dialog_bbox = dialog_bbox.repeat(num_samples, 1, 1)
negative_dialog_bbox = torch.zeros_like(dialog_bbox)
-
8 扩散
这里就是调用Unet进行去噪
# 8. Denoising loop
self._num_timesteps = len(timesteps)
...
with progress_bar_context:
    for i, t in enumerate(timesteps):

        # expand the latents if we are doing classifier free guidance  如果启用了分类器自由引导,则扩展潜变量。
        latent_model_input = torch.cat([latents] * 2) if self.do_classifier_free_guidance else latents

        latent_model_input = self.scheduler.scale_model_input(latent_model_input, t)    # 根据当前步骤 t 进行缩放,以模拟从噪声到数据的平滑过渡。

        # predict the noise residual
        added_cond_kwargs = {"text_embeds": add_text_embeds, "time_ids": add_time_ids}

        noise_pred = self.unet(     # 使用 U-Net 模型预测噪声残差。
            latent_model_input,
            t,
            encoder_hidden_states=prompt_embeds,        # 文本和参考图像
            added_cond_kwargs=added_cond_kwargs,
            cross_attention_kwargs=cross_attention_kwargs,  # 角色边界框
            dialog_bbox=dialog_bbox,    # 对话框
        ).sample

        # perform guidance
        if self.do_classifier_free_guidance:    # 启用了分类器自由引导,则执行引导操作。
            noise_pred_uncond, noise_pred_text = noise_pred.chunk(2)
            noise_pred = noise_pred_uncond + self.guidance_scale * (noise_pred_text - noise_pred_uncond)

        # compute the previous noisy sample x_t -> x_t-1
        latents = self.scheduler.step(noise_pred, t, latents, return_dict=False)[0]     # 计算前一个噪声样本 [b,4,28,48]
进入Unet网络,位于src/models/unet.py
class UNetMangaModel(UNet2DConditionModel):
    def forward(
8.1 时间步处理
首先通过Timesteps和TimestepEmbedding获取时间步嵌入emb,然后通过get_aug_embed()获取增强嵌入,然后把二者加起来,获得最终嵌入。
# 1. time
t_emb = self.get_time_embed(sample=sample, timestep=timestep)   # Timesteps [2b,320],fp16
emb = self.time_embedding(t_emb, timestep_cond)     # 获取时间嵌入 [2b,1280]
aug_emb = self.get_aug_embed(   # 使用text_embeds获取增强嵌入    emb+text_embeds=2816->1280 [2b,1280]
    emb=emb, encoder_hidden_states=encoder_hidden_states, added_cond_kwargs=added_cond_kwargs
)

emb = emb + aug_emb if aug_emb is not None else emb
其中self.get_aug_embed如下,具体来说,这里获取文本和时间嵌入的向量text_embeds([2b,1280])和time_embeds([2b,1536])后,concat起来,得到[2b,2816],然后通过TextTimeEmbedding生成最终的增强嵌入向量aug_emb,其尺寸为[2b,1280]。
elif self.config.addition_embed_type == "text_time":
    text_embeds = added_cond_kwargs.get("text_embeds")

    time_ids = added_cond_kwargs.get("time_ids")        # tensor([[224., 386.,   0.,   0., 224., 386.],[224., 386.,   0.,   0., 224., 386.]]
    time_embeds = self.add_time_proj(time_ids.flatten())        # Timesteps投影到一个合适的维度
    time_embeds = time_embeds.reshape((text_embeds.shape[0], -1))       # [2b,1536]
    add_embeds = torch.concat([text_embeds, time_embeds], dim=-1)   # 合并嵌入 [2b,2816]
    add_embeds = add_embeds.to(emb.dtype)
    aug_emb = self.add_embedding(add_embeds)    # 2816->1280  [2b,1280]   使用 add_embedding 方法生成最终的增强嵌入向量。
-
8.2 预处理
用卷积层处理输入的潜在噪声
# 2. pre-process
sample = self.conv_in(sample)       # 4->320  [2b,320,h,w]=[2b,320,28,48]
接下来将对话框embedding和噪声叠加起来
# 2.5 add dialog bbox embedding
if dialog_bbox is not None:
    sample = self.encode_dialog_bbox(sample, dialog_bbox)   # 形状不变
这个函数的作用是:根据对话框的归一化坐标,计算其在样本中的实际坐标,然后在每个对话框的位置加上dialog_bbox_embedding,而这个dialog_bbox_embedding是一个可学习的参数
class UNetMangaModel(UNet2DConditionModel):
    def encode_dialog_bbox(self, sample, dialog_bbox):
        batch, channel, height, width = sample.shape
        _, num_dialogs, _ = dialog_bbox.shape
        # Initialize the output tensor with zeros
        dialog_masked_embeds = torch.zeros_like(sample)

        # For each bounding box, apply the dialog_bbox_embedding within the bounding box
        for i in range(batch):
            for j in range(num_dialogs):        # 计算其在样本中的实际坐标。
                x1 = int(dialog_bbox[i, j, 0] * width)
                y1 = int(dialog_bbox[i, j, 1] * height)
                x2 = int(dialog_bbox[i, j, 2] * width)
                y2 = int(dialog_bbox[i, j, 3] * height)

                x1, x2 = max(0, x1), min(width, x2)     # 确保计算出的坐标在样本的有效范围内。
                y1, y2 = max(0, y1), min(height, y2)

                dialog_masked_embeds[i, :, y1:y2, x1:x2] = self.dialog_bbox_embedding.view(channel, 1, 1)       # 将预定义的 dialog_bbox_embedding 嵌入到 dialog_masked_embeds 中。

        sample = sample + dialog_masked_embeds      # 叠加嵌入

        return sample
dialog_bbox_embedding是一个可学习的参数,用于告诉模型何处应该有对话框。
self.dialog_bbox_embedding = torch.nn.Parameter(torch.randn(self.config.block_out_channels[0]))-
8.3 下采样
首先根据输入的lora_scale,添加lora矩阵
if USE_PEFT_BACKEND:
    # weight the lora layers by setting `lora_scale` for each PEFT layer
    scale_lora_layers(self, lora_scale)
然后遍历下采样部分down_blocks
for downsample_block in self.down_blocks:
    if hasattr(downsample_block, "has_cross_attention") and downsample_block.has_cross_attention:
        # For t2i-adapter CrossAttnDownBlock2D
        additional_residuals = {}
        if is_adapter and len(down_intrablock_additional_residuals) > 0:
            additional_residuals["additional_residuals"] = down_intrablock_additional_residuals.pop(0)

        sample, res_samples = downsample_block(
            hidden_states=sample,
            temb=emb,
            encoder_hidden_states=encoder_hidden_states,
            attention_mask=attention_mask,
            cross_attention_kwargs=cross_attention_kwargs,
            encoder_attention_mask=encoder_attention_mask,
            **additional_residuals,
        )
    else:
        sample, res_samples = downsample_block(hidden_states=sample, temb=emb)
        if is_adapter and len(down_intrablock_additional_residuals) > 0:
            sample += down_intrablock_additional_residuals.pop(0)

    down_block_res_samples += res_samples
down_blocks的架构如下:
ModuleList(
  (0): DownBlock2D(
    (resnets):
    (downsamplers):
  (1): CrossAttnDownBlock2D(
    (attentions):
    (resnets):
    (downsamplers):
  (2): CrossAttnDownBlock2D(
    (attentions):
    (resnets):
  )
)
resnet
down_blocks首先通过resnet引入时间步信息,Resnet架构如下:
(0): ResnetBlock2D(
    (norm1): GroupNorm(32, 960, eps=1e-05, affine=True)
    (conv1): Conv2d(960, 320, kernel_size=(3, 3), stride=(1, 1), padding=(1, 1))
    (time_emb_proj): Linear(in_features=1280, out_features=320, bias=True)
    (norm2): GroupNorm(32, 320, eps=1e-05, affine=True)
    (dropout): Dropout(p=0.0, inplace=False)
    (conv2): Conv2d(320, 320, kernel_size=(3, 3), stride=(1, 1), padding=(1, 1))
    (nonlinearity): SiLU()
    (conv_shortcut): Conv2d(960, 320, kernel_size=(1, 1), stride=(1, 1))
)
注意力
CrossAttnDownBlock2D里有三个注意力机制,分别是自注意力、文本交叉注意力,角色交叉注意力。整体架构如下:
(1): CrossAttnDownBlock2D(
    (attentions): ModuleList(
      (0-1): 2 x Transformer2DModel(
        (norm): GroupNorm(32, 640, eps=1e-06, affine=True)
        (proj_in): Linear(in_features=640, out_features=640, bias=True)
        (transformer_blocks): ModuleList(
          (0-1): 2 x BasicTransformerBlock(
            (norm1): LayerNorm((640,), eps=1e-05, elementwise_affine=True)
            (attn1): Attention(
              (to_q): Linear(in_features=640, out_features=640, bias=False)
              (to_k): Linear(in_features=640, out_features=640, bias=False)
              (to_v): Linear(in_features=640, out_features=640, bias=False)
              (to_out): ModuleList(
                (0): Linear(in_features=640, out_features=640, bias=True)
                (1): Dropout(p=0.0, inplace=False)
              )
              (processor): AttnProcessor2_0()
            )
            (norm2): LayerNorm((640,), eps=1e-05, elementwise_affine=True)
            (attn2): Attention(
              (to_q): Linear(in_features=640, out_features=640, bias=False)
              (to_k): Linear(in_features=2048, out_features=640, bias=False)
              (to_v): Linear(in_features=2048, out_features=640, bias=False)
              (to_out): ModuleList(
                (0): Linear(in_features=640, out_features=640, bias=True)
                (1): Dropout(p=0.0, inplace=False)
              )
              (processor): MaskedIPAttnProcessor2_0(
                (to_k_ip): Linear(in_features=2048, out_features=640, bias=False)
                (to_v_ip): Linear(in_features=2048, out_features=640, bias=False)
              )
            )
            (norm3): LayerNorm((640,), eps=1e-05, elementwise_affine=True)
            (ff): FeedForward(
              (net): ModuleList(
                (0): GEGLU(
                  (proj): Linear(in_features=640, out_features=5120, bias=True)
                )
                (1): Dropout(p=0.0, inplace=False)
                (2): Linear(in_features=2560, out_features=640, bias=True)
              )
            )
          )
        )
        (proj_out): Linear(in_features=640, out_features=640, bias=True)
      )
    )
其中自注意力架构如下,不多解释:
(attn1): Attention(
    (to_q): Linear(in_features=640, out_features=640, bias=False)
    (to_k): Linear(in_features=640, out_features=640, bias=False)
    (to_v): Linear(in_features=640, out_features=640, bias=False)
    (to_out): ModuleList(
        (0): Linear(in_features=640, out_features=640, bias=True)
        (1): Dropout(p=0.0, inplace=False)
    )
)文本交叉注意力架构如下,其中噪声提供Q,文本通过KV:
(attn2): Attention(
    (to_q): Linear(in_features=640, out_features=640, bias=False)
    (to_k): Linear(in_features=2048, out_features=640, bias=False)
    (to_v): Linear(in_features=2048, out_features=640, bias=False)
    (to_out): ModuleList(
        (0): Linear(in_features=640, out_features=640, bias=True)
        (1): Dropout(p=0.0, inplace=False)
    )
)
文本交叉注意力的代码如下:
- 将输入信息encoder_hidden_states拆分成两部分 encoder_hidden_states(文本向量[b,77,2048])和ip_hidden_states(角色参考图向量[b,80,2048]),
- 掩码为None,
- attn2只计算噪声和文本向量的交叉注意力。
query = attn.to_q(hidden_states)
encoder_hidden_states, ip_hidden_states = (
    encoder_hidden_states[:, :end_pos, :],
    encoder_hidden_states[:, end_pos:, :],
)
...
key = attn.to_k(encoder_hidden_states)
value = attn.to_v(encoder_hidden_states)
hidden_states = F.scaled_dot_product_attention(
    new_query, key, value, attn_mask=attention_mask, dropout_p=0.0, is_causal=False
)角色交叉注意力架构如下:
(processor): MaskedIPAttnProcessor2_0(
    (to_k_ip): Linear(in_features=2048, out_features=640, bias=False)
    (to_v_ip): Linear(in_features=2048, out_features=640, bias=False)
)角色交叉注意力的代码如下:
- 使用和文本交叉注意力同一个噪声Q,
- 使用bbox提供的掩码,
- 角色参考图提供的KV,计算注意力。
attention_mask_ip = self.prepare_attention_mask_ip(bbox, hidden_states, attn.heads, aspect_ratio)
ip_key = self.to_k_ip(ip_hidden_states)
ip_value = self.to_v_ip(ip_hidden_states)
ip_hidden_states = F.scaled_dot_product_attention(
    new_query, ip_key, ip_value, attn_mask=attention_mask_ip, dropout_p=0.0, is_causal=False
)
最后将两个交叉注意力的结果结合后输出,其中scale就是在gradio界面里设置的IP scale
hidden_states = hidden_states + self.scale * ip_hidden_states    # 将两个交叉注意力的结果结合

hidden_states = attn.to_out[0](hidden_states)    # linear proj
hidden_states = attn.to_out[1](hidden_states)    # dropout

if attn.residual_connection:    # 残差连接
    hidden_states = hidden_states + residual

hidden_states = hidden_states / attn.rescale_output_factor
-
8.4 中间层
# 4. mid
if self.mid_block is not None:
    if hasattr(self.mid_block, "has_cross_attention") and self.mid_block.has_cross_attention:
        sample = self.mid_block(
            sample,
            emb,
            encoder_hidden_states=encoder_hidden_states,
            attention_mask=attention_mask,
            cross_attention_kwargs=cross_attention_kwargs,
            encoder_attention_mask=encoder_attention_mask,
        )
    else:
        sample = self.mid_block(sample, emb)
中间层架构如下:
UNetMidBlock2DCrossAttn(
  (attentions):
  (resnets):
)
-
8.5 上采样
# 5. up
for i, upsample_block in enumerate(self.up_blocks):
    is_final_block = i == len(self.up_blocks) - 1

    res_samples = down_block_res_samples[-len(upsample_block.resnets) :]        # 跳层连接
    down_block_res_samples = down_block_res_samples[: -len(upsample_block.resnets)]

    # if we have not reached the final block and need to forward the
    # upsample size, we do it here
    if not is_final_block and forward_upsample_size:
        upsample_size = down_block_res_samples[-1].shape[2:]

    if hasattr(upsample_block, "has_cross_attention") and upsample_block.has_cross_attention:
        sample = upsample_block(
            hidden_states=sample,
            temb=emb,
            res_hidden_states_tuple=res_samples,
            encoder_hidden_states=encoder_hidden_states,
            cross_attention_kwargs=cross_attention_kwargs,
            upsample_size=upsample_size,
            attention_mask=attention_mask,
            encoder_attention_mask=encoder_attention_mask,
        )
    else:
        sample = upsample_block(
            hidden_states=sample,
            temb=emb,
            res_hidden_states_tuple=res_samples,
            upsample_size=upsample_size,
        )
下采样架构如下:
ModuleList(
  (0): CrossAttnUpBlock2D(
    (attentions):
    )
    (resnets):
    (upsamplers):
  )
  (1): CrossAttnUpBlock2D(
    (attentions):
    (resnets):
    (upsamplers):
  )
  (2): UpBlock2D(
    (resnets):
  )
)
-
8.6 输出
# 6. post-process
if self.conv_norm_out:
    sample = self.conv_norm_out(sample)
    sample = self.conv_act(sample)
sample = self.conv_out(sample)      # [2b,3,28,48]

if USE_PEFT_BACKEND:        # 移除模型中LoRA层之前设置的权重。
    # remove `lora_scale` from each PEFT layer
    unscale_lora_layers(self, lora_scale)
-
9. 最终输出
将VAE和输出转换为fp32格式,应用缩放还原,然后使用VAE的解码器解码图像,最后转换为PIL格式,进行输出。
# make sure the VAE is in float32 mode, as it overflows in float16  检查 VAE 是否需要上浮点精度。
needs_upcasting = self.vae.dtype == torch.float16 and self.vae.config.force_upcast

if needs_upcasting:     # 确保latents张量和VAE模型的post_quant_conv层的参数具有相同的数据类型,这在混合精度训练中非常重要。
    self.upcast_vae()       # 将 VAE(变分自编码器)的部分组件转换为 float32 类型
    latents = latents.to(next(iter(self.vae.post_quant_conv.parameters())).dtype)       # fp16->fp32

# unscale/denormalize the latents
if has_latents_mean and has_latents_std:
    ...
else:
    latents = latents / self.vae.config.scaling_factor  # 还原缩放

image = self.vae.decode(latents, return_dict=False)[0]  # Decode [b,4,h,2]->[b,3,H,W]

# cast back to fp16 if needed
if needs_upcasting:
    self.vae.to(dtype=torch.float16)

image = self.image_processor.postprocess(image, output_type="pil")      # 转换为PIL图像

# Offload all models
self.maybe_free_model_hooks()

return StableDiffusionXLPipelineOutput(images=image)
至此,整个流程就结束了。
-
gradio.py
这个文件是包含MLLM的版本,因为只多了MLLM,因此我们重点关注MLLM部分:
简单来说,就是使用阶段一的生成的角色参考图像嵌入输入MLLM,MLLM生成新的角色参考图像嵌入,我们用新的角色参考图像嵌入替换旧的,输入阶段二的Diffusion网络进行生成。
def result_generation(...):
    print(f"ip_bbox: {ip_bbox}")
    print(f"dialog_bbox: {dialog_bbox}")

    generator = torch.Generator('cuda:0').manual_seed(seed)

    input_ids, ids_cmp_mask = get_mllm_inputs(prompt, tokenizer_mllm)

    while len(ip_images) < pipeline.unet.config.max_num_ips:
        image = Image.new('RGB', (224, 224), (0, 0, 0))
        ip_images.append(image)
        ip_bbox.append([0.0, 0.0, 0.0, 0.0])

    # 生成阶段一的角色参考图像嵌入
    clip_ip_images = clip_image_processor(images=ip_images, return_tensors="pt").pixel_values
    magi_ip_images = magi_image_processor(images=ip_images, return_tensors="pt").pixel_values
    clip_image_embeds = pipeline.image_encoder(clip_ip_images.to('cuda:0', dtype=pipeline.dtype), output_hidden_states=True).hidden_states[-2] # [max_num_ips, sequence_length, clip_dim]
    magi_image_embeds = pipeline.magi_image_encoder(magi_ip_images.to('cuda:0', dtype=pipeline.dtype)).last_hidden_state[:, 0] # [max_num_ips, magi_dim]
    image_embeds = pipeline.image_proj_model(clip_image_embeds.unsqueeze(0), magi_image_embeds)
    image_embeds = image_embeds[:, pipeline.unet.config.num_vision_tokens:, :] # [1, max_num_ips * num_vision_tokens, target_dim]

    output = agent_model.generate(      # MLLM更新的角色参考图像
        tokenizer=tokenizer_mllm,
        input_ids=input_ids.unsqueeze(0).to('cuda:0'),
        image_embeds=image_embeds,      # 阶段一中的角色参考图像嵌入
        ids_cmp_mask=ids_cmp_mask.unsqueeze(0).to('cuda:0', dtype=torch.bool),
        max_new_tokens=500,
        num_img_gen_tokens=agent_model.output_resampler.num_queries,
    )

    img_gen_feat = output['img_gen_feat'].view(pipeline.unet.config.max_num_ips, pipeline.unet.config.num_vision_tokens, -1)
    img_gen_feat = img_gen_feat * mllm_scale + image_embeds.view(pipeline.unet.config.max_num_ips, pipeline.unet.config.num_vision_tokens, -1) * (1 - mllm_scale)

    try:
        images = pipeline(
            prompt=prompt,
            prompt_2=prompt,
            height=height,
            width=width,
            num_inference_steps=num_inference_steps,
            guidance_scale=guidance_scale,
            negative_prompt=negative_prompt,
            negative_prompt_2=negative_prompt,
            num_samples=num_samples,
            generator=generator,
            # manga conditions
            ip_images=[],
            ip_image_embeds=img_gen_feat,       # MLLM更新的角色参考图像
            ip_bbox=ip_bbox.copy(),
            ip_scale=ip_scale,
            dialog_bbox=dialog_bbox.copy(),
        ).images
    except Exception as e:
        print(f"generation failed! image shape: [{width}, {height}] num_sample: {num_samples}. Probably OOM.")
        gc.collect()
        torch.cuda.empty_cache()

    return images
导入部分如下:
# Load MLLM
tokenizer_mllm = LlamaTokenizer.from_pretrained(os.path.join(args.ckpt_path, "mllm", "tokenizer"))
llm_model = LlamaForCausalLM.from_pretrained(os.path.join(args.ckpt_path, "mllm", "llm"), torch_dtype=weight_dtype)

input_resampler = QwenResampler(**config.agent.input_resampler)
output_resampler = QwenResampler(**config.agent.output_resampler)
agent_model = ContinuousLVLM.from_pretrained(
    llm=llm_model,
    input_resampler=input_resampler,
    output_resampler=output_resampler,
).to(device='cuda:0', dtype=weight_dtype)
-
-
5.总结
随着DiffSensei框架的不断进步和完善,我们站在了一个新时代的门槛上,一个由人工智能驱动的创意和叙事相结合的时代。DiffSensei不仅仅是一个技术突破,它代表了一种全新的创作方式,一种能够让艺术创作者、设计师和普通用户都能以前所未有的方式表达自己想法的工具。
展望未来,DiffSensei的应用前景无限广阔。从自动化内容生成到个性化娱乐体验,从教育领域的可视化教学到电影和游戏行业的故事板设计,DiffSensei都有可能成为这些领域中不可或缺的一部分。随着技术的不断发展,我们可以预见,DiffSensei将激发更多的创意火花,推动艺术和科技的融合,为全球观众带来更加丰富和多元的视觉体验。
-
亲爱的读者们,如果您对DiffSensei框架的创新之旅感到兴奋,对人工智能如何重塑创意产业的未来充满好奇,那么请不要犹豫,动动您的手指,给我们的文章点个赞,让这份创新精神传播得更远。
[点赞] 让更多人看到这篇文章的精彩
[关注] 与我们一同踏上AI创意之旅
[收藏] 将这份灵感保留,随时回顾
感谢您的每一次互动,我们珍惜与您的每一次连接!


 3021
3021

 被折叠的 条评论
为什么被折叠?
被折叠的 条评论
为什么被折叠?
 到【灌水乐园】发言


