


目录
一、项目方案
ROS的通讯机制使得它在机器人和无人驾驶领域应用十分广泛。所以本项目通讯都在ROS里进行。
1.激光雷达或者相机通过ROS发送点云信息
2.获得的点云msg消息通过转换送入pointpillars目标检测框架,检测完毕获得检测框通过ROS消息发送出去。
3.在ROS的rviz里面对这些消息进行显示。
二、项目准备工作
1.安装并配置好Openpcdet的环境
使用OpenPcdet框架里面的pointpillars代码进行,因为这个框架对于三维目标检测算法的封装集成度很高,方便我们进行使用。
2.安装好ROS melodic
本项目是基于ROS进行的,所以要提前安装好,其他的ROS版本也可
三、项目工作空间创建及代码配置
mkdir -p ~/pointpillars_ros/src
cd pointpillars_ros/src
下载这个包,这个包是某个大佬写的,后面有参考链接。
git clone https://github.com/BIT-DYN/pointpillars_ros
cd ..
进入openpcdet的conda环境,然后安装几个库,jsk-recognition-msg这个库里面的消息主要是存放检测框的。具体可以看这个链接https://blog.csdn.net/leesanity/article/details/123137541
# 进入到搭建好的openpcdet环境
conda activate pcdet
pip install --user rospkg catkin_pkg
pip install pyquaternion

sudo apt-get install ros-melodic-pcl-ros
sudo apt-get install ros-melodic-jsk-recognition-msg
sudo apt-get install ros-melodic-jsk-rviz-plugins
catkin_make
然后再把Openpcdet里面的相关文件移进来,放到src/pointpillars/tools下面
这里可以改一下demo.py里面配置文件和预训练模型,然后放入数据检查一下openpcdet移植过来还能跑通不。
四、具体代码修改与讲解
先修改ros.py,大家可以先用下面的ros.py代码替换掉原先的。代码如下:
#!/usr/bin/env python3

import rospy

from sensor_msgs.msg import PointCloud2,PointField

import sensor_msgs.point_cloud2 as pc2
from std_msgs.msg import Header
from jsk_recognition_msgs.msg import BoundingBox, BoundingBoxArray

import time
import numpy as np
from pyquaternion import Quaternion

import argparse
import glob
from pathlib import Path

import numpy as np
import torch
import scipy.linalg as linalg

import sys
sys.path.append("/home/wangchen/pointpillars_ros/src/pointpillars_ros")

from pcdet.config import cfg, cfg_from_yaml_file
from pcdet.datasets import DatasetTemplate
from pcdet.models import build_network, load_data_to_gpu
from pcdet.utils import common_utils

class DemoDataset(DatasetTemplate):
    def __init__(self, dataset_cfg, class_names, training=True, root_path=None, logger=None, ext='.bin'):
        """
        Args:
            root_path: 根目录
            dataset_cfg: 数据集配置
            class_names: 类别名称
            training: 训练模式
            logger: 日志
            ext: 扩展名
        """
        super().__init__(
            dataset_cfg=dataset_cfg, class_names=class_names, training=training, root_path=root_path, logger=logger
        )


class Pointpillars_ROS:
    def __init__(self):
        config_path, ckpt_path = self.init_ros()
        self.init_pointpillars(config_path, ckpt_path)


    def init_ros(self):
        """ Initialize ros parameters """
        config_path = rospy.get_param("/config_path", "/home/wangchen/pointpillars_ros/src/pointpillars_ros/tools/cfgs/kitti_models/pointpillar.yaml")
        ckpt_path = rospy.get_param("/ckpt_path", "/home/wangchen/pointpillars_ros/src/pointpillars_ros/tools/pointpillar_7728.pth")
        # # subscriber
        # self.sub_velo = rospy.Subscriber("/kitti/velo/pointcloud", PointCloud2, self.lidar_callback, queue_size=1,
        #                                  buff_size=2 ** 12)
        #
        # # publisher
        # self.sub_velo = rospy.Publisher("/modified", PointCloud2, queue_size=1)
        # self.pub_bbox = rospy.Publisher("/detections", BoundingBoxArray, queue_size=10)
        return config_path, ckpt_path


    def init_pointpillars(self, config_path, ckpt_path):
        """ Initialize second model """
        logger = common_utils.create_logger() # 创建日志
        logger.info('-----------------Quick Demo of Pointpillars-------------------------')
        cfg_from_yaml_file(config_path, cfg)  # 加载配置文件

        self.demo_dataset = DemoDataset(
            dataset_cfg=cfg.DATA_CONFIG, class_names=cfg.CLASS_NAMES, training=False,
            ext='.bin', logger=logger
        )
        self.model = build_network(model_cfg=cfg.MODEL, num_class=len(cfg.CLASS_NAMES), dataset=self.demo_dataset)
        # 加载权重文件
        self.model.load_params_from_file(filename=ckpt_path, logger=logger, to_cpu=True)
        self.model.cuda() # 将网络放到GPU上
        self.model.eval() # 开启评估模式


    def rotate_mat(self, axis, radian):
        rot_matrix = linalg.expm(np.cross(np.eye(3), axis / linalg.norm(axis) * radian))
        return rot_matrix


    def lidar_callback(self, msg):
        """ Captures pointcloud data and feed into second model for inference """
        pcl_msg = pc2.read_points(msg, field_names = ("x", "y", "z", "intensity"), skip_nans=True)
        #这里的field_names可以不要,不要就是把数据全部读取进来。也可以用field_names = ("x", "y", "z")这个只读xyz坐标
        #得到的pcl_msg是一个generator生成器,如果要一次获得全部的点,需要转成list
        np_p = np.array(list(pcl_msg), dtype=np.float32)
        #print(np_p.shape)
        # 旋转轴
        #rand_axis = [0,1,0]
        #旋转角度
        #yaw = 0.1047
        #yaw = 0.0
        #返回旋转矩阵
        #rot_matrix = self.rotate_mat(rand_axis, yaw)
        #np_p_rot = np.dot(rot_matrix, np_p[:,:3].T).T

        # convert to xyzi point cloud
        x = np_p[:, 0].reshape(-1)
        #print(np.max(x),np.min(x))
        y = np_p[:, 1].reshape(-1)
        z = np_p[:, 2].reshape(-1)
        if np_p.shape[1] == 4: # if intensity field exists
            i = np_p[:, 3].reshape(-1)
        else:
            i = np.zeros((np_p.shape[0], 1)).reshape(-1)
        points = np.stack((x, y, z, i)).T
        # 组装数组字典
        input_dict = {
            'frame_id': msg.header.frame_id,
            'points': points
        }
        data_dict = self.demo_dataset.prepare_data(data_dict=input_dict) # 数据预处理
        data_dict = self.demo_dataset.collate_batch([data_dict])
        load_data_to_gpu(data_dict) # 将数据放到GPU上
        pred_dicts, _ = self.model.forward(data_dict) # 模型前向传播
        scores = pred_dicts[0]['pred_scores'].detach().cpu().numpy()
        mask = scores > 0.5
        scores = scores[mask]
        boxes_lidar = pred_dicts[0]['pred_boxes'][mask].detach().cpu().numpy()
        label = pred_dicts[0]['pred_labels'][mask].detach().cpu().numpy()
        num_detections = boxes_lidar.shape[0]

        arr_bbox = BoundingBoxArray()
        for i in range(num_detections):
            bbox = BoundingBox()

            bbox.header.frame_id = msg.header.frame_id
            bbox.header.stamp = rospy.Time.now()
            bbox.pose.position.x = float(boxes_lidar[i][0])
            bbox.pose.position.y = float(boxes_lidar[i][1])
            bbox.pose.position.z = float(boxes_lidar[i][2]) #+ float(boxes_lidar[i][5]) / 2
            bbox.dimensions.x = float(boxes_lidar[i][3])  # width
            bbox.dimensions.y = float(boxes_lidar[i][4])  # length
            bbox.dimensions.z = float(boxes_lidar[i][5])  # height
            q = Quaternion(axis=(0, 0, 1), radians=float(boxes_lidar[i][6]))
            bbox.pose.orientation.x = q.x
            bbox.pose.orientation.y = q.y
            bbox.pose.orientation.z = q.z
            bbox.pose.orientation.w = q.w
            bbox.value = scores[i]
            bbox.label = label[i]

            arr_bbox.boxes.append(bbox)

        arr_bbox.header.frame_id = msg.header.frame_id
        #arr_bbox.header.stamp = rospy.Time.now()

        if len(arr_bbox.boxes) is not 0:
            pub_bbox.publish(arr_bbox)
            self.publish_test(points, msg.header.frame_id)

    def publish_test(self, cloud, frame_id):
        header = Header()
        header.stamp = rospy.Time()
        header.frame_id = frame_id
        fields = [PointField('x', 0, PointField.FLOAT32, 1),
                  PointField('y', 4, PointField.FLOAT32, 1),
                  PointField('z', 8, PointField.FLOAT32, 1),
                  PointField('intensity', 12, PointField.FLOAT32, 1)]  # ,PointField('label', 16, PointField.FLOAT32, 1)
        #creat_cloud不像read,他必须要有fields,而且field定义有两种。一个是上面的,一个是下面的fields=_make_point_field(4)
        msg_segment = pc2.create_cloud(header = header,fields=fields,points = cloud)

        pub_velo.publish(msg_segment)
        #pub_image.publish(image_msg)


def _make_point_field(num_field):
    msg_pf1 = pc2.PointField()
    msg_pf1.name = np.str_('x')
    msg_pf1.offset = np.uint32(0)
    msg_pf1.datatype = np.uint8(7)
    msg_pf1.count = np.uint32(1)

    msg_pf2 = pc2.PointField()
    msg_pf2.name = np.str_('y')
    msg_pf2.offset = np.uint32(4)
    msg_pf2.datatype = np.uint8(7)
    msg_pf2.count = np.uint32(1)

    msg_pf3 = pc2.PointField()
    msg_pf3.name = np.str_('z')
    msg_pf3.offset = np.uint32(8)
    msg_pf3.datatype = np.uint8(7)
    msg_pf3.count = np.uint32(1)

    msg_pf4 = pc2.PointField()
    msg_pf4.name = np.str_('intensity')
    msg_pf4.offset = np.uint32(16)
    msg_pf4.datatype = np.uint8(7)
    msg_pf4.count = np.uint32(1)

    if num_field == 4:
        return [msg_pf1, msg_pf2, msg_pf3, msg_pf4]

    msg_pf5 = pc2.PointField()
    msg_pf5.name = np.str_('label')
    msg_pf5.offset = np.uint32(20)
    msg_pf5.datatype = np.uint8(4)
    msg_pf5.count = np.uint32(1)

    return [msg_pf1, msg_pf2, msg_pf3, msg_pf4, msg_pf5]
if __name__ == '__main__':
    global sec
    sec = Pointpillars_ROS()

    rospy.init_node('pointpillars_ros_node', anonymous=True)

    # subscriber

    sub_velo = rospy.Subscriber("/kitti/velo/pointcloud", PointCloud2, sec.lidar_callback, queue_size=1,
                                    buff_size=2 ** 12)


    # publisher
    pub_velo = rospy.Publisher("/modified", PointCloud2, queue_size=1)
    pub_bbox = rospy.Publisher("/detections", BoundingBoxArray, queue_size=10)

    try:
        rospy.spin()
    except KeyboardInterrupt:
        del sec
        print("Shutting down")
替换完之后,大家要改的是24行,56 ,57行的预训练权重和config文件,改成你自己的路径即可。如果是你自己的雷达或相机219行换成你自己的话题名
launch/pointpillars.launch的修改
<node pkg="rosbag" type="play" name="player" output="log" args="-l /media/ubuntu/ximing/dataset/ros_kitti/bag/2011_10_03/kitti_2011_10_03_drive_0027_synced.bag" />
把这个里面的ROSBAG路径改一下,改成你自己的就行。
这里附上一个ROSBAG包制作的链接https://blog.csdn.net/FSKEps/article/details/90345566
这个链接里面需要下载的包在我百度网盘里,链接: https://pan.baidu.com/s/1EtG_Z8jujW77bU9o_ZoduQ提取码: sfiw
launch/pointpillars.rviz的修改
这个里面主要把Topic话题改一下,一个图像,一个点云,那个modified不改
Topic: /kitti/velo/pointcloud
Image Topic: /kitti/camera_color_left/image_raw
这两个话题是kitti的ROSbag包的话题,如果是自己的激光雷达要修改这两个话题。
还有一处如果是自己的雷达或相机也要修改。
Fixed Frame: velo_link,这里如果是自己的也要改。指的RVIZ里面的基准坐标系
五、实时检测效果展示
conda activate pcdet
source ~/pointpillars_ros/devel/setup.bash
roslaunch pointpillars_ros pointpillars.launch
可能会卡顿,打开RVIZ之后等一分钟。
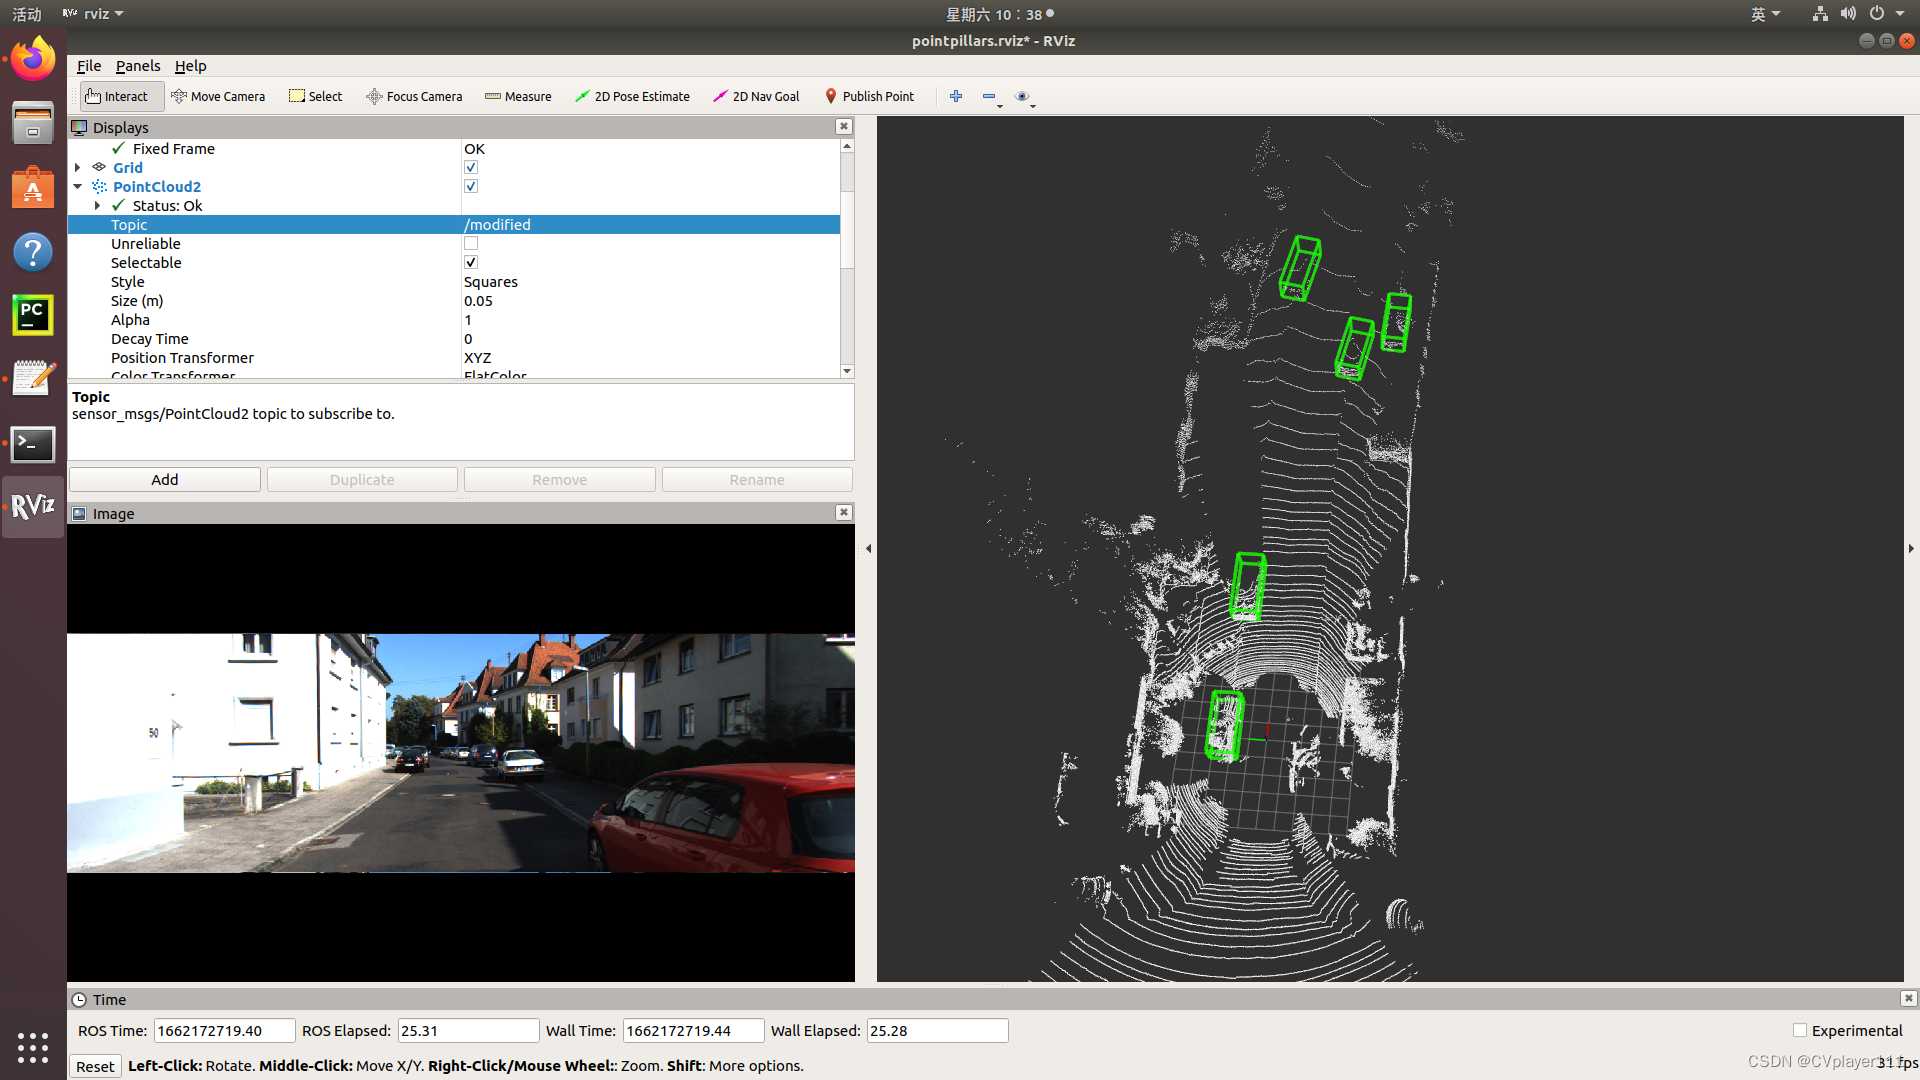
具体动画效果看大佬的bilibili链接https://www.bilibili.com/video/BV1ce4y1D76o/
播放的时候点云换成modified,这时框与点云可以对上。如果不换对不上。
六、项目思考以及未解决的问题
首先是点云和检测框在RVIZ里面显示的问题,/kitti/velo/pointcloud这个是我们订阅的点云话题,送入pointpillars检测之后会耗费一段时间,这时检测出来的检测框和/kitti/velo/pointcloud的时间戳对不上,所以会导致RVIZ里面点云与框不对应。这时我们在检测完框之后,重新定义一个点云,把他的时间戳和检测框的对齐,再发布出来就是我们代码里的modified点云,所以modified点云与框可以对应,但此时图像是和/kitti/velo/pointcloud对应的,所以我的想法是同时也订阅一个图像信息,等检测完,创建一个新的modified图像再发布,让他们时间戳对齐,这样就可以解决了,但事实证明,这样尝试了一下还是对不齐,希望大家有想法的可以积极讨论一下,很期待和大家一起解决这个问题。
第二个问题就是大家用自己的相机或者雷达做实时检测显示,我这里也和一位博主讨论过,把点云图像换成自己相机的,还有RVIZ里面的launch文件的基准坐标系也要改成你自己的。但是在实际场景中检测出来的检测框乱飞。现在还在尝试解决,希望大家可以一起解决这个问题。目前就这么多,也希望大家可以把自己的想法和问题说出来,我们一起讨论,谢谢大家的参与。
关于自己数据实时检测已经实现了,自己数据检测时要注意两点:
1.坐标系一定要转换为openpcdet的统一坐标系。
2.自己雷达采集的intensity一定要置零之后再进行检测,不然检测框会乱飞。
七、Reference
https://blog.csdn.net/jiachang98/article/details/126106126?spm=1001.2014.3001.5501
https://blog.csdn.net/weixin_43807148/article/details/125867953


 8939
8939


 被折叠的 条评论
为什么被折叠?
被折叠的 条评论
为什么被折叠?
 到【灌水乐园】发言


