


论文地址:Sensors | Free Full-Text | SECOND: Sparsely Embedded Convolutional Detection
代码地址:https://github.com/traveller59/second.pytorch
https://github.com/open-mmlab/OpenPCDet
一、论文动机
1.现有方法大多将点云转换为2D的BEV或前视图表示,丢失了大量的空间信息
2.VoxelNet提出了基于voxel的3D检测网络,但是其3D卷积部分运算量过大,实时性不佳
二、论文方法
1.引入稀疏卷积替代原有的3D卷积,并进行改进
2.提出了一种新颖的角度回归方法
3.为点云检测引入了一种新的数据增强方法
三、网络结构

主要由三部分组成,VFE特征提取阶段,稀疏卷积层,RPN网络。其中第一部分和第三部分和VoxelNet相似就不介绍了。主要介绍一下第二块稀疏卷积。
3.1 Voxelwise Feature Extractor(Voxel特征提取)
论文里的方法和VoxelNet一样,但是OpenPcDet作者发现,其实直接求voxel里面采样点的平均特征,直接把这个特征当作voxel的特征就行,不用VFE那么麻烦,效果也差不多。
3.2 Sparse Convolutional Middle Extractor(稀疏卷积层)
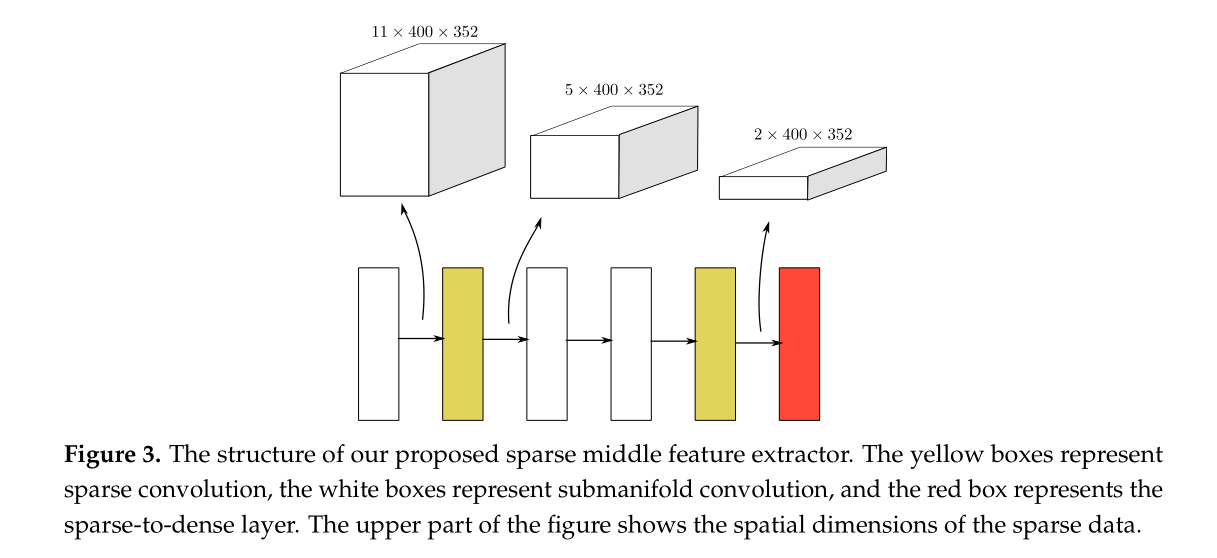
这部分通过利用输入数据的稀疏性来限制输出的稀疏性。
1.为什么要引入稀疏卷积?
因为在对点云进行体素化之后,大部分的网格都是空的,这时如果直接进行3D卷积,势必会造成太多不必要的计算,而稀疏卷积就是要解决这个问题的。
2.稀疏卷积的输出
稀疏卷积的输出分为两类:1.Sparse out 只要卷积核覆盖到非零数据点就输出。
2.submanifold output 只有卷积核中心覆盖到非零数据才有输出
3.具体过程
传统的卷积操作是通过 img2col 实现的,稀疏卷积则通过Rulebook来实现计算。
①建立哈希表:建立输入和输出的哈希表,通过哈希表我们可以把输入、输出的张量坐标分别映射到输入序号、输出序号
②建立RuleBook:建立起输入序号和输出序号之间的联系
1.从 P(out) 到GetOffset() 一句话来说,GetOffset()就是用于找出output中某位置需要用卷积核中的那个weight来计算。
2.从GetOffset()到Rulebook
③用GPU来实现稀疏卷积:有了上面两个步骤建立的查询表之后,我们的GPU通过查表有针对性进行一些卷积运算,节省很多不必要的运算了。
具体看稀疏卷积 Sparse Convolution Net - 知乎 (zhihu.com)
3.3 Region Proposal Network(RPN网络)
先下采样再上采样,将上采样进行特征维度拼接,然后用1*1进行回归。
四、代码分析
4.1点云预处理
点云输入后首先进行各种数据增强和处理(、限定range、随机翻转、旋转、比例缩放、打乱点顺序、gt_sampling等等)
OpenPcdet代码位置:pcdet/datasets/augmentor/data_augmentor.py
4.2点云体素化
OpenPcdet代码位置:pcdet/datasets/processor/data_processor.py
    def transform_points_to_voxels(self, data_dict=None, config=None):
        """
        将点云转换为voxel,调用spconv的VoxelGeneratorV2
        """
        if data_dict is None:
            grid_size = (self.point_cloud_range[3:6] - self.point_cloud_range[0:3]) / np.array(config.VOXEL_SIZE)
            self.grid_size = np.round(grid_size).astype(np.int64)
            self.voxel_size = config.VOXEL_SIZE
            # just bind the config, we will create the VoxelGeneratorWrapper later,
            # to avoid pickling issues in multiprocess spawn
            return partial(self.transform_points_to_voxels, config=config)

        if self.voxel_generator is None:
            self.voxel_generator = VoxelGeneratorWrapper(
                # 给定每个voxel的长宽高  [0.05, 0.05, 0.1]
                vsize_xyz=config.VOXEL_SIZE,  # [0.16, 0.16, 4]
                # 给定点云的范围 [  0.  -40.   -3.   70.4  40.    1. ]
                coors_range_xyz=self.point_cloud_range,
                # 给定每个点云的特征维度,这里是x,y,z,r 其中r是激光雷达反射强度
                num_point_features=self.num_point_features,
                # 给定每个pillar中有采样多少个点,不够则补0
                max_num_points_per_voxel=config.MAX_POINTS_PER_VOXEL,  # 32
                # 最多选取多少个voxel,训练16000,推理40000
                max_num_voxels=config.MAX_NUMBER_OF_VOXELS[self.mode],  # 16000
            )

        # 使用spconv生成voxel输出
        points = data_dict['points']
        voxel_output = self.voxel_generator.generate(points)

        # 假设一份点云数据是N*4,那么经过pillar生成后会得到三份数据
        # voxels代表了每个生成的voxel数据,维度是[M, 5, 4]
        # coordinates代表了每个生成的voxel所在的zyx轴坐标,维度是[M,3]
        # num_points代表了每个生成的voxel中有多少个有效的点维度是[m,],因为不满5会被0填充
        voxels, coordinates, num_points = voxel_output

        # False
        if not data_dict['use_lead_xyz']:
            voxels = voxels[..., 3:]  # remove xyz in voxels(N, 3)

        data_dict['voxels'] = voxels
        data_dict['voxel_coords'] = coordinates
        data_dict['voxel_num_points'] = num_points
        return data_dict
4.3VFE(体素特征编码层)
原来的VFE操作速度太慢,并且对显存不友好,在新的实现中,去掉了原来Stacked Voxel Feature Encoding,直接计算每个voxel内点的平均值,当成这个voxel的特征;大幅提高了计算的速度,并且也取得了不错的检测效果。得到voxel特征的维度变换为(Batch*16000,5,4) ->(Batch*16000, 4)
OpenPcdet代码位置:pcdet/models/backbones_3d/vfe/mean_vfe.py
class MeanVFE(VFETemplate):
    def __init__(self, model_cfg, num_point_features, **kwargs):
        super().__init__(model_cfg=model_cfg)
        # 每个点多少个特征(x,y,z,r)
        self.num_point_features = num_point_features

    def get_output_feature_dim(self):
        return self.num_point_features

    def forward(self, batch_dict, **kwargs):
        """
        Args:
            batch_dict:
                voxels: (num_voxels, max_points_per_voxel, C)
                voxel_num_points: optional (num_voxels) how many points in a voxel
            **kwargs:
        Returns:
            vfe_features: (num_voxels, C)
        """
        # here use the mean_vfe module to substitute for the original pointnet extractor architecture
        voxel_features, voxel_num_points = batch_dict['voxels'], batch_dict['voxel_num_points']
        # 求每个voxel内 所有点的和
        # eg:SECOND  shape (Batch*16000, 5, 4) -> (Batch*16000, 4)
        points_mean = voxel_features[:, :, :].sum(dim=1, keepdim=False)
        # 正则化项, 保证每个voxel中最少有一个点,防止除0
        normalizer = torch.clamp_min(voxel_num_points.view(-1, 1), min=1.0).type_as(voxel_features)
        # 求每个voxel内点坐标的平均值
        points_mean = points_mean / normalizer
        # 将处理好的voxel_feature信息重新加入batch_dict中
        batch_dict['voxel_features'] = points_mean.contiguous()
        return batch_dict
4.4 3D SparseConv层
OpenPcdet代码位置:pcdet/models/backbones_3d/spconv_backbone.py
[batch_size*16000,4]->[batch_size,4,41,1600,1408]->[batch_size,128,2,200,176]
def post_act_block(in_channels, out_channels, kernel_size, indice_key=None, stride=1, padding=0,
                   conv_type='subm', norm_fn=None):
    # 后处理执行块,根据conv_type选择对应的卷积操作并和norm与激活函数封装为块
    if conv_type == 'subm':
        conv = spconv.SubMConv3d(in_channels, out_channels, kernel_size, bias=False, indice_key=indice_key)
    elif conv_type == 'spconv':
        conv = spconv.SparseConv3d(in_channels, out_channels, kernel_size, stride=stride, padding=padding,
                                   bias=False, indice_key=indice_key)
    elif conv_type == 'inverseconv':
        conv = spconv.SparseInverseConv3d(in_channels, out_channels, kernel_size, indice_key=indice_key, bias=False)
    else:
        raise NotImplementedError

    m = spconv.SparseSequential(
        conv,
        norm_fn(out_channels),
        nn.ReLU(),
    )

    return m


class VoxelBackBone8x(nn.Module):
    def __init__(self, model_cfg, input_channels, grid_size, **kwargs):
        super().__init__()
        self.model_cfg = model_cfg
        norm_fn = partial(nn.BatchNorm1d, eps=1e-3, momentum=0.01)

        self.sparse_shape = grid_size[::-1] + [1, 0, 0]

        self.conv_input = spconv.SparseSequential(
            spconv.SubMConv3d(input_channels, 16, 3, padding=1, bias=False, indice_key='subm1'),
            norm_fn(16),
            nn.ReLU(),
        )
        block = post_act_block

        self.conv1 = spconv.SparseSequential(
            block(16, 16, 3, norm_fn=norm_fn, padding=1, indice_key='subm1'),
        )

        self.conv2 = spconv.SparseSequential(
            # [1600, 1408, 41] <- [800, 704, 21]
            block(16, 32, 3, norm_fn=norm_fn, stride=2, padding=1, indice_key='spconv2', conv_type='spconv'),
            block(32, 32, 3, norm_fn=norm_fn, padding=1, indice_key='subm2'),
            block(32, 32, 3, norm_fn=norm_fn, padding=1, indice_key='subm2'),
        )

        self.conv3 = spconv.SparseSequential(
            # [800, 704, 21] <- [400, 352, 11]
            block(32, 64, 3, norm_fn=norm_fn, stride=2, padding=1, indice_key='spconv3', conv_type='spconv'),
            block(64, 64, 3, norm_fn=norm_fn, padding=1, indice_key='subm3'),
            block(64, 64, 3, norm_fn=norm_fn, padding=1, indice_key='subm3'),
        )

        self.conv4 = spconv.SparseSequential(
            # [400, 352, 11] <- [200, 176, 5]
            block(64, 64, 3, norm_fn=norm_fn, stride=2, padding=(0, 1, 1), indice_key='spconv4', conv_type='spconv'),
            block(64, 64, 3, norm_fn=norm_fn, padding=1, indice_key='subm4'),
            block(64, 64, 3, norm_fn=norm_fn, padding=1, indice_key='subm4'),
        )

        last_pad = 0
        last_pad = self.model_cfg.get('last_pad', last_pad)
        self.conv_out = spconv.SparseSequential(
            # [200, 150, 5] -> [200, 150, 2]
            spconv.SparseConv3d(64, 128, (3, 1, 1), stride=(2, 1, 1), padding=last_pad,
                                bias=False, indice_key='spconv_down2'),
            norm_fn(128),
            nn.ReLU(),
        )
        self.num_point_features = 128
        self.backbone_channels = {
            'x_conv1': 16,
            'x_conv2': 32,
            'x_conv3': 64,
            'x_conv4': 64
        }

    def forward(self, batch_dict):
        """
        Args:
            batch_dict:
                batch_size: int
                vfe_features: (num_voxels, C)
                voxel_coords: (num_voxels, 4), [batch_idx, z_idx, y_idx, x_idx]
        Returns:
            batch_dict:
                encoded_spconv_tensor: sparse tensor
        """
        # voxel_features, voxel_coords  shape (Batch * 16000, 4)
        voxel_features, voxel_coords = batch_dict['voxel_features'], batch_dict['voxel_coords']
        batch_size = batch_dict['batch_size']
        # 根据voxel坐标,并将每个voxel放置voxel_coor对应的位置,建立成稀疏tensor
        input_sp_tensor = spconv.SparseConvTensor(
            # (Batch * 16000, 4)
            features=voxel_features,
            # (Batch * 16000, 4) 其中4为 batch_idx, x, y, z
            indices=voxel_coords.int(),
            # [41,1600,1408] ZYX 每个voxel的长宽高为0.05,0.05,0.1 点云的范围为[0, -40, -3, 70.4, 40, 1]
            spatial_shape=self.sparse_shape,
            # 4
            batch_size=batch_size
        )

        """
        稀疏卷积的计算中,feature,channel,shape,index这几个内容都是分开存放的,
        在后面用out.dense才把这三个内容组合到一起了,变为密集型的张量
        spconv卷积的输入也是一样,输入和输出更像是一个  字典或者说元组
        注意卷积中pad与no_pad的区别
        """

        # # 进行submanifold convolution
        # [batch_size, 4, [41, 1600, 1408]] --> [batch_size, 16, [41, 1600, 1408]]
        x = self.conv_input(input_sp_tensor)

        # [batch_size, 16, [41, 1600, 1408]] --> [batch_size, 16, [41, 1600, 1408]]
        x_conv1 = self.conv1(x)
        # [batch_size, 16, [41, 1600, 1408]] --> [batch_size, 32, [21, 800, 704]]
        x_conv2 = self.conv2(x_conv1)
        # [batch_size, 32, [21, 800, 704]] --> [batch_size, 64, [11, 400, 352]]
        x_conv3 = self.conv3(x_conv2)
        # [batch_size, 64, [11, 400, 352]] --> [batch_size, 64, [5, 200, 176]]
        x_conv4 = self.conv4(x_conv3)


        # for detection head
        # [200, 176, 5] -> [200, 176, 2]
        # [batch_size, 64, [5, 200, 176]] --> [batch_size, 128, [2, 200, 176]]
        out = self.conv_out(x_conv4)

        batch_dict.update({
            'encoded_spconv_tensor': out,
            'encoded_spconv_tensor_stride': 8
        })
        batch_dict.update({
            'multi_scale_3d_features': {
                'x_conv1': x_conv1,
                'x_conv2': x_conv2,
                'x_conv3': x_conv3,
                'x_conv4': x_conv4,
            }
        })
        batch_dict.update({
            'multi_scale_3d_strides': {
                'x_conv1': 1,
                'x_conv2': 2,
                'x_conv3': 4,
                'x_conv4': 8,
            }
        })

        return batch_dict
4.5 Reshape to BEV层
OpenPcdet代码位置:pcdet/models/backbones_2d/map_to_bev/height_compression.py
由于前面VoxelBackBone8x得到的tensor是稀疏的,所以要先转成密集数据
[batch_size, 128, [2, 200, 176]]---->>[batch_size,256,200,176]
# 在高度方向上进行压缩
class HeightCompression(nn.Module):
    def __init__(self, model_cfg, **kwargs):
        super().__init__()
        self.model_cfg = model_cfg
        # 高度的特征数
        self.num_bev_features = self.model_cfg.NUM_BEV_FEATURES

    def forward(self, batch_dict):
        """
        Args:
            batch_dict:
                encoded_spconv_tensor: sparse tensor
        Returns:
            batch_dict:
                spatial_features:
        """
        # 得到VoxelBackBone8x的输出特征
        encoded_spconv_tensor = batch_dict['encoded_spconv_tensor']
        # 将稀疏的tensor转化为密集tensor,[bacth_size, 128, 2, 200, 176]
        # 结合batch,spatial_shape、indice和feature将特征还原到密集tensor中对应位置
        spatial_features = encoded_spconv_tensor.dense()
        # batch_size,128,2,200,176
        N, C, D, H, W = spatial_features.shape
        """
        将密集的3D tensor reshape为2D鸟瞰图特征
        将两个深度方向内的voxel特征拼接成一个 shape : (batch_size, 256, 200, 176)
        z轴方向上没有物体会堆叠在一起,这样做可以增大Z轴的感受野,
        同时加快网络的速度,减小后期检测头的设计难度
        """
        spatial_features = spatial_features.view(N, C * D, H, W)
        # 将特征和采样尺度加入batch_dict
        batch_dict['spatial_features'] = spatial_features
        # 特征图的下采样倍数 8倍
        batch_dict['spatial_features_stride'] = batch_dict['encoded_spconv_tensor_stride']
        return batch_dict
4.6RPN网络
OpenPcdet代码位置:pcdet/models/backbones_2d/base_bev_backbone.py
    def forward(self, data_dict):
        """
        Args:
            data_dict:
                spatial_features : (4, 256, 200, 176)
        Returns:
        """
        spatial_features = data_dict['spatial_features']
        ups = []
        ret_dict = {}
        x = spatial_features

        # 对不同的分支部分分别进行conv和deconv的操作
        for i in range(len(self.blocks)):
            """
            SECOND中一共存在两个下采样分支,
            分支一: (batch,128,200,176)
            分支二: (batch,256,100,88)
            """
            x = self.blocks[i](x)

            stride = int(spatial_features.shape[2] / x.shape[2])
            ret_dict['spatial_features_%dx' % stride] = x

            # 如果存在deconv,则对经过conv的结果进行反卷积操作
            """
            SECOND中存在两个下采样,则分别对两个下采样分支进行反卷积操作
            分支一: (batch,128,200,176)-->(batch,256,200,176)
            分支二: (batch,256,100,88)-->(batch,256,200,176)
            """
            if len(self.deblocks) > 0:
                ups.append(self.deblocks[i](x))
            else:
                ups.append(x)

        # 将上采样结果在通道维度拼接
        if len(ups) > 1:
            """
            最终经过所有上采样层得到的2个尺度的的信息
            每个尺度的 shape 都是 (batch,256,200,176)
            在第一个维度上进行拼接得到x  维度是 (batch,512,200,176)
            """
            x = torch.cat(ups, dim=1)
        elif len(ups) == 1:
            x = ups[0]

        # Fasle
        if len(self.deblocks) > len(self.blocks):
            x = self.deblocks[-1](x)

        # 将结果存储在spatial_features_2d中并返回
        data_dict['spatial_features_2d'] = x

        return data_dict
最后,应用三个 1×1 卷积来预测类别、回归偏移和方向。
五、损失函数
当同一个3D检测框的预测方向恰好与真实方向相反的时候,预测的前6个变量的回归损失较小,而最后一个方向的回归损失会很大,这其实并不利于模型训练。为了解决这个问题,作者引入角度回归的正弦误差损失,当方向相反时,角度误差很小,但我们又加入了方向分类器softmax。
分类用Focal loss,回归用smoothL1
六、Reference
https://zhuanlan.zhihu.com/p/439879213
https://blog.csdn.net/weixin_42905141/article/details/122677428


 1万+
1万+

 被折叠的 条评论
为什么被折叠?
被折叠的 条评论
为什么被折叠?
 到【灌水乐园】发言


