


主要记录一下GAMES101作业的记录和思考。
1 总览
到目前为止,我们已经学习了如何使用矩阵变换来排列二维或三维空间中的对象。所以现在是时候通过实现一些简单的变换矩阵来获得一些实际经验了。在接下来的三次作业中,我们将要求你去模拟一个基于CPU的光栅化渲染器的简化版本。
本次作业的任务是填写一个旋转矩阵和一个透视投影矩阵。给定三维下三个点
v
1
(
2.0
,
0.0
,
−
2.0
)
,
v
1
(
0.0
,
2.0
,
−
2.0
)
,
v
2
(
−
2.0
,
0.0
,
−
2.0
)
v_1(2.0,0.0,-2.0),v_1(0.0,2.0,-2.0),v_2(-2.0,0.0,-2.0)
v1(2.0,0.0,−2.0),v1(0.0,2.0,−2.0),v2(−2.0,0.0,−2.0),你需要将这三个点的坐标变换为屏幕坐标并在屏幕上绘制出对应的线框三角形(在代码框架中,我们已经提供了draw triangle函数,所以你只需要去构建变换矩阵即可)。简而言之,我们需要进行模型、视图、投影、视口等变换来将三角形显示在屏幕上。在提供的代码框架中,我们留下了模型变换和投影变换的部分给你去完成。如果你对上述概念有任何不清楚或疑问,请复习课堂笔记或询问助教。
以下是你需要在main.cpp中修改的函数(请不要修改任何的函数名和其他已经填写好的函数,并保证提交的代码是已经完成且能运行的):
get_model_matrix(float rotation_angle):逐个元素地构建模型变换矩阵并返回该矩阵。在此函数中,你只需要实现三维中绕z轴旋转的变换矩阵,而不用处理平移与缩放。
get_projection_matrix(float eye_fov,float aspect_ratio,float zNear,f1 oat zFar):使用给定的参数逐个元素地构建透视投影矩阵并返回该矩阵。
[Optional]main():自行补充你所需的其他操作。
2. 代码编写
get_model_matrix(float rotation_angle)
三维中绕z轴旋转的变换矩阵的定义(按照要求写就行)
R = [ cos α − sin α 0 sin α cos α 0 0 0 1 ] \mathbf{R}=\begin{bmatrix}\cos\alpha & -\sin\alpha & 0\\ \sin\alpha & \cos\alpha & 0\\ 0 & 0 &1\end{bmatrix} R= cosαsinα0−sinαcosα0001
代码
Eigen::Matrix4f get_model_matrix(float rotation_angle)
{
    Eigen::Matrix4f model = Eigen::Matrix4f::Identity();
    // TODO: Implement this function
    // Create the model matrix for rotating the triangle around the Z axis.
    // Then return it.
    float rotation_angle_rad = rotation_angle * MY_PI  / 180;
    model(0, 0) = cos(rotation_angle_rad);
    model(0, 1) = -sin(rotation_angle_rad);
    model(1, 0) = sin(rotation_angle_rad);
    model(1, 1) = cos(rotation_angle_rad);

    return model;

}
get_projection_matrix(float eye_fov,float aspect_ratio,float zNear,f1 oat zFar)
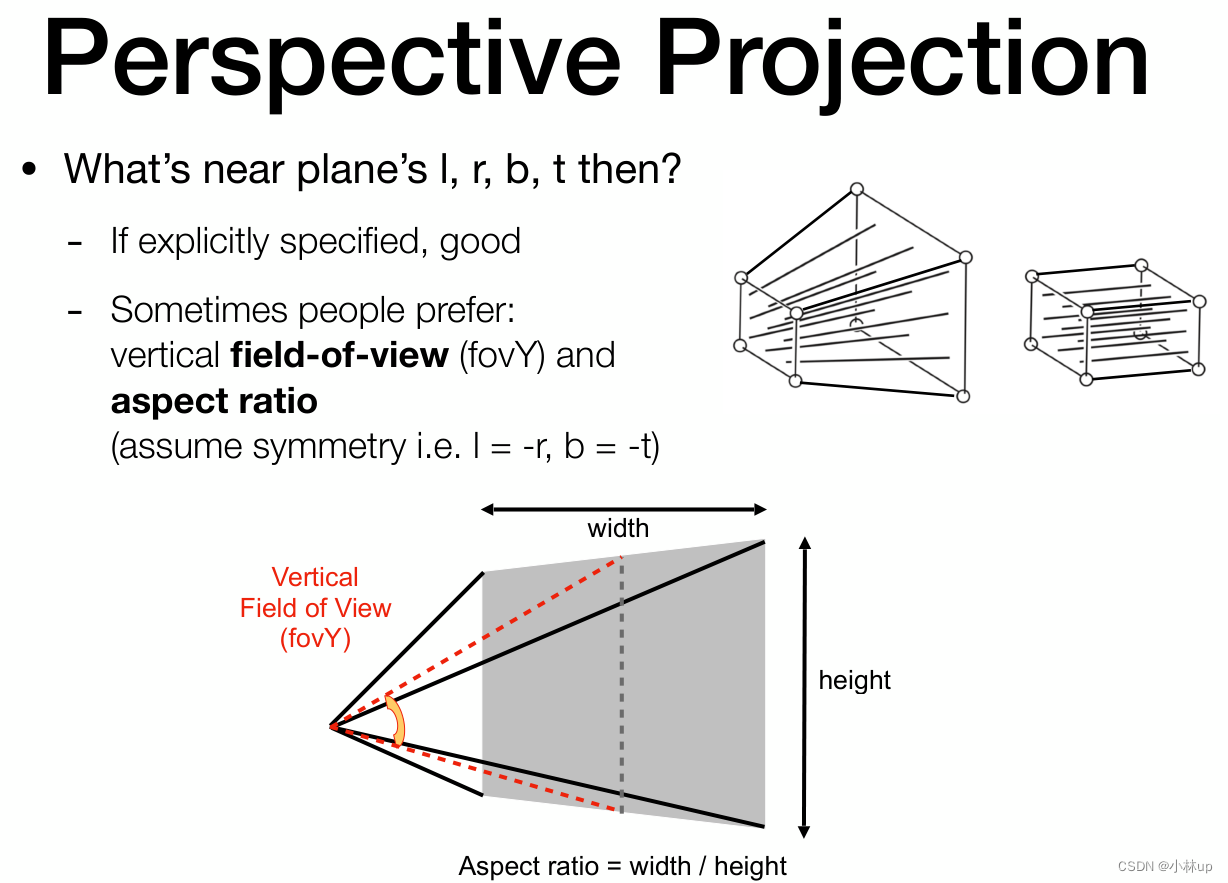
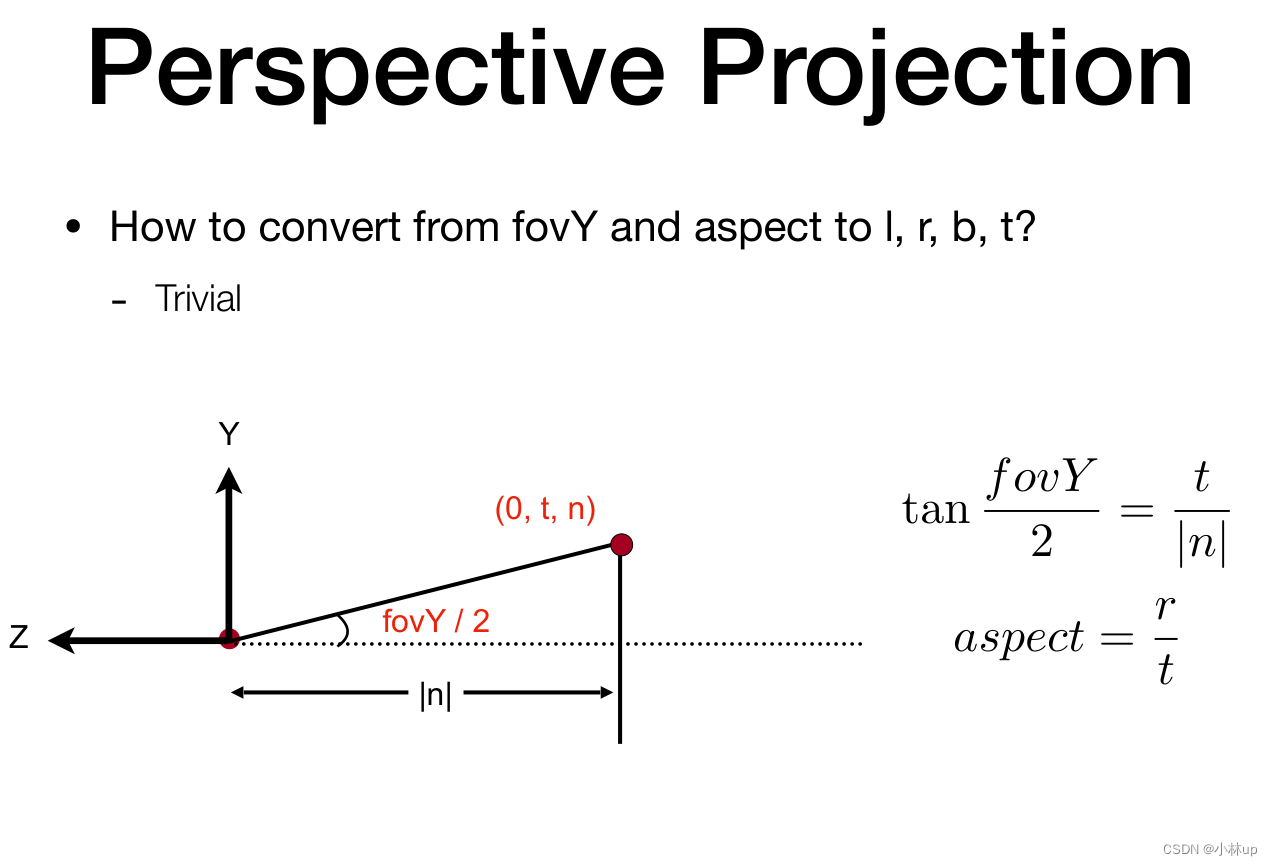
根据Lecture5的ppt我们知道eye_fov和aspect_ratio的含义,其中:
tan eye_fov 2 = t ∣ n ∣ \tan\frac{\text{eye\_fov}}{2} = \frac{t}{|n|} tan2eye_fov=∣n∣t
aspect_ratio = r / t \text{aspect\_ratio} = r/t aspect_ratio=r/t
我们使用投影矩阵的最后的表达式:
M
per
=
[
2
n
r
−
l
0
l
+
r
l
−
r
0
0
2
n
t
−
b
b
+
t
b
−
t
0
0
0
f
+
n
n
−
f
2
f
n
f
−
n
0
0
1
0
]
\mathbf{M}_{\text {per }}=\left[\begin{array}{cccc} \frac{2 n}{r-l} & 0 & \frac{l+r}{l-r} & 0 \\ 0 & \frac{2 n}{t-b} & \frac{b+t}{b-t} & 0 \\ 0 & 0 & \frac{f+n}{n-f} & \frac{2 f n}{f-n} \\ 0 & 0 & 1 & 0 \end{array}\right]
Mper =
r−l2n0000t−b2n00l−rl+rb−tb+tn−ff+n100f−n2fn0
要注意的是,由于作业里的zNear和zFar都是正值,和闫老师在课上讲的是负值不一样,如果直接这样最后会导致三角形最后是颠倒的(左手系和右手系的区别吧)
关于投影矩阵错误导致图形颠倒推荐看看文章:
代码
Eigen::Matrix4f get_projection_matrix(float eye_fov, float aspect_ratio, float zNear, float zFar)
{
    // Students will implement this function
    Eigen::Matrix4f projection = Eigen::Matrix4f::Identity();
    // TODO: Implement this function
    // Create the projection matrix for the given parameters.
    // Then return it.
    float t = abs(zNear) * tan(eye_fov * MY_PI / (180 * 2));
    float r = aspect_ratio * t;
    float l = -r;
    float b = -t;
    float n = -zNear;
    float f = -zFar;

    projection(0, 0) = 2 * n / (r - l);
    projection(0, 2) = (l + r) / (l - r);
    projection(1, 1) = 2 * n / (t - b);
    projection(1, 2) = (b + t) / (b - t);
    projection(2, 2) = (f + n) / (n - f);
    projection(2, 3) = 2 * f * n / (f - n);
    projection(3, 2) = 1.0;
    projection(3, 3) = 0.0;
    return projection;
}
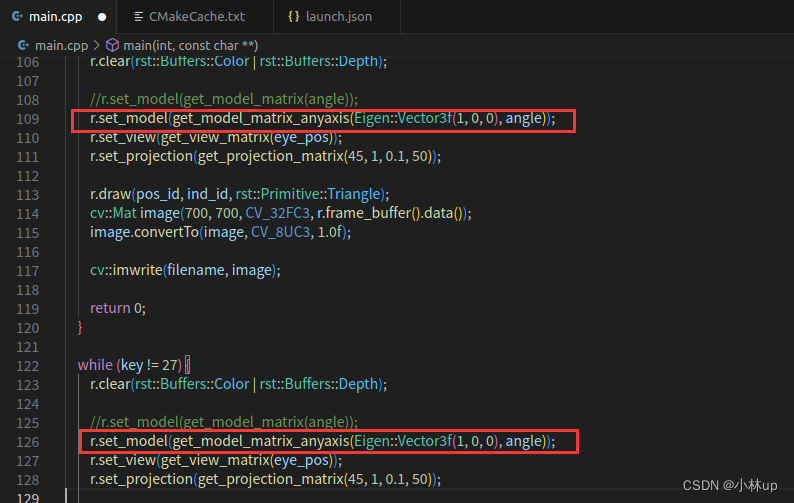
进阶代码 Eigen::Matrix4f get_model_matrix_anyaxis(Vector3f axis, float angle)
这里使用了罗德里格斯公式,任意轴的矢量为 v = [ v 1 , v 2 , v 3 ] \mathbf{v}=[v_1,v_2,v_3] v=[v1,v2,v3],旋转的角度为 θ \theta θ,罗德里格斯的旋转矩阵的公式( 3 × 3 3\times3 3×3)为:
R = I + sin θ [ v ] + ( 1 − cos θ ) [ v ] 2 \mathbf{R} = \mathbf{I}+\sin\theta[\mathbf{v}]+ (1-\cos\theta)[\mathbf{v}]^2 R=I+sinθ[v]+(1−cosθ)[v]2
其中
[ v ] = [ 0 − v 3 v 2 v 3 0 − v 1 − v 2 v 1 0 ] [\mathbf{v}] = \begin{bmatrix}0 & -v_3 & v_2\\v_3 & 0 &-v_1\\-v_2& v_1 & 0\end{bmatrix} [v]= 0v3−v2−v30v1v2−v10
最后我们要给让旋转矩阵扩展为
4
×
4
4\times 4
4×4的齐次变换矩阵:
T
=
[
R
0
3
×
1
0
1
×
3
1
]
\mathbf{T} = \begin{bmatrix}\mathbf{R} & \mathbf{0}_{3\times 1}\\\mathbf{0}_{1\times 3} & 1\end{bmatrix}
T=[R01×303×11]
Eigen::Matrix4f get_model_matrix_anyaxis(Vector3f axis, float angle)
{
    Eigen::Matrix4f model = Eigen::Matrix4f::Identity();
    float rotation_angle_rad = angle * MY_PI  / 180;
    Eigen::Matrix3f R_screw;
    R_screw << 0.0, -axis.z(), axis.y(), axis.z(), 0.0, -axis.x(), -axis.y(), axis.x(), 0.0;
    Eigen::Matrix3f E = Eigen::Matrix3f::Identity();
    model.block(0,0,3,3) = E + sin(rotation_angle_rad) * R_screw + (1 - cos(rotation_angle_rad)) * R_screw * R_screw;

    return model;

}
要调用这个函数,在main函数凡是调用了绕z轴旋转函数get_model_matrix的地方都改成get_model_matrix_anyaxis函数就好了,然后记得设定旋转轴,我这里设置的是x轴
(
1
,
0
,
0
)
(1,0,0)
(1,0,0)。
要改的有两个地方
3. 其他
在main函数里面有一个小bug,当输入3个参数的命令行:
./Rasterizer −r 20
并没有按照作业的文档说的那样生成output.png。
原来的代码:
    if (argc >= 3) {
        command_line = true;
        angle = std::stof(argv[2]); // -r by default
        if (argc == 4) {
            filename = std::string(argv[3]);
        }
        else
            return 0;
    }
修改的代码,删掉else return 0。
    if (argc >= 3) {
        command_line = true;
        angle = std::stof(argv[2]); // -r by default
        if (argc == 4) {
            filename = std::string(argv[3]);
        }
    }
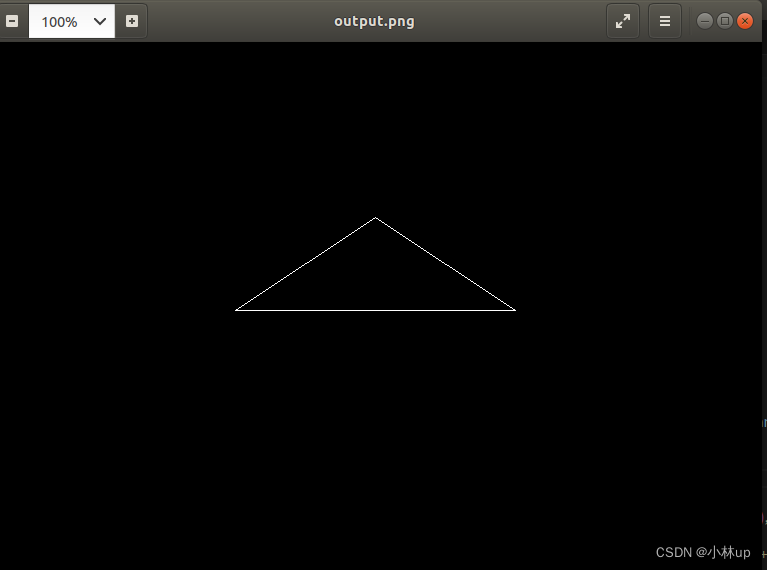
4. 最终效果
绕z轴旋转90度
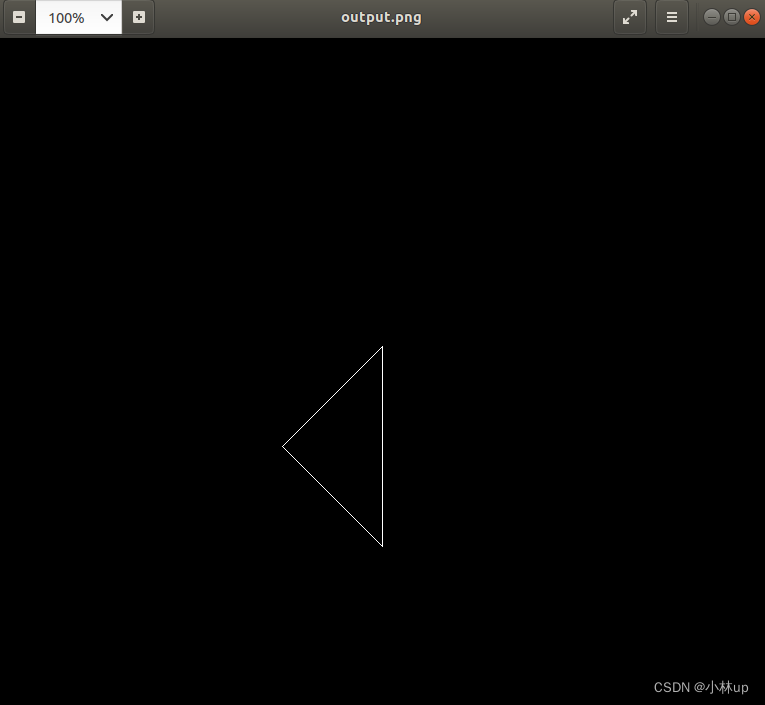
绕x轴旋转90度


 3640
3640


 被折叠的 条评论
为什么被折叠?
被折叠的 条评论
为什么被折叠?
 到【灌水乐园】发言


