


在之前的文章中,我们介绍了Hugging Face调用模型的基本原理,具体参考博客: 【大模型】基于Hugging Face调用及微调大模型(1)
本篇主要讲如何基于Hugging Face的TRL、Transformers框架和数据集来微调开放的大语言模型。
一、环境配置
这里我们基于conda的虚拟环境安装需要的依赖包,环境中已自带 torch==2.3.1:
pip install transformers
pip install datasets

pip install trl
pip install peft
pip install bitsandbytes

pip install accelerate
pip install evaluate
其中,transformers 和 datasets 无需再过多说明,是我们基于Hugging Face平台微调大模型所必须得依赖包。下面对其中比较重要的几个包做简要介绍:
- trl:全称为Transformer Reinforcement Learning,TRL是使用强化学习的全栈Transformer语言模型。trl 是一个全栈库,其中我们提供一组工具,用于通过强化学习训练Transformer语言模型和稳定扩散模型,从监督微调步骤(SFT)到奖励建模步骤(RM)再到近端策略优化(PPO)步骤。该库建立在Hugging Face 的 transformers 库之上。
Github地址:TRL - Transformer Reinforcement Learning
The trl library is a full stack tool to fine-tune and align transformer language and diffusion models using methods such as Supervised Fine-tuning step (SFT), Reward Modeling (RM) and the Proximal Policy Optimization (PPO) as well as Direct Preference Optimization (DPO).
-
peft:全称为Parameter-Efficient Fine-Tuning,PEFT。peft是一种专门为高效调参而设计的深度学习库,其使用了类似于只是蒸馏的技术,通过在预训练模型上添加少量数据来进行微调,从而实现将预训练模型的知识迁移到新的微调模型中。
Github地址:https://github.com/huggingface/peft -
bitsandbytes:CUDA自定义函数的轻量级封装库,可实现大模型的量化。bitsandbytes库是将模型量化为8位和4位的最简单选择。
- 8位量化将fp16中的异常值与int8中的非异常值相乘,将非异常值转换回fp16,然后将它们相加以返回fp16中的权重。这减少了异常值对模型性能产生的降级效果。
- 4位量化进一步压缩了模型,并且通常与QLoRA一起用于微调量化LLM(低精度语言模型)。
二、微调 Gemma 模型
【任务描述】:基于输入的提示词,补全名人名言,并按照指定格式输出。
【参考博客】:使用 Hugging Face 微调 Gemma 模型
首先介绍下这里要用到的Gemma模型:Gemma是谷歌的一个轻量级、最先进的开放模型家族,适用于各种文本生成任务,包括问答、摘要和推理等,模型地址:https://huggingface.co/google/gemma-2b
Gemma is a family of lightweight, state-of-the-art open models from Google, built from the same research and technology used to create the Gemini models. They are text-to-text, decoder-only large language models, available in English, with open weights, pre-trained variants, and instruction-tuned variants. Gemma models are well-suited for a variety of text generation tasks, including question answering, summarization, and reasoning. Their relatively small size makes it possible to deploy them in environments with limited resources such as a laptop, desktop or your own cloud infrastructure, democratizing access to state of the art AI models and helping foster innovation for everyone.
微调的具体步骤如下:
-
从 Hugging Face Hub 下载
Gemma模型文件。
下载链接:https://huggingface.co/google/gemma-2b/tree/main
下载完成后放到本地目录./models/gemma-2b下。 -
加载模型。
import torch
from transformers import AutoTokenizer, AutoModelForCausalLM, BitsAndBytesConfig

model_id = "./models/gemma-2b"  # 模型的本地路径

# 定义量化参数
bnb_config = BitsAndBytesConfig(
    load_in_4bit=True,  # 启用4位加载
    bnb_4bit_quant_type="nf4",   # 指定用于量化的数据类型。支持两种量化数据类型: fp4 (四位浮点)和 nf4 (常规四位浮点)
    bnb_4bit_compute_dtype=torch.bfloat16  # 用于线性层计算的数据类型
)

tokenizer = AutoTokenizer.from_pretrained(model_id)  # token=os.environ['HF_TOKEN']
model = AutoModelForCausalLM.from_pretrained(model_id, quantization_config=bnb_config, device_map={"":0})  # token=os.environ['HF_TOKEN']
这里bnb_config定义了加载模型的基本配置,基于BitsAndBytesConfig类通过 4 位精度实现量化基础模型,以实现更高的内存效率微调协议。
使用模型量化功能,首先需要在环境中安装 bitsandbytes 库,然后在加载模型时传递 BitsAndBytesConfig对象,即可加载具有 QLoRA 的模型。
- 测试原始模型。
Gemma本身适用于问答任务,我们首先来测试下模型的<问答>效果:
model_path = "./models/gemma-2b"

tokenizer = AutoTokenizer.from_pretrained(model_path)
model = AutoModelForCausalLM.from_pretrained(model_path, device_map={"":0})

text = "What is machine learning?"
device = "cuda:0"
inputs = tokenizer(text, return_tensors="pt").to(device)

outputs = model.generate(**inputs)
print(tokenizer.decode(outputs[0], skip_special_tokens=True))
输出结果如下:
<bos>What is machine learning?

Machine learning is a branch of artificial intelligence that allows computers to learn
可以看到在<问答>场景下Gemma的效果还不错。
因为这里我们想做的任务是<基于输入的提示词,补全名人名言>。在开始微调前,我们也先使用一个相当熟知的名言来测试一下 Gemma 模型:
text = "Quote: Imagination is more"
device = "cuda:0"
inputs = tokenizer(text, return_tensors="pt").to(device)

outputs = model.generate(**inputs, max_new_tokens=20)
print(tokenizer.decode(outputs[0], skip_special_tokens=True))
运行代码,输出结果如下:
Quote: Imagination is more important than knowledge. Knowledge is limited. Imagination encircles the world.

- Albert Einstein

The
再运行一次,输出结果为:
Quote: Imagination is more important than knowledge. Knowledge is limited. Imagination encircles the world. - Albert Einstein

I am
我们发现在<名人名言补全>场景中,模型不仅补全了名言输出了作者,最后还输出了一些不相关的词(如:the、I am等)。这并不完全是我们希望看到的答案格式。我们将尝试通过微调让模型学会以我们期望的格式来产生答案,预期格式如下:
Quote: Imagination is more important than knowledge. Knowledge is limited. Imagination encircles the world.

Author: Albert Einstein
-
下载微调数据集。
我们选择一个英文“名人名言”数据集Abirate/english_quotes,下载地址:https://huggingface.co/datasets/Abirate/english_quotes ,
并将数据集防止本地路径./datasets/english_quotes下。 -
加载微调数据集。
# 加载微调数据集
# data = load_dataset(data_path)   # 加载远程数据集
data_path = "../../../data/english_quotes/quotes.jsonl"
data = load_dataset('json', data_files=data_path)   # 加载本地数据集
- 使用 LoRA 对模型进行微调:
这里,微调的方法采用LoRA(Low-Rank Adaptation),LoRA是微软研究团队提出的一种通过冻结预训练模型参数,在Transformer每一层中加入2个可供训练的A、B低秩旁路矩阵(其中一个矩阵负责降维、另一个负责升维),可大幅减少微调参数量的方法。 详见论文:LoRA: Low-Rank Adaptation of Large Language Models (2021)。
# 定义LoRA微调参数
from peft import LoraConfig
lora_config = LoraConfig(
r=8, # LoRA中的秩
target_modules=["q_proj", "o_proj", "k_proj", "v_proj", "gate_proj", "up_proj", "down_proj"],
task_type="CAUSAL_LM", # 因果语言模型
)
# 使用 LoRA 对模型进行微调
import transformers
from trl import SFTTrainer
def formatting_func(example):
text = f"Quote: {example['quote'][0]}\nAuthor: {example['author'][0]}"
return [text]
trainer = SFTTrainer(
model=model,
train_dataset=data["train"],
args=transformers.TrainingArguments(
per_device_train_batch_size=1,
gradient_accumulation_steps=4,
warmup_steps=2,
max_steps=10, # 最大迭代次数
learning_rate=2e-4,
fp16=True,
logging_steps=1,
output_dir="./outputs/gemma-new", # 微调后模型的输出路径
optim="paged_adamw_8bit"
),
peft_config=lora_config,
formatting_func=formatting_func,
)
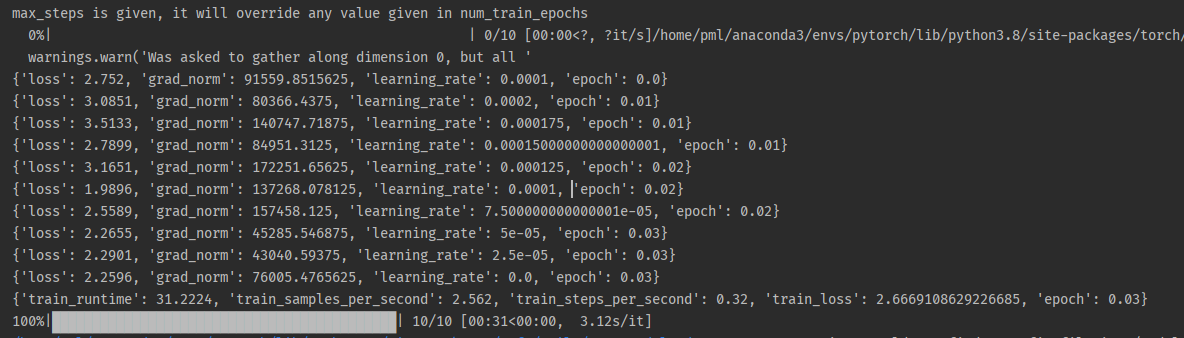
trainer.train()
这里,最大训练迭代次数max_steps可以根据需求进行设置。
运行模型,等待训练完成。
查看路径 ./outputs/gemma-new,已经有了微调完成的新模型文件:
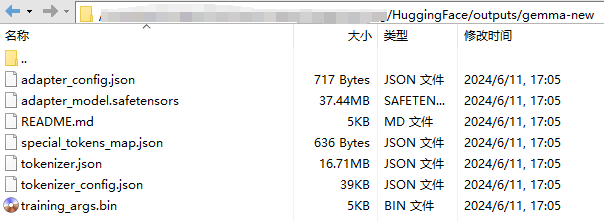
- 测试模型。我们使用先前的提示词,基于微调后的模型来推理:
通常情况下,微调时会保存LoRA权重,而不是整个模型的权重,因为LoRA权重比原始模型小得多。因此需要加载微调时保存的LoRA权重以及基础模型进行推理,主要代码如下:
from peft import PeftModel

base_model_path = "./models/gemma-2b"
new_model_path = "./outputs/gemma-new"

base_model = AutoModelForCausalLM.from_pretrained(base_model_path)
merge_model = PeftModel.from_pretrained(base_model, new_model_path)  # 加载base model和new model

merge_model = merge_model.merge_and_unload()  # 物理合并
然后再基于合并后的模型进行推理即可。


 2466
2466

 被折叠的 条评论
为什么被折叠?
被折叠的 条评论
为什么被折叠?
 到【灌水乐园】发言


