


kitti数据集
00 无人驾驶数据集汇总
0.kitti数据简介
kitti数据集是一个为立体,光流,视觉里程计,3D目标检测和3D跟踪等任务而开发采集的基准数据集。
它利用了Annieway自动驾驶平台,配备了1个OXTS RT 3003,1台Velodyne HDL-64E激光扫描仪,2台Point Grey Flea 2(FL2-14S3M-C)一百四十万像素灰度相机,2台一百四十万像素彩色摄像头,以及4个4~8mm的可变焦镜头Edmund Optics NT59-917。
根据 Are we ready for Autonomous Driving? The KITTI Vision Benchmark Suite 这篇文章的描述,相机,激光扫描仪以及定位系统全部都经过了校准和时间同步,且里程计的真值由GPS/IMU定位单元的输出投影到校准后的左侧相机得到。
也就是说,在kitti提供的里程计真值是基于相机坐标系的,而根据上面kitti链接中的介绍,相机坐标系为:向前为z,向右为x,向下为y;而velodyne激光扫描仪坐标系则是:向前x,向左y,向上z。(需要注意的是,点云数据是在激光雷达坐标系下,而真值则是在相机坐标系下。)
在从官网上下载的真值位姿具有以下格式(kitti总共有编号为00-20的21个数据集序列,其中只有00-10序列公开了真值,序列11~20仅用来做为算法评估使用):
1.000000e+00 9.043680e-12 2.326809e-11 5.551115e-17 9.043683e-12 1.000000e+00 2.392370e-10 3.330669e-16 2.326810e-11 2.392370e-10 9.999999e-01 -4.440892e-16
9.999978e-01 5.272628e-04 -2.066935e-03 -4.690294e-02 -5.296506e-04 9.999992e-01 -1.154865e-03 -2.839928e-02 2.066324e-03 1.155958e-03 9.999971e-01 8.586941e-01
9.999910e-01 1.048972e-03 -4.131348e-03 -9.374345e-02 -1.058514e-03 9.999968e-01 -2.308104e-03 -5.676064e-02 4.128913e-03 2.312456e-03 9.999887e-01 1.716275e+00
9.999796e-01 1.566466e-03 -6.198571e-03 -1.406429e-01 -1.587952e-03 9.999927e-01 -3.462706e-03 -8.515762e-02 6.193102e-03 3.472479e-03 9.999747e-01 2.574964e+00
它们每一行有12个数据,它们记录了每一个ie时刻的位置和方向,对于上面的每一行p0p1p2…p11它们与(旋转+平移)欧式矩阵
1.kitti数据集点云bin文件显示
1.bin文件显示
参考点云侠点云,才发觉bin文件cc加载可能出错(我还以为内存不够还特地增加了内存)
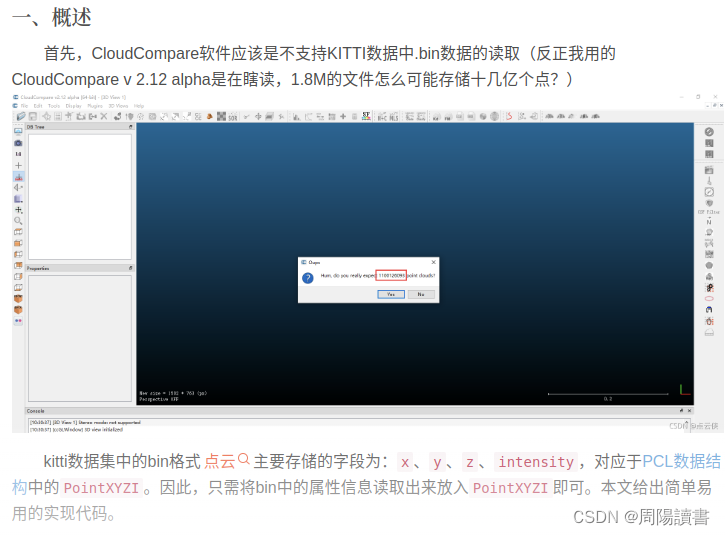
经研究,我当前觉得可行的思路:
1.bin文件单个单个转成pcd文件
参考连接:KITTI-二进制点云数据集使用笔记
2.bin文件读取解析,然后通过ROS节点发出来,再通过rviz显示
参考连接:kitti数据集在ros中可视化一(显示(发布)点云、图像信息,学习笔记)
2.KITTI真值数据理解及下载
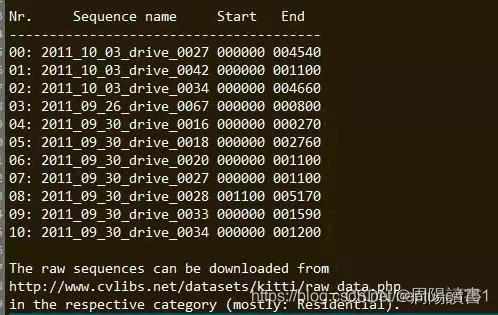
KITTI Visual Odometry一整个数据集分成的10个序列
上方的对应KITTI RAW DATA
Nr. Sequence name
00: 2011_10_03_drive_0027
01: 2011_10_03_drive_0042
02: 2011_10_03_drive_0034
03: 2011_09_26_drive_0067
04: 2011_09_30_drive_0016
05: 2011_09_30_drive_0018
06: 2011_09_30_drive_0020
07: 2011_09_30_drive_0027
08: 2011_09_30_drive_0028
09: 2011_09_30_drive_0033
10: 2011_09_30_drive_0034
如:KITTI00下载这个网址–>KITTI RAW DATA里面的名为2011_10_03_drive_0027 数据集
闭环检测的KITTI数据集的Ground-Truth
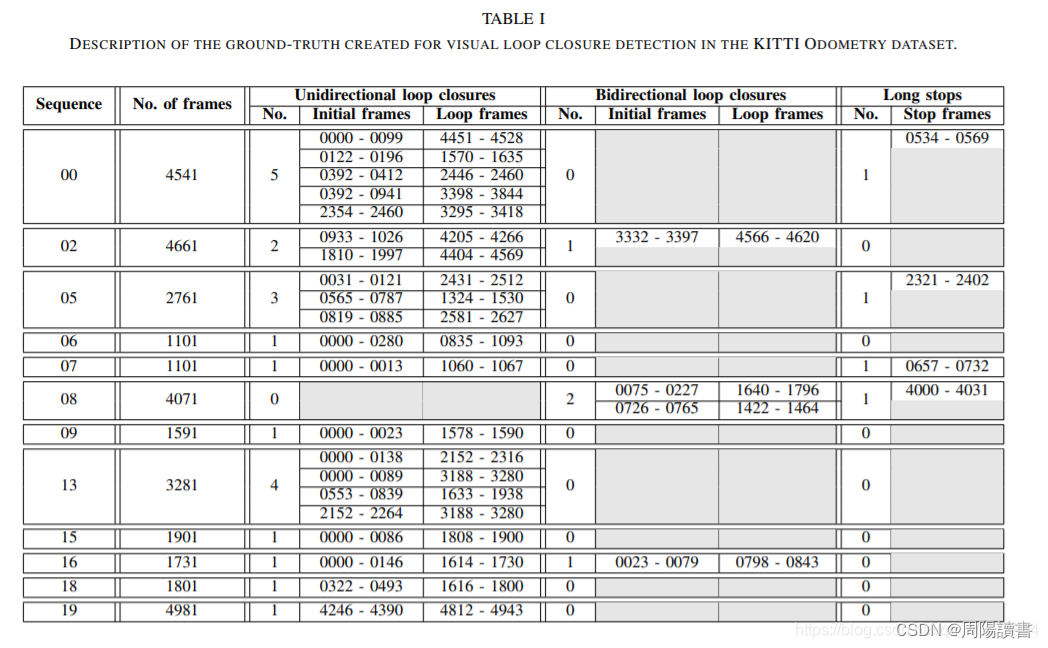
图片出处:Fast and Effective Visual Place Recognition using Binary Codes and Disparity Information

注:
1)若仅测试算法是否安装好,对轨迹无要求,建议选小一点的包,eg.04、17、20、03;
2)若测试算法性能,要求闭环,含有真值,但包不要太大,eg.07、06、09;
3)若测试算法性能,要求轨迹复杂,含有真值,电脑性能好,eg.05、08、00、02。
3.KITTI数据集Raw Data与Ground Truth序列00-10的对应关系,以及对应的标定参数
KITTI数据集Raw Data与Ground Truth序列00-10的对应关系,以及对应的标定参数
官网上真值下载位置:KITTI-Visual Odometry / SLAM Evaluation 2012
具体位置:
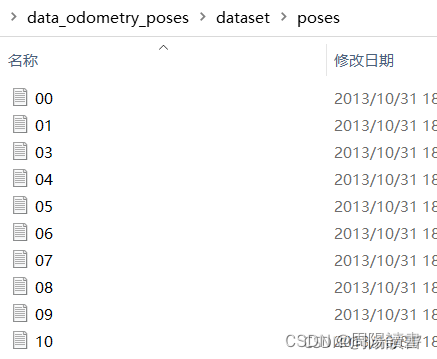
真值:Download odometry ground truth poses (4 MB) (这里有序号00-10,共11个真值数据)
(外参)标定参数(以及时间戳):Download odometry data set (calibration files, 1 MB)
kitti真值是按相机的坐标系(右x-下y-前z)来的,激光雷达的坐标系是(前x-左y-上z),他们之间存在一个转换关系,外参下载(Download odometry data set (calibration files, 1 MB) )。
在poses目录下,包含00.txt-10.txt 11个序列,每一个文件包换Nx12个表格,N代表帧数。每一行利用3x4转移矩阵代表左边相机系统位姿,转移矩阵将当前帧左边相机系统中的一个点映射到第0帧的坐标系统中。转移矩阵中平移的部分表示当前相机位置(相对于第0帧)。
下面代码为MATLAB中显示上图sequence 00的groundtruth,修改filename可以获得所有sequence的groundtruth地图。
%% display groundtruth of KITTI poses
% include sequence from 00-10.txt

% read from poses
filename = '$PATH/poses/00.txt';
fid = fopen(filename);
fseek(fid, 0, 'bof');
lastposition = ftell(fid);
disp(['start position:',num2str(lastposition)]);

groundtruth = [];

while fgetl(fid) ~= -1, % end of line check

    fseek(fid, lastposition, 'bof');
    line = textscan(fid,'%f %f %f %f %f %f %f %f %f %f %f %f\n',1);
    line = [line{:}];
    transform = vec2mat(line,4);

    groundtruth = [groundtruth; [transform(1,4), transform(3,4)]];
    lastposition = ftell(fid);
    disp(['lastposition:',num2str(lastposition)]);

end

% display ground truth
scatter(groundtruth(:,1),groundtruth(:,2));

fclose(fid);
4.calib.txt文件说明
4.1 KITTI Odometry数据集GT怎么用
KITTI Odometry数据集使用很广泛,但对于新手来说,即使了解过了pin-hole成像原理、camera instrinsics & extrinsics、旋转矩阵这些知识,碰到GT文件中诸多矩阵也难免有点懵。前面在看相关内容的时候发现,针对数据集GT本身的内容描述很少,所以希望记录一下自己的理解

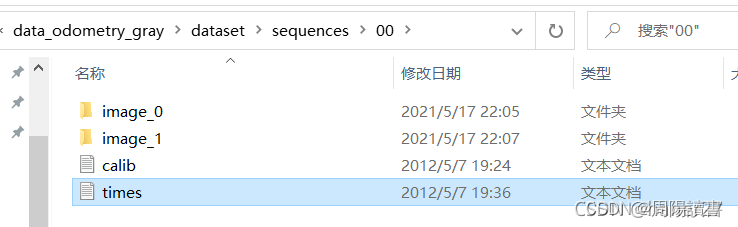
在原始数据 data_odometry_color文件夹、data_odometry_gray文件夹下对应序列中有calib.txt和times.txt
数据结构可描述如下:
- sequences
  - 01
    - image2
    - image3
    - calib.txt
    - times.txt
  - 02
  ...
- pose
  - 00.txt
  - 01.txt
  ...
这其中主要就是calib.txt文件与pose文件夹下的xx.txt文件需要详细说明一下。
4.1.1 calib.txt文件
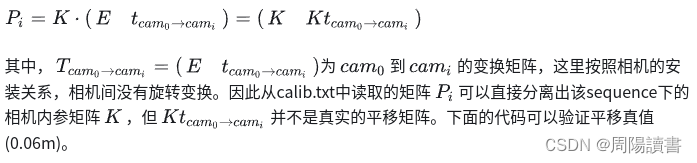
sequence/01下的calib.txt文件中是P0,P1,P2,P3,这四个矩阵并不是相机内参矩阵(Camera Instrinsics),而是当世界坐标系与cam0相机坐标系一致时(
R
w
o
r
l
d
−
c
a
m
0
=
E
R_{world}-cam0 = E
Rworld−cam0=E )的单应性矩阵(Homography Matrix),具体可表示为:
import numpy as np
import os

with open(os.path.join(odos_dir,'calib.txt'),'r') as f:
    iPx = f.readlines()
# homography matrix
iP0 = np.array([float(i) for i in iPx[0].strip('\n').split(' ')[1:]]).reshape(3,4)
iP2 = np.array([float(i) for i in iPx[2].strip('\n').split(' ')[1:]]).reshape(3,4)

# instrincs of cams
K0 = iP0[:3,:3]
K2 = iP2[:3,:3]

# calculate real translation
K0_inv = np.linalg.inv(K0)
K2_inv = np.linalg.inv(K2)
T0 = K0_inv@(iP0[:3,3].reshape(3,1))
T2 = K2_inv@(iP2[:3,3].reshape(3,1))

# translation in x axis
print('cam2 to cam0 distance:{0} m'.format(T2[0,0]-T0[0,0]))
# cam2 to cam0 distance:0.05993857787245178 m
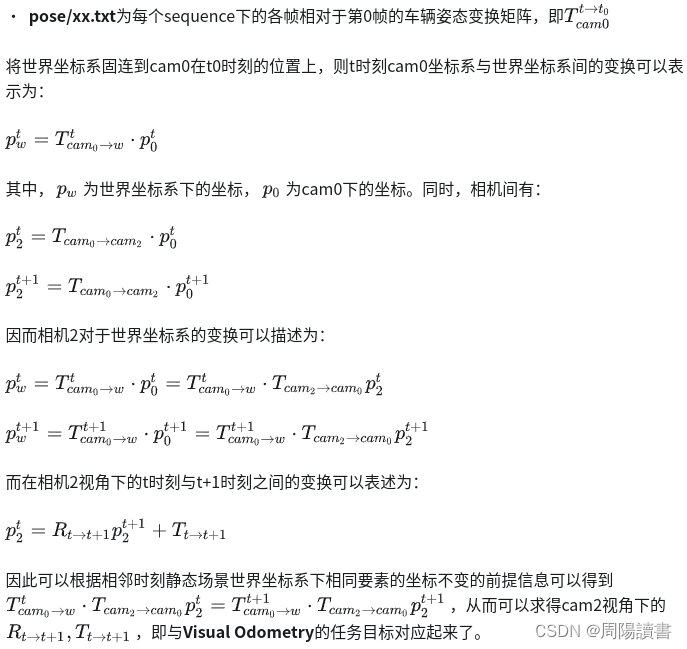
4.1.2 pose/xx.txt文件
4.2 KITTI数据集 激光雷达-图像坐标系转换关系
KITTI数据集中一共有几个坐标系:
- 激光雷达坐标系 (下图1中的蓝色坐标系)
- 相机坐标系 (下图1中的红色坐标系)
- IMU
- 车辆
KITTI数据集中的坐标转换牵扯到以下相关文件: lable_2、calib
lable_2是KITTI数据集的标注内容,给出示例:
Truck 0.00 0 -1.57 599.41 156.40 629.75 189.25 2.85 2.63 12.34 0.47 1.49 69.44 -1.56
Car 0.00 0 1.85 387.63 181.54 423.81 203.12 1.67 1.87 3.69 -16.53 2.39 58.49 1.57
Cyclist 0.00 3 -1.65 676.60 163.95 688.98 193.93 1.86 0.60 2.02 4.59 1.32 45.84 -1.55
DontCare -1 -1 -10 503.89 169.71 590.61 190.13 -1 -1 -1 -1000 -1000 -1000 -10
DontCare -1 -1 -10 511.35 174.96 527.81 187.45 -1 -1 -1 -1000 -1000 -1000 -10
DontCare -1 -1 -10 532.37 176.35 542.68 185.27 -1 -1 -1 -1000 -1000 -1000 -10
DontCare -1 -1 -10 559.62 175.83 575.40 183.15 -1 -1 -1 -1000 -1000 -1000 -10
对于标注文件的解释释义,包含了以下部分:
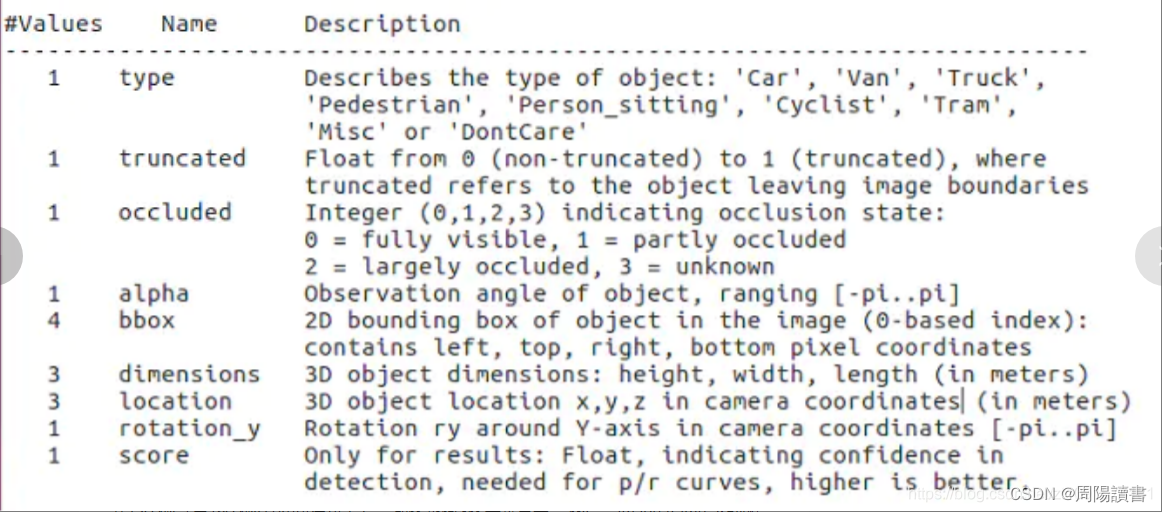
可以看出,标注文件中的location是按照 camera coordinates(相机坐标系)进行标注的,因此要想对KITTI数据集中的坐标进行转换时离不开calib文件。
calib文件内容示例如下:
P0: 7.070493000000e+02 0.000000000000e+00 6.040814000000e+02 0.000000000000e+00 0.000000000000e+00 7.070493000000e+02 1.805066000000e+02 0.000000000000e+00 0.000000000000e+00 0.000000000000e+00 1.000000000000e+00 0.000000000000e+00
P1: 7.070493000000e+02 0.000000000000e+00 6.040814000000e+02 -3.797842000000e+02 0.000000000000e+00 7.070493000000e+02 1.805066000000e+02 0.000000000000e+00 0.000000000000e+00 0.000000000000e+00 1.000000000000e+00 0.000000000000e+00
P2: 7.070493000000e+02 0.000000000000e+00 6.040814000000e+02 4.575831000000e+01 0.000000000000e+00 7.070493000000e+02 1.805066000000e+02 -3.454157000000e-01 0.000000000000e+00 0.000000000000e+00 1.000000000000e+00 4.981016000000e-03
P3: 7.070493000000e+02 0.000000000000e+00 6.040814000000e+02 -3.341081000000e+02 0.000000000000e+00 7.070493000000e+02 1.805066000000e+02 2.330660000000e+00 0.000000000000e+00 0.000000000000e+00 1.000000000000e+00 3.201153000000e-03
R0_rect: 9.999128000000e-01 1.009263000000e-02 -8.511932000000e-03 -1.012729000000e-02 9.999406000000e-01 -4.037671000000e-03 8.470675000000e-03 4.123522000000e-03 9.999556000000e-01
Tr_velo_to_cam: 6.927964000000e-03 -9.999722000000e-01 -2.757829000000e-03 -2.457729000000e-02 -1.162982000000e-03 2.749836000000e-03 -9.999955000000e-01 -6.127237000000e-02 9.999753000000e-01 6.931141000000e-03 -1.143899000000e-03 -3.321029000000e-01
Tr_imu_to_velo: 9.999976000000e-01 7.553071000000e-04 -2.035826000000e-03 -8.086759000000e-01 -7.854027000000e-04 9.998898000000e-01 -1.482298000000e-02 3.195559000000e-01 2.024406000000e-03 1.482454000000e-02 9.998881000000e-01 -7.997231000000e-01
P0、P1、P2、P3是KITTI采集工具中的三个相机对应的参数,共计12个数字,reshape为(3,4)
R0_rect:9个数字,reshape为(3,3),补0扩展为(4,4),右下角元素置位 1
Tr_velo_to_cam:12个数字,reshape为(3,4),补0扩展为(4,4),右下角置位 1
坐标转换关系如下:
设 y为 激光雷达坐标写下的点 (x,y,z,r)
Tr_velo_to_cam * y : 把激光雷达坐标系下的点y投影到相机坐标系
R0_rect * Tr_velo_to_cam * y: 将激光雷达坐标系下的点投影到编号为0的相机坐标系,结果为(x,y,z,1),直接取前三个为投影结果,当计算出z<0的时候表明该点在相机的后面
P2 * R0_rect * Tr_velo_to_cam * y:将激光雷达坐标系下的点投影到编号为2的相机采集的图像坐标系中,结果形式为(u,v,w)。 Ps:u,w需要除以w后取整才是最终的像素。
投影前的3D BBox共计有8个点,投影到图像坐标中也会有8个点,选取八个点中最大值最小值组成 (x1,y1,x2,y2)就是最终的2D BBox
转换代码参考如下:
def velodyne2img(calib_dir, img_id, velo_box):
    """
    :param calib_dir: calib文件的地址
    :param img_id: 要转化的图像id
    :param velo_box: (n,8,4),要转化的velodyne frame下的坐标,n个3D框,每个框的8个顶点,每个点的坐标(x,y,z,1)
    :return: (n,4),转化到 image frame 后的 2D框 的 x1y1x2y2
    """
    # 读取转换矩阵
    calib_txt=os.path.join(calib_dir, img_id) + '.txt'
    calib_lines = [line.rstrip('\n') for line in open(calib_txt, 'r')]
    for calib_line in calib_lines:
        if 'P2' in calib_line:
            P2=calib_line.split(' ')[1:]
            P2=np.array(P2, dtype='float').reshape(3,4)
        elif 'R0_rect' in calib_line:
            R0_rect=np.zeros((4,4))
            R0=calib_line.split(' ')[1:]
            R0 = np.array(R0, dtype='float').reshape(3, 3)
            R0_rect[:3,:3]=R0
            R0_rect[-1,-1]=1
        elif 'velo_to_cam' in calib_line:
            velo_to_cam = np.zeros((4, 4))
            velo2cam=calib_line.split(' ')[1:]
            velo2cam = np.array(velo2cam, dtype='float').reshape(3, 4)
            velo_to_cam[:3,:]=velo2cam
            velo_to_cam[-1,-1]=1

    tran_mat=P2.dot(R0_rect).dot(velo_to_cam)  # 3x4

    velo_box=velo_box.reshape(-1,4).T
    img_box = np.dot(tran_mat, velo_box).T
    img_box=img_box.reshape(-1,8,3)

    img_box[:,:,0]=img_box[:,:,0]/img_box[:,:,2]
    img_box[:, :, 1] = img_box[:, :, 1] / img_box[:, :, 2]
    img_box=img_box[:,:,:2]   # (n,8,2)

    x1y1=np.min(img_box,axis=1)
    x2y2 = np.max(img_box, axis=1)
    result =np.hstack((x1y1,x2y2))   #(n,4)

    return result
5.kitti数据集拼接点云
在 KITTI 数据集中利用车辆位姿真值拼接 pcd 点云并滤波,得到一个准确的点云地图
C++代码如下:
#include "stdlib.h"
#include <unistd.h>
#include <pcl/visualization/cloud_viewer.h>
#include <pcl/common/transforms.h>
#include <pcl/common/projection_matrix.h>

#include <pcl/point_cloud.h>

#include <pcl/filters/voxel_grid.h>
#include <pcl/filters/statistical_outlier_removal.h>

#include <pcl/point_types.h>
#include <pcl/io/pcd_io.h>
#include <fstream>
#include <cassert>
#include <string>
#include <iostream>
#include <sys/types.h>
#include <dirent.h>
#include <vector>
#include <string.h>
using namespace std;

// ubuntu 系统下读取指定目录下的所有文件名及其绝对路径
void GetFileNames(string path,vector<string>& filenames)
{
    DIR *pDir;
    struct dirent* ptr;
    if(!(pDir = opendir(path.c_str())))
        return;
    while((ptr = readdir(pDir))!=0) {
        if (strcmp(ptr->d_name, ".") != 0 && strcmp(ptr->d_name, "..") != 0)
            filenames.push_back(path + "/" + ptr->d_name);
    }
    closedir(pDir);
}

int main()
{

    pcl::PointCloud<pcl::PointXYZRGB>::Ptr allcloud (new pcl::PointCloud<pcl::PointXYZRGB>); // 创建点云(指针)

    pcl::visualization::CloudViewer viewer("viewer");  // 用来显示拼接后的点云
    vector<Eigen::Isometry3d> Trans = {Eigen::Isometry3d::Identity()};
    Eigen::Isometry3d T12 = Eigen::Isometry3d::Identity();
    /*T12(0,0) = 1  ;T12(0,1) = 0  ;T12(0,2) = 0  ;
    T12(1,0) = 0  ;T12(1,1) = 0  ;T12(1,2) = -1 ;
    T12(2,0) = 0  ;T12(2,1) = 1   ;T12(2,2) = 0  ;*/
    Eigen::Isometry3d T_out = Eigen::Isometry3d::Identity();
    //从激光到相机坐标系的外参,从 KITTI 的 Odometry 数据集中的 calib 文件夹下的 sequence_01 序列得到
    T_out(0,0)= 4.2e-04  ;T_out(0,1) =  -9.99e-01  ;T_out(0,2) = -8.08e-03  ;T_out(0,3) = -1.198e-02  ;
    T_out(1,0) = -7.21e-03  ;T_out(1,1) = 8.08e-03  ;T_out(1,2) = -9.999e-01;  T_out(1,3) = -5.40e-02  ;
    T_out(2,0) = 9.9997e-01  ;T_out(2,1) =4.8594e-04 ;T_out(2,2) = -7.20e-03 ;T_out(2,3) = -2.92e-01;

    cout<<"T12 = "<<T12.matrix()<<endl;
    //读取GroundTruth文件(车辆位姿真值文件),在 KITTI 的 Odometry 数据集中的 poses 文件夹内得到,和 01 序列对应
    ifstream fin("/home/clzx/ZhangYong/01.txt");

    vector<string> filename;
    string path = "/home/clzx/ZhangYong/rgbd";  // 存放待拼接的 pcd 点云文件的目录
    GetFileNames(path, filename);

    string feature;
    float feat_onepoint;
    vector<float>lines;
    for(int i = 0; i < filename.size(); i++)
    {
        pcl::PointCloud<pcl::PointXYZRGB>::Ptr pointcloud(new pcl::PointCloud<pcl::PointXYZRGB>);
        pcl::PointCloud<pcl::PointXYZRGB>::Ptr downcloud (new pcl::PointCloud<pcl::PointXYZRGB>);
        pcl::PointCloud<pcl::PointXYZRGB>::Ptr outcloud (new pcl::PointCloud<pcl::PointXYZRGB>);
        Eigen::Isometry3d transformation = Eigen::Isometry3d::Identity();
        Eigen::Isometry3d transformation2 = Eigen::Isometry3d::Identity();
        getline(fin,feature); //一次读取一行数据
        stringstream stringin(feature); //使用串流实现对string的输入输出操作
        lines.clear();
        while(stringin >> feat_onepoint) //按空格一次读取一个数据存入feat_onePoint
            lines.push_back(feat_onepoint); //存储每行按空格分开的数据
        //cout<<"lines = "<<lines[0]<<endl;
        for(int m=0;m<3;m++)
            for(int n=0;n<4;n++)
                transformation(m,n) = lines[m*4+n];
        cout<<"第"<<i<<"帧"<<endl;
        //cout<<" 原来的transformation = "<<transformation.matrix()<<endl;

		// 因为我的点云文件已经转换到了参考相机(00 相机)坐标系下,所以不需要再乘以 T_out(从激光坐标系到参考相机(00 相机)坐标系的外参)了,如果没有转换的则要乘以外参。
        //transformation2 = transformation*T_out;
        transformation2 = transformation;

        //cout<<" 转换后的transformation = "<<transformation2.matrix()<<endl;
        pcl::io::loadPCDFile<pcl::PointXYZRGB> (filename[i], *pointcloud);
        pcl::transformPointCloud( *pointcloud, *outcloud, transformation2.matrix() );
        //体素滤波
        pcl::VoxelGrid<pcl::PointXYZRGB> downSampled;  //创建滤波对象
        downSampled.setInputCloud (outcloud);            //设置需要过滤的点云给滤波对象
        downSampled.setLeafSize (0.2f,0.2f, 0.2f);  //设置滤波时创建的体素体积为1cm的立方体,三个参数表示体素栅格叶大小,分别表示体素在XYZ方向的尺寸
        downSampled.setDownsampleAllData(true); //设置是否对所有的字段进行下采样
        downSampled.filter (*downcloud);           //执行滤波处理,存储输出

        *allcloud = *allcloud + *downcloud;

        viewer.showCloud(allcloud);  // 刷新显示点云
    }
    pcl::io::savePCDFile("/home/clzx/ZhangYong/result.pcd", *allcloud); //拼接后的pcd文件保存目录
    cout<<"Final result saved."<<endl;
    while( !viewer.wasStopped() )
    {

    }
}
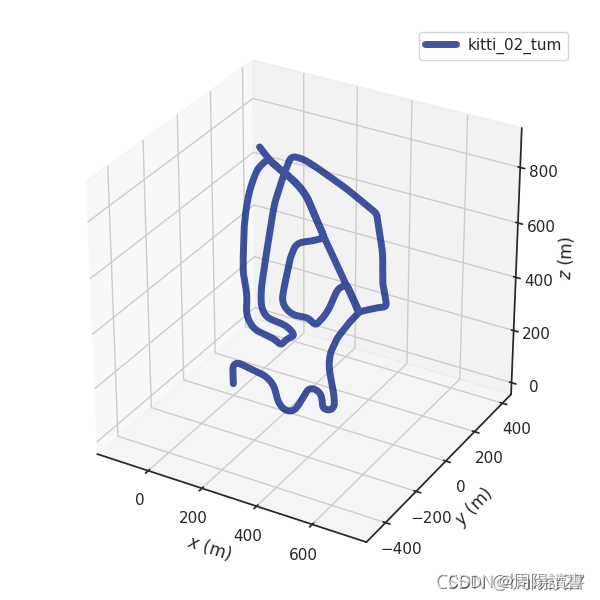
6.KITTI数据集基准、转换成tum以及十个groundtruth对应图
KITTI数据集基准、转换成tum以及十个groundtruth对应图
6.1 时间戳
时间戳的位置
gt的位置
利用evo进行转换
python2 kitti_poses_and_timestamps_to_trajectory.py 10.txt times10.txt kitti_10_tum.txt
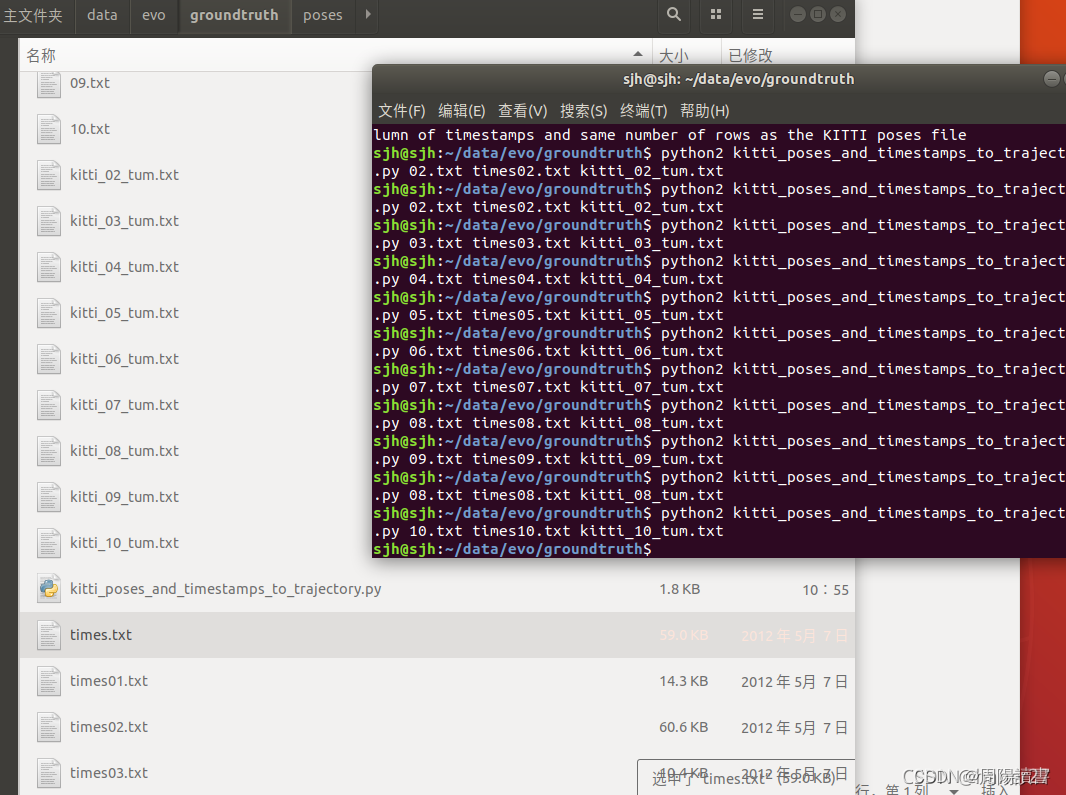
生成kitti基准带时间的tum格式
7.KITTI数据真值处理
KITTI数据真值处理
1:KITTI数据odometry数据提供真值包含两个文件夹
data_odometry_calib
data_odometry_poses
其中一个是位姿,一个是相对应的时间和校准参数,将对应的00.txt 与times.txt放入evo文件夹内:
使用指令将12列的kitti轨迹格式真值转换成8列格式的tum轨迹格式
python kitti_poses_and_timestamps_to_trajectory.py 00.txt times.txt kitti_00_gt.txt
转换得到tum格式的真值后,我们可以进行评定,将我们得到的vio_GPS_global.txt 与这里的真值进行对比
evo_rpe tum kitti.txt kitti_00_gt.txt -a -p


 5万+
5万+

 被折叠的 条评论
为什么被折叠?
被折叠的 条评论
为什么被折叠?
 到【灌水乐园】发言


