


The final goal of every deep learning project is to bring value to the product. Of course, we want to have the best possible model. What is “best” — depends on the particular use case, and I will leave this discussion aside from this post. I want to talk about how to get the maximum from your train.py script.
每个深度学习项目的最终目标是为产品带来价值。 当然,我们希望拥有最好的模型。 什么是“最佳”-取决于特定的用例,在本文中,我将不做任何讨论。 我想谈谈如何从train.py脚本中获得最大收益 。
在这篇文章中,我们将介绍以下技巧: (In this post we’re going to cover the following tips:)
- High-level frameworks instead own-made train loops 高层框架代替自制火车循环
- Monitor progress of the training with additional metrics 使用其他指标监控培训进度
- Use TensorBoard 使用TensorBoard
- Visualize predictions of the model 可视化模型的预测
- Use Dict as return value for Dataset and Model 使用Dict作为数据集和模型的返回值
- Detect anomalies and address numerical instabilities 检测异常并解决数值不稳定性
Disclaimer: In the next section, I will include a few source-code listings. Most of them are tailored for the Catalyst framework (version 20.08) and available in pytorch-toolbelt.
免责声明 :在下一节中,我将包括一些源代码清单。 其中大多数是针对Catalyst框架(版本20.08)量身定制的,可在pytorch-toolbelt中使用 。
不要重新发明轮子 (Don’t re-invent the wheel)
Advice 1 — Leverage high-level training frameworks from PyTorch ecosystem
建议1 —利用PyTorch生态系统的高级培训框架
PyTorch offers excellent flexibility and freedom in writing your training loop from scratch. In theory, this opens an endless possibility to write any training logic. In practice, you rarely will write exotic training loops for training CycleGAN, distilling BERT, or implementing 3D object detection from scratch.
PyTorch在从头开始编写训练循环时提供了出色的灵活性和自由度。 从理论上讲,这为编写任何训练逻辑提供了无限可能。 实际上,您很少会编写奇特的训练循环来训练CycleGAN,提取BERT或从头开始实现3D对象检测。
Writing a full training loop from scratch is an excellent way to learn the fundamentals of PyTorch. Yet I highly recommend switching into high-level frameworks once you get some grasp. There are plenty of options: Catalyst, PyTorch-Lightning, Fast.AI, Ignite, and others. High-level libraries save your time by:
从零开始编写完整的培训循环是学习PyTorch基础知识的绝佳方法。 但是,我强烈建议您掌握一些知识后再切换到高级框架。 有很多选项: Catalyst , PyTorch-Lightning , Fast.AI , Ignite 等 。 高级库通过以下方式节省您的时间:
- Offering well-tested training loops 提供经过测试的培训循环
- Support of the configuration files 支持配置文件
- Support for multi-GPU and distributed training 支持多GPU和分布式培训
- Management of checkpoints/experiments 管理检查点/实验
- Automatic logging of the training progress 自动记录培训进度
It takes some time to get the maximum from these high-level libraries. However, this one-time investment pays off in the long-run.
从这些高级库获取最大收益需要花费一些时间。 但是,从长远来看,这项一次性投资是有回报的。
Pros
优点
- The training pipeline becomes smaller — the less code — the less chance of bugs. 训练流水线变得更小-更少的代码-更少的错误机会。
- Easier experiment management. 简化实验管理。
- Simplified distributed and mixed-precision training 简化的分布式和混合精度训练
Cons
缺点
- Another abstraction level — as usual, when using a high-level framework, we have to write code within design principles and paradigms of that particular framework. 另一个抽象级别-通常,在使用高级框架时,我们必须在该特定框架的设计原理和范式内编写代码。
- Time investment — learning additional framework requires time. 时间投入-学习其他框架需要时间。
显示指标 (Show me the metrics)
Advice 2 — Look at additional metrics during the training
建议2-在培训期间查看其他指标
Nearly every quick-start example project for classifying images in MNIST or CIFAR and even ImageNet have one thing in common — they report a minimal set of metrics during and after the training. Most often, it’s Top-1 and Top-5 accuracy, error rate, train/validation losses, and that’s it. Although these metrics are essential, it’s just the tip of an iceberg!
几乎每个用于在MNIST或CIFAR甚至ImageNet中对图像进行分类的快速示例项目都有一个共同点-他们在培训期间和培训后报告的指标最少。 通常,它是Top-1和Top-5的准确性,错误率,训练/验证损失,仅此而已。 尽管这些指标很重要,但这只是冰山一角!
Modern image classification models have tens of millions of parameters. Do you want to evaluate it using only one scalar value?
现代图像分类模型具有数千万个参数。 您是否只使用一个标量值来评估它?
CNN classification model that has the best Top-1 accuracy may not be the best one in terms of generalization. Depending on your domain and requirements, you may want to save models with the lowest false-positive/false-negative rates or the one with the highest average precision.
就泛化而言,具有最佳Top-1准确性的CNN分类模型可能不是最佳模型。 根据您的域和要求,您可能要保存错误肯定/错误否定率最低的模型或平均精度最高的模型。
Let me give you some ideas, what data you can log during the training:
让我给您一些想法,您可以在培训期间记录哪些数据:
Grad-CAM heat-map — to see on what parts of the image make the most contribution to a particular class.
Grad-CAM热图 -查看图像的哪些部分对特定类别的贡献最大。

Confusion Matrix — shows you what pair of classes are the most challenging for your model.
混淆矩阵 -向您显示哪些类别的模型对您的模型最具挑战性。

Distribution of predictions — gives you insights on the optimal decision boundary.
预测的分布 -为您提供最佳决策边界的见解。

Minimum/Average/Maximum value of the gradients across all layers — allows identifying if there is a vanishing/exploding gradient in the model or poorly initialized layer.
所有图层上的渐变的最小值/平均值/最大值 -可以识别模型中或初始化不佳的图层中是否存在消失/爆炸的渐变。
使用仪表板工具监控培训 (Use dashboard tools to monitor the training)
Advice 3 — Use TensorBoard or any other solution to monitor progress of training
建议3-使用TensorBoard或任何其他解决方案来监视培训进度
Probably the last thing you want to do when training a model is to look at the console output. A powerful dashboard where you can see all the metrics all at once is a way more efficient way to check the results of the training.
训练模型时,您可能要做的最后一件事是查看控制台输出。 功能强大的仪表板可让您一次查看所有指标,这是一种更有效的方式来检查培训结果。

For small number experiments and non-distributed environments, TensorBoard is a gold standard. It’s fully supported in PyTorch since version 1.3 and provides a rich set of features to manage trials. There are more advanced cloud-based solutions like Weights&Biases, Alchemy, and TensorBoard.dev that makes it easier to monitor and compare training sessions over multiple machines.
对于少量实验和非分布式环境,TensorBoard是黄金标准。 自1.3版以来,PyTorch完全支持它,并提供了丰富的功能来管理试用。 还有更高级的基于云的解决方案,例如Weights& Biases , Alchemy和TensorBoard.dev ,它们使监视和比较多台机器上的培训课程变得更加容易。
When using Tensorboard, I typically log set of metrics:
使用Tensorboard时,我通常会记录一组指标:
- Learning rate & other optimizer parameters that may change (Momentum, weight decay, etc.) 学习率和其他可能改变的优化器参数(动量,体重下降等)
- Time spent in data preprocessing and inside the model 在数据预处理和模型内部花费的时间
- Losses across train & validation (for every batch and averaged per-epoch) 整个训练和验证过程中的损失(每批次和平均每个时期)
- Metrics across train & validation 跨培训和验证的指标
- Hyperparameters of the training session of final metric values 最终指标值培训课程的超参数
- Confusion matrices, Precision-Recall curve, AUC (If applicable) 混淆矩阵,精确调用曲线,AUC(如果适用)
- Visualization of the model predictions (If applicable) 可视化模型预测(如果适用)
一张图片胜过千言万语 (A picture is worth a thousand words)
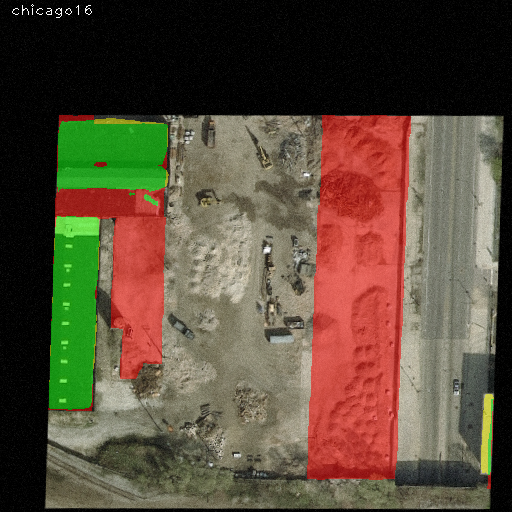
It’s super-important to look at the predictions of the model visually. Sometimes training data is noisy; sometimes, the model is over-fitting to artifacts of an image. By visualizing the best and worst batch (based on loss or your metric of interest), you can get valuable insight into cases where your models perform well and poorly.
直观地查看模型的预测非常重要。 有时训练数据比较嘈杂; 有时,模型过度适合图像的伪像。 通过可视化最佳和最差批次(基于损失或您的兴趣指标),您可以深入了解模型性能良好和不良的情况。
Advice 5 — Visualize best and worst batch every epoch. It may give you invaluable insights
建议5-可视化每个时期的最佳批次和最差批次。 它可以为您提供宝贵的见解
Tip for Catalyst users: Example of using visualization callback I here: https://github.com/BloodAxe/Catalyst-Inria-Segmentation-Example/blob/master/fit_predict.py#L258
Catalyst用户的提示 :我在此处使用可视化回调的示例: https : //github.com/BloodAxe/Catalyst-Inria-Segmentation-Example/blob/master/fit_predict.py#L258
For example, in the Global Wheat Detection challenge, we need to detect wheat heads on the image. By visualizing the pictures of the best batch (based on mAP metric), we see that model does a near-perfect job in finding small objects.
例如,在“ 全球小麦检测”挑战中,我们需要检测图像上的小麦头。 通过可视化最佳批次的图片(基于mAP度量标准),我们看到该模型在查找小物体方面做得非常接近。

In contrast, when we look at the first sample of the worst batch, we see that model struggles to make accurate predictions on large objects. The visual analysis gives an invaluable insight for any data-scientist.
相反,当我们查看最差批次的第一个样本时,我们发现模型难以对大型物体做出准确的预测。 可视化分析为任何数据科学家提供了宝贵的见解。

Looking at the worst batch also helps to spot errors in data labeling. Usually, samples with wrong labels with have a bigger loss and hence will emerge in the worst batch. By doing a visual check of the worst batch at each epoch, you can eliminate those mistakes:
查看最差的批次还有助于发现数据标记中的错误。 通常,带有错误标签的样品损失较大,因此会在最差的批次中出现。 通过在每个时期对最差的批次进行视觉检查,可以消除这些错误:
使用Dict作为数据集和模型的返回值 (Use Dict as return value for Dataset and Model)
Advice 4 — If your model returns more than one value — use
Dictto return the result. Don’t usetuple.建议4 –如果模型返回多个值,请使用
Dict返回结果。 不要使用tuple。
In complex models, it is not uncommon to return multiple outputs. For instance, object detection models usually return bounding boxes and their labels, in image segmentation CNN-s we often return intermediate masks for deep supervision, multi-task learning is also viral these days.
在复杂模型中,返回多个输出并不罕见。 例如,对象检测模型通常返回边界框及其标签,在图像分割CNN中,我们经常返回中间遮罩以进行深度监控,如今,多任务学习也非常流行。
In many open-source implementations, I see quite often something like:
在许多开源实现中,我经常看到类似以下内容的东西:
# Bad practice, don't return tuple
class RetinaNet(nn.Module):
  ...


  def forward(self, image):
    x = self.encoder(image)
    x = self.decoder(x)
    bboxes, scores = self.head(x)
    return bboxes, scores


  ...
With all the respect to authors, I claim this is a bad, very bad approach to return results from the model. Here’s what I recommend to use instead:
考虑到作者的所有方面,我认为这是从模型返回结果的一种非常糟糕的方法 。 建议您改用以下方法 :
class RetinaNet(nn.Module):
  RETINA_NET_OUTPUT_BBOXES = "bboxes"
  RETINA_NET_OUTPUT_SCORES = "scores"


  ...


  def forward(self, image):
    x = self.encoder(image)
    x = self.decoder(x)
    bboxes, scores = self.head(x)
    return { RETINA_NET_OUTPUT_BBOXES: bboxes,
             RETINA_NET_OUTPUT_SCORES: scores }


  ...
This advice somewhat resonate with postulate from “The Zen of Python” — “Explicit is better than implicit”. Following this rule will make your code much cleaner and easier to maintain.
该建议与“ Python的禅宗”的假设有点共鸣-“ 显式优于隐式” 。 遵循此规则将使您的代码更简洁,更易于维护。
So why I think the second option is better? For several reasons:
那么,为什么我认为第二种选择更好呢? 有几个原因:
- Return values have an explicit name associated with it. You don’t need to remember the exact order of elements in the tuple 返回值具有与之关联的显式名称。 您无需记住元组中元素的确切顺序
- If you need to access a specific element of the returned dictionary, you can do this by its name 如果您需要访问返回字典的特定元素,则可以按其名称进行操作
- Adding new outputs from the model does not break the code 从模型添加新输出不会破坏代码
With Dict you can even change the behavior of your model to return additional outputs on demand. For instance, here’s a short snippet demonstrating how to return multiple “main” outputs and two “auxiliary” outputs for metric learning:
使用Dict您甚至可以更改模型的行为以按需返回其他输出。 例如,这是一个简短的代码段,展示了如何返回多个“主”输出和两个“辅助”输出以进行度量学习:
# https://github.com/BloodAxe/Kaggle-2020-Alaska2/blob/master/alaska2/models/timm.py#L104


def forward(self, **kwargs):
  x = kwargs[self.input_key]
  x = self.rgb_bn(x)
  x = self.encoder.forward_features(x)
  embedding = self.pool(x)
  result = {
    OUTPUT_PRED_MODIFICATION_FLAG: self.flag_classifier(self.drop(embedding)),
    OUTPUT_PRED_MODIFICATION_TYPE: self.type_classifier(self.drop(embedding)),
  }
  if self.need_embedding:
    result[OUTPUT_PRED_EMBEDDING] = embedding
  if self.arc_margin is not None:
    result[OUTPUT_PRED_EMBEDDING_ARC_MARGIN] = self.arc_margin(embedding)


  return result
The same advice applies to Dataset class. For the Cifar-10 toy example, it is ok to return the image and its corresponding label as a tuple. But when dealing with multi-task or multi-input models, you want to return samples from your dataset as Dict type:
相同的建议适用于Dataset类。 对于Cifar-10玩具示例,可以将图像及其相应的标签作为元组返回。 但是在处理多任务或多输入模型时,您希望将数据集中的样本作为Dict类型返回:
# https://github.com/BloodAxe/Kaggle-2020-Alaska2/blob/master/alaska2/dataset.py#L373
class TrainingValidationDataset(Dataset):
    def __init__(
        self,
        images: Union[List, np.ndarray],
        targets: Optional[Union[List, np.ndarray]],
        quality: Union[List, np.ndarray],
        bits: Optional[Union[List, np.ndarray]],
        transform: Union[A.Compose, A.BasicTransform],
        features: List[str],
    ):
        """
        :param obliterate - Augmentation that destroys embedding.
        """
        if targets is not None:
            if len(images) != len(targets):
                raise ValueError(f"Size of images and targets does not match: {len(images)} {len(targets)}")


        self.images = images
        self.targets = targets
        self.transform = transform
        self.features = features
        self.quality = quality
        self.bits = bits


    def __len__(self):
        return len(self.images)


    def __repr__(self):
        return f"TrainingValidationDataset(len={len(self)}, targets_hist={np.bincount(self.targets)}, qf={np.bincount(self.quality)}, features={self.features})"


    def __getitem__(self, index):
        image_fname = self.images[index]
        try:
            image = cv2.imread(image_fname)
            if image is None:
                raise FileNotFoundError(image_fname)
        except Exception as e:
            print("Cannot read image ", image_fname, "at index", index)
            print(e)


        qf = self.quality[index]
        data = {}
        data["image"] = image
        data.update(compute_features(image, image_fname, self.features))


        data = self.transform(**data)


        sample = {INPUT_IMAGE_ID_KEY: os.path.basename(self.images[index]), INPUT_IMAGE_QF_KEY: int(qf)}


        if self.bits is not None:
            # OK
            sample[INPUT_TRUE_PAYLOAD_BITS] = torch.tensor(self.bits[index], dtype=torch.float32)


        if self.targets is not None:
            target = int(self.targets[index])
            sample[INPUT_TRUE_MODIFICATION_TYPE] = target
            sample[INPUT_TRUE_MODIFICATION_FLAG] = torch.tensor([target > 0]).float()


        for key, value in data.items():
            if key in self.features:
                sample[key] = tensor_from_rgb_image(value)


        return sample
When you have Dictionaries in your code, you can reference input/outputs with name constants everywhere. Following this rule will make your training pipeline very clear and easy to follow:
当您的代码中包含字典时,您可以在任何地方使用名称常量引用输入/输出。 遵循此规则将使您的培训流程非常清晰并易于遵循:
# https://github.com/BloodAxe/Kaggle-2020-Alaska2


callbacks += [
  CriterionCallback(
    input_key=INPUT_TRUE_MODIFICATION_FLAG,
    output_key=OUTPUT_PRED_MODIFICATION_FLAG,
    criterion_key="bce"
  ),
  CriterionCallback(
    input_key=INPUT_TRUE_MODIFICATION_TYPE,
    output_key=OUTPUT_PRED_MODIFICATION_TYPE,
    criterion_key="ce"
  ),
  CompetitionMetricCallback(
    input_key=INPUT_TRUE_MODIFICATION_FLAG,
    output_key=OUTPUT_PRED_MODIFICATION_FLAG,
    prefix="auc",
    output_activation=binary_logits_to_probas,
    class_names=class_names,
  ),
  OutputDistributionCallback(
      input_key=INPUT_TRUE_MODIFICATION_FLAG,
      output_key=OUTPUT_PRED_MODIFICATION_FLAG,
      output_activation=binary_logits_to_probas,
      prefix="distribution/binary",
  ),
  BestMetricCheckpointCallback(
    target_metric="auc",
    target_metric_minimize=False,
    save_n_best=3),
]
在训练中检测异常 (Detecting anomalies in training)
Advice 5 — Use
torch.autograd.detect_anomaly()to find arithmetical anomalies during the training建议5 — 在培训期间 使用
torch.autograd.detect_anomaly()查找算术异常
If you see any NaNs or Inf in the loss/metrics during the training — an alarm should ring in your head. It is an indicator that something is wrong in your pipeline. Typically, it could be caused by:
如果在训练期间您在损耗/指标中看到任何NaN或Inf,则应该在您的头上响起警报。 这表明管道中有问题。 通常,它可能是由于:
- Bad initialization of your model or particular layers (You can always check which ones by looking at gradients magnitude) 模型或特定图层的初始化错误(您始终可以通过查看梯度大小来检查哪些图层)
Mathematically incorrect operation (
torch.sqrt()from a negative number,torch.log()of non-positive one, etc.)在数学上不正确的操作(
torch.sqrt()从一个负数,torch.log()非正之一等)Improper use of
torch.mean()andtorch.sum()reduction (Mean on zero-sized tensor will give nan, sum on large tensor can easily lead to overflow)torch.mean()和torch.sum()归约使用不当(零张量上的均值将给出nan,大张量上的总和很容易导致溢出)Using
x.sigmoid()in loss without care (If you need probabilities in a loss function, a better way would bex.sigmoid().clamp(eps,1-epsortorch.logsigmoid(x).exp()to prevent gradients from vanishing)在损失中使用
x.sigmoid()无需x.sigmoid()如果需要损失函数中的概率,更好的方法是x.sigmoid().clamp(eps,1-eps或torch.logsigmoid(x).exp()防止渐变消失)- Low epsilon value in Adam-like optimizers 类Adam优化器中的epsilon值低
- Not using dynamic loss scaling while training with fp16 使用fp16训练时不使用动态损耗缩放
To find the exact place in your code, where Nan/Inf appears for the first time, PyTorch offers an easy-to-use method torch.autograd.detect_anomaly():
为了找到代码中首次出现Nan / Inf的确切位置,PyTorch提供了一个易于使用的方法torch.autograd.detect_anomaly() :
import torch


def main():
    torch.autograd.detect_anomaly()
    ...
    # Rest of the training code


# OR
class MyNumericallyUnstableLoss(nn.Module):
  def forward(self, input, target):
    with torch.autograd.set_detect_anomaly(True):
       loss = input * target
       return loss
Use it for debugging purposes and disabled otherwise since anomaly detection brings computational overhead and slows down training loop at around 10–15%.
将其用于调试目的,否则将其禁用,因为异常检测会带来计算开销,并使训练循环的速度降低10-15%左右 。
结束 (The end)
Thanks for reading! I hope you enjoy it and found some take-away’s from this post. And what your tips & tricks you want to share? Please write in comments your know-hows, or if you’re interested in particular PyTorch-related topics — let me know too!
谢谢阅读! 我希望您喜欢它,并从这篇文章中找到了一些收获。 您想分享什么技巧? 请在评论中写下您的专业知识,或者如果您对与PyTorch相关的特定主题感兴趣–也请告诉我!
Eugene is a computer vision & machine learning engineer with more than ten years of experience in software development. Author of “Mastering OpenCV for practical computer-vision projects” book. Kaggle master. Member of Albumentations core team. Author of pytorch-toolbelt. OpenCV, PyTorch, and Catalyst contributor. https://www.linkedin.com/in/cvtalks/
Eugene是一位计算机视觉和机器学习工程师,在软件开发方面拥有十多年的经验。 《 精通OpenCV实用计算机视觉项目 》一书的作者。 Kaggle 大师 。 相册核心团队成员。 pytorch -toolbelt的作者。 OpenCV,PyTorch和Catalyst贡献者。 https://www.linkedin.com/in/cvtalks/
翻译自: https://towardsdatascience.com/efficient-pytorch-supercharging-training-pipeline-19a26265adae


 797
797


 被折叠的 条评论
为什么被折叠?
被折叠的 条评论
为什么被折叠?
 到【灌水乐园】发言


