


Apollo规划代码ros移植-动态障碍物处理(一)
工程代码看这篇:Apollo6.0规划代码ros移植-路径规划可跑工程分享。
关于动态障碍物的处理,目前我认为主要有三种反映:
(1)超车
(2)跟随(减速避让)
(3)停车
目前,在模拟障碍物时,我们提前生成障碍物的行使轨迹点。然后设置一定的速度让障碍物移动。目前通过sleep的方式控制车的移动速度,后面完善一下。还有,目前先学习Lattice规划对动态障碍物的处理。需要说明一下的事情,只能用Lattice采样规划,因为Lattice二次规划在代码里面只用static_obs_sl_boundaries_进行处理,说明只针对静态障碍物。
一.超车
从代码来看,Apollo在巡航模式的纵向轨迹采样后面接了障碍物的ST图采样:
//产生纵向轨迹,即速度规划
void Trajectory1dGenerator::GenerateLongitudinalTrajectoryBundle(const PlanningTarget &planning_target,
                                                                 Trajectory1DBundle *ptr_lon_trajectory_bundle) const
{
  // 巡航轨迹是无规则规划的,不考虑障碍物
  GenerateSpeedProfilesForCruising(planning_target.cruise_speed(), ptr_lon_trajectory_bundle); //巡航

  GenerateSpeedProfilesForPathTimeObstacles(ptr_lon_trajectory_bundle); //超车或者跟随前车

  if (planning_target.has_stop_point()) //停车
  {
    GenerateSpeedProfilesForStopping(planning_target.stop_point(), ptr_lon_trajectory_bundle);
  }
}
GenerateSpeedProfilesForPathTimeObstacles函数如下:
void Trajectory1dGenerator::GenerateSpeedProfilesForPathTimeObstacles(Trajectory1DBundle *ptr_lon_trajectory_bundle) const
{
  auto end_conditions = end_condition_sampler_.SampleLonEndConditionsForPathTimePoints();
  if (end_conditions.empty())
  {
    return;
  }
  GenerateTrajectory1DBundle<5>(init_lon_state_, end_conditions, ptr_lon_trajectory_bundle);
}
采样的时候分两种,即超车和跟随采样:
std::vector<SamplePoint> EndConditionSampler::QueryPathTimeObstacleSamplePoints() const
{
  std::vector<SamplePoint> sample_points;

  for (const auto &path_time_obstacle : ptr_path_time_graph_->GetPathTimeObstacles()) //遍历障碍物的ST信息
  {
    std::string obstacle_id = path_time_obstacle.id();
    QueryFollowPathTimePoints(obstacle_id, &sample_points);   //跟随采样
    QueryOvertakePathTimePoints(obstacle_id, &sample_points); //超车采样
  }
  return sample_points;
}
这里的处理我觉得很奇怪,那是要跟随呢还是超车呢,我在想是不是需要有一个决策,例如EM里面的STBoundary有下面的类型:
  enum class BoundaryType
  {
    UNKNOWN,
    STOP,
    FOLLOW,
    YIELD,
    OVERTAKE,
    KEEP_CLEAR,
  };
根据这些类型来决定如何采样才是清晰的思路。好的,先按照源码的结构来。
超车采样函数:
//超车采样
void EndConditionSampler::QueryOvertakePathTimePoints(const std::string &obstacle_id, std::vector<SamplePoint> *sample_points) const
{
  // 获取障碍物周围点的ST
  std::vector<STPoint> overtake_path_time_points =
      ptr_path_time_graph_->GetObstacleSurroundingPoints(
          obstacle_id, Config_.FLAGS_numerical_epsilon, Config_.FLAGS_time_min_density);
  //取点
  for (const auto &path_time_point : overtake_path_time_points)
  {
    double v = ptr_prediction_querier_->ProjectVelocityAlongReferenceLine(obstacle_id, path_time_point.s(), path_time_point.t());
    SamplePoint sample_point;
    sample_point.path_time_point = path_time_point;
    sample_point.path_time_point.set_s(path_time_point.s() + Config_.FLAGS_default_lon_buffer);
    sample_point.ref_v = v;
    sample_points->push_back(std::move(sample_point));
  }
}
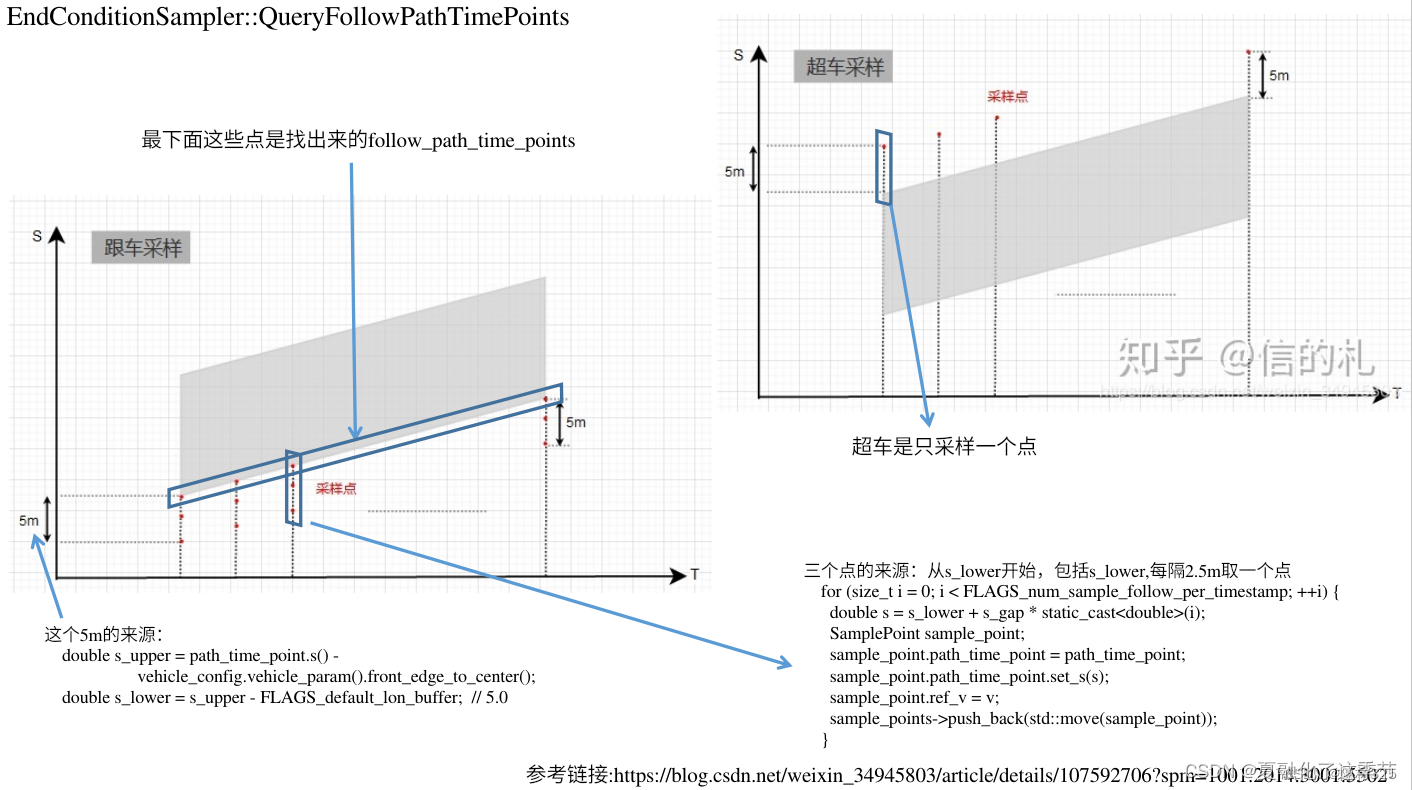
采样原理其实不难理解,就是在取ST图的上面的边界点,每个FLAGS_time_min_density取一个。接着求出映射参考线的速度。最后取边界点往上距FLAGS_default_lon_buffer的点。图可以看这个大佬的解析:
Apollo6.0代码Lattice算法详解——Part5: 生成横纵向轨迹,下面图片取自这位大佬。
二.跟随(减速避让)
这里的跟随和减速避让应该是有差别的,但是好像采样方式一样,采样原理看上面那个图。代码如下:
//跟车采样
void EndConditionSampler::QueryFollowPathTimePoints(const std::string &obstacle_id, std::vector<SamplePoint> *const sample_points) const
{
  // 获取障碍物周围点的ST
  std::vector<STPoint> follow_path_time_points =
      ptr_path_time_graph_->GetObstacleSurroundingPoints(obstacle_id, -Config_.FLAGS_numerical_epsilon, Config_.FLAGS_time_min_density);

  // for循环遍历ST下边界点
  for (const auto &path_time_point : follow_path_time_points)
  {
    // 沿参考线速度投影,求出障碍物的速度在参考线方向的分量
    double v = ptr_prediction_querier_->ProjectVelocityAlongReferenceLine(
        obstacle_id, path_time_point.s(), path_time_point.t());

    // Generate candidate s
    double s_upper = path_time_point.s() - Config_.front_edge_to_center;
    double s_lower = s_upper - Config_.FLAGS_default_lon_buffer;
    // CHECK_GE(FLAGS_num_sample_follow_per_timestamp, 2);

    double s_gap = Config_.FLAGS_default_lon_buffer /
                   static_cast<double>(Config_.FLAGS_num_sample_follow_per_timestamp - 1);

    // 三个点,从s_lower开始,包括s_lower,每隔 s_gap m取一个点
    for (size_t i = 0; i < Config_.FLAGS_num_sample_follow_per_timestamp; ++i)
    {
      double s = s_lower + s_gap * static_cast<double>(i);
      SamplePoint sample_point;
      sample_point.path_time_point = path_time_point;
      sample_point.path_time_point.set_s(s);
      sample_point.ref_v = v;
      sample_points->push_back(std::move(sample_point));
    }
  }
}
三.停车
停车简单,距离障碍物很近自动停下,注意这里停车,不是指停车规划(停到目标位置),而是一种行使反映。
四.动态障碍物预测
以下是我仿照的预测轨迹。通过设定预测时间,可以求出预测轨迹的每个轨迹点的参数。
//产生pre_timepre_time秒的预测
prediction::Ob_Trajectory Obstacle_avoid::Generater_Trajectory(geometry_msgs::Pose ob_pos, double pre_time, double obstacle_threa, double obstacle_velocity)
{
  prediction::Ob_Trajectory result;
  std::vector<TrajectoryPoint> Trajectories;
  Eigen::MatrixXd ob_points;
  ob_points = Eigen::MatrixXd::Zero(2, 3); //初始化零矩阵
  ob_points(0, 0) = ob_pos.position.x;
  ob_points(0, 1) = ob_pos.position.y;
  ob_points(0, 2) = 0;

  ob_points(1, 0) = ob_pos.position.x + pre_time * cos(obstacle_threa);
  ob_points(1, 1) = ob_pos.position.y + pre_time * sin(obstacle_threa);
  ob_points(1, 2) = 0;

  Eigen::MatrixXd path_point_after_interpolation;
  average_interpolation(ob_points, path_point_after_interpolation, pre_time); //线性插值

  double s = 0.0;
  double prev_x = 0.0;
  double prev_y = 0.0;
  double relative_time = 0.0;
  bool empty_path = true;
  std::vector<double> headings;
  std::vector<double> kappas;
  std::vector<double> dkappas;
  std::vector<double> accumulated_s;
  std::vector<std::pair<double, double>> xy_points;

  for (size_t i = 0; i < path_point_after_interpolation.rows(); i++)
  {
    xy_points.emplace_back(path_point_after_interpolation(i, 0), path_point_after_interpolation(i, 1));
  }

  if (!PathMatcher::ComputePathProfile(xy_points, &headings, &accumulated_s, &kappas, &dkappas))
  {
    ROS_WARN("obstacle prediction trajectory generate failed!");
  }
  // std::cout << "path_point_after_interpolation.rows():" << path_point_after_interpolation.rows() << "\n";

  for (int i = 0; i < path_point_after_interpolation.rows(); i++)//遍历每个预测轨迹点
  {
    TrajectoryPoint tra_;
    tra_.set_x(path_point_after_interpolation(i, 0)); // x
    tra_.set_y(path_point_after_interpolation(i, 1)); // y
    tra_.set_theta(headings[i]);
    tra_.set_v(obstacle_velocity); //假设未来匀速
    tra_.set_a(0);                 //匀速,那么a=0
    tra_.set_kappa(kappas[i]);
    tra_.set_dkappa(dkappas[i]);
    tra_.set_s(accumulated_s[i]);

    tra_.set_relative_time(relative_time);

    Trajectories.push_back(tra_);

    relative_time += Config_.FLAGS_trajectory_time_resolution;
  }

  result.Set_Trajectory(Trajectories);
  return result;
}
可看课程系列:
https://www.bilibili.com/video/BV1j94y1B7Ai/?buvid=XY4BB7D48AA71766FB7E422428AB2162768E4&is_story_h5=false&mid=vLcmcVJZwLVM5M3cErNrKw%3D%3D&plat_id=240&share_from=ugc&share_medium=android&share_plat=android&share_source=QQ&share_tag=s_i×tamp=1689339850&unique_k=CP6TAse&up_id=300556577
需要代码可私信。


 2119
2119


 被折叠的 条评论
为什么被折叠?
被折叠的 条评论
为什么被折叠?
 到【灌水乐园】发言


