


LK光流
问题1:光流文献综述
问题2:forward-addtive Gauss-Newton 光流的实现
从最小二乘角度来看,每个像素的误差怎么定义?
像素的误差指的是匹配像素的差值
误差相对于自变量的导数如何定义?
利用导数的定义求解图像对坐标的导数 ( i m g ( i , j + 1 ) − i m g ( i , j − 1 ) ) / 2 (img(i,j+1)-img(i,j-1))/2 (img(i,j+1)−img(i,j−1))/2
主要思想
- 利用导数的定义求解图像对坐标的导数 ( i m g ( i , j + 1 ) − i m g ( i , j − 1 ) ) / 2 (img(i,j+1)-img(i,j-1))/2 (img(i,j+1)−img(i,j−1))/2
核心源代码
// compute cost and jacobian
for (int x = -half_patch_size; x < half_patch_size; x++)
    for (int y = -half_patch_size; y < half_patch_size; y++) {

        // TODO START YOUR CODE HERE (~8 lines)
        double error = 0;
        Eigen::Vector2d J;  // Jacobian
        int step = 1;
        if (inverse == false) {
            // Forward Jacobian

            double xCalc = kp.pt.x + dx + x;
            double yCalc = kp.pt.y + dy + y;
            double xCalcNext, xCalcBack;
            double yCalcNext, yCaleBack;
            xCalcNext = xCalc + step;
            xCalcBack = xCalc - step;
            yCalcNext = yCalc + step;
            yCaleBack = yCalc - step;

            J[0] = -(GetPixelValue(img2, xCalcNext, yCalc) - GetPixelValue(img2, xCalcBack, yCalc))/(xCalcNext  - xCalcBack);
            J[1] = -(GetPixelValue(img2, xCalc, yCalcNext) - GetPixelValue(img2, xCalc, yCaleBack))/(yCalcNext  - yCaleBack);
            error = GetPixelValue(img1, kp.pt.x + x, kp.pt.y + y) - GetPixelValue(img2, xCalc, yCalc);
        }
    }
}

//计算H和b
H += J * J.transpose();
b += -J * error;
cost += error;

//计算增量
Eigen::Vector2d update;
update = H.llt().solve(b);
CMAKE
find_package(Eigen3 REQUIRED)
include_directories(${EIGEN3_INCLUDE_DIR})

find_package(OpenCV REQUIRED)
include_directories(${OpenCV_INCLUDE_DIRS})

find_package(Sophus REQUIRED)
include_directories(${Sophus_INCLUDE_DIR})

find_package(Pangolin REQUIRED)
include_directories(${Pangolin_INCLUDE_DIRS})

add_executable(optical_flow optical_flow.cpp)
target_link_libraries(optical_flow ${OpenCV_LIBRARIES} )

add_executable(direct_method direct_method.cpp)
target_link_libraries(direct_method ${OpenCV_LIBRARIES} )
target_link_libraries(direct_method ${Pangolin_LIBRARIES})

add_executable(disparty disparty.cpp)
target_link_libraries(disparty ${OpenCV_LIBRARIES} )
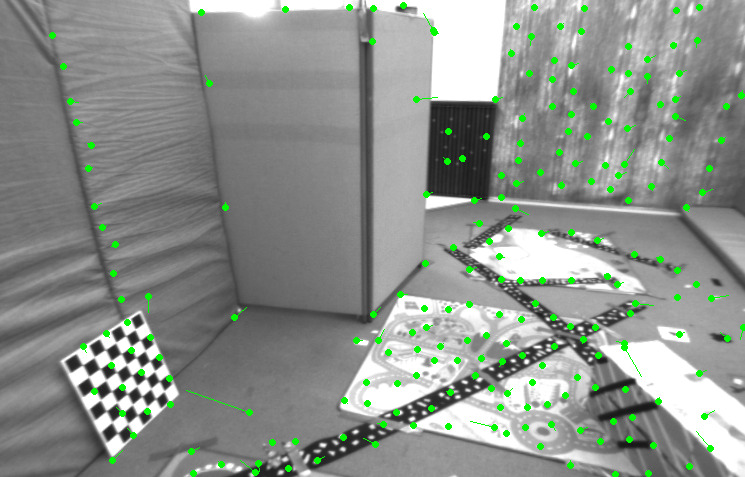
运行结果
问题3:反向法
主要思想
- 计算原图中的梯度,替换到待优化坐标处的梯度
核心源代码
// Inverse Jacobian
double xCalc = kp.pt.x + x;
double yCalc = kp.pt.y + y;
double xCalcNext, xCalcBack;
double yCalcNext, yCalcBack;
xCalcNext = xCalc + step;
xCalcBack = xCalc - step;
yCalcNext = yCalc + step;
yCalcBack = yCalc - step;

J[0] = -(GetPixelValue(img1, xCalcNext, yCalc) - GetPixelValue(img1, xCalcBack, yCalc))/(xCalcNext  - xCalcBack);
J[1] = -(GetPixelValue(img1, xCalc, yCalcNext) - GetPixelValue(img1, xCalc, yCalcBack))/(yCalcNext  - yCalcBack);
error = GetPixelValue(img1, kp.pt.x + x, kp.pt.y + y) - GetPixelValue(img2, kp.pt.x + x + dx, kp.pt.y + y + dy);
运行结果
问题4:推广至金字塔
所谓 coarse-to-fine 是指怎样的过程
先从低分辨率的图中找到最优位置,随后上升到一个比较高的分辨率,继续寻优,直到原分辨率
光流法中的金字塔用途和特征点法中的金字塔有何差别
特征点法中的金字塔主要是为了增加对图片尺度的鲁棒性,而光流法中的金字塔是为了避免优化过程中的局部最优
主要思想
- 通过OpenCV resize函数变换图像的尺度
- 由低分辨率的开始,根据光度一致性对patch进行优化,并逐步提高分辨率,每提高一次分辨率,特征点的坐标要乘2
核心源代码
// create pyramids
vector<Mat> pyr1, pyr2; // image pyramids
// TODO START YOUR CODE HERE (~8 lines)
// 建立图像金字塔
cv::Mat leftTemp = img1.clone();
cv::Mat rightTemp = img2.clone();
float scale = 2;
for (int i = 0; i < pyramids; i++) {
    pyr1.push_back(leftTemp);
    pyr2.push_back(rightTemp);
    cv::resize(leftTemp, leftTemp, cv::Size(leftTemp.cols/2, leftTemp.rows/2));
    cv::resize(rightTemp, rightTemp, cv::Size(rightTemp.cols/2, rightTemp.rows/2));
    scale = scale/2;
}
// TODO END YOUR CODE HERE

// coarse-to-fine LK tracking in pyramids
// TODO START YOUR CODE HERE
vector<KeyPoint> tempkp1;
vector<KeyPoint> tempkp2;

//将特征点尺寸同步缩放到低分辨率下
for(int i = 0; i < kp1.size(); i++)
{
    cv::KeyPoint temp = kp1[i];
    temp.pt.x *= scale;
    temp.pt.y *= scale;
    tempkp1.push_back(temp);
}
for(int i = 0; i < kp2.size(); i++)
{
    cv::KeyPoint temp = kp2[i];
    temp.pt.x *= scale;
    temp.pt.y *= scale;
    tempkp2.push_back(temp);
}

// 由低分辨率向高分辨率逐步寻找最优patch
for(int i = pyramids - 1; i >= 0; i--)
{
    cout << "pyramids = " << i << endl;
    cv::Mat tempImg1 = pyr1[i];
    cv::Mat tempImg2 = pyr2[i];
    OpticalFlowSingleLevel(tempImg1, tempImg2, tempkp1, tempkp2, success, inverse);
    if(i == 0)
        break;
    for(int i = 0; i < tempkp1.size(); i++)
    {
        KeyPoint temp = tempkp1[i];
        temp.pt.x *= 2;
        temp.pt.y *= 2;
        tempkp1[i] = temp;

        temp = tempkp2[i];
        temp.pt.x *= 2;
        temp.pt.y *= 2;
        tempkp2[i] = temp;
    }
}

kp2.resize(tempkp2.size());
for(int i = 0; i < tempkp2.size(); i++)
{
    kp2[i] = tempkp2[i];
}
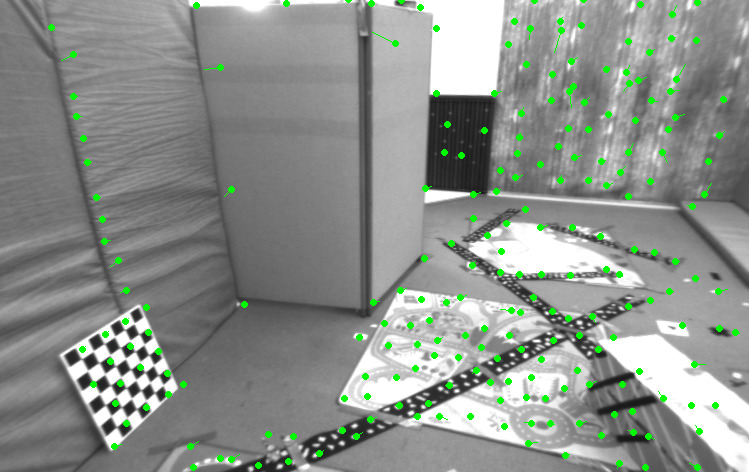
运行结果

直接法
问题1:单层直接法
该问题中的误差项是什么
参考图像像素点和被投影到的零一章图像中位置的光度(像素值)之差
误差相对于自变量的雅可比维度是多少?如何求解?
自变量为SE(3)李代数形式,因此是1*6的矩阵,可通过链式法则求解,光度差对像素坐标的导数->像素坐标对TP的导数->TP对左扰动的导数。
核心源代码
// Define Hessian and bias
Matrix6d H = Matrix6d::Zero();  // 6x6 Hessian
Vector6d b = Vector6d::Zero();  // 6x1 bias

for (size_t i = 0; i < px_ref.size(); i++) {

    // compute the projection in the second image
    // TODO START YOUR CODE HERE
    Eigen::Vector3d p;
    p[0] = (px_ref[i][0] - cx)/fx*depth_ref[i];
    p[1] = (px_ref[i][1] - cy)/fy*depth_ref[i];
    p[2] = depth_ref[i];
    p = T21*p;
    float u =0, v = 0;
    u = p[0]*fx/p[2]+cx;
    v = p[1]*fy/p[2]+cy;
    if(u - half_patch_size < 0 || v - half_patch_size < 0 || u + half_patch_size >= img2.cols || v + half_patch_size >= img2.rows)
        continue;
    nGood++;
    goodProjection.push_back(Eigen::Vector2d(u, v));


    // and compute error and jacobian
    for (int x = -half_patch_size; x < half_patch_size; x++)
        for (int y = -half_patch_size; y < half_patch_size; y++) {

            //project
            double error =0;
            double img1_u = px_ref[i][0] + x;
            double img1_v = px_ref[i][1] + y;
            double img2_u = u + x;
            double img2_v = v + x;
            error = GetPixelValue(img1, img1_u, img1_v) - GetPixelValue(img2, img2_u, img2_v) ;

            Eigen::Vector2d J_img_pixel;    // image gradients 1*2
            J_img_pixel[0] =  (GetPixelValue(img2, img2_u + 1, img2_v ) - GetPixelValue(img2, img2_u - 1, img2_v))/2;
            J_img_pixel[1] =  (GetPixelValue(img2, img2_u, img2_v + 1 ) - GetPixelValue(img2, img2_u, img2_v - 1))/2;

            Matrix26d J_pixel_xi;   // pixel to \xi in Lie algebra 2*6
            Eigen::Matrix<double, 2, 3> J_e2Pc;
            Eigen::Matrix<double, 3, 6> J_Pc2Li;
            J_e2Pc << -fx/p(2), 0, (fx*p(0))/(p(2)*p(2)), \
                0, -fy/p(2), (fy*p(1))/(p(2)*p(2));
            J_Pc2Li.block(0,0,3,3) = Eigen::Matrix3d::Identity(3, 3);
            J_Pc2Li.block(0,3,3,3) <<  0, p(2), -p(1), -p(2), 0, p(0), p(1), -p(0), 0;
            J_pixel_xi = J_e2Pc*J_Pc2Li;

            // total jacobian
            Vector6d J;
            J = J_img_pixel.transpose()*J_pixel_xi;

            H += J * J.transpose();
            b += -error * J;
            cost += error * error;
        }
}

// solve update and put it into estimation
// TODO START YOUR CODE HERE
Vector6d update;
update =  H.llt().solve(b);
T21 = Sophus::SE3d::exp(update) * T21;
// END YOUR CODE HERE
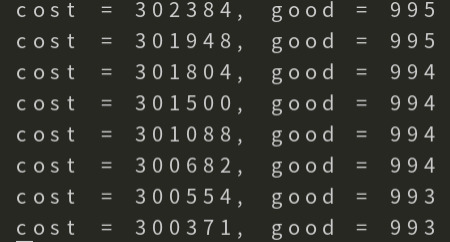
运行结果
由下图可以看出,误差在下降
问题2:多层直接法
核心代码
void DirectPoseEstimationMultiLayer(
        const cv::Mat &img1,
        const cv::Mat &img2,
        const VecVector2d &px_ref,
        const vector<double> depth_ref,
        Sophus::SE3d &T21
) {

    // parameters
    int pyramids = 4;
    double pyramid_scale = 0.5;
    double scales[] = {1.0, 0.5, 0.25, 0.125};

    // create pyramids
    vector<cv::Mat> pyr1, pyr2; // image pyramids
    // TODO START YOUR CODE HERE
    cv::Mat leftTemp = img1.clone();
    cv::Mat rightTemp = img2.clone();
    for (int i = 0; i < pyramids; i++) {
            pyr1.push_back(leftTemp);
            pyr2.push_back(rightTemp);
            cv::resize(leftTemp, leftTemp, cv::Size(leftTemp.cols/2, leftTemp.rows/2));
            cv::resize(rightTemp, rightTemp, cv::Size(rightTemp.cols/2, rightTemp.rows/2));
    }
    // END YOUR CODE HERE

    double fxG = fx, fyG = fy, cxG = cx, cyG = cy;  // backup the old values
    for (int level = pyramids - 1; level >= 0; level--) {
        VecVector2d px_ref_pyr; // set the keypoints in this pyramid level
        for (auto &px: px_ref) {
            px_ref_pyr.push_back(scales[level] * px);
        }

        // TODO START YOUR CODE HERE
        // scale fx, fy, cx, cy in different pyramid levels
        fx = fxG*scales[level] ;
        fy = fyG*scales[level];
        cx = cxG*scales[level];
        cy = cyG*scales[level];
        // END YOUR CODE HERE
        DirectPoseEstimationSingleLayer(pyr1[level], pyr2[level], px_ref_pyr, depth_ref, T21);
    }
    cv::waitKey();
}
运行结果


使用光流计算视差
主要思想
- 类似光流法,通过两个图像对应点的像素的差值作为优化项优化坐标位置
- 值得注意的是,这里应该只优化X坐标
核心源代码
int main()
{
// 读取图片
Mat leftImg, rightImg, disparityImg;
leftImg = imread("/home/sld/workspace/vslamLessonHomeWork/L6/project/img/left.png", 0);
rightImg = imread("/home/sld/workspace/vslamLessonHomeWork/L6/project/img/right.png", 0);
disparityImg = imread("/home/sld/workspace/vslamLessonHomeWork/L6/project/img/disparity.png", 0);
// 计算特征点
vector<KeyPoint>detectKeyPoint1;
vector<KeyPoint>detectKeyPoint2;
Ptr<GFTTDetector> gftt = GFTTDetector::create();
gftt->detect(leftImg,detectKeyPoint1);
vector<bool> success;
//迭代计算视差
//vector<double> disparties;
int err = 0;
int num = 0;
OpticalFlowMultiLevel(leftImg, rightImg, detectKeyPoint1, detectKeyPoint2, success, false);
for(int i = 0; i < detectKeyPoint1.size(); i++)
{
if(success[i] == false)
continue;
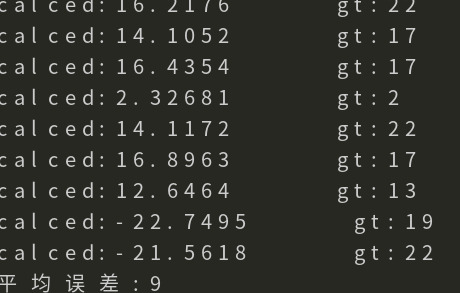
double disparty1 = detectKeyPoint1[i].pt.x - detectKeyPoint2[i].pt.x;
cout << "calced:" << disparty1 << " ";
double disparty2 = disparityImg.at<unsigned char>(detectKeyPoint1[i].pt.y, detectKeyPoint1[i].pt.x);
cout << "gt:" << disparty2 << endl;
num++;
err += abs(disparty1 - disparty2);
}
cout << "平均误差:" << err/num << endl;
}
运行结果


 2249
2249


 被折叠的 条评论
为什么被折叠?
被折叠的 条评论
为什么被折叠?
 到【灌水乐园】发言


