


仿真环境中操作TurtleBot
进行实操之前,先准备环境
$ sudo apt install ros-kinetic-turtlebot ros-kinetic-turtlebot-apps ros-kinetic-turtlebot-interactions ros-kinetic-turtlebot-simulator ros-kinetic-kobuki-ftdi ros-kinetic-turtlebot-gazebo
一、实操
1.1 查看姿态信息
环境准备好后,执行以下命令启动
$ roslaunch turtlebot_gazebo turtlebot_world.launch
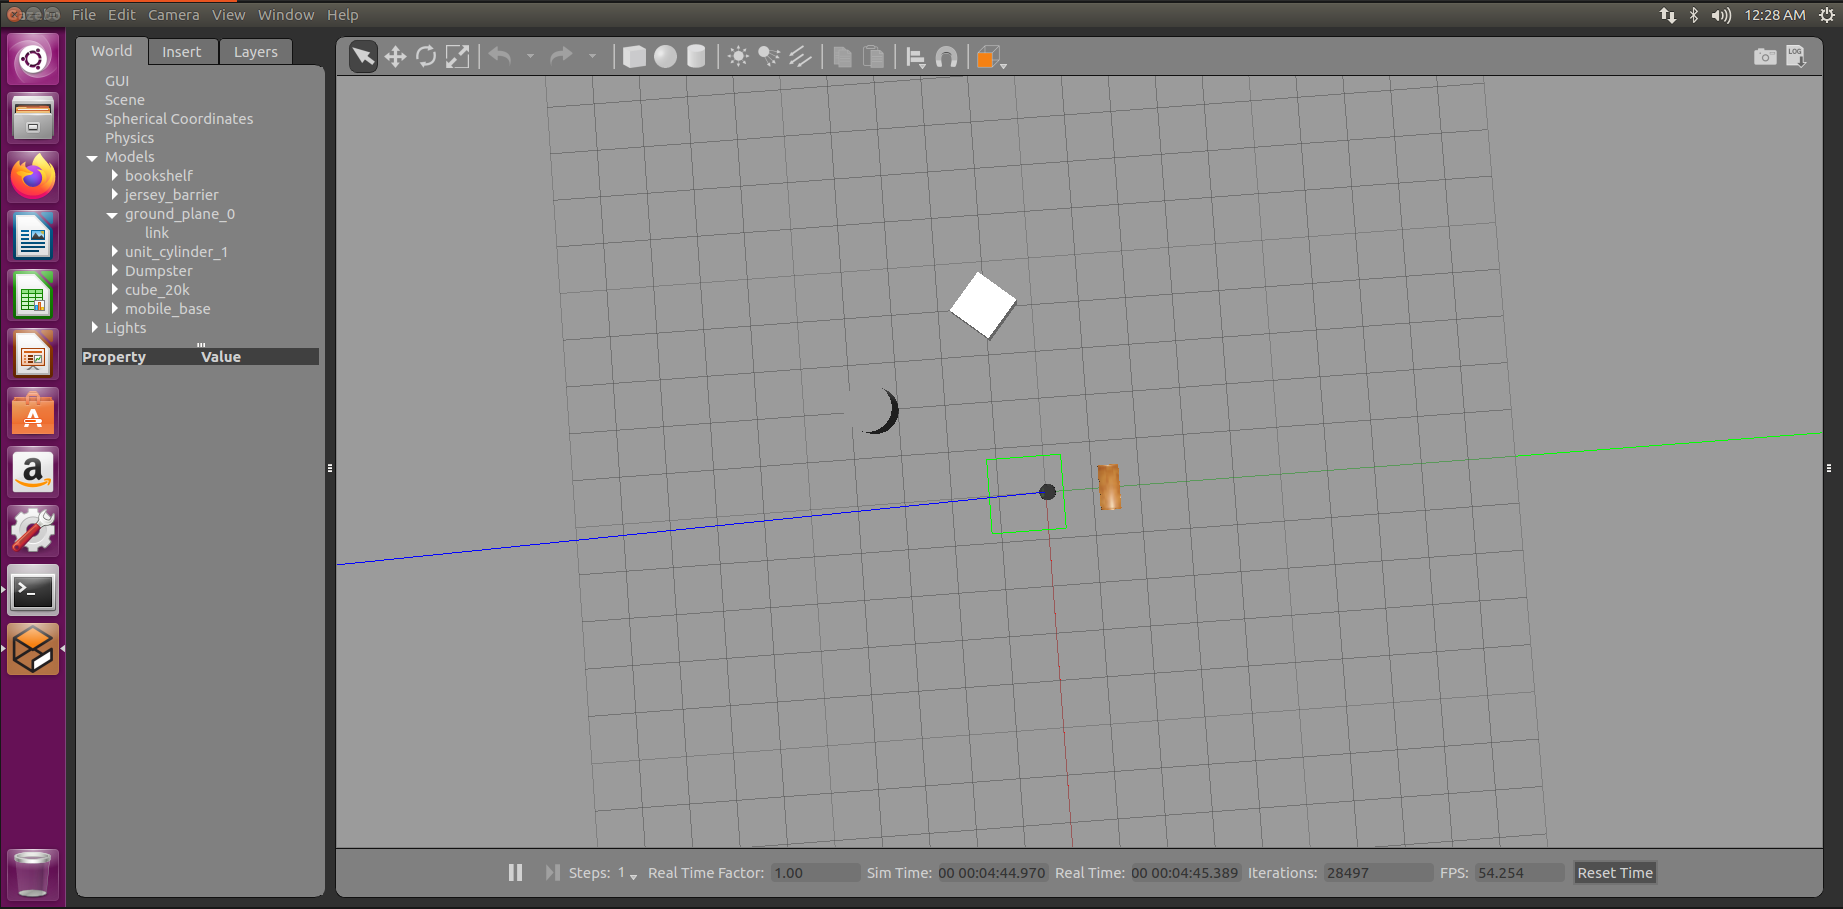
可以看见以下效果,视角不舒服的话,就按Ctrl+Shift+鼠标左键调整调整至你喜欢的视角,并通过滚轮缩放大小。

按如下顺序点击,TurtleBot将被一个白色框线框住,并可以查看姿态信息
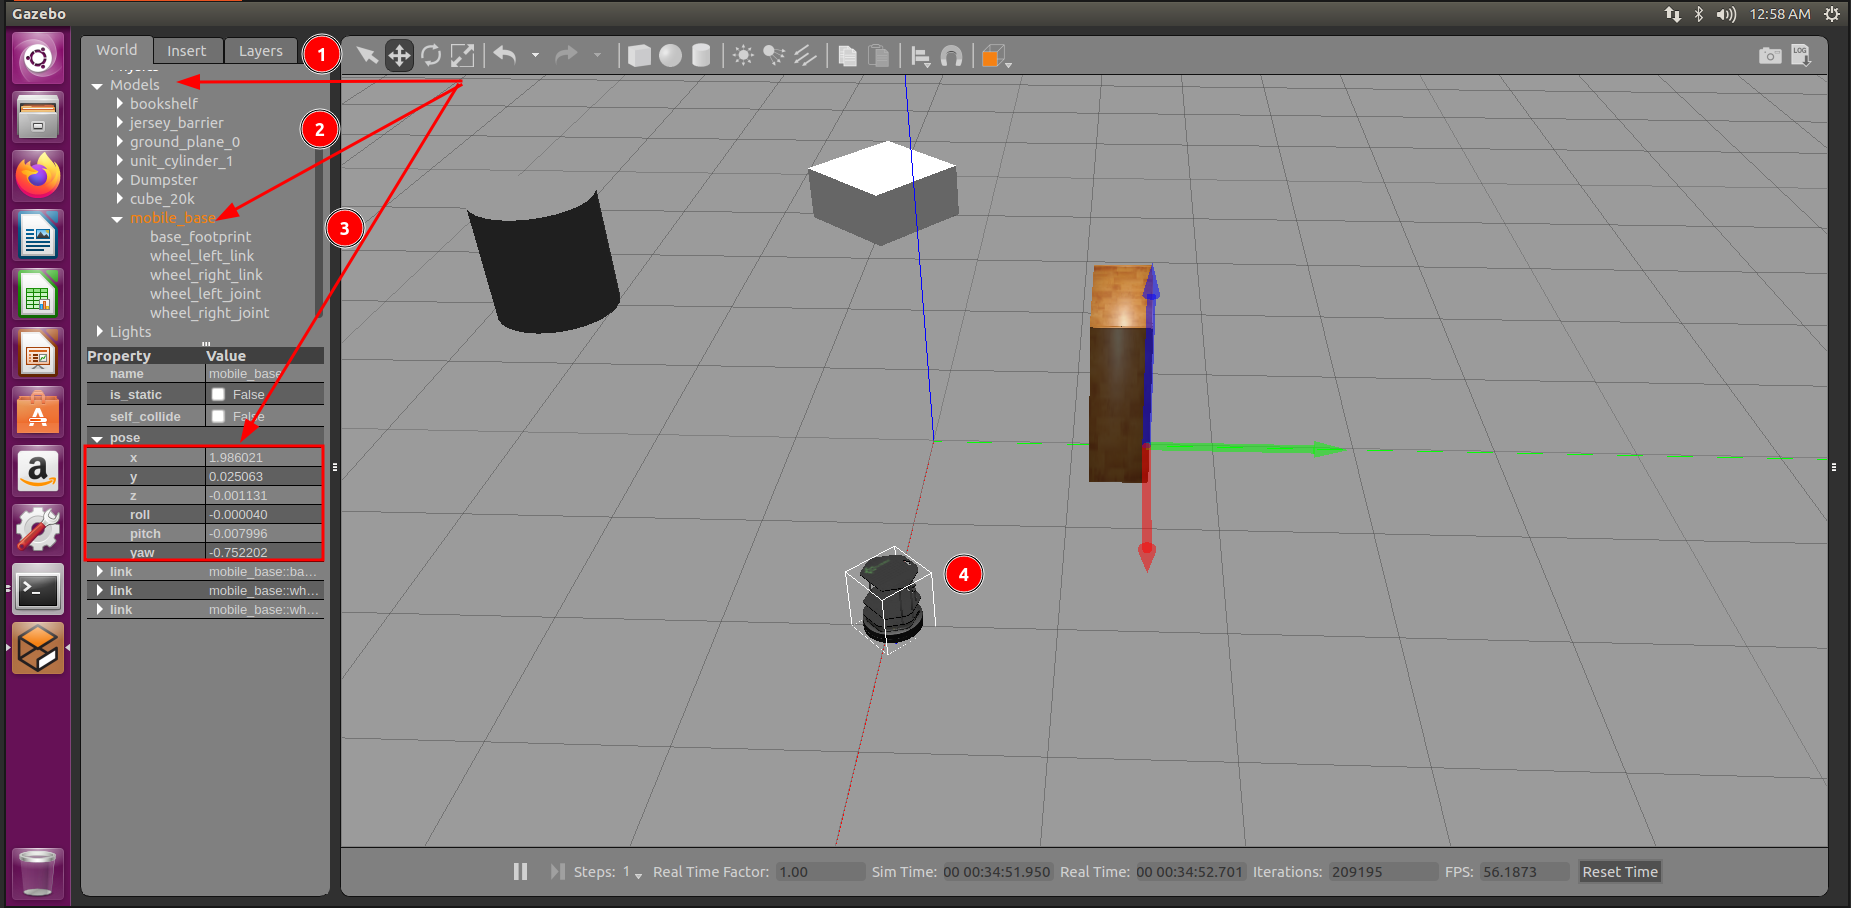
也可以用以下命令,打印出mobile_base的姿态信息,注意到,由于车应该是放置在水平面上的,position.z的值本应该是0,这里却是一串-0.00113074128666的小数,原因是什么呢?是ROS的缺陷吗?//@TODO,此问题待解答,然后看到orientation的x,y,z,w,这被称作四元数(quaternion),用来表示三维空间里的旋转,关于四元数如何表示三维空间里的旋转,见《二维空间与三维空间的姿态表示法》
$ rosservice call gazebo/get_model_state '{model_name: mobile_base}'
header:
  seq: 1
  stamp:
    secs: 1945
    nsecs: 170000000
  frame_id: ''
pose:
  position:
    x: 1.97484093771
    y: 0.0147819206239
    z: -0.00113074128666
  orientation:
    x: -0.00134519341326
    y: -0.00376571136568
    z: -0.348703846748
    w: 0.937224432639
twist:
  linear:
    x: -0.000155242355429
    y: -0.000224370086231
    z: -4.28258194336e-06
  angular:
    x: -0.0023805996017
    y: 0.00191483013878
    z: 0.000121453647707
success: True
status_message: "GetModelState: got properties"
1.2 控制turtlebot移动的三种方式
1.2.1 命令行发布指令
可以看到,这个名字叫做mobile_base的link(连接刚体),根据之前操作小乌龟的文章,我们要先找到有哪些node在跑,然后再找到对应的有哪些topic在publish和被subscribe,去控制mobile_base,开始,我们干脆看图说话。
rosrun rqt_graph rqt_graph
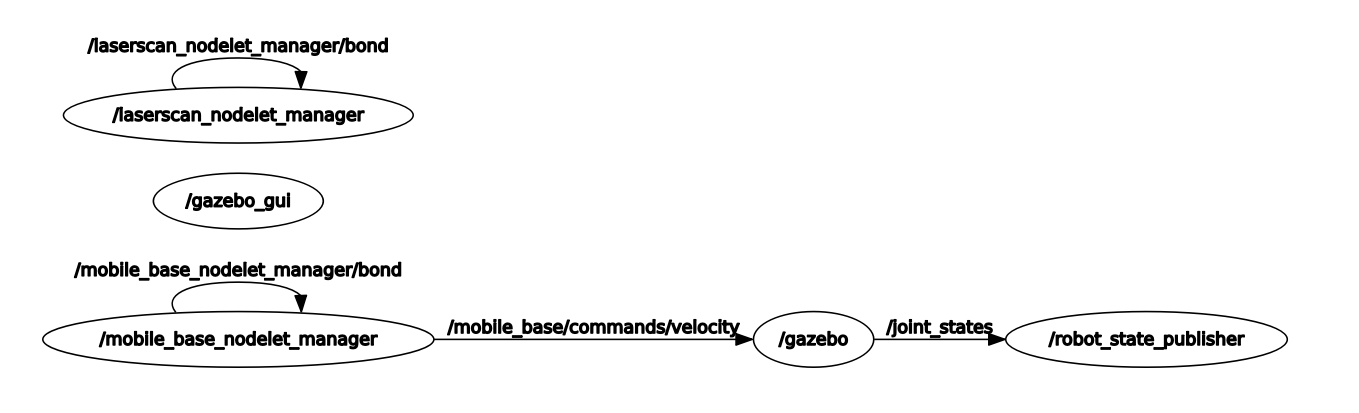 目的很明确,要找的node就应该是
/gazebo了,我原本以为,这里会有一个结点应该叫mobile_base,但想了想,它应该被整个包含在/gazebonode环境里面了,所以/gazebo这个node还是有非常多子结构,不然一个孤零零的/gazebo,怎么完成这么多物体的操作呢?
$ rosnode list
/gazebo #忽略
/gazebo_gui #忽略
/laserscan_nodelet_manager
/mobile_base_nodelet_manager #可能是
/robot_state_publisher
/rosout #忽略
继续,信息有点多,但是我们还是只需要看Subscriptions这个,服从命令听指挥是优良作风,看名字的话,在上面rqt_graph图中所见到的的topic正是/mobile_base/commands/velocity,哦这里连message的数据类型都给出来了是geometry_msgs/Twist,
$ rosnode info /gazebo
--------------------------------------------------------------------------------
Node [/gazebo]
Publications:
 * /camera/depth/camera_info [sensor_msgs/CameraInfo]
 * /camera/depth/image_raw [sensor_msgs/Image]
...
...

Subscriptions:
 * /clock [rosgraph_msgs/Clock]
 * /gazebo/set_link_state [unknown type]
 * /gazebo/set_model_state [unknown type]
 * /mobile_base/commands/motor_power [unknown type]
 * /mobile_base/commands/reset_odometry [unknown type]
 * /mobile_base/commands/velocity [geometry_msgs/Twist]
...
...
那么就有的放矢了,发布命令
$ rostopic pub -r 10 /mobile_base/commands/velocity /geometry_msgs/Twist '{linear: {x: 0.2}}'

1.2.2 键盘操控
执行下面的命令,可以用键盘操作
$ roslaunch turtlebot_teleop keyboard_teleop.launch

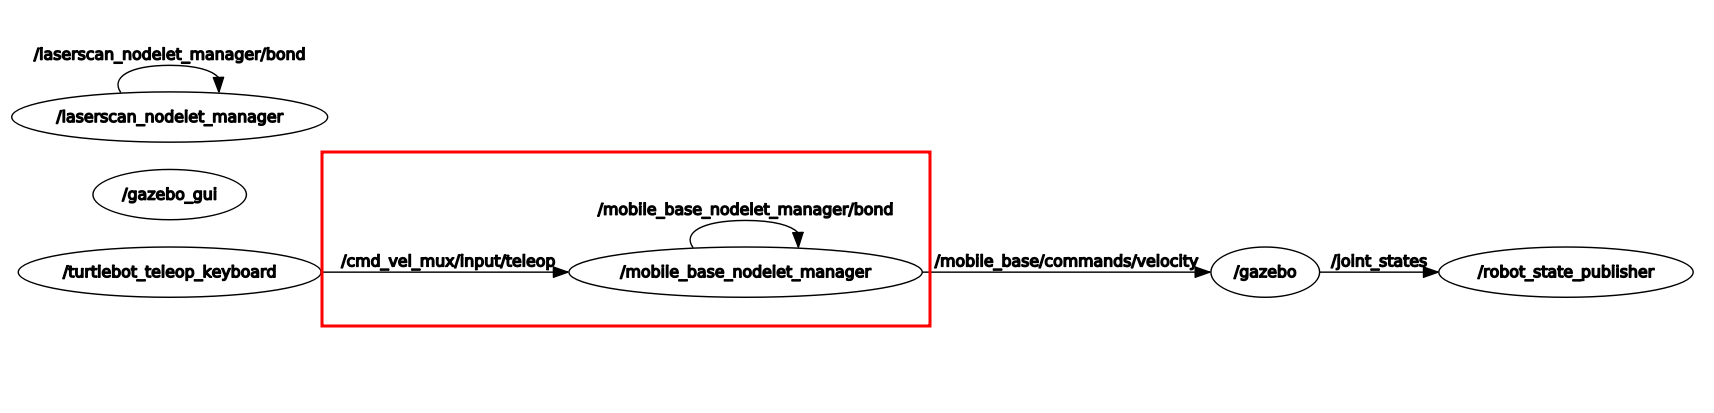
 但这个package是turtlebot_teleop有什么说法和依据吗?为什么执行的是它,答案是没有,代码开发时的设计如此,来看最新的
rqt_graph,所以这建立在你非常了解你所要运行的仿真环境基础上,才能做到用键盘操作,不然琢磨半天也不会知道如何使用键盘去操作这个turtlebot。
1.2.3 Python脚本控制
西天取经,孙悟空总算是要拿到他的如意金箍棒了,有了程序,才叫编程,有了金箍棒,孙悟空才能大闹天宫,可孙悟空终会有取到经书的一刻,那时,不只是涅盘成佛,也是大圣的寂灭。
创建一份ControlTurtleBot.py,内容为:
#!/usr/bin/env python
# Execute as a python script
# Set linear and angular values of TurtleBot's speed and turning.
import rospy      # Needed to create a ROS node
from geometry_msgs.msg import Twist    # Message that moves base

class ControlTurtleBot():
  def __init__(self):
    # ControlTurtleBot is the name of the node sent to the #master
    rospy.init_node('ControlTurtleBot', anonymous=False)

    # Message to screen
    rospy.loginfo("Press CTRL+c to stop TurtleBot")

    # Keys CNTL + c will stop script #这里的self.shutdown是一个函数地址
    rospy.on_shutdown(self.shutdown)

    # Publisher will send Twist message on topic cmd_vel_mux/input/navi

    self.cmd_vel = rospy.Publisher('cmd_vel_mux/input/navi',
    Twist, queue_size=10)

    # TurtleBot will receive the message 10 times per second.
    rate = rospy.Rate(10);
    # 10 Hz is fine as long as the processing does not exceed
    #   1/10 second.

    # Twist is geometry_msgs for linear and angular velocity
    move_cmd = Twist()
    move_cmd.linear.x = 0.3
    # Modify this value to change speed
    # Turn at 0 radians/s
    move_cmd.angular.z = 0
    # Modify this value to cause rotation rad/s

    # Loop and TurtleBot will move until you type CNTL+c
    while not rospy.is_shutdown():
      # publish Twist values to TurtleBot node /cmd_vel_mux
      self.cmd_vel.publish(move_cmd)
      # wait for 0.1 seconds (10 HZ) and publish again
      rate.sleep()


  def shutdown(self):
    # You can stop turtlebot by publishing an empty Twist
    # message
    rospy.loginfo("Stopping TurtleBot")

    self.cmd_vel.publish(Twist())
    # Give TurtleBot time to stop
    rospy.sleep(1)

if __name__ == '__main__':
  try:
    ControlTurtleBot()
  except:
    rospy.loginfo("End of the trip for TurtleBot")
然后赋予执行权限,并用python解释执行,然后小车就会沿着它自身坐标系的x轴方向一直前进。
$ chmod +x ControlTurtleBot.py
$ python ControlTurtleBot.py
1.2.4 使用rqt工具界面,发布运动指令
rqt = ROS Qt GUI Toolkit,
$ rqt
然后在插件选项栏里,将Message Publisher与Topic Monitor调出来
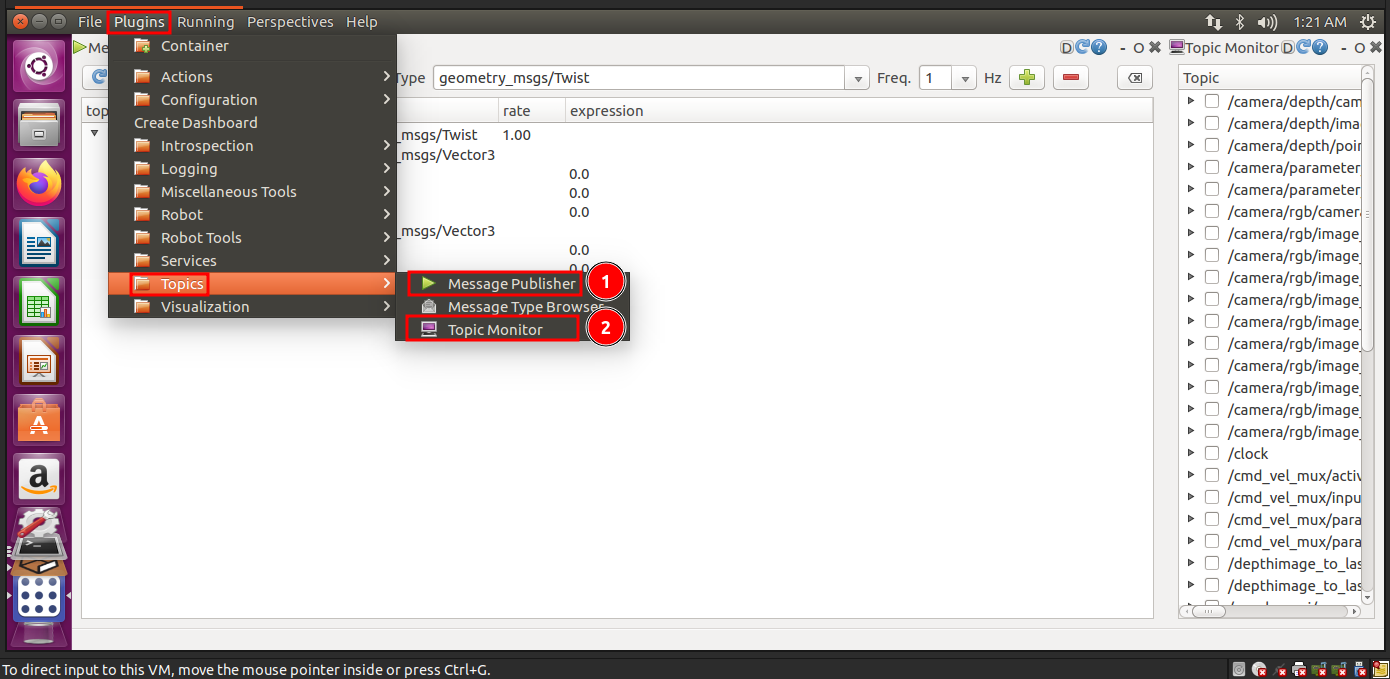 并选择对应的Topic和Message Type,设置数据值,然后勾选发布
 另外rqt这个工具可以让你跟踪发布的message,一旦TurtleBot的行动不是你预期的那样,你可以进行debug排查原因。
二、里程计(odometry)
这个odometry是用来估计mobile robot当前所处位置,和起点之间的距离和姿态变化,当mobile robot走了一段较长的距离时,这个数据会变得不准,原因可能是车轮的直径参数有误,或者路不平导致车轮的转换器输出了不准确的数据,书上给了一篇IEEE Transactions on Robotics and Automation(IEEE TRO)收录的论文,对这个问题有较为详尽的讨论 Measurement and Correction of Systematic Odometry Errors in Mobile Robots.pdf,这篇文章还讨论了轴距(wheelbase)的影响。
这是一作老头子的个人主页 Johann Borenstein。
首先,查看/odom这个topic使用的message,结果显示是nav_msgs/Odometry,再看nav_msgs/Odometry的数据格式
$ rostopic type /odom
nav_msgs/Odometry
$ rosmsg show nav_msgs/Odometry
std_msgs/Header header
  uint32 seq
  time stamp
  string frame_id
string child_frame_id
geometry_msgs/PoseWithCovariance pose
  geometry_msgs/Pose pose
    geometry_msgs/Point position
      float64 x
      float64 y
      float64 z
    geometry_msgs/Quaternion orientation
      float64 x
      float64 y
      float64 z
      float64 w
  float64[36] covariance
geometry_msgs/TwistWithCovariance twist
  geometry_msgs/Twist twist
    geometry_msgs/Vector3 linear
      float64 x
      float64 y
      float64 z
    geometry_msgs/Vector3 angular
      float64 x
      float64 y
      float64 z
  float64[36] covariance
用以下命令可以使turtlebot归位
# 1.查找归位topic对应的message
$ rostopic type /mobile_base/commands/reset_odometry
std_msgs/Empty
# 2.命令mobile_base归位
$ rostopic pub /mobile_base/commands/reset_odometry std_msgs/Empty
$ rostopic echo /mobile_base/sensors/imu_data
使用以下命令,分别把gazebo和rviz启动起来
$ roslaunch turtlebot_gazebo turtlebot_world.launch
$ roslaunch turtlebot_rviz_launchers view_robot.launch
按如下方式勾选
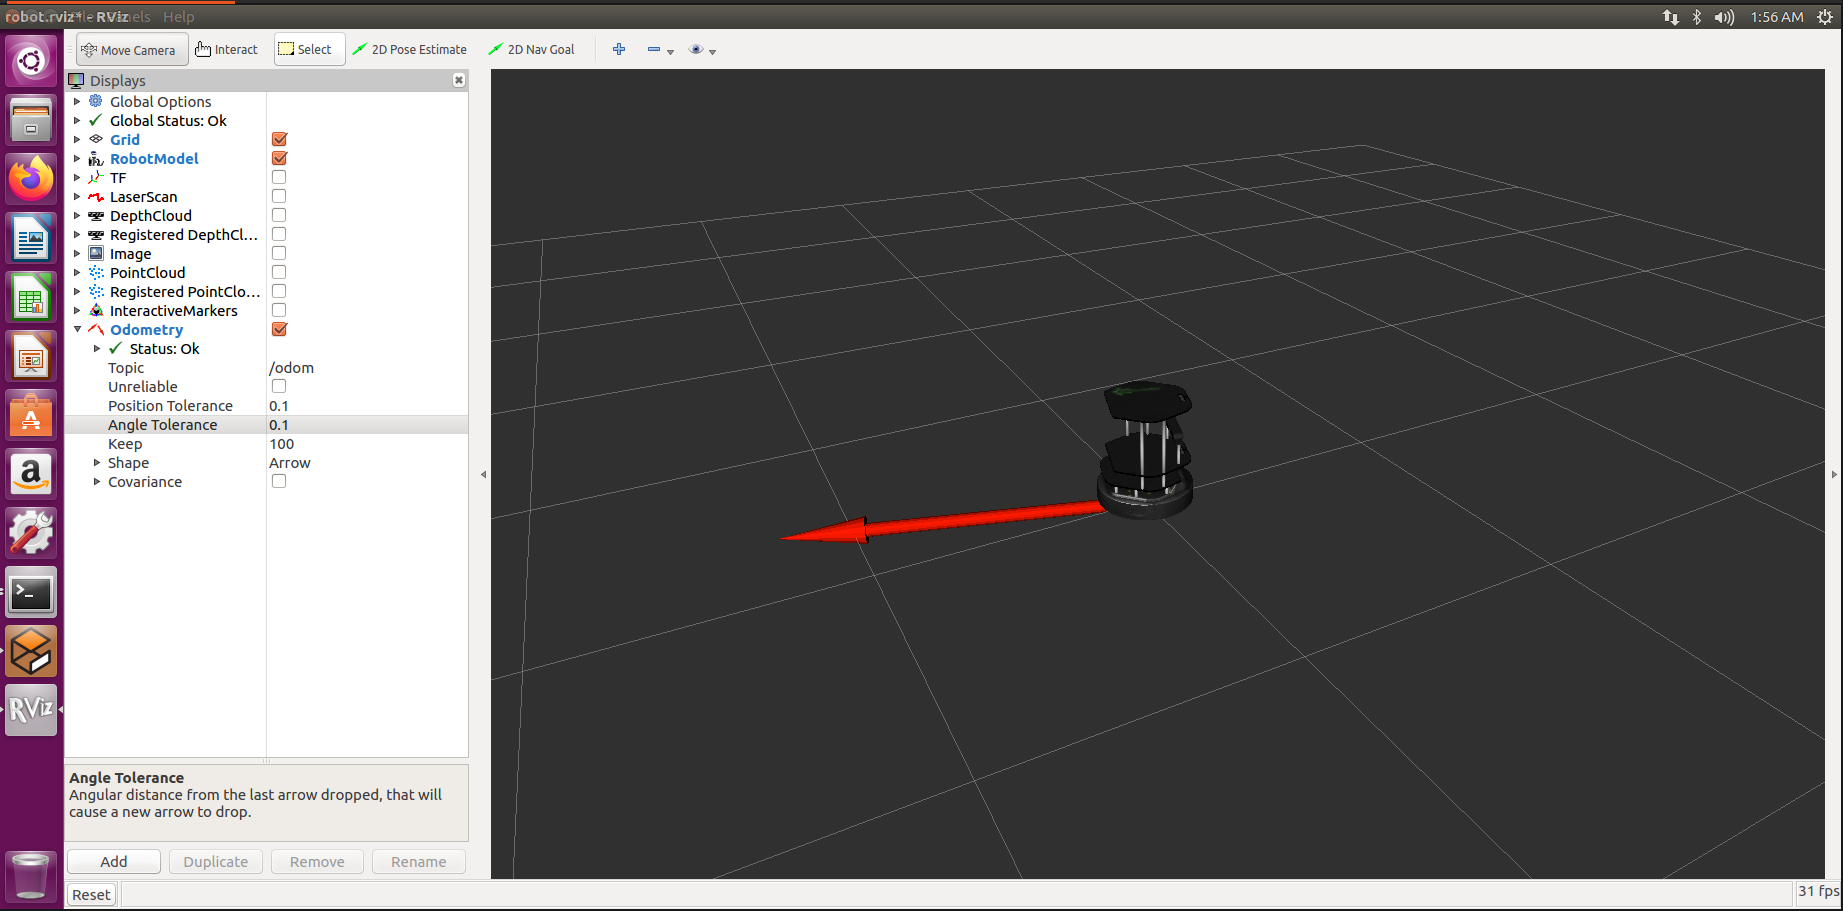
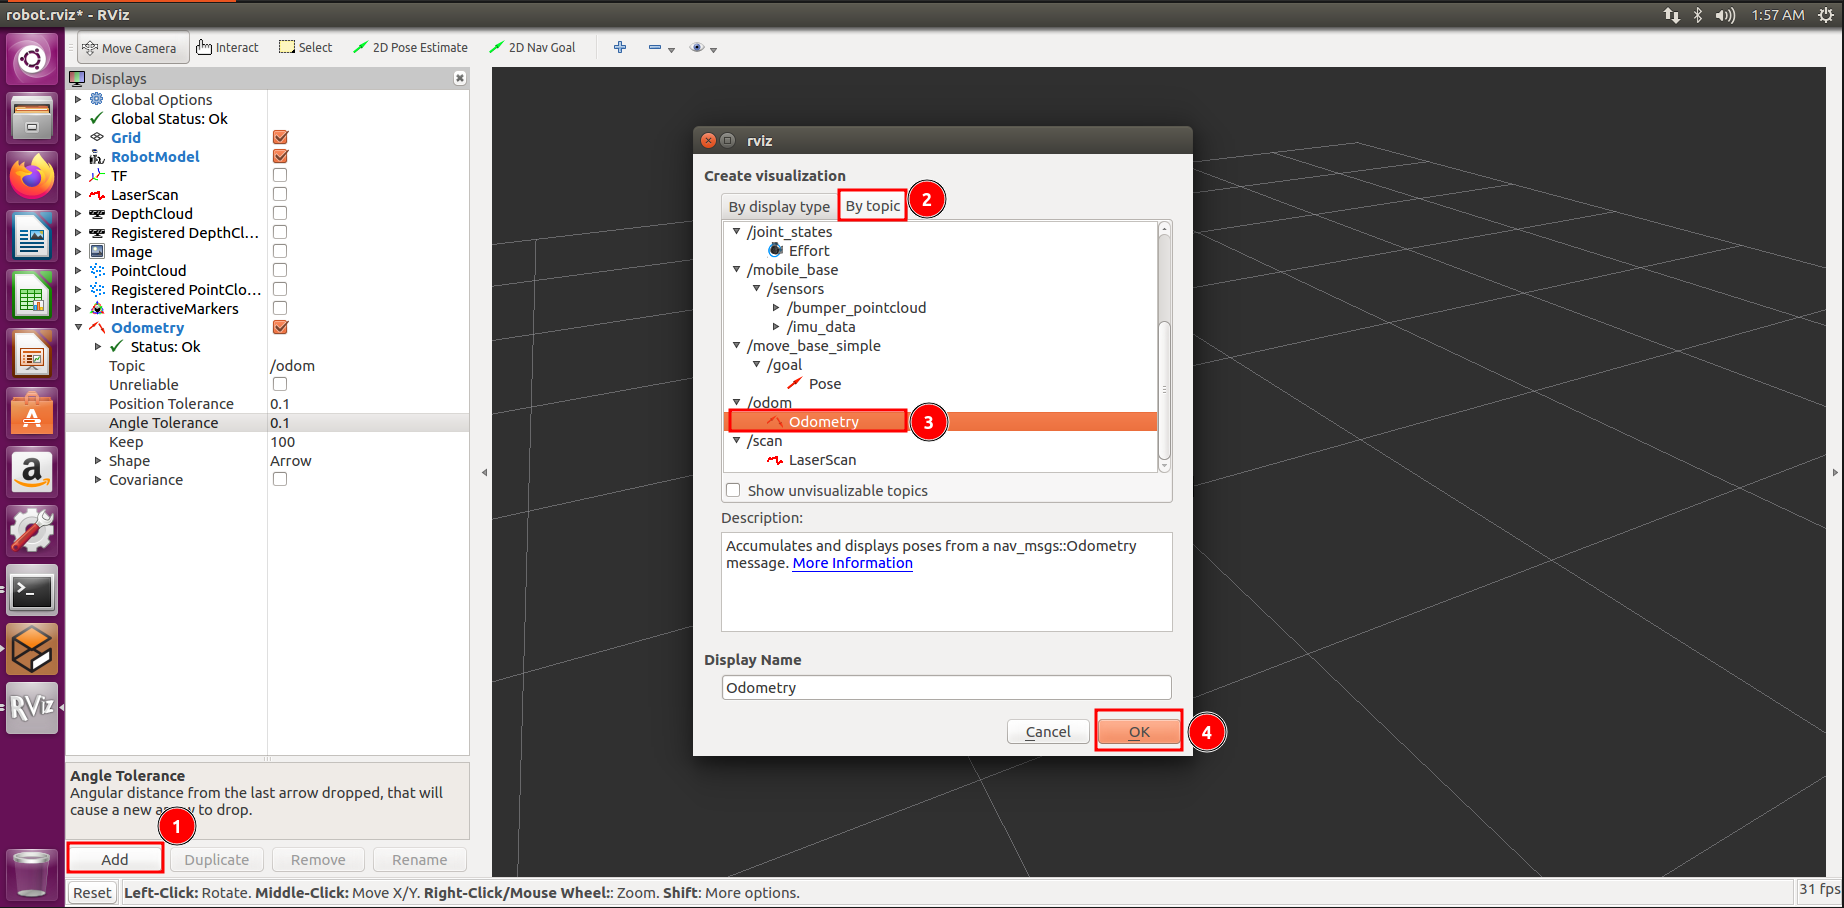 就会出现一根红色箭头,将指明turtlebot的前进方向
 然后发布运动命令
$ rostopic pub -r 10 /cmd_vel_mux/input/teleop \geometry_msgs/Twist '{linear: {x: 0.1, y: 0, z: 0}, angular: {x: 0, y: 0, z: -0.5}}'
# 效果与上面的一样,
$ rostopic pub -r 10 /mobile_base/commands/velocity \geometry_msgs/Twist '{linear: {x: 0.1, y: 0, z: 0}, angular: {x: 0, y: 0, z: -0.5}}'
TurtleBot3 仿真
安装环境
$ sudo apt-get install ros-kinetic-joy ros-kinetic-teleop-twist-joy ros-kinetic-teleop-twist-keyboard ros-kinetic-laser-proc ros-kinetic-rgbd-launch ros-kinetic-depthimage-to-laserscan ros-kinetic-rosserial-arduino ros-kinetic-rosserial-python ros-kinetic-rosserial-server ros-kinetic-rosserial-client ros-kinetic-rosserial-msgs ros-kinetic-amcl ros-kinetic-map-server ros-kinetic-move-base ros-kinetic-urdf ros-kinetic-xacro ros-kinetic-compressed-image-transport ros-kinetic-rqt-image-view ros-kinetic-gmapping ros-kinetic-navigation
然后将给turtlebot3远程计算机开发的ROS catkin 软件包代码拉到本地,并进行编译
$ cd ~/catkin_ws/src/
$ git clone https://github.com/ROBOTIS-GIT/turtlebot3_simulations.git
$ git clone https://github.com/ROBOTIS-GIT/turtlebot3_msgs.git
$ git clone https://github.com/ROBOTIS-GIT/turtlebot3.git
$ cd ~/catkin_ws
$ catkin_make
用以下命令,去指定model,这样再启动rviz环境下看到的就是burger这个机器人,TurtleBot 3 Burger [US]
$ export TURTLEBOT3_MODEL=burger
$ roslaunch turtlebot3_fake turtlebot3_fake.launch
然后在新的Terminal,就可以用键盘控制这个机器人了
$ export TURTLEBOT3_MODEL=burger
$ roslaunch turtlebot3_teleop turtlebot3_teleop_key.launch

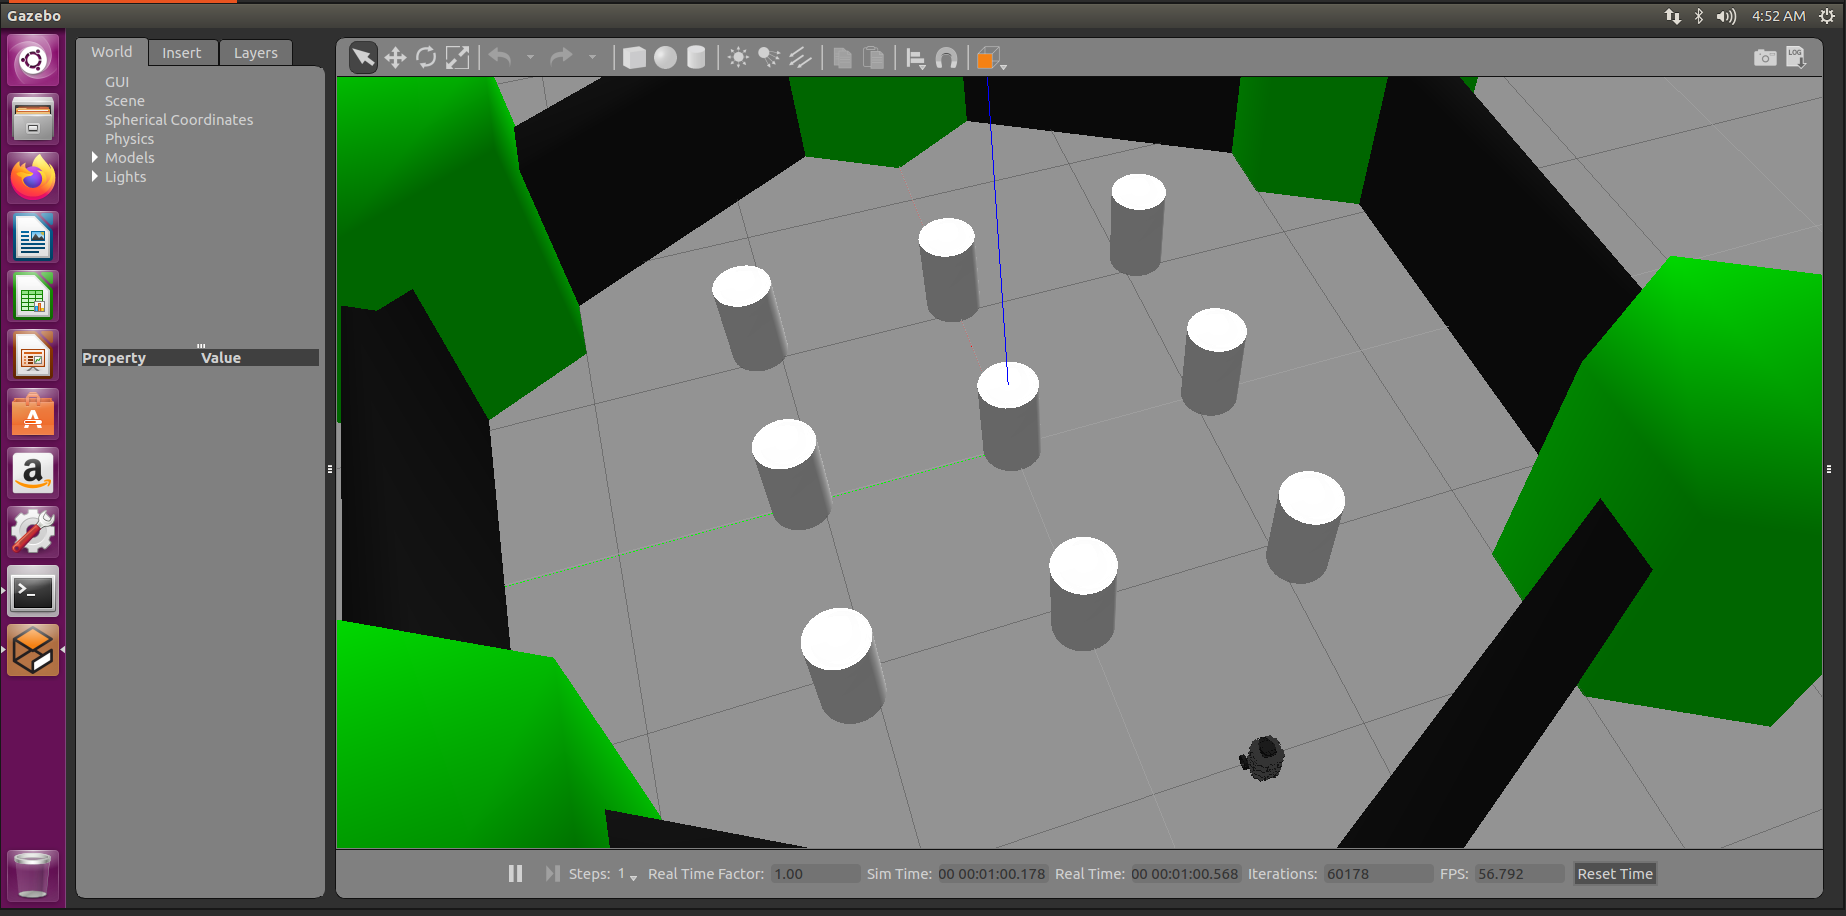
关闭刚刚打开rviz的终端,然后是gazebo环境的仿真,你应该会看到如下画面
$ export TURTLEBOT3_MODEL=burger
$ roslaunch turtlebot3_gazebo turtlebot3_world.launch
 然后再打开一个Terminal,执行下面的命令,你就能操控turtlebot3在这个仿真环境里行驶了
$ export TURTLEBOT3_MODEL=burger
$ roslaunch turtlebot3_teleop turtlebot3_teleop_key.launch

并且turtlebot3还可以自动行驶,关掉执行turtlebot3_teleop的终端,在新的Terminal里执行下面的命令
$ export TURTLEBOT3_MODEL=burger
$ roslaunch turtlebot3_gazebo turtlebot3_simulation.launch

来看下为什么turtlebot3不撞墙,新建一个Terminal并执行
$ export TURTLEBOT3_MODEL=burger
$ roslaunch turtlebot3_gazebo turtlebot3_gazebo_rviz.launch
发现有激光雷达的扫描数据,红点连起来就是激光雷达的描边
 书本的第三章后半部分就在写硬件部分的实操了,第三章就到这里


 4083
4083


 被折叠的 条评论
为什么被折叠?
被折叠的 条评论
为什么被折叠?
 到【灌水乐园】发言


