


 |
| The script in the above image does not work. Don't even try. |
A macroScript is essentially a script that you can execute with a button, or by assigning it to a hot-key in max. They are extremely easy to make, and I'm going to walk you through the easy steps of doing it. First we are going to make the script and map it to a button in a custom floating toolbar. Then after that, we'll edit the appearance of the button, and bind it to a key.
We're going to make a script that takes the current object in the selection, and set its position to the origin in world space. In other words, the object that is selected will be moved to [ 0, 0, 0 ] in world space coordinates. I'm making this script because I find myself typing "0, 0, 0" into the bottom coordinate bar all the time, and i'm sick of doing it. It takes like 3 seconds and a couple of clicks to do it, but we can cut those seconds and mouse clicks out of the workflow by making a button that does it all in one stroke.
The first step is to go to the Customize drop down menu in 3DS Max, and click on Customize User Interface. This will bring up a window with a bunch of options on it. Click on the "Toolbars" tab, and over there on the right side you'll see a button that says "New". Click that shit.
 |
| I made a large, condescending red square to show you where to click. |
When you click the "New" button, you'll be prompted to name your Toolbar. Don't fuck this up. Name it something awesome, like "Tim 'The Toolbar' Taylor". If you don't get that joke, you were born after 1990. Anyways, this will create a new tiny, empty toolbar for you to place custom buttons on. Congratulations, you've made it through step one.
Next, go ahead and go to the MAXScript tab, which should be directly next to the Customize tab you clicked earlier, and go to MAXScript > New Script. This will bring up the fancy Max Script editor, which will be where we write our script. After that, go ahead and hit F11, or go to MAXScript > MAXScript Listener. this will bring up the MAXScript Listener, which is a super useful tool that will help you debug your script as well as output commands you perform in Max as you do them. If you don't see the Macro Recorder section, just go to your MAXScript listener's Macro Recorder drop-down menu, and click "Enable". If you still don't see it, it may be because it has been scrunched up at the top, so you'll have to drag the section down a bit to see it. It should look like this.

To clarify, the white space is for debugging, and testing small blocks of code. The downside is that there isn't any syntax highlighting in this window. The window with the pink background color is the macro recorder, and as you do stuff in Max, the corresponding script command will appear in this window. This will help you figure out most commands just by looking at it. In many cases, you can simply copy/paste text from this window, and make a script out of it with very few modifications.
So if you have an object in the scene like a box, and you move it around, you'll see that a bunch of commands appear in the macro recorder that say something along the lines of "move $ [45.7762,0,0]". Lets break this down really quick. "move" is the method used to move nodes around in 3D space. It takes 2 arguments. The object being moved, and a 3point vector that tells the script how many units to move it by. the "$" character represents the selected objects in the scene. The 3 point vector is a list of 3 floating number values that represent the X, Y, and Z axis respectively. The syntax for a 3point vector is always in square brackets like this: [10, 0, 0]. So in other words, when we see the command "move $ [45.7762,0,0]", we know that it means in literal terms, "move the selection on the X axis 45.7762 units". Pretty easy, eh?
Unfortunately, we can't use the move command to achieve what we want, because the "move" command is for offsetting the object from it's initial position. In order to actually SET the position of the object we want, we have to access it's position, and change it through script. To do this, go ahead and select an object in your scene and type into the bottom listener window, "$.pos" and hit enter. If all goes well, you'll get a 3 point vector that represents the position of the selected object's XYZ coordinates.

You can modify the position of your selected object by simply typing something like $.pos = [0,0,0] . Here you are actually modifying the position of the selected object by providing a point in world space for it to move to. So remember that little toolbar that we made earlier? The one named after Tim "The Toolman" Taylor? Well.. go ahead and highlight that line of code ( $.pos = [0,0,0] ) and drag and drop it into the toolbar. If it works the way it should, you should now see an icon in that toolbar. When you click it, it should execute the block of code you just dragged up there.
Now I want you to right click on the newly created button and go to "Edit MacroScript". This will bring up the actual code for the button in your MAXScript Editor. You should see this:
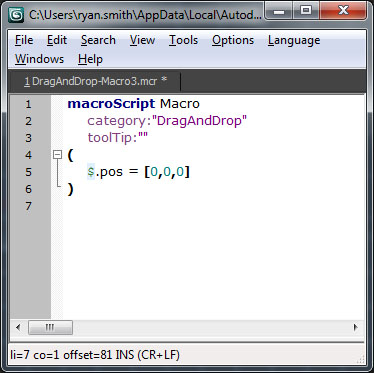
The term macroScript in bold, blue type is what defines the actual command. The word Macro after it is what the command is called. You can change it to something like "CenterWorld", the "category:"DragAndDrop" is where the command will show up in the customize user interface menu. The Tooltip is this yellow box that appears when you mouse over the button. Feel free to change these to whatever you want. For this tutorial i'll just leave the values as default.
You may need to close your customize user interface window and re-open it again to see the changes, but now you should be able to see your new command under the "DragAndDrop" category in your MainUI Group. Now you can bind this to a key, and simply snap your selected object to the origin whenever you want.
ProTip: If you try using the command when there's more than one object in your selection, you will probably get an error. To fix this, edit your script so that instead of saying "$.pos = [0,0,0]", make it say "selection.pos = [0,0,0]".
If you want to learn more about Max Script... please head over to
http://vimeo.com/album/1514565/page:1 and check out this guy's tutorials. They are very concise and to the point, and are way better than anything you'll learn concerning MAXScript on this blog.
原文:http://technical-eden.blogspot.tw/2011/12/making-quick-macroscripts-in-3ds-max.html
原文:http://technical-eden.blogspot.tw/2011/12/making-quick-macroscripts-in-3ds-max.html


 2558
2558

 被折叠的 条评论
为什么被折叠?
被折叠的 条评论
为什么被折叠?
 到【灌水乐园】发言


