目录
1 基础
在上一节的摄像机标定中,我们已经得到了摄像机矩阵,畸变系数等。有了这些信息我们就可以估计图像中图案的姿势,比如目标对象是如何摆放,如 何旋转等。对一个平面对象来说,我们可以假设 Z=0,这样问题就转化成摄像 机在空间中是如何摆放(然后拍摄)的。所以,如果我们知道对象在空间中的 姿势,我们就可以在图像中绘制一些 2D 的线条来产生 3D 的效果。我们来看 一下怎么做吧。
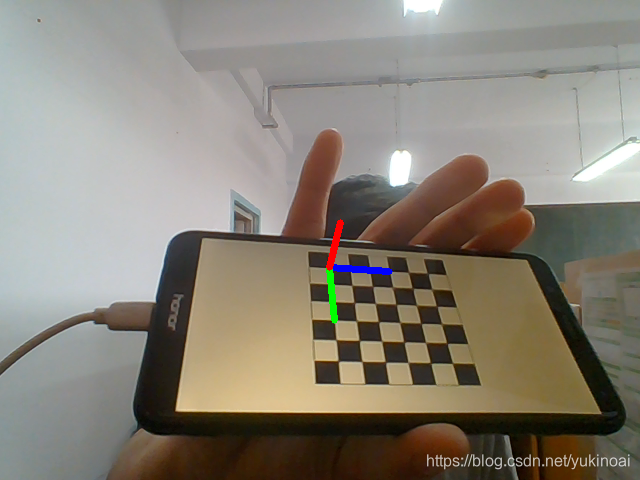
我们的问题是,在棋盘的第一个角点绘制 3D 坐标轴(X,Y,Z 轴)。X轴为蓝色,Y 轴为绿色,Z 轴为红色。在视觉效果上来看,Z 轴应该是垂直与 棋盘平面的。
首先我们要加载前面结果中摄像机矩阵和畸变系数。
这些系数的获得方法可以参考https://blog.csdn.net/yukinoai/article/details/89630883
import numpy as np
import cv2 as cv
import glob
# 导入数据
with np.load('B.npz') as X:
    mtx, dist, _, _ = [X[i] for i in ('mtx', 'dist', 'rvecs', 'tvecs')]
现在我们来创建一个函数:draw,它的参数有棋盘上的角点(使用 cv2.findChessboardCorners() 得到)和要绘制的 3D 坐标轴上的点。
# 画坐标轴
def draw(img, corners, imgpts):
    corner = tuple(corners[0].ravel())
    img = cv.line(img, corner, tuple(imgpts[0].ravel()), (255, 0, 0), 5)
    img = cv.line(img, corner, tuple(imgpts[1].ravel()), (0, 255, 0), 5)
    img = cv.line(img, corner, tuple(imgpts[2].ravel()), (0, 0, 255), 5)
    return img
和前面一样,我们要设置终止条件,对象点(棋盘上的 3D 角点)和坐标轴点。3D 空间中的坐标轴点是为了绘制坐标轴。我们绘制的坐标轴的长度为 3。所以 X 轴从(0,0,0)绘制到(3,0,0),Y 轴也是。Z 轴从(0,0,0)绘制 到(0,0,-3)。负值表示它是朝着(垂直于)摄像机方向。
criteria = (cv.TERM_CRITERIA_EPS + cv.TERM_CRITERIA_MAX_ITER, 30, 0.001)
objp = np.zeros((6*6, 3), np.float32)
objp[:, :2] = np.mgrid[0:6, 0:6].T.reshape(-1, 2)
axis = np.float32([[3, 0, 0], [0, 3, 0], [0, 0, -3]]).reshape(-1, 3)
很通常一样我们需要加载图像。搜寻 6x6 的格子,如果发现,我们就把它优化到亚像素级。然后使用函数:cv2.solvePnPRansac() 来计算旋转和变换。
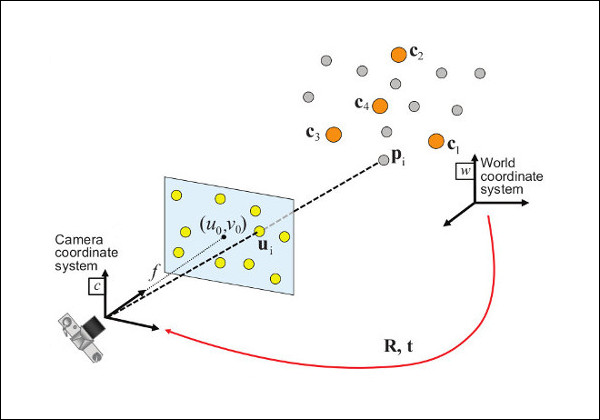
该函数对给定的一组目标点、它们对应的图像投影、摄像机矩阵和畸变系数进行估计,见下图(更准确地说,摄像机框架的x轴指向右侧,y轴向下,z轴向前)。

在世界坐标系表示Xw投射到图像平面(u, v)使用透视投影模型Π和摄像机内参数矩阵:
因此,估计的姿态是旋转(rvec)和平移(tvec)向量,它们允许将世界帧中表示的3D点转换为摄像机帧:
retval, rvec, tvec = cv.solvePnP(objectPoints, imagePoints, cameraMatrix, distCoeffs, rvec, tvec, useExtrinsicGuess, flags)
- objectPoints:对象坐标空间中对象点的数组,Nx3为1通道或1xN/Nx1为3通道,其中N为点的个数。
- imagePoints:对应的图像点数组,Nx2 1通道或1xN/Nx1 2通道,其中N为点的个数。
- cameraMatrix:输入相机矩阵
- distCoeffs:输入失真系数向量
- rvec:输出旋转矢量,它与tvec一起将模型坐标系中的点带到摄像机坐标系中。
- tvec:输出平移失量
- useExtrinsicGuess:默认false。用于SOLVEPNP_ITERATIVE的参数.如果为真(1),则函数使用所提供的rvec和tvec值分别作为旋转矢量和平移矢量的初始近似,并进一步优化。
- flags:使用的算法,默认第一个
- SOLVEPNP_ITERATIVE (默认)迭代法基于Levenberg-Marquardt优化。在本例中,函数找到这样一个最小化重投影误差的位姿,即观察到的投影图像点与投影(使用投影点)对象点之间距离的平方之和。
- SOLVEPNP_P3P Method is based on the paper of X.S. Gao, X.-R. Hou, J. Tang, H.-F. Chang "Complete Solution Classification for the Perspective-Three-Point Problem" ([70]). In this case the function requires exactly four object and image points.
- SOLVEPNP_AP3P Method is based on the paper of T. Ke, S. Roumeliotis "An Efficient Algebraic Solution to the Perspective-Three-Point Problem" ([107]). In this case the function requires exactly four object and image points.
- SOLVEPNP_EPNP Method has been introduced by F.Moreno-Noguer, V.Lepetit and P.Fua in the paper "EPnP: Efficient Perspective-n-Point Camera Pose Estimation" ([118]).
- SOLVEPNP_DLS Method is based on the paper of Joel A. Hesch and Stergios I. Roumeliotis. "A Direct Least-Squares (DLS) Method for PnP" ([91]).
- SOLVEPNP_UPNP Method is based on the paper of A.Penate-Sanchez, J.Andrade-Cetto, F.Moreno-Noguer. "Exhaustive Linearization for Robust Camera Pose and Focal Length Estimation" ([165]). In this case the function also estimates the parameters fx and fy assuming that both have the same value. Then the cameraMatrix is updated with the estimated focal length.
- SOLVEPNP_AP3P Method is based on the paper of Tong Ke and Stergios I. Roumeliotis. "An Efficient Algebraic Solution to the Perspective-Three-Point Problem" ([107]). In this case the function requires exactly four object and image points.
但我们有了变换矩阵之后,我们就可以利用cv2.projectPoints()将这些坐标轴点映射到图像平面中去。
imagePoints, jacobian=cv.projectPoints(objectPoints, rvec, tvec, cameraMatrix, distCoeffs, imagePoints, jacobian, aspectRatio)
- objectPoints:对象坐标空间中对象点的数组,Nx3为1通道或1xN/Nx1为3通道,其中N为点的个数。
- rvec:旋转矢量
- tvec:位移矢量
- cameraMatrix:输入相机矩阵
- distCoeffs:输入失真系数向量
- imagePoints:图像点的输出数组,2xN/Nx2 1通道或1xN/Nx1 2通道
- jacobian:可选输出2Nx(10+)图像点对旋转矢量分量、平移矢量分量、焦距分量、主点坐标分量和畸变系数的导数雅可比矩阵。在旧的接口中,雅可比矩阵的不同分量通过不同的输出参数返回。
- aspectRatio:可选“固定长宽比”参数。如果参数不为0,则函数假设长径比(fx/fy)是固定的,并相应地调整雅可比矩阵。
简单来说,我们在图像平面上找到了与 3D 空间中的点(3,0,0),(0,3,0),(0,0,3) 相对应的点。然后我们就可以使用我们的函数 draw() 从图像 上的第一个角点开始绘制连接这些点的直线了。
整个程序如下:
import numpy as np
import cv2 as cv
import glob
# 导入数据
with np.load('B.npz') as X:
    mtx, dist, _, _ = [X[i] for i in ('mtx', 'dist', 'rvecs', 'tvecs')]


# 画坐标轴
def draw(img, corners, imgpts):
    corner = tuple(corners[0].ravel())
    img = cv.line(img, corner, tuple(imgpts[0].ravel()), (255, 0, 0), 5)
    img = cv.line(img, corner, tuple(imgpts[1].ravel()), (0, 255, 0), 5)
    img = cv.line(img, corner, tuple(imgpts[2].ravel()), (0, 0, 255), 5)
    return img


criteria = (cv.TERM_CRITERIA_EPS + cv.TERM_CRITERIA_MAX_ITER, 30, 0.001)
objp = np.zeros((6*6, 3), np.float32)
objp[:, :2] = np.mgrid[0:6, 0:6].T.reshape(-1, 2)
axis = np.float32([[3, 0, 0], [0, 3, 0], [0, 0, -3]]).reshape(-1, 3)
images = glob.glob('E:\\Program\\Python\\OpenCV-test\\Chessboard\\*.png')

for fname in images:
    img = cv.imread(fname)
    gray = cv.cvtColor(img, cv.COLOR_BGR2GRAY)
    ret, corners = cv.findChessboardCorners(gray, (6, 6), None)
    if ret:
        corners2 = cv.cornerSubPix(gray, corners, (11, 11), (-1, -1), criteria)
        # 寻找旋转和平移矢量
        ret, rvecs, tvecs = cv.solvePnP(objp, corners2, mtx, dist)
        # 将3D点投影到平面
        imgpts, jac = cv.projectPoints(axis, rvecs, tvecs, mtx, dist)
        img = draw(img, corners2, imgpts)
        cv.imshow('img', img)
        k = cv.waitKey(0) & 0xFF
        if k == ord('s'):
            cv.imwrite(fname+'AXIS'+'.png', img)
cv.destroyAllWindows()
摄像头实时识别程序如下:
import numpy as np
import cv2

cap = cv2.VideoCapture(0)
# 导入相机矩阵
with np.load('B.npz') as X:
    mtx, dist, _, _ = [X[i] for i in ('mtx', 'dist', 'rvecs', 'tvecs')]


# 画坐标轴
def draw(img, corners, imgpts):
    corner = tuple(corners[0].ravel())
    img = cv2.line(img, corner, tuple(imgpts[0].ravel()), (255, 0, 0), 5)
    img = cv2.line(img, corner, tuple(imgpts[1].ravel()), (0, 255, 0), 5)
    img = cv2.line(img, corner, tuple(imgpts[2].ravel()), (0, 0, 255), 5)
    return img


criteria = (cv2.TERM_CRITERIA_EPS + cv2.TERM_CRITERIA_MAX_ITER, 30, 0.001)
objp = np.zeros((6*6, 3), np.float32)
objp[:, :2] = np.mgrid[0:6, 0:6].T.reshape(-1, 2)
axis = np.float32([[3, 0, 0], [0, 3, 0], [0, 0, -3]]).reshape(-1, 3)


if cap.isOpened() is True:  # 检查摄像头是否正常启动
    while(1):
        ret, img = cap.read()
        gray = cv2.cvtColor(img, cv2.COLOR_BGR2GRAY)
        ret, corners = cv2.findChessboardCorners(gray, (6, 6), None)
        if not ret:
            cv2.imshow('img', img)
        else:
            corners2 = cv2.cornerSubPix(
                gray, corners, (11, 11), (-1, -1), criteria)
            # Find the rotation and translation vectors.
            ret, rvecs, tvecs = cv2.solvePnP(objp, corners2, mtx, dist)
            # project 3D points to image plane
            imgpts, jac = cv2.projectPoints(axis, rvecs, tvecs, mtx, dist)
            img = draw(img, corners2, imgpts)
            cv2.imshow('img', img)
        k = cv2.waitKey(5) & 0xFF
        if k == ord('s'):
            cv2.imwrite('AXIS'+'.png', img)
        elif k == 27:
            break
    cap.release()
    cv2.destroyAllWindows()
else:
    print('cap is not opened!')
效果如下:

2 渲染一个立方体
如果你想绘制一个立方体的话要对 draw() 函数进行如下修改: 修改后的 draw() 函数:
def draw(img, corners, imgpts):
    imgpts = np.int32(imgpts).reshape(-1, 2)
    # draw ground floor in green
    img = cv2.drawContours(img, [imgpts[:4]], -1, (0, 255, 0), -3)
    # draw pillars in blue color
    for i, j in zip(range(4), range(4, 8)):
        img = cv2.line(img, tuple(imgpts[i]), tuple(imgpts[j]), (255), 3)
    # draw top layer in red color
    img = cv2.drawContours(img, [imgpts[4:]], -1, (0, 0, 255), 3)
    return img
修改后的坐标轴点。它们是 3D 空间中的一个立方体的 8 个角点:
axis = np.float32([[0, 0, 0], [0, 3, 0], [3, 3, 0], [3, 0, 0],
                   [0, 0, -3], [0, 3, -3], [3, 3, -3], [3, 0, -3]])
摄像头实时监测程序如下:
import numpy as np
import cv2

cap = cv2.VideoCapture(0)
# 导入相机矩阵
with np.load('B.npz') as X:
    mtx, dist, _, _ = [X[i] for i in ('mtx', 'dist', 'rvecs', 'tvecs')]


# 画立方体
def draw(img, corners, imgpts):
    imgpts = np.int32(imgpts).reshape(-1, 2)
    # draw ground floor in green
    img = cv2.drawContours(img, [imgpts[:4]], -1, (0, 255, 0), -3)
    # draw pillars in blue color
    for i, j in zip(range(4), range(4, 8)):
        img = cv2.line(img, tuple(imgpts[i]), tuple(imgpts[j]), (255), 3)
    # draw top layer in red color
    img = cv2.drawContours(img, [imgpts[4:]], -1, (0, 0, 255), 3)
    return img


criteria = (cv2.TERM_CRITERIA_EPS + cv2.TERM_CRITERIA_MAX_ITER, 30, 0.001)
objp = np.zeros((6*6, 3), np.float32)
objp[:, :2] = np.mgrid[0:6, 0:6].T.reshape(-1, 2)
axis = np.float32([[0, 0, 0], [0, 3, 0], [3, 3, 0], [3, 0, 0],
                   [0, 0, -3], [0, 3, -3], [3, 3, -3], [3, 0, -3]])


if cap.isOpened() is True:  # 检查摄像头是否正常启动
    while(1):
        ret, img = cap.read()
        gray = cv2.cvtColor(img, cv2.COLOR_BGR2GRAY)
        ret, corners = cv2.findChessboardCorners(gray, (6, 6), None)
        if not ret:
            cv2.imshow('img', img)
        else:
            corners2 = cv2.cornerSubPix(
                gray, corners, (11, 11), (-1, -1), criteria)
            # Find the rotation and translation vectors.
            ret, rvecs, tvecs = cv2.solvePnP(objp, corners2, mtx, dist)
            # project 3D points to image plane
            imgpts, jac = cv2.projectPoints(axis, rvecs, tvecs, mtx, dist)
            img = draw(img, corners2, imgpts)
            cv2.imshow('img', img)
        k = cv2.waitKey(5) & 0xFF
        if k == ord('s'):
            cv2.imwrite('CUBE'+'.png', img)
        elif k == 27:
            break
    cap.release()
    cv2.destroyAllWindows()
else:
    print('cap is not opened!')
效果如下:


 2534
2534

 被折叠的 条评论
为什么被折叠?


