


特征匹配算法简介
OpenCV库函数里面集成了相关特征匹配算法,目前有:Brute-Force Matcher(BF)算法、FLANN算法使用频率较高。暴力匹配算法比较简单:就是通过描述子descriptors1中任意特征去匹配descriptors2中的所有特征,得到距离的结果值,然后通过Ratio-test抑制来降低错误匹配点。FLANN算法是最近邻算法的快速近似,以此来提升匹配的计算效率,下面我们来简单通过调用OpenCV自带的库函数进行运用。
1 ORB匹配算法(Python)
ORB算法是当前唯一能够满足实时性的应用场景匹配算法,当然其性能要比SIFT/SURF算法略差。但是,其能够在相对保持性能的同时,计算速度大幅提升。在室内定位、导航等应用广泛,例如较为经典算法:ORB-SLAM,具体ORB算法细节可以参考我另外一篇C++版本的ORB博文:OpenCV实践之ORB算法
from __future__ import print_function
import cv2 as cv
import numpy as np

img1 = cv.imread('./data/box.png', cv.IMREAD_GRAYSCALE)
img2 = cv.imread('./data/box_in_scene.png', cv.IMREAD_GRAYSCALE)
if img1 is None or img2 is None:
    print('Could not open or find the images!')
    exit(0)

#-- Step 1: Detect the keypoints using SURF Detector, compute the descriptors
detector = cv.ORB_create()

keypoints1, descriptors1 = detector.detectAndCompute(img1, None)
keypoints2, descriptors2 = detector.detectAndCompute(img2, None)

#-- Step 2: Matching descriptor vectors with a brute force matcher
matcher = cv.BFMatcher(cv.NORM_HAMMING, crossCheck=True)
matches = matcher.match(descriptors1, descriptors2)

# Sort matches in the order of their distances
matches = sorted(matches, key = lambda x : x.distance)
#-- Draw matches
img_matches = np.empty((max(img1.shape[0], img2.shape[0]), img1.shape[1]+img2.shape[1], 3), dtype=np.uint8)
cv.drawMatches(img1, keypoints1, img2, keypoints2, matches[:10], img_matches)

#-- Show detected matches
cv.imshow('Matches', img_matches)
cv.waitKey(0)
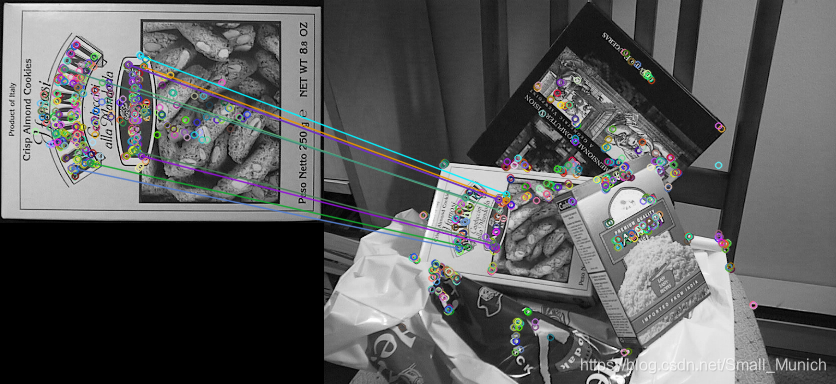
1.1 ORB算法实验结果
2 SIFT算法
谈到SIFT算法,不用再具体讨论其算法细节!网上资源解说很多,原因也是SIFT算法是最经典的特征匹配算法。当然,也可以参考一下我的博文:C++版本实现OpenCV实践之SIFT/SURF算法,SIFT算法解说:SIFT算法系列之尺度空间和SIFT算法系列之特征点检测。OK, 下面上Python版本的代码:
2.1 SIFT+BF+Ratio-Test
from __future__ import print_function
import cv2 as cv
import numpy as np

img1 = cv.imread('./data/box.png', cv.IMREAD_GRAYSCALE)
img2 = cv.imread('./data/box_in_scene.png', cv.IMREAD_GRAYSCALE)
if img1 is None or img2 is None:
    print('Could not open or find the images!')
    exit(0)

#-- Step 1: Detect the keypoints using SIFT Detector, compute the descriptors
detector = cv.xfeatures2d_SIFT.create()

keypoints1, descriptors1 = detector.detectAndCompute(img1, None)
keypoints2, descriptors2 = detector.detectAndCompute(img2, None)

#-- Step 2: Matching descriptor vectors with a brute force matcher
matcher = cv.BFMatcher()
matches = matcher.knnMatch(descriptors1, descriptors2, k=2)

#--Step 3: Apply Ratio Test
good = []
for m,n in matches:
    if m.distance < 0.5*n.distance:
        good.append([m])

#-- Draw matches
img_matches = np.empty((max(img1.shape[0], img2.shape[0]), img1.shape[1]+img2.shape[1], 3), dtype=np.uint8)
cv.drawMatchesKnn(img1, keypoints1, img2, keypoints2, good, img_matches)

#-- Show detected matches
cv.imshow('Matches', img_matches)
cv.waitKey(0)
2.1 SIFT使用BF算法+Ratio-Test来进行特征匹配

2.2 SIFT+FLANN算法代码
from __future__ import print_function
import cv2 as cv

from matplotlib import pyplot as plt

img1 = cv.imread('./data/box.png', cv.IMREAD_GRAYSCALE)
img2 = cv.imread('./data/box_in_scene.png', cv.IMREAD_GRAYSCALE)
if img1 is None or img2 is None:
    print('Could not open or find the images!')
    exit(0)

# Initiate SIFT detector
detector = cv.xfeatures2d_SIFT.create()

keypoints1, descriptors1 = detector.detectAndCompute(img1, None)
keypoints2, descriptors2 = detector.detectAndCompute(img2, None)

# FLANN paramters
FLANN_INDEX_KDTREE = 0
index_params = dict(algorithm = FLANN_INDEX_KDTREE, trees = 5)
search_params = dict(check=50) # or pass dictory

flann = cv.FlannBasedMatcher(index_params, search_params)

matches = flann.knnMatch(descriptors1, descriptors2, k=2)

# Need to draw only good matches, so create a mask
matchesMask = [[0,0] for i in range(len(matches))] # python2.x for xrange()

# ratio test as per Lowe's paper
for i,(m,n) in enumerate(matches):
    if m.distance < 0.5 * n.distance:
        matchesMask[i] = [1,0]

draw_params = dict(matchColor=(0, 0, 255), singlePointColor=(255, 0, 0),
                   matchesMask=matchesMask, flags=0)

img_matches = cv.drawMatchesKnn(img1, keypoints1, img2, keypoints2, matches, None, **draw_params)

#-- Show detected matches
cv.imshow('Matches', img_matches)
cv.waitKey(0)
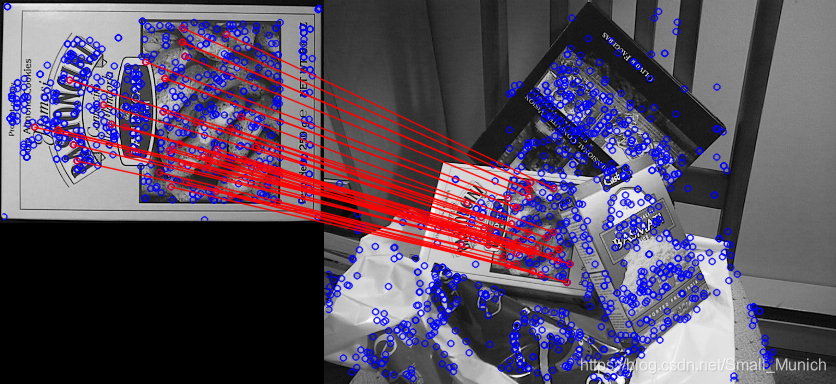
2.2 SIFT+FLANN算法特征匹配结果
3 小结
简单学习使用opencv-python版本进行调用相关特征匹配函数,当然python2.x在官网示例可以直接运行。python3.x会有一些小地方需要修改,本文是基于python3.x系列的代码,如果你安装的是python3.x系列的话,可以直接运行。逐渐熟悉python-opencv版本函数调用后,将会在以后更新python-opencv相关算法。如有错误,还请批评指正!


 5844
5844

 被折叠的 条评论
为什么被折叠?
被折叠的 条评论
为什么被折叠?
 到【灌水乐园】发言


