


数据洞察预设到业务流程中
With Presets, you can customize the default state of just about anything in Unity – Components, Importers, Managers – without coding. Presets can benefit development teams of all sizes, from streamlining repetitive tasks or validating design decisions, to enforcing standards and project templating. In this post, we’ll dig into many of the features provided by Presets, including basic functionality, tips and tricks, and then delve into some advanced use cases.
使用预设,您可以自定义Unity中几乎所有内容(组件,导入程序,管理器)的默认状态,而无需进行编码。 预设可以使各种规模的开发团队受益,从简化重复任务或验证设计决策到执行标准和项目模板。 在本文中,我们将深入研究Presets提供的许多功能,包括基本功能,技巧和窍门,然后深入研究一些高级用例。
首先,什么是预设? (First things first: what is a Preset?)
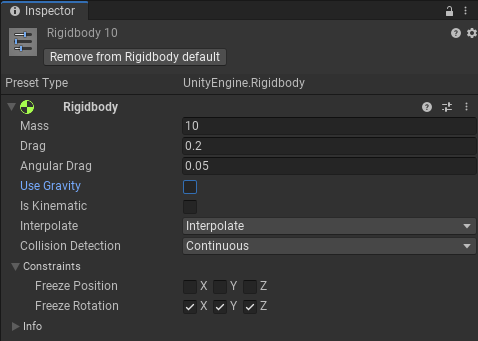
Fundamentally, a Preset is an Asset that allows you to override the defaults for a given Component, Importer, or Manager (anything that extends Unity.Object, in fact). Would it make more sense in your project for a RigidBody to default to a mass of 10 instead of 1, but have gravity turned off? Make it so with a preset.
从根本上讲,预设是一项资产,它使您可以覆盖给定Component,Importer或Manager( 实际上 是扩展 Unity.Object的 任何内容)的默认值 。 将RigidBody的质量默认设置为10而不是1,但关闭重力会更有意义吗? 使用预设进行调整。
We can use Presets on things that get imported or instantiated in the hierarchy: Textures, FBX files, MonoBehaviour components like Light, Camera, or RigidBody.
我们可以对在层次结构中导入或实例化的对象使用“预设”:纹理,FBX文件,诸如光,相机或RigidBody之类的MonoBehaviour组件。
Note that Presets are an Editor feature, designed to improve your authoring workflow, not a runtime feature. The Presets aren’t shipped with your binary, so don’t expect GameObject.AddComponent<RigidBody>() to apply these same defaults. However, the Editor-time ObjectFactory API does support Presets, so ObjectFactory.AddComponent<RigidBody>() operates with the assumption that the project Presets will be respected.
请注意,预设是一种编辑器功能,旨在改善您的创作工作流程,而不是运行时功能。 预设不随您的二进制文件一起提供,因此不要期望 GameObject.AddComponent <RigidBody>() 应用这些相同的默认值。 但是,编辑时ObjectFactory API 确实 支持Presets,因此 ObjectFactory.AddComponent <RigidBody>()的 运行假设是将遵守项目Presets。
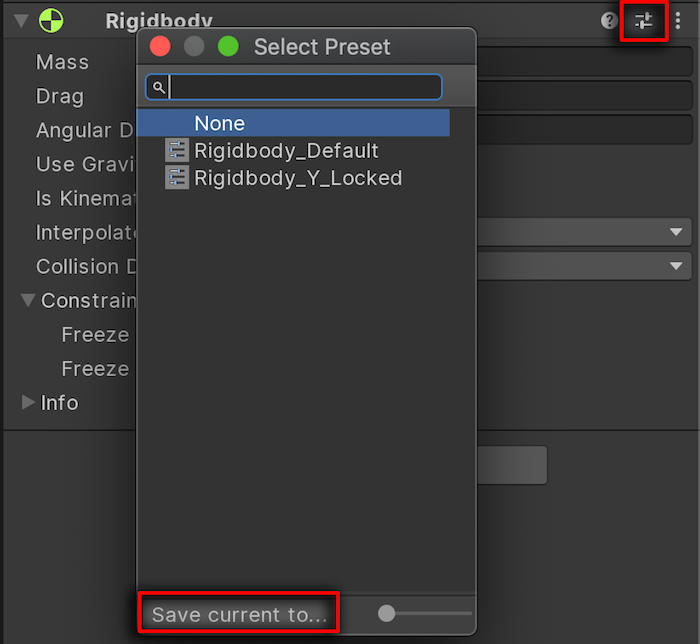
To create a Preset, all you need to do is go to an existing importer or component of the same type, make your adjustments to it in the Inspector, then click the Preset Icon in the upper right. A window will open where you can choose “Save Current To…” to save out the asset.
要创建预设,您所需要做的就是转到现有的相同类型的导入器或组件,在检查器中对其进行调整,然后单击右上角的预设图标。 将打开一个窗口,您可以在其中选择“保存当前到...”以保存资产。
快速使用预设的提示和技巧 (Tips and tricks for working quickly with Presets)
Here are a few fun ways to apply Presets in your project.
这是在项目中应用预设的一些有趣方法。
单击预设图标 (Click the Preset Icon)
OK, this one is (hopefully) pretty obvious. Clicking the Preset Icon in any Inspector will allow you to select any preset for the same component or file Type.
好的,这一点(希望)很明显。 单击任何检查器中的“预设”图标将使您可以为同一组件或文件类型选择任何预设。
拖放到检查器 (Drag-and-drop to Inspector)
You can simply drag a preset from the Project Window and onto a component in the Inspector if you want to change the values of that component.
如果要更改某个组件的值,只需将其从“项目”窗口拖到“检查器”中的某个组件上即可。
You can also add a new Component to a GameObject by dragging the preset into the Inspector.
您还可以通过将预设拖动到Inspector中,将新的Component添加到GameObject。
拖放到层次结构 (Drag-and-drop to Hierarchy)
Presets can also be used to create new objects in the hierarchy. You can quickly create a new GameObject containing the preset’s associated component by dragging from the Project Window straight into the hierarchy.
预设还可以用于在层次结构中创建新对象。 您可以通过从“项目”窗口直接拖动到层次结构中,快速创建一个包含预设的关联组件的新GameObject。
This workflow is a little bit like working with a prefab, but note that Presets are not prefabs! The preset – by design – maintains no link with any object created from that preset.
此工作流程有点像使用预制件,但请注意,预设 不是 预制件! 预设(根据设计)不与从该预设创建的任何对象保持链接。
You can even drag-and-drop multiple Presets and generate a GameObject with all the associated components!
您甚至可以拖放多个预设,并生成具有所有相关组件的GameObject!
管理预设 (Managing Presets)
Presets work in conjunction with the Preset Manager, a UI found within Edit → Project Settings…
预设与“预设管理器”结合使用,“预设管理器”位于“编辑”→“项目设置”…中。
To add a default, open the Preset Manager, click “Add Default Preset”, then select the Type for which you want a default. Finally, click the circle to the right of None (Preset) and select a preset asset that matches the Type from the Select Preset popup.
要添加默认设置,请打开“预设管理器”,单击“添加默认预设”,然后选择您想要默认设置的类型。 最后,单击“无(预设)”右边的圆圈,然后从“选择预设”弹出窗口中选择一个与“类型”匹配的预设资产。
Here’s a more populated Preset Manager in which we can see the RigidBody 10 preset that we created at the start of this blog post, applied as the project default for RigidBody.
这是一个人口更多的预设管理器,在其中我们可以看到 我们在本博文开头创建 的 RigidBody 10 预设,将其用作RigidBody的项目默认设置。
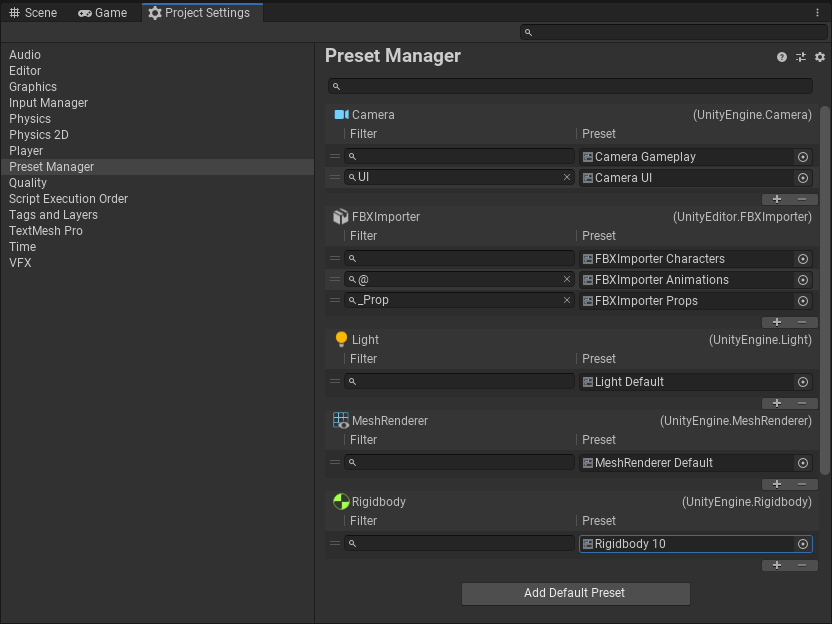
With this setup, every RigidBody created will, by default, come with a mass of 10 and gravity disabled.
使用此设置,默认情况下,创建的每个RigidBody的质量均为10,并且禁用了重力。
But check out how the Preset Manager allows more than one default per Type. This powerful extension of the preset idea – new in 2019.3 – means that we can have multiple “defaults” between which we can discriminate based on a name. Looking at Camera in the image above, you’ll observe that the blank filter uses the Camera Gameplay preset. This means that by default every camera will use this preset. But we’ve tied the filter “UI” to a Camera UI preset for use with our UI cameras. With this setup, if I create any camera with “UI” anywhere in the GameObject name – “UICamera”, “Camera UI”, or “HUDUICamera” – the Camera UI preset will be used in preference to the default one.
但是,请检查“预设管理器”如何为每种类型允许多个默认值。 预设概念的强大扩展(2019.3中的新增功能)意味着我们可以有多个“默认值”,可以根据名称在它们之间进行区分。 查看上图中的“相机”,您会发现空白滤镜使用了“ 相机游戏 设置”预设。 这意味着默认情况下,每个摄像机都将使用此预设。 但是我们已经将过滤器“ UI”绑定到了 与我们的UI相机一起使用 的 Camera UI 预设。 通过此设置,如果我在GameObject名称中的任何位置创建带有“ UI”的任何摄像机–“ UICamera”,“ Camera UI”或“ HUDUICamera”, 则将优先使用 Camera UI 预设,而不是默认 摄像机 。

Some notes about Preset Manager:
关于预设管理器的一些注意事项:
String matching is case-insensitive, so in the “UI” example above be careful of a name like “GuideCamera”, which includes the matching “UI” string but may not be what you intended!
字符串匹配不区分大小写,因此在上面的“ UI”示例中,请小心使用“ GuideCamera”之类的名称,其中包括匹配的“ UI”字符串,但可能不是您想要的!
Where an object matches multiple defaults for a single type, the preset applied will be the LAST match in the list.
当一个对象与单个类型的多个默认值匹配时,所应用的预设将是列表中的LAST匹配项。
You can reset any component to a default by choosing “Reset” for that component.
通过为该组件选择“重置”,可以将任何组件重置为默认组件。
For importers, it’s the file name, rather than the GameObject name, that drives which filter gets used.
对于进口商来说,驱动使用哪个过滤器的是文件名而不是GameObject名称。
经理预设 (Presets for managers)
One of the great virtues of Presets is their ability to align a team on key art and design decisions: what color are our lights? How heavy do we want RigidBodies to be? What are our standards for importing normal maps? When applying Presets to managers, we can carry this idea forward to the project level. Let’s look, for example, at the Physics Manager and the Tags and Layers Manager.
Presets的一大优点是能够使团队根据关键的艺术和设计决策进行调整:我们的灯是什么颜色的? 我们希望RigidBodies有多重? 我们导入法线贴图的标准是什么? 在将预设应用于管理人员时,我们可以将此想法推广到项目级别。 例如,让我们看一下“物理管理器”和“标签和图层管理器”。
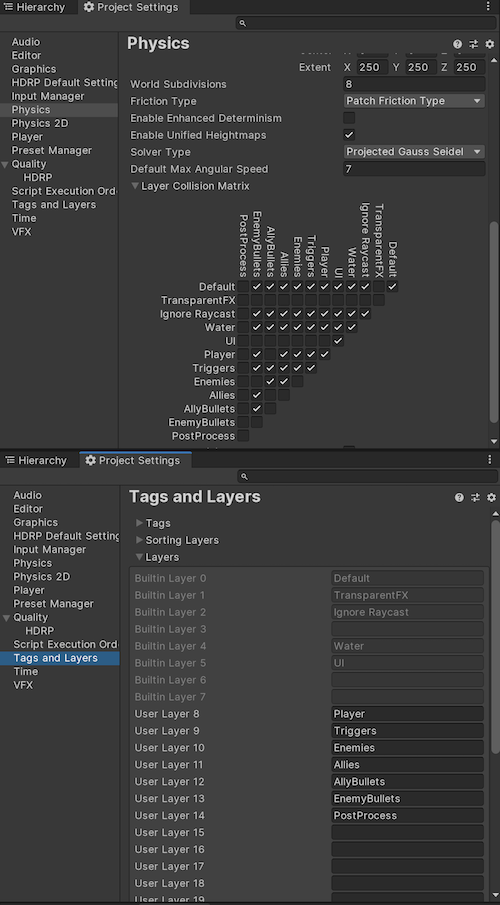
In the example, we’ve gone to rather a lot of trouble to ensure a specific set of physics interactions between layers (enemies don’t interact with other enemies, allies and their bullets don’t interact with other allies). These decisions may have relevance for follow-on or adjoining projects, and Presets make it easy to memorialize decisions and share those from one project to another.
在该示例中,为了确保各层之间的一组特定的物理相互作用,我们付出了很多麻烦(敌人不会与其他敌人互动,盟友及其子弹不会与其他盟友互动)。 这些决策可能与后续或毗邻的项目相关,而“预设”可以使您轻松记住决策并将这些决策从一个项目共享给另一个项目。
In the animation below, watch how we save the two managers out and apply them to a separate project. This can be a big help for bootstrapping new projects in your organization.
在下面的动画中,观看我们如何将两个经理省下来,并将其应用于一个单独的项目。 这对于引导组织中的新项目可能是一个很大的帮助。
当然有一个API! (Of course there’s an API!)
For the majority of cases, the visual interface above is probably sufficient, but if you’re authoring, say, an import pipeline or building tooling it might help to have programmatic control over your Presets. To this end we’ve exposed the Presets API for your enjoyment and productivity.
在大多数情况下,上面的可视界面可能就足够了,但是,例如,如果您编写的是导入管道或构建工具,则可以通过编程方式控制预设。 为此,我们公开了Presets API,以帮助您提高工作效率。
The following examples are all available on Github.
以下示例在 Github 上都可用 。
Let’s start with a simple example. Imagine we want to add a tool that applies one or more properties from a single light to all the lights in a scene.
让我们从一个简单的例子开始。 想象一下,我们想添加一个工具,将一个或多个属性从单个光源应用于场景中的所有光源。
|
1
2
3
4
5
6
7
8
9
10
11
12
13
14
15
16
17
18
19
20
21
|
[MenuItem("CONTEXT/Light/Replicate Color in Scene")]
public static void ApplyAllLights(MenuCommand command)
{
// Get our current selected light
var referenceLight = command.context as Light;
if (referenceLight != null)
{
// Create a Preset out of it
var lightPreset = new Preset(referenceLight);
// Find all Light components in the scene of our reference light
var allLights = referenceLight.gameObject.scene.GetRootGameObjects()
.SelectMany(r => r.GetComponentsInChildren<Light>(true));
// Choose which serialized property we want to apply to everyone
var propertyToApply = new[] { "m_Color" };
// Apply the Preset with only the selected property to all the Lights
foreach (var light in allLights)
{
lightPreset.ApplyTo(light, propertyToApply);
}
}
}
|
|
1
2
3
4
5
6
7
8
9
10
11
12
13
14
15
16
17
18
19
20
21
|
[ MenuItem ( "CONTEXT/Light/Replicate Color in Scene" ) ]
public static void ApplyAllLights ( MenuCommand command )
{
// Get our current selected light
var referenceLight = command . context as Light ;
if ( referenceLight != null )
{
// Create a Preset out of it
var lightPreset = new Preset ( referenceLight ) ;
// Find all Light components in the scene of our reference light
var allLights = referenceLight . gameObject . scene . GetRootGameObjects ( )
. SelectMany ( r = > r . GetComponentsInChildren < Light > ( true ) ) ;
// Choose which serialized property we want to apply to everyone
var propertyToApply = new [ ] { "m_Color" } ;
// Apply the Preset with only the selected property to all the Lights
foreach ( var light in allLights )
{
lightPreset . ApplyTo ( light , propertyToApply ) ;
}
}
}
|
This code takes a reference object, a light, and then creates a Preset on-the-fly (var lightPreset = new Preset(referenceLight)). It then uses m_Color from the referenceLight to apply that value to all other lights in the scene.
此代码获取一个参考对象,一个光源,然后动态创建一个预设( var lightPreset = new Preset(referenceLight) )。 然后,它使用 m_Color 从 referenceLight 该值适用于场景中的所有其他灯。
Here’s how our new tool behaves inside Unity.
这是我们的新工具在Unity内部的行为方式。
Note that this demonstrates a programmatic example of a partial preset, i.e., the code grabs and applies just a subset of the full preset property set. This is a functionality we hope to expose in UI sometime soon.
请注意,这演示了 部分 预设 的程序化示例 ,即代码仅获取并应用了完整预设属性集的子集。 我们希望此功能可以尽快在UI中公开。
For our second example, let’s look at how we can apply a single preset to all assets of the same Type in a project folder.
对于第二个示例,让我们看一下如何将单个预设应用于项目文件夹中相同类型的所有资产。
|
1
2
3
4
5
6
7
8
9
10
11
12
13
14
15
16
17
18
19
20
21
22
23
24
25
26
27
|
[MenuItem("CONTEXT/Material/Replicate Material Color in Folder")]
public static void ApplyAllMaterialsInFolder(MenuCommand command)
{
// Get our current selected Material
var referenceMaterial = command.context as Material;
if (referenceMaterial != null)
{
var assetPath = AssetDatabase.GetAssetPath(referenceMaterial);
if (!string.IsNullOrEmpty(assetPath))
{
// Create a Preset out of it
var materialPreset = new Preset(referenceMaterial);
// Find all Material assets in the same folder
var assetFolder = Path.GetDirectoryName(assetPath);
var allMaterials = AssetDatabase.FindAssets("t:Material", new[] { assetFolder })
.Select(AssetDatabase.GUIDToAssetPath)
.Select(AssetDatabase.LoadAssetAtPath<Material>);
// Select the first color entry; in the standard shader this entry is _Color
var propertyToApply = new[] { "m_SavedProperties.m_Colors.Array.data[0]" };
// Apply the Preset with only the selected property to all the Materials
foreach (var material in allMaterials)
{
materialPreset.ApplyTo(material, propertyToApply);
}
}
}
}
|
|
1
2
3
4
5
6
7
8
9
10
11
12
13
14
15
16
17
18
19
20
21
22
23
24
25
26
27
|
[ MenuItem ( "CONTEXT/Material/Replicate Material Color in Folder" ) ]
public static void ApplyAllMaterialsInFolder ( MenuCommand command )
{
// Get our current selected Material
var referenceMaterial = command . context as Material ;
if ( referenceMaterial != null )
{
var assetPath = AssetDatabase . GetAssetPath ( referenceMaterial ) ;
if ( ! string . IsNullOrEmpty ( assetPath ) )
{
// Create a Preset out of it
var materialPreset = new Preset ( referenceMaterial ) ;
// Find all Material assets in the same folder
var assetFolder = Path . GetDirectoryName ( assetPath ) ;
var allMaterials = AssetDatabase . FindAssets ( "t:Material" , new [ ] { assetFolder } )
. Select ( AssetDatabase . GUIDToAssetPath )
. Select ( AssetDatabase . LoadAssetAtPath < Material > ) ;
// Select the first color entry; in the standard shader this entry is _Color
var propertyToApply = new [ ] { "m_SavedProperties.m_Colors.Array.data[0]" } ;
// Apply the Preset with only the selected property to all the Materials
foreach ( var material in allMaterials )
{
materialPreset . ApplyTo ( material , propertyToApply ) ;
}
}
}
}
|
As before, we take a reference object, this time a selected Material (var referenceMaterial = command.context as Material), then use it to create a Preset on-the-fly (var materialPreset = new Preset(referenceMaterial)). Then we locate the folder in which this material resides and apply the Color property to all materials in the same folder.
和以前一样,我们采用一个参考对象,这次是一个选定的Material( var referenceMaterial = command.context 为 Material ),然后使用它来动态创建一个预设( var materialPreset = new Preset(referenceMaterial) )。 然后,我们找到该材质所在的文件夹,并将Color属性应用于同一文件夹中的所有材质。
Again, let’s see how this plays out in the Editor.
再次,让我们看看它如何在编辑器中进行。
Finally, let’s look at a somewhat more complex example. In this snippet, we’re taking a selected light and – depending on whether a Light default already exists – either creating that preset or updating the default preset to match the selection. Follow the comments in the code below to understand how it works.
最后,让我们看一个更复杂的示例。 在此片段中,我们将选择一个灯光,并根据该灯光是否已存在默认值来创建该预设或更新默认预设以匹配该选择。 请按照下面的代码中的注释来了解其工作原理。
|
1
2
3
4
5
6
7
8
9
10
11
12
13
14
15
16
17
18
19
20
21
22
23
24
25
26
27
28
29
30
31
32
33
34
35
36
37
38
39
40
41
42
43
44
45
|
public static void UpdateOrAddLightDefaults(MenuCommand command)
{
// Get our current selected light
var referenceLight = command.context as Light;
// Get the list of default Presets that apply to that light
var defaults = Preset.GetDefaultPresetsForObject(referenceLight);
if (defaults.Length == 0)
{
// We don't have a default yet, let's create one!
var defaultLight = new Preset(referenceLight);
// We're kind people, so let's nicely ask the user where to save this default
var path = EditorUtility.SaveFilePanelInProject("Create Default Light preset",
"Light", "preset", "Select a folder to save the new default");
// If the selected path already contains a Preset, its instanceID would be changed by a plain replace
// We use this trick to replace the values only so an Object referencing the existing asset will not break
var existingAsset = AssetDatabase.LoadAssetAtPath<Preset>(path);
if (existingAsset != null)
{
EditorUtility.CopySerialized(defaultLight, existingAsset);
defaultLight = existingAsset;
}
else
{
AssetDatabase.CreateAsset(defaultLight, path);
}
// Load the existing default list
// We don't want to lose any configuration that may point specific GameObject because of the filters
var existingDefault = Preset.GetDefaultPresetsForType(defaultLight.GetPresetType()).ToList();
// Insert the new one at the beginning of the list with no filter
// so it applies to any Light that doesn't have a default
existingDefault.Insert(0, new DefaultPreset("", defaultLight));
// Set the new list as default for Lights.
Preset.SetDefaultPresetsForType(defaultLight.GetPresetType(), existingDefault.ToArray());
}
else
{
// We want to update the values only to the last default
// because maybe other Presets apply to other objects first
// and we don't want to change them
var lastPreset = defaults.Last();
lastPreset.UpdateProperties(referenceLight);
}
}
|
|
1
2
3
4
5
6
7
8
9
10
11
12
13
14
15
16
17
18
19
20
21
22
23
24
25
26
27
28
29
30
31
32
33
34
35
36
37
38
39
40
41
42
43
44
45
|
public static void UpdateOrAddLightDefaults ( MenuCommand command )
{
// Get our current selected light
var referenceLight = command . context as Light ;
// Get the list of default Presets that apply to that light
var defaults = Preset . GetDefaultPresetsForObject ( referenceLight ) ;
if ( defaults . Length == 0 )
{
// We don't have a default yet, let's create one!
var defaultLight = new Preset ( referenceLight ) ;
// We're kind people, so let's nicely ask the user where to save this default
var path = EditorUtility . SaveFilePanelInProject ( "Create Default Light preset" ,
"Light" , "preset" , "Select a folder to save the new default" ) ;
// If the selected path already contains a Preset, its instanceID would be changed by a plain replace
// We use this trick to replace the values only so an Object referencing the existing asset will not break
var existingAsset = AssetDatabase . LoadAssetAtPath < Preset > ( path ) ;
if ( existingAsset != null )
{
EditorUtility . CopySerialized ( defaultLight , existingAsset ) ;
defaultLight = existingAsset ;
}
else
{
AssetDatabase . CreateAsset ( defaultLight , path ) ;
}
// Load the existing default list
// We don't want to lose any configuration that may point specific GameObject because of the filters
var existingDefault = Preset . GetDefaultPresetsForType ( defaultLight . GetPresetType ( ) ) . ToList ( ) ;
// Insert the new one at the beginning of the list with no filter
// so it applies to any Light that doesn't have a default
existingDefault . Insert ( 0 , new DefaultPreset ( "" , defaultLight ) ) ;
// Set the new list as default for Lights.
Preset . SetDefaultPresetsForType ( defaultLight . GetPresetType ( ) , existingDefault . ToArray ( ) ) ;
}
else
{
// We want to update the values only to the last default
// because maybe other Presets apply to other objects first
// and we don't want to change them
var lastPreset = defaults . Last ( ) ;
lastPreset . UpdateProperties ( referenceLight ) ;
}
}
|
Here’s an animation showing how this works in Unity. Notice how on our first pass through we are guided through the creation of a new preset, but on our second pass, we simply update the existing one.
这是一个动画,显示了它在Unity中的工作方式。 请注意,在第一次遍历中,如何引导我们创建新的预设,但是在第二遍遍中,我们只是更新了现有预设。
下一步:预设就是您要的预设! (Next steps: Presets are what you want them to be!)
We have several ideas in the works for upcoming versions of the feature, including (as mentioned above) partial Presets, improved filtering functionality, and application of Presets to folders. But as we said at the outset, Presets are all about making Unity behave the way you need it to behave. With that in mind, it’s important to us that we hear from you. Do you have ideas for what you could be doing to improve your workflow with this feature? Let us know your thoughts in the comments!
对于即将发布的功能版本,我们有一些想法,包括(如上所述)部分预设,改进的过滤功能以及将预设应用于文件夹。 但是正如我们在一开始就说过的那样,预设就是要使Unity表现出所需的行为方式。 考虑到这一点,重要的是我们收到您的来信。 您是否对使用此功能可以改善工作流程有什么想法? 在评论中让我们知道您的想法!
数据洞察预设到业务流程中


 9538
9538

 被折叠的 条评论
为什么被折叠?
被折叠的 条评论
为什么被折叠?
 到【灌水乐园】发言


