


中国全息ar市场规模
During our talk at Unite Austin 2017, we brought up scaled content and why you would want it. We also discussed why you would not want to scale the content itself, but use “camera-tricks” to do the scaling. We showed two options for scaling content, one of them uses one camera, while the other uses two or more cameras. We want to provide the details of the implementations here.
在Unite Austin 2017的演讲中 ,我们提出了可扩展的内容以及您为什么想要它。 我们还讨论了为什么您不想缩放内容本身,而是使用“照相机技巧”进行缩放。 我们展示了两个缩放内容的选项,其中一个使用一个摄像头,而另一个使用两个或更多摄像头。 我们想在此处提供实现的详细信息。
基本原理 (Rationale)
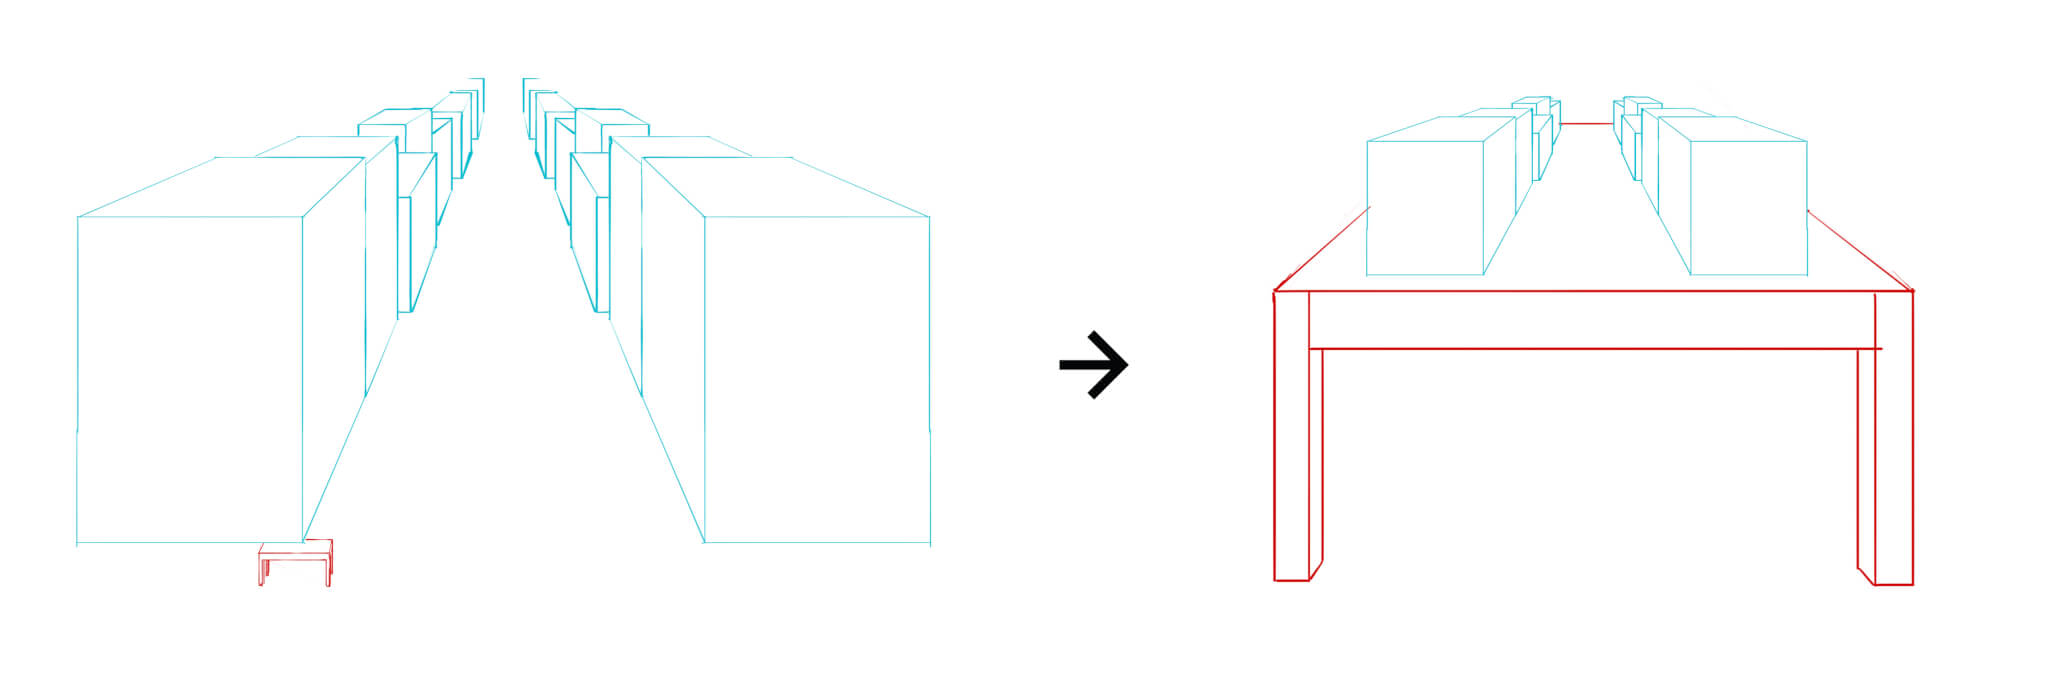
Suppose you want to create a desktop game called Ragin’ Rooster, the story of an irradiated giant chicken that scratches and pecks cities apart. You could start with a city block environment from the Asset Store. You settle on one that has a 100 meter by 100 meter area for the city block. Next, you import rooster asset into your city scene.A 0.3 meter high rooster isn’t going to terrorize anyone, so you set his scale to 100 in all three axises, making your roster 30 meters high, impressive!
假设您要创建一个名为Ragin'Rooster的桌面游戏,这个故事讲述了一只被辐照的巨型鸡在城市之间划伤和啄开的情况。 您可以从Asset Store中的城市街区环境开始。 您选择的城市街区面积为100米x 100米。 接下来,您将公鸡资产导入您的城市场景中.0.3米高的公鸡不会吓,任何人,因此您将他的标尺在所有三个轴上设置为100,使您的名册高30米,令人印象深刻!
How difficult is it to transition a third person perspective game like this into an AR experience?when moving to any new platform, you always expect some common issues, such as User Interface changes and different forms of input. AR has one additional aspect which you may not be anticipating: scale.
将这样的第三人称视角游戏转换为AR体验有多困难?当转移到任何新平台时,您总是会遇到一些常见问题,例如用户界面更改和不同形式的输入。 AR还有一个您可能不会想到的方面:规模。
Transitioning the Ragin’ Rooster game over to ARKit / ARCore first involves importing the specific asset package for each AR technology into your game. With a few minor scene changes, you are ready to see how the game looks in AR. When you launch the game, you may only see a few giant pixels that take up most of the screen. Moving around, your screen becomes obscured with these giant pixels. No city. No rooster. What went wrong?
将Ragin'Rooster游戏过渡到ARKit / ARCore首先需要将每种AR技术的特定资产包导入到您的游戏中。 进行了一些小的场景更改,您就可以看到游戏在AR中的外观。 启动游戏时,您可能只会看到占据整个屏幕大部分的几个巨大像素。 四处走动,您的屏幕被这些巨大的像素所遮盖。 没有城市。 没有公鸡 什么地方出了错?
规模 (Scale)
Unity’s editor works in distance units of meters. A 100 meter city block would take up 100 units. ARKit and ARCore also work natively in meters. Sounds like a perfect match. For some AR experiences, you may want to have assets that match up perfectly to the world. For example, a mannequin of your height showing you the latest fashions that you can walk around. For table top experiences, you will generally will want your assets to size down to fit within the play area on your table. In this example, our Ragin’ Rooster city, when put into AR, is taking up 100 meters in physical space, just like a real city block. As most tables are around half a meter in size, we have a problem fitting our city onto the table.
Unity的编辑器以米的距离单位工作。 一个100米的城市街区将占用100个单位。 ARKit和ARCore本身也可以在米中工作。 听起来像是绝配。 对于某些AR体验,您可能希望拥有与世界完美匹配的资产。 例如,一个身高高的模特向您展示您可以走动的最新时尚。 对于桌面体验,通常需要缩小资产大小以适合桌子上的游戏区域。 在此示例中,将我们的Ragin'Rooster城市放入AR后,正像实际的城市街区一样占用了100米的物理空间。 由于大多数桌子的大小约为半米,因此我们无法将城市安装到桌子上。
As an experienced Unity developer, your first solution to scaling the city, rooster, and effects to fit on the table might be to place everything under one parent transform and scale that transform. Visually, the city and the rooster will scale down, but effects do not scale properly. Your rooster may still move at the original speed. In addition, gravity isn’t scaled, causing everything to fall at crazy fast speeds. You could spend a lot of time manually tweaking these areas to try and get it to match up, but if you want to support different table sizes and always have your city scale appropriately, this might become nearly impossible.
作为经验丰富的Unity开发人员,要缩放城市,公鸡和效果使其适合桌面的第一个解决方案可能是将所有内容置于一个父变换下并缩放该变换。 在视觉上,城市和公鸡将按比例缩小,但效果无法按比例缩放。 您的公鸡可能仍会以原始速度移动。 此外,重力没有按比例缩放,导致一切以疯狂的快速速度坠落。 您可能需要花费大量时间手动调整这些区域以使其匹配,但是如果您要支持不同的表大小并始终保持适当的城市规模,则这几乎变得不可能。
Fortunately, the new common AR scripting interfaces solve this problem without requiring you to manually adjust individual aspects within your game. We offer two different solutions depending upon your needs: one which is designed to apply a universal scale across the entire scene and one which allows different mixtures of scale.
幸运的是,新的通用AR脚本界面可以解决此问题, 而无需您手动调整游戏中的各个方面。 我们根据您的需求提供两种不同的解决方案:一种设计为在整个场景中应用通用比例尺,另一种则允许不同比例尺的混合。
通用秤 (Universal Scale)
The easiest thing to do is simply multiply all positional data coming from the device by a constant scale value. This includes the position of the device itself, as well as any data it generates, such as planes or feature points. Rotational information does not need to be scaled.
最简单的方法是将来自设备的所有位置数据乘以恒定的比例值。 这包括设备本身的位置以及它生成的任何数据,例如平面或特征点。 旋转信息不需要缩放。
ARCore and ARKit produce information in meter scale, but it is relative to where it begins tracking. That is, (0, 0, 0) refers to the position at the time the app began. All the data it produces, e.g. planes, are also relative to this startup position. We’ll call this “device space.”
ARCore和ARKit产生以米为单位的信息,但它与开始跟踪的位置有关。 也就是说,(0,0,0)表示应用程序启动时的位置。 它产生的所有数据(例如飞机)也都与此启动位置有关。 我们将其称为“设备空间”。
Unity also uses meters, but a common use case might be to scale those multi-meter tall objects down to the size of a few real-world centimeters. We’ll call this original space in which the scene was authored “content space.”
Unity还使用仪表,但是一个常见的用例可能是将那些多米高的对象缩小到几个实际厘米的大小。 我们将场景被编写为的原始空间称为“内容空间”。
Multiplying positional data by a scale factor transforms from device space into content space. Scaling the content, by contrast, transforms content space into device space. The latter is much more difficult, since many systems within Unity change their behavior or are difficult to scale effectively.
将位置数据乘以比例因子会从设备空间转换为内容空间。 相反,缩放内容会将内容空间转换为设备空间。 后者要困难得多,因为Unity中的许多系统都会更改其行为或难以有效扩展。
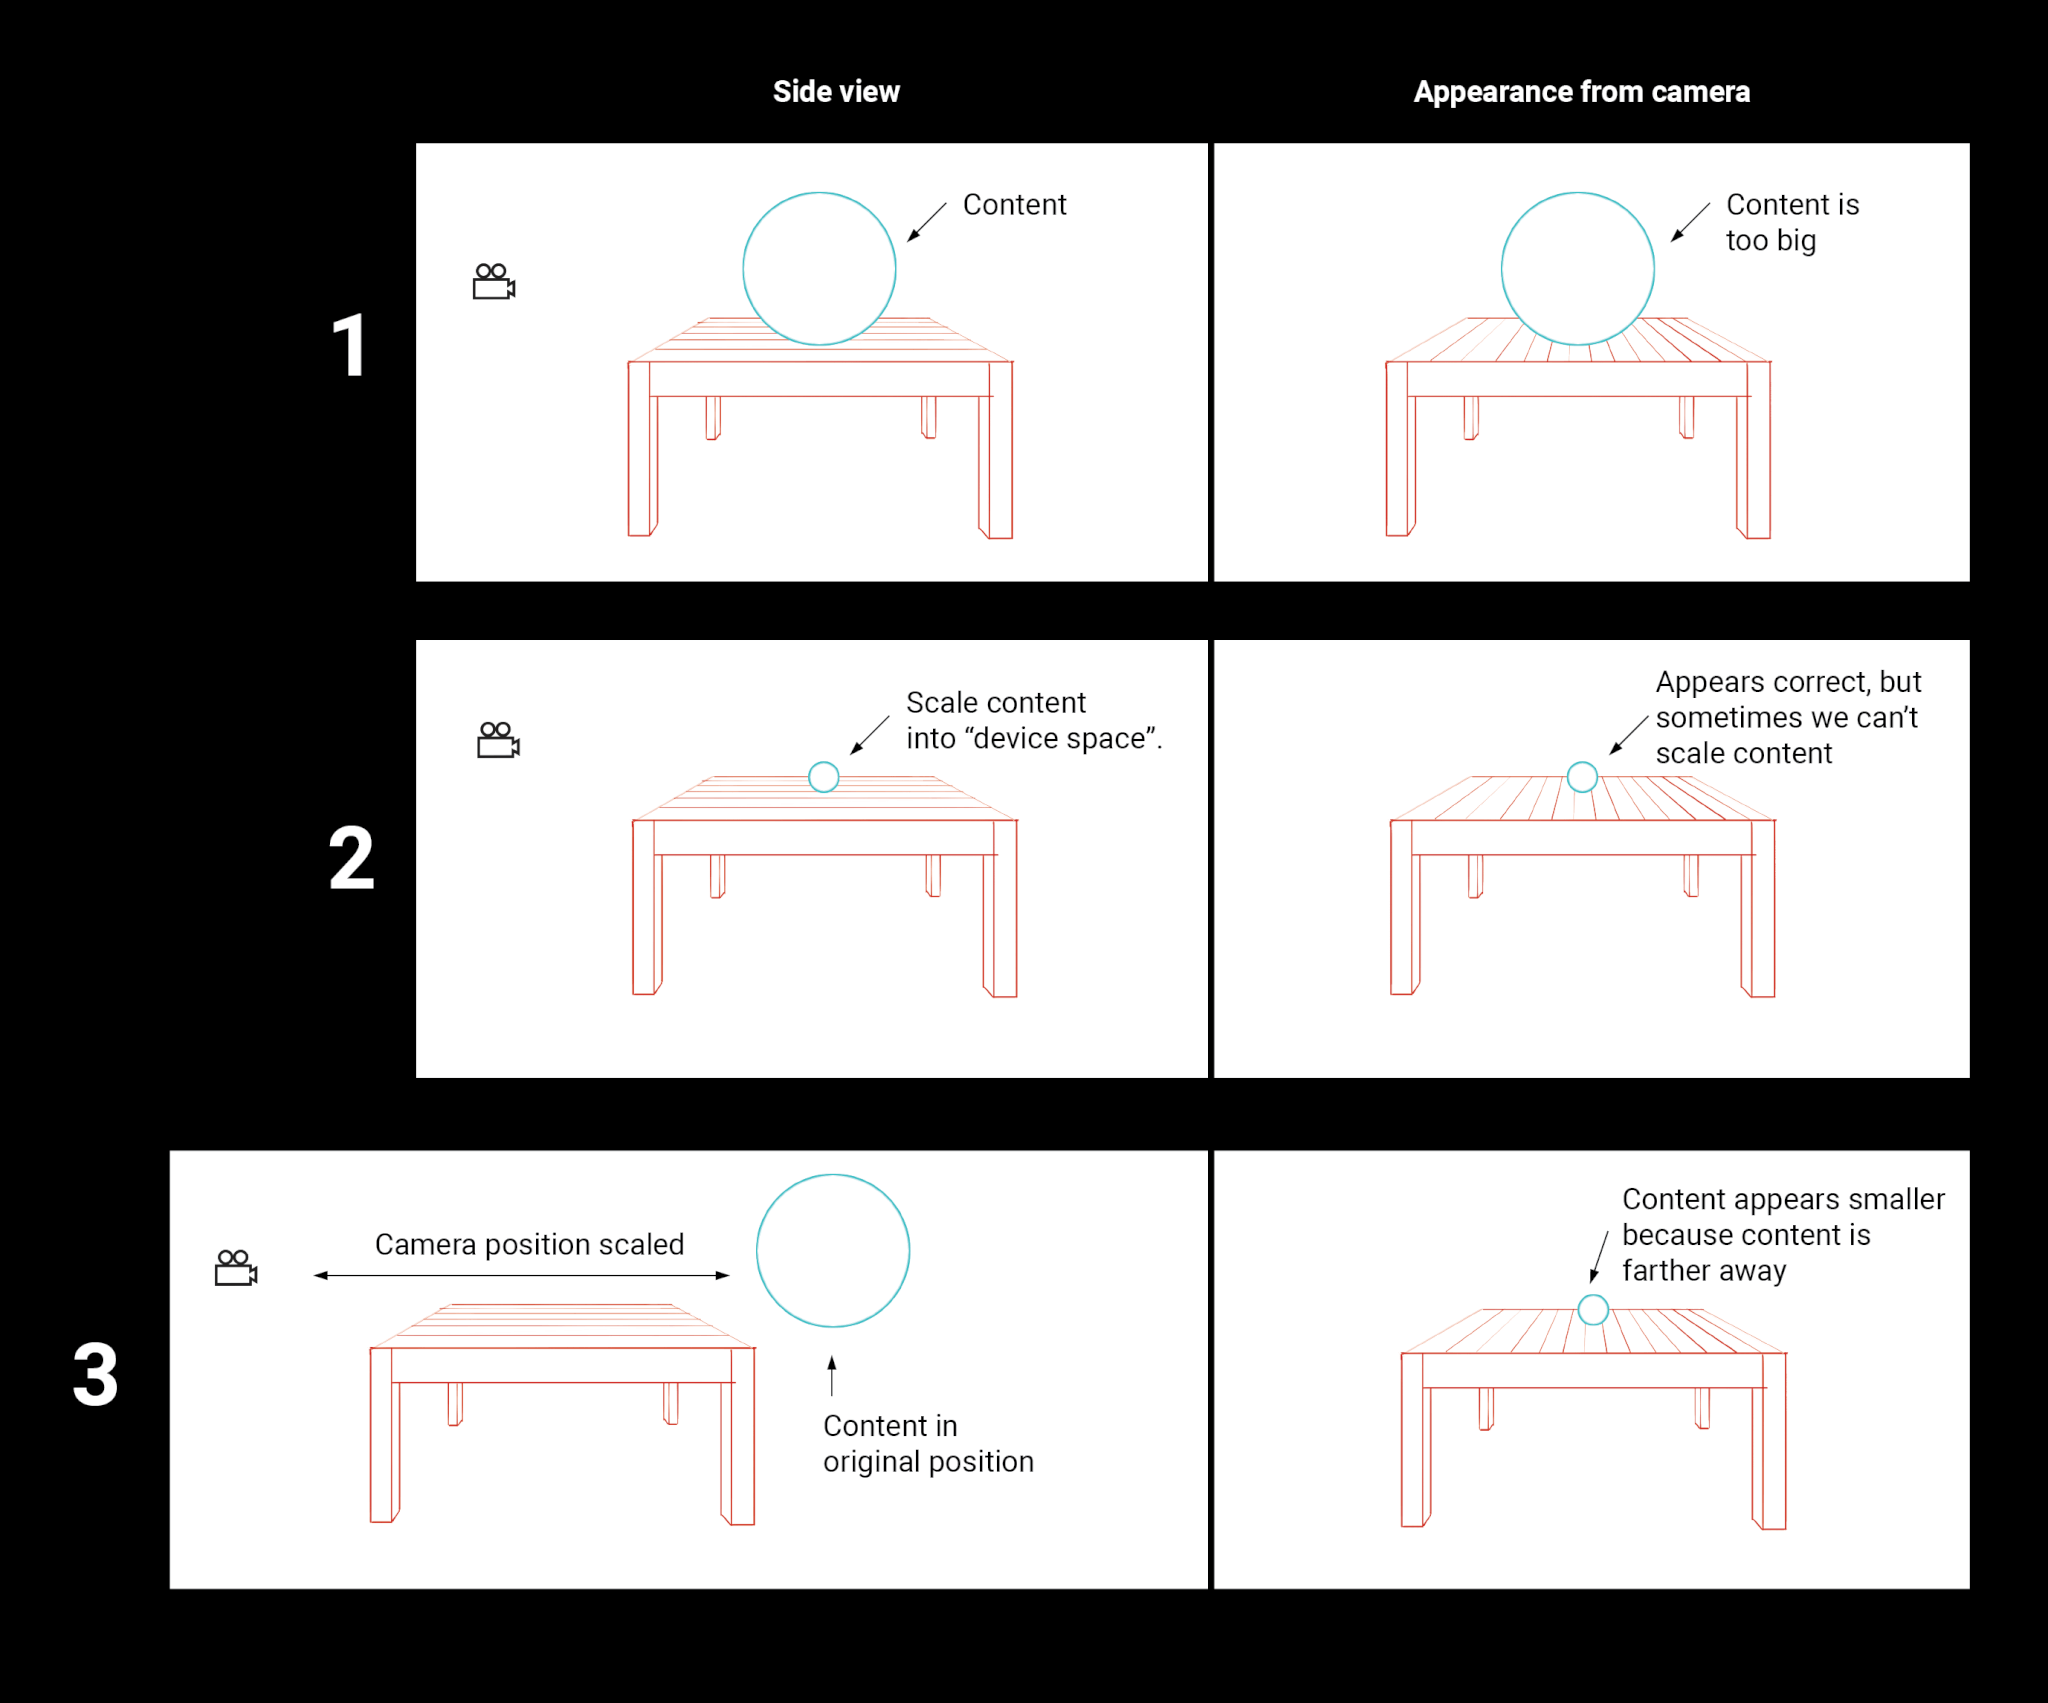
For example, physical interactions will change under scale. Scaling down physics objects can cause instability, jitter, or other undesirable changes in behavior. Other systems, such as terrain and nav meshes, can’t be scaled or moved once created, so scaling them is not an option. Particle systems don’t have an overall scale factor, so the developer would need to tweak several individual settings in order to maintain the original look. It’s much easier to simply scale the camera.
例如,物理交互将在规模范围内变化。 按比例缩小物理对象可能会导致不稳定,抖动或其他不希望的行为更改。 创建后无法缩放或移动其他系统(例如terrain和nav网格),因此无法缩放它们。 粒子系统没有整体比例因子,因此开发人员需要调整几个单独的设置才能保持原始外观。 简单地缩放摄像机要容易得多。
For our Unite demos, we put the Unity Camera under a parent GameObject called “AR Root”. All device-generated GameObjects, such as planes, are instantiated as siblings to the camera GameObject. We can then apply scale and a positional offset to the AR Root GameObject which will move and scale the camera and planes. Our hierarchy during runtime might look like this:
对于我们的Unite演示,我们将Unity Camera放在父游戏对象“ AR Root”下。 所有设备生成的GameObject(例如飞机)都被实例化为相机GameObject的同级。 然后,我们可以将比例和位置偏移应用于AR Root GameObject,它将移动和缩放摄影机和平面。 运行时的层次结构可能如下所示:
AR Root
AR根
ARCamera Plane1 Plane2 …
ARCamera Plane1 Plane2…
The AR Root GameObject should have an ARController component, which manages the lifecycle of the AR SDK. To set the scale, simply set the value of ARController.scale.
AR Root GameObject应该具有一个ARController组件,该组件管理AR SDK的生命周期。 要设置比例,只需设置ARController.scale的值即可 。
例 (Example)
Say our scale factor is 10. When the app starts up, the device reports its position as (0, 0, 0), so our ARCamera will also be at (0, 0, 0). We step backward one meter in the real world, so the ARCamera now has a localPosition of (0, 0, -1). However, because the AR Root GameObject has a scale of (10, 10, 10), the camera’s world position will be (0, 0, -10). This means content at the origin will be ten times farther away from the camera, which makes it appear ten times smaller. However, it isn’t really smaller, so physics interactions remain the same, nav meshes continue to work as originally designed, etc.
假设我们的比例因子是10。当应用启动时,设备将其位置报告为(0,0,0),因此我们的ARCamera也将位于(0,0,0)。 我们在现实世界中向后退一米,因此ARCamera现在具有(0,0,-1)的localPosition。 但是,由于AR根GameObject的比例为(10,10,10),因此相机的世界位置将为(0,0,-10)。 这意味着原点的内容距离相机的距离将是十倍,这使其看起来要小十倍。 但是,它并没有真正变小,因此物理相互作用保持不变,导航网格仍按最初设计的方式工作,等等。
命中测试 (Hit testing)
Both ARKit and ARCore provide APIs for hit testing against feature points and planes. However, they are not scale aware (that is, the hit test is performed in device space). We could transform from content space to device space, perform the hit test, then transform the result back into content space. For our needs, however, we simply add a mesh collider to our plane GameObjects and raycast against the mesh collider of the plane.
ARKit和ARCore都提供了API,用于对特征点和基准面进行命中测试。 但是,它们不支持缩放(即,命中测试是在设备空间中执行的)。 我们可以从内容空间转换为设备空间,执行点击测试,然后将结果转换回内容空间。 但是,出于我们的需要,我们只需要向飞机GameObjects添加一个网格碰撞器,并针对该飞机的网格碰撞器进行光线投射。
The plane prefab that we use has a plane primitive and mesh collider on it, arranged in such a way that unit scale will produce a 1×1 meter plane. Since the AR Root GameObject has a scale factor, it will also scale the planes. This means we can do normal physics raycasts without worrying about scale. For example, say we want to place an object on a plane when the user taps the screen. We can use code like this:
我们使用的平面预制件上有一个平面图元和一个网格碰撞器,其排列方式为单位比例将产生一个1×1米的平面。 由于AR根GameObject具有比例因子,因此也会缩放平面。 这意味着我们可以进行普通的物理射线广播,而不必担心规模。 例如,假设我们要在用户点击屏幕时将对象放置在平面上。 我们可以使用如下代码:
|
1
2
3
4
5
6
7
8
|
Ray ray = camera.ScreenPointToRay(Input.mousePosition);
RaycastHit rayHit;
if (Physics.Raycast(ray, out rayHit, float.MaxValue, planeLayerMask))
{
m_ObjectToPlace.transform.position = rayHit.point;
}
|
|
1
2
3
4
5
6
7
8
|
Ray ray = camera . ScreenPointToRay ( Input . mousePosition ) ;
RaycastHit rayHit ;
if ( Physics . Raycast ( ray , out rayHit , float . MaxValue , planeLayerMask ) )
{
m_ObjectToPlace . transform . position = rayHit . point ;
}
|
See PlaceOnPlane.cs for a full example. Notice there is no special handling of scale here because the camera and planes are already in content space.
有关完整示例,请参见PlaceOnPlane.cs 。 请注意,此处没有特殊的比例尺处理方法,因为相机和平面已经在内容空间中。
配套规模 (Matching Scale)
The above explains how to apply a particular scale factor, but what if you want to fit a specific asset or level geometry onto a surface whose size isn’t known until a plane is found? Imagine you have a complex scene, perhaps representing an entire city block, and you want to place it on a tabletop such that it exactly fits on the table. What scale factor should you choose? Simple! The correct scale factor is:
上面说明了如何应用特定的比例因子,但是,如果要将特定的资产或关卡几何体拟合到其大小直到找到平面才知道的表面上,该怎么办? 想象一下,您有一个复杂的场景,也许代表了整个城市街区,并且想要将其放置在桌面上,使其完全适合桌子。 您应该选择什么比例因子? 简单! 正确的比例因子是:
scale = levelSize / surfaceSize
比例尺=水平尺寸/表面尺寸
Where levelSize is the size (in meters) of the content. This could be the length of one edge of its bounding box, for example. The surfaceSize is the size (in real world meters) of the plane. This might be the length of the smallest dimension, e.g.:
其中levelSize是内容的大小(以米为单位)。 例如,这可以是其边界框的一个边缘的长度。 surfaceSize是飞机的尺寸(以实际米为单位)。 这可能是最小尺寸的长度,例如:
Mathf.Min(plane.width, plane.height)
Mathf.Min(plane.width,plane.height)
See MatchingScalePicker.cs for a complete example.
有关完整示例,请参见MatchingScalePicker.cs 。
定位和定向关卡几何 (Positioning and orienting level geometry)
Recall that some assets can’t be moved or rotated at runtime, e.g. terrain and nav meshes in Unity have this restriction. We know how to scale them at runtime, but what about positioning and orienting them? If you want to place your level geometry on a tabletop, the plane representing the table could be at any position and orientation. Since we can’t move the content, we instead have to position and orient the AR Root GameObject accordingly.
回想一下某些资产在运行时无法移动或旋转,例如Unity中的terrain和nav网格具有此限制。 我们知道如何在运行时缩放它们,但是如何定位和定向它们呢? 如果要将关卡几何放置在桌面上,则表示工作台的平面可以处于任何位置和方向。 由于无法移动内容,因此必须相应地定位和定向AR Root GameObject。
For example, if the center of my level geometry is at p1, and I want to place it at p2, then we want to move the AR Root GameObject such that p1=p2. That is, rather than move the level geometry to p2, shift the AR Root GameObject by the same amount in the opposite direction. Since the planes and camera do not move relative to each other, it will appear as if only the level geometry has moved.
例如,如果我的关卡几何的中心在p1处,而我想将其放置在p2处,则我们要移动AR根游戏对象,使p1 = p2。 也就是说,不是将关卡几何图形移动到p2,而是将AR根GameObject在相反方向上移动相同的数量。 由于平面和摄影机不会相对移动,因此看起来好像只有关卡几何体已经移动。
We can do the same thing with orientation. Since we cannot rotate the level geometry to match the orientation of the plane, we inverse rotate the AR Root GameObject. Another way to think about this is that if we want to rotate the level geometry in space, we actually orbit the AR Root around the level geometry in the opposite direction.
我们可以通过定位来做同样的事情。 由于我们无法旋转关卡几何形状以匹配平面的方向,因此我们反向旋转了AR根GameObject。 考虑这一点的另一种方法是,如果我们想在空间中旋转关卡几何图形,实际上我们会沿相反的方向围绕该关卡几何图形绕着AR根旋转。
The ARController component has some helper methods to achieve these position and orientation changes:
ARController组件具有一些辅助方法来实现这些位置和方向更改:
public Vector3 ARController.pointOfInterestThe “point of interest” is the position in content space that we want to orbit the AR Root GameObject about. Typically, this is the pivot of the level geometry.
公共Vector3 ARController.pointOfInterest “兴趣点”是我们要围绕AR Root GameObject在内容空间中运行的位置。 通常,这是关卡几何的枢纽。
public Quaternion ARController.rotationThe rotation the content at pointOfInterest should appear to have. In reality, the AR Root GameObject rotates in the opposite direction by the same amount.
公共四元数ARController.rotation pointOfInterest上的内容应该轮换显示。 实际上,AR Root GameObject沿相反方向旋转相同的量。
public void AlignWithPointOfInterest(Vector3 position)Moves the AR Root GameObject such that the point of interest appears to be at “position”. This might be the result of a raycast against a plane.
公共无效AlignWithPointOfInterest(Vector3位置) 移动AR根GameObject,以使兴趣点似乎位于“位置”。 这可能是对飞机进行射线投射的结果。
See the DemoGUI.cs component for a code example.
有关代码示例,请参见DemoGUI.cs组件。
鳞片混合物 (Mixtures of Scale)
The second (two or more cameras) option is outlined below, and the code and project for it on ARKit Plugin is available here. It’s not available as part of the ARInterface example projects at this time, but will be ported over at a later date.
下面概述了第二个(两个或更多摄像机)选项,可在此处使用ARKit Plugin上的代码和项目。 目前,它还不能作为ARInterface示例项目的一部分使用,但将在以后移植。
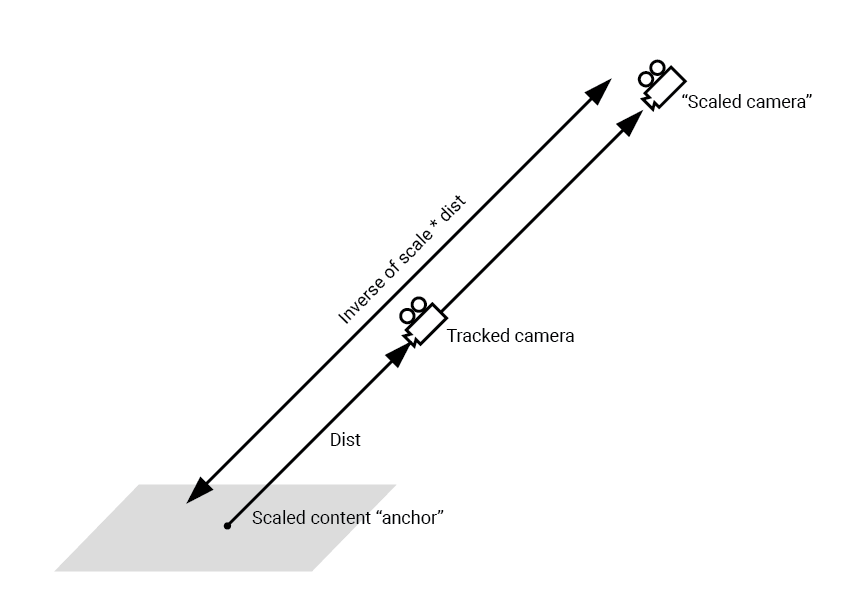
For the two camera solution, we use one camera to keep track of the GameObjects in the current real world coordinate system e.g. the size and position of the table you are trying to display things on. Lets call this camera the “TrackingDataCamera”, and keep this moving and rotating according to what the ARKit device does. It will also render any of the ARKit generated GameObjects, like the debug planes and feature points.
对于两摄像机解决方案,我们使用一台摄像机跟踪当前现实世界坐标系中的GameObject,例如,您要在上面显示事物的桌子的大小和位置。 让我们将此相机称为“ TrackingDataCamera”,并根据ARKit设备的操作使其保持旋转和旋转。 它还将渲染ARKit生成的任何GameObject,例如调试平面和特征点。
The second camera, which we will call the “ContentCamera” will have a parent transform that will be positioned and rotated in such a way that rendering the content scene using this camera will make the scene (which is static remember) appear in the right place, and at the right size. How is this achieved? We start with a “content anchor”, which is a point in real world coordinates where you want your scaled scene to appear. We calculate the offset of our TrackingDataCamera from this point. We then multiply this offset by the inverse of the scale you desire for your scene (e.g. if you want your city scene to be 1/100 the size, we will multiply the offset by 100). We then translate the parent transform of the ContentCamera to this multiplied offset from the anchor. The camera transform for this ContentCamera still follows the same positioning and rotation of the TrackedCamera, so its orientation matches what device does. See rough sketch for how parent transform is moved.
第二个相机(我们称为“ ContentCamera”)将具有父变换,该父变换将以如下方式定位和旋转:使用此相机渲染内容场景将使场景(静态记住)显示在正确的位置,并且尺寸合适。 如何实现的? 我们从“内容锚点”开始,它是现实世界坐标中您要显示比例缩放场景的点。 我们从这一点计算TrackingDataCamera的偏移量。 然后,将该偏移量乘以您对场景所需的比例的倒数(例如,如果您希望城市场景的大小为1/100,则将偏移量乘以100)。 然后,我们将ContentCamera的父变换转换为与锚点成倍的偏移量。 此ContentCamera的摄影机转换仍然遵循TrackedCamera的相同定位和旋转,因此其方向与设备的操作匹配。 请参见粗略草图,了解如何移动父变换。
How to use this? In the UnityARContentScalingScene, replace the SkyscraperRoot GameObject with whatever scene objects contains your content. When you start the scene, it will look for a surface, and when you tap on the debug plane that describes the surface, it will use that hit position as the ContentAnchor noted above. Your content will appear at that position. If you know what scale you want your content at, put that value in ContentCameraParent GameObject in the Content Scale parameter of the Content Scale Manager component. The GUI + and – buttons can help you find the correct scale for your content if it isn’t correct.
如何使用呢? 在UnityARContentScalingScene中,将SkyscraperRoot GameObject替换为包含您的内容的场景对象。 开始场景时,它将查找表面,而在描述该表面的调试平面上点击时,它将使用该命中位置作为上述ContentAnchor。 您的内容将出现在该位置。 如果您知道内容的缩放比例,则将该值放入ContentScalera Manager组件的Content Scale参数的ContentCameraParent GameObject中。 如果内容不正确,则GUI +和–按钮可以帮助您找到正确的内容比例。
The two camera (or multi-camera) solution can be useful in various situations:
两台摄像机(或多摄像机)解决方案在各种情况下很有用:
加入可扩展内容俱乐部! (Join the Scaled Content Club!)
As you can see, our AR experiences can be made more realistic and beautiful by taking content that has been authored in a specific scale and couching it in the real world at a different scale. We talked about some ways to do that without too much work on the authoring side, and provided two readymade solutions that you can use for your own apps. Please experiment with these and let us know how it works for you on the forums. Show us your results on Twitter – we can’t wait for the next #madewithunity Friday!
如您所见,通过采用特定比例创作的内容并将其以不同比例呈现在现实世界中,可以使我们的AR体验更加真实和美观。 我们讨论了一些在创作方面无需过多工作的方法,并提供了两种现成的解决方案,您可以将它们用于自己的应用程序。 请尝试这些,并在论坛上让我们知道它如何为您工作。 在Twitter上向我们显示您的结果-我们等不及下一个#madewithunity星期五!
翻译自: https://blogs.unity3d.com/2017/11/16/dealing-with-scale-in-ar/
中国全息ar市场规模


 1167
1167

 被折叠的 条评论
为什么被折叠?
被折叠的 条评论
为什么被折叠?
 到【灌水乐园】发言


