


一、引言
ONNX(Open Neural Network Exchange)是一种开放格式,用于表示深度学习模型。它旨在促进不同框架之间的模型互操作性。然而,在实际应用中,我们可能需要对模型进行定制和优化,以满足特定场景的需求。ONNX-GraphSurgeon正是为此而生,它允许开发者轻松地修改和优化ONNX模型。

二、ONNX-GraphSurgeon简介
ONNX-GraphSurgeon是一个Python库,用于操作ONNX计算图。它提供了丰富的API,支持对计算图进行增删改查等操作。以下是ONNX-GraphSurgeon的主要特点:
灵活性:可以轻松地修改计算图结构,如添加、删除、替换节点和边。
高效性:支持在计算图中进行层融合、模型剪枝等优化操作。
易用性:提供了简洁的API,便于开发者快速上手。
官方代码地址:
https://github.com/NVIDIA/TensorRT/tree/release/10.1/tools/onnx-graphsurgeon

三、安装ONNX-GraphSurgeon
在开始使用ONNX-GraphSurgeon之前,需要先安装以下依赖:
Python 3.6及以上版本
ONNX 1.6.0及以上版本
numpy
安装命令如下:
pip install onnx-graphsurgeon
四、对onnx输入端进行处理
1、onnx为啥需要剪切呢?
你以为的模型导出的onnx,
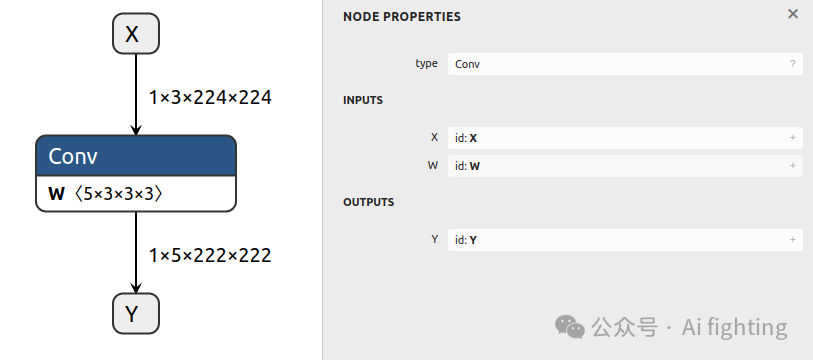
实际导出的onnx.

使用ONNX-GraphSurgeon 剪切后的onnx.
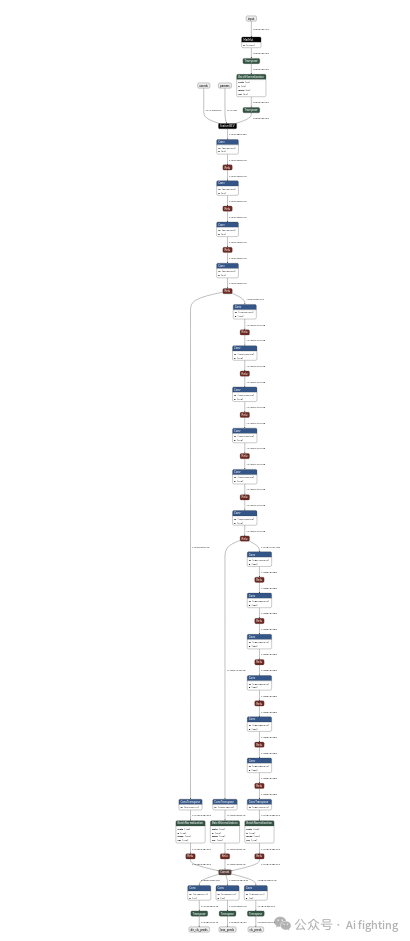
2、生成模型
建立一个模型:output = ReLU((A * X^T) + B) (.) C + D
#!/usr/bin/env python3

# Copyright (c) 2021, NVIDIA CORPORATION. All rights reserved.

#

# Licensed under the Apache License, Version 2.0 (the "License");

# you may not use this file except in compliance with the License.

# You may obtain a copy of the License at

#

#     http://www.apache.org/licenses/LICENSE-2.0

#

# Unless required by applicable law or agreed to in writing, software

# distributed under the License is distributed on an "AS IS" BASIS,

# WITHOUT WARRANTIES OR CONDITIONS OF ANY KIND, either express or implied.

# See the License for the specific language governing permissions and

# limitations under the License.

#


import onnx_graphsurgeon as gs

import numpy as np

import onnx


print("Graph.layer Help:\n{}".format(gs.Graph.layer.__doc__))


# We can use `Graph.register()` to add a function to the Graph class. Later, we can invoke the function

# directly on instances of the graph, e.g., `graph.add(...)`

@gs.Graph.register()

def add(self, a, b):

    # The Graph.layer function creates a node, adds inputs and outputs to it, and finally adds it to the graph.

    # It returns the output tensors of the node to make it easy to chain.

    # The function will append an index to any strings provided for inputs/outputs prior

    # to using them to construct tensors. This will ensure that multiple calls to the layer() function

    # will generate distinct tensors. However, this does NOT guarantee that there will be no overlap with

    # other tensors in the graph. Hence, you should choose the prefixes to minimize the possibility of

    # collisions.

    return self.layer(op="Add", inputs=[a, b], outputs=["add_out_gs"])


@gs.Graph.register()

def mul(self, a, b):

    return self.layer(op="Mul", inputs=[a, b], outputs=["mul_out_gs"])


@gs.Graph.register()

def gemm(self, a, b, trans_a=False, trans_b=False):

    attrs = {"transA": int(trans_a), "transB": int(trans_b)}

    return self.layer(op="Gemm", inputs=[a, b], outputs=["gemm_out_gs"], attrs=attrs)


# You can also specify a set of opsets when regsitering a function.

# By default, the function is registered for all opsets lower than Graph.DEFAULT_OPSET

@gs.Graph.register(opsets=[11])

def relu(self, a):

    return self.layer(op="Relu", inputs=[a], outputs=["act_out_gs"])


# Note that the same function can be defined in different ways for different opsets.

# It will only be called if the Graph's opset matches one of the opsets for which the function is registered.

# Hence, for the opset 11 graph used in this example, the following function will never be used.

@gs.Graph.register(opsets=[1])

def relu(self, a):

    raise NotImplementedError("This function has not been implemented!")


##########################################################################################################

# The functions registered above greatly simplify the process of building the graph itself.


graph = gs.Graph(opset=11)


# Generates a graph which computes:

# output = ReLU((A * X^T) + B) (.) C + D

X = gs.Variable(name="X", shape=(64, 64), dtype=np.float32)

graph.inputs = [X]


# axt = (A * X^T)

# Note that we can use NumPy arrays directly (e.g. Tensor A),

# instead of Constants. These will automatically be converted to Constants.

A = np.ones(shape=(64, 64), dtype=np.float32)

axt = graph.gemm(A, X, trans_b=True)


# dense = ReLU(axt + B)

B = np.ones((64, 64), dtype=np.float32) * 0.5

dense = graph.relu(*graph.add(*axt, B))


# output = dense (.) C + D

# If a Tensor instance is provided (e.g. Tensor C), it will not be modified at all.

# If you prefer to set the exact names of tensors in the graph, you should

# construct tensors manually instead of passing strings or NumPy arrays.

C = gs.Constant(name="C", values=np.ones(shape=(64, 64), dtype=np.float32))

D = np.ones(shape=(64, 64), dtype=np.float32)

graph.outputs = graph.add(*graph.mul(*dense, C), D)


# Finally, we need to set the output datatype to make this a valid ONNX model.

#   In our case, all the data types are float32.

for out in graph.outputs:

    out.dtype = np.float32


onnx.save(gs.export_onnx(graph), "model.onnx")
3、在初始结点处增加操作
在Gemm操作前添加减均值,除均差的操作。
import onnx_graphsurgeon as gs

import numpy as np

import onnx


#增加减均值,除方差的操作 X^T) + B) (.) C + D


graph = gs.import_onnx(onnx.load("model.onnx"))


tamps = graph.tensors()


X = gs.Variable(name="X", shape=(64, 64), dtype=np.float32)


# 定义均值和方差

mean_value = np.array([0.5], dtype=np.float32)  # 替换 YOUR_MEAN_VALUE

std_value = np.array([0.2], dtype=np.float32)   # 替换 YOUR_STD_VALUE


mean = gs.Constant(name="mean", values=mean_value)

std = gs.Constant(name="std", values=std_value)


# 创建减均值和除方差的节点

sub_output = gs.Variable(name="X_minus_mean", shape=(64, 64), dtype=np.float32)

div_output = gs.Variable(name="X_normalized", shape=(64, 64), dtype=np.float32)


sub_node = gs.Node(op="Sub", inputs=[X, mean], outputs=[sub_output])

div_node = gs.Node(op="Div", inputs=[sub_output, std], outputs=[div_output])


# 将新创建的节点添加到图中

graph.nodes.extend([sub_node, div_node])


first_node = [node for node in graph.nodes if node.op == "Gemm"][0]

first_node.inputs[1] = div_node.outputs[0]


# 清理和顶排序

graph.cleanup().toposort()


onnx.save(gs.export_onnx(graph), "model_add.onnx")
4、修改结点的输入
将输入X改成Y。
import onnx_graphsurgeon as gs

import numpy as np

import onnx


# output = ReLU((A * X^T) + B) (.) C + D


graph = gs.import_onnx(onnx.load("model.onnx"))


tamps = graph.tensors()


# modify the input from X to Y

Y = gs.Variable(name="Y", shape=(64, 64), dtype=np.float32)


graph.inputs = [Y]


first_node = [node for node in graph.nodes if node.op == "Gemm"][0]

first_node.inputs[1] = Y


# 清理和顶排序

graph.cleanup().toposort()


onnx.save(gs.export_onnx(graph), "model_modify.onnx")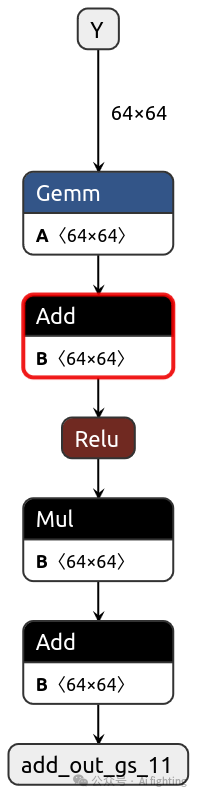
5、删除结点
删除Gemm操作
import onnx_graphsurgeon as gs
import numpy as np
import onnx
# output = ReLU((A * X^T) + B) (.) C + D
graph = gs.import_onnx(onnx.load("model.onnx"))
tamps = graph.tensors()
#delete Gemm
first_node = [node for node in graph.nodes if node.op == "Add"][0]
first_node.inputs[0] = tamps["X"]
# 清理和顶排序
graph.cleanup().toposort()
onnx.save(gs.export_onnx(graph), "model_delete.onnx")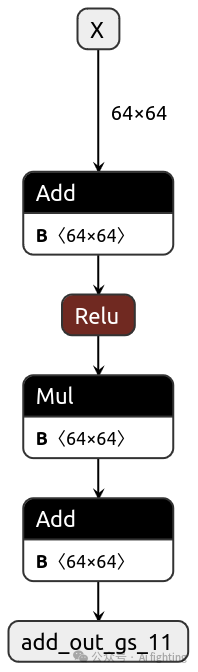
总结:
ONNX GraphSurgeon 是一个强大的深度学习模型优化工具,它可以帮助我们提高模型的推理速度和资源利用率。通过合理地使用 ONNX GraphSurgeon,我们可以使深度学习模型在各种硬件平台上发挥出更好的性能。
欢迎关注我的公众号auto_driver_ai(Ai fighting), 第一时间获取更新内容。


 1927
1927


 被折叠的 条评论
为什么被折叠?
被折叠的 条评论
为什么被折叠?
 到【灌水乐园】发言


