


前言
本文主要是需要实现在ros环境下,相机和雷达进行软同步采集数据,所以需要使用ROS启动basler相机。
本文系统:ubuntu20.04,ROS:noetic,在安装驱动之前需要确保ROS是已经安装可用的。
提示:以下是本篇文章正文内容,下面案例可供参考
一、使用ROS打开basler相机
在ros的官网中,提供了详细的操作步骤,但是中间会遇到比较多的问题,网址:https://wiki.ros.org/pylon_camera
具体步骤:
1.安装pylonSDK,在basler官网下载对应的文件:https://www2.baslerweb.cn/cn/downloads/software-downloads/pylon-6-1-1-linux-x86-64-bit-debian/ (我这里使用的是6.1.1版本,是很早之前下的了,可以在网站找自己需要的版本)
安装:
sudo dpkg -i /home/xxx/xxx/pylon_5.0.12.11829-deb0_amd64
echo "export PYLON=/opt/pylon" >> ~/.bashrc
source ~/.bashrc
echo $PYLON_ROOT
2.配置 rosdep,即用于检查和安装 ROS 软件包的系统依赖的 ROS 命令行工具,可以通过执行以下命令来实现:(这里就是创建了一个文件,然后把双引号部分的内容写进去了,其实就是对应的在github里面的一个配置文件,这里官网前面提到要根据自己的ROS版本修改indigo,我这里没有修改)
sudo sh -c 'echo "yaml https://raw.githubusercontent.com/magazino/pylon_camera/indigo-devel/rosdep/pylon_sdk.yaml " > /etc/ros/rosdep/sources.list.d/15-plyon_camera.list'
然后执行:
rosdep update
这一步应该都会遇到超时的问题,主要是服务器raw.githubusercontent.com无法访问,有两种方法可以解决:
1)翻墙,通过海外安装
2)执行下面的命令,修改对应的文件内容
sudo vim /etc/ros/rosdep/sources.list.d/15-plyon_camera.list
sudo vim /etc/ros/rosdep/sources.list.d/20-default.list
修改为
yaml https://mirror.ghproxy.com/https://raw.githubusercontent.com/magazino/pylon_camera/indigo-devel/rosdep/pylon_sdk.yaml
# os-specific listings first
yaml https://mirror.ghproxy.com/https://raw.githubusercontent.com/ros/rosdistro/master/rosdep/osx-homebrew.yaml osx

# generic
yaml https://mirror.ghproxy.com/https://raw.githubusercontent.com/ros/rosdistro/master/rosdep/base.yaml
yaml https://mirror.ghproxy.com/https://raw.githubusercontent.com/ros/rosdistro/master/rosdep/python.yaml
yaml https://mirror.ghproxy.com/https://raw.githubusercontent.com/ros/rosdistro/master/rosdep/ruby.yaml
gbpdistro https://mirror.ghproxy.com/https://raw.githubusercontent.com/ros/rosdistro/master/releases/fuerte.yaml fuerte

# newer distributions (Groovy, Hydro, ...) must not be listed anymore, they are being fetched from the rosdistro index.yaml instead
修改之后记得输入:wq保存后退出,然后重新rosdep update,如果还是失败多rosdep update几次。
3.克隆pylon_camera-pkg和camera_control_msgs-pkg,并通过rosdep install安装所有必要的依赖项:
mkdir -p catkin_ws/src
cd catkin_ws/src
git clone https://github.com/magazino/pylon_camera.git
git clone https://github.com/magazino/camera_control_msgs.git
安装依赖项必须新打开一个新的终端
rosdep install --from-paths . --ignore-src --rosdistro=$ROS_DISTRO -y
最后构建pylon_camera包
cd ~/catkin_ws && catkin_make
二、遇到的问题
1.catkin_make失败,缺少一些环境,直接安装即可,把对应的下划线换成-连接,noetic是自己对应的ROS版本;
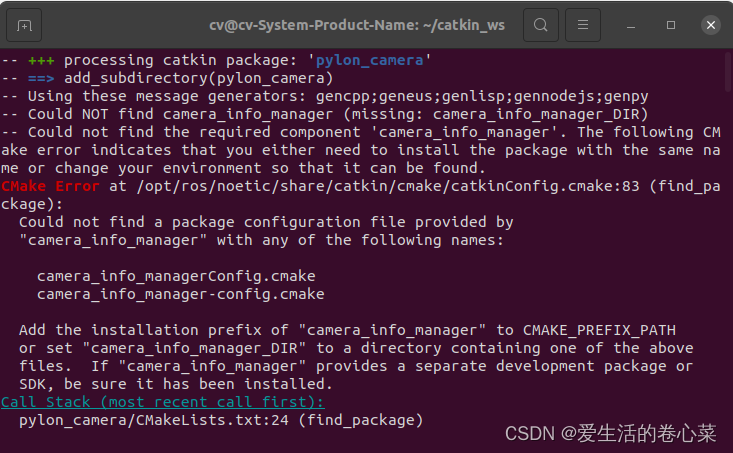
sudo apt-get install ros-noetic-camera-info-manager
2.找不到对应的头文件
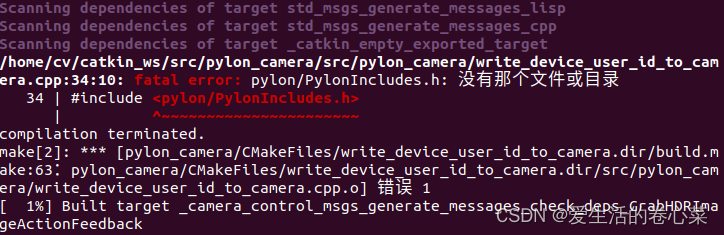
解决方法:
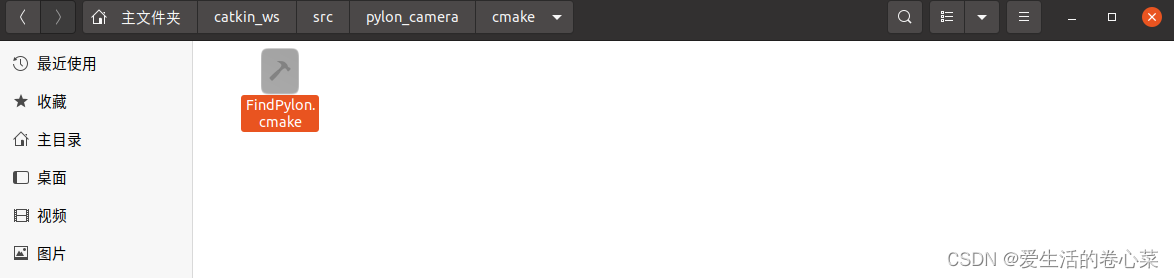
找到对应目录下的这个文件,将set(PYLON_ROOT “/opt/pylon5”) 改成set(PYLON_ROOT “/opt/pylon”),这里每个人的版本不一样的话会不一样,具体查看自己电脑里面/opt目录下的名称。如果这个方法不行的话,就直接修改对应的CMakeLists.txt文件,直接导入头文件;具体文件位置:
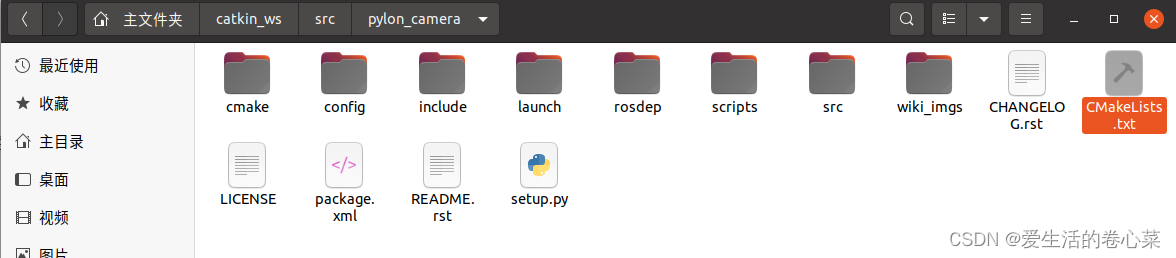
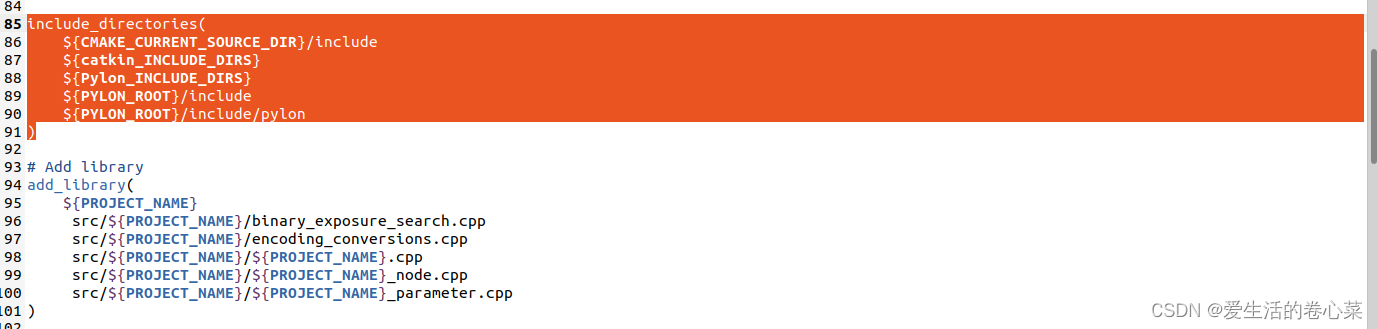
在文件中找到对应位置,对应添加和修改,引入头文件(这列设置文件路径也要对应自己电脑里面的目录)
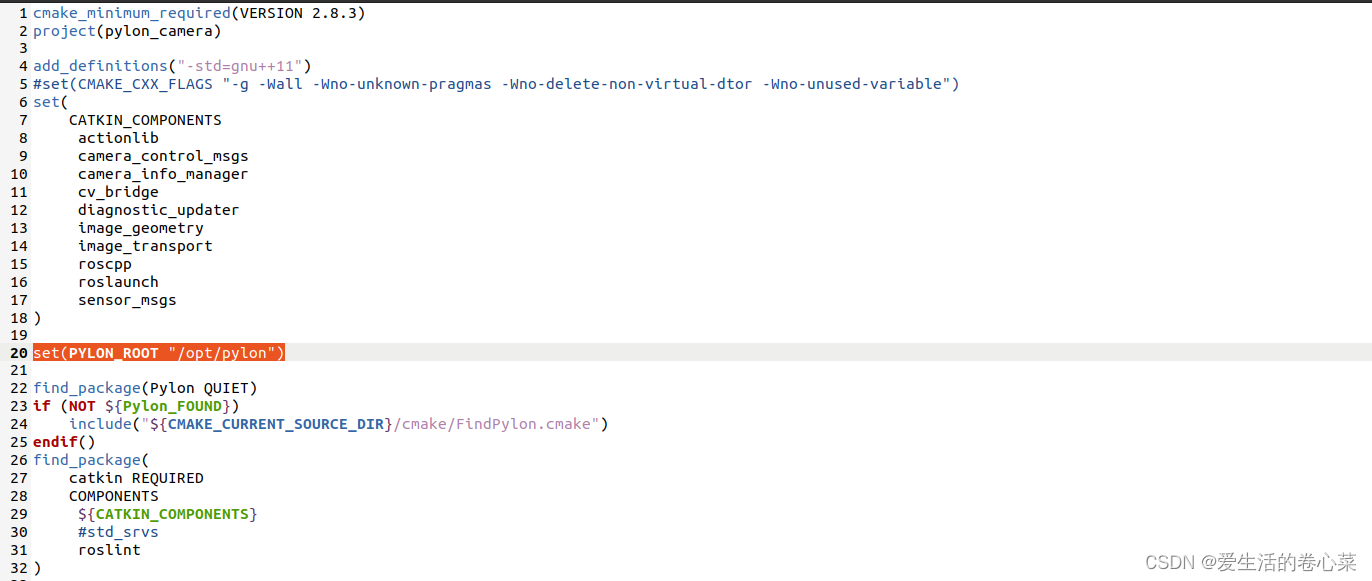
set(PYLON_ROOT "/opt/pylon")
include_directories(
    ${CMAKE_CURRENT_SOURCE_DIR}/include
    ${catkin_INCLUDE_DIRS}
    ${Pylon_INCLUDE_DIRS}
    ${PYLON_ROOT}/include
    ${PYLON_ROOT}/include/pylon
)
3.抓取图像失败
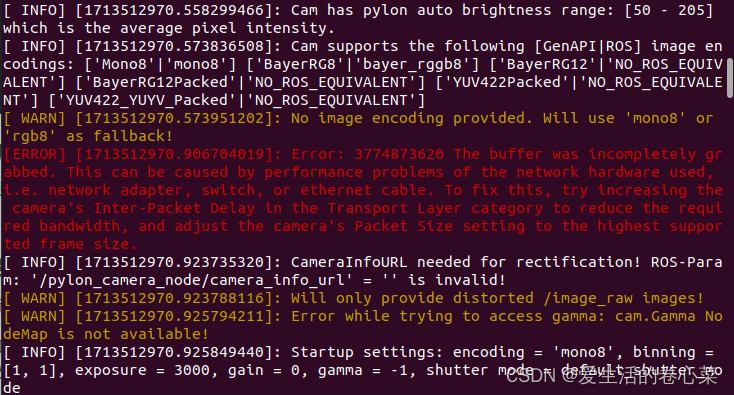
这里在对应的相机ros包里面找到default.yaml文件,找到对应image_encoding,改为如下设置

image_encoding: "bayer_rggb8"
4.获取图像失败
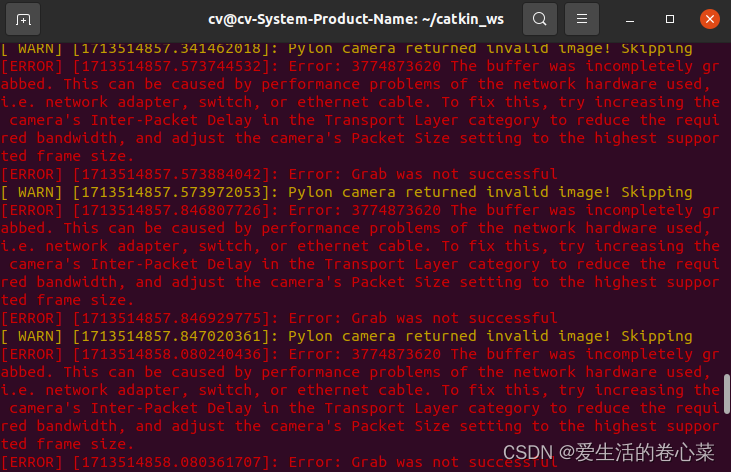
解决方法:设置巨型帧,这里的enp1s0f0是自己电脑的网口编号,根据自己的电脑进行修改
sudo ifconfig enp1s0f0 mtu 9000
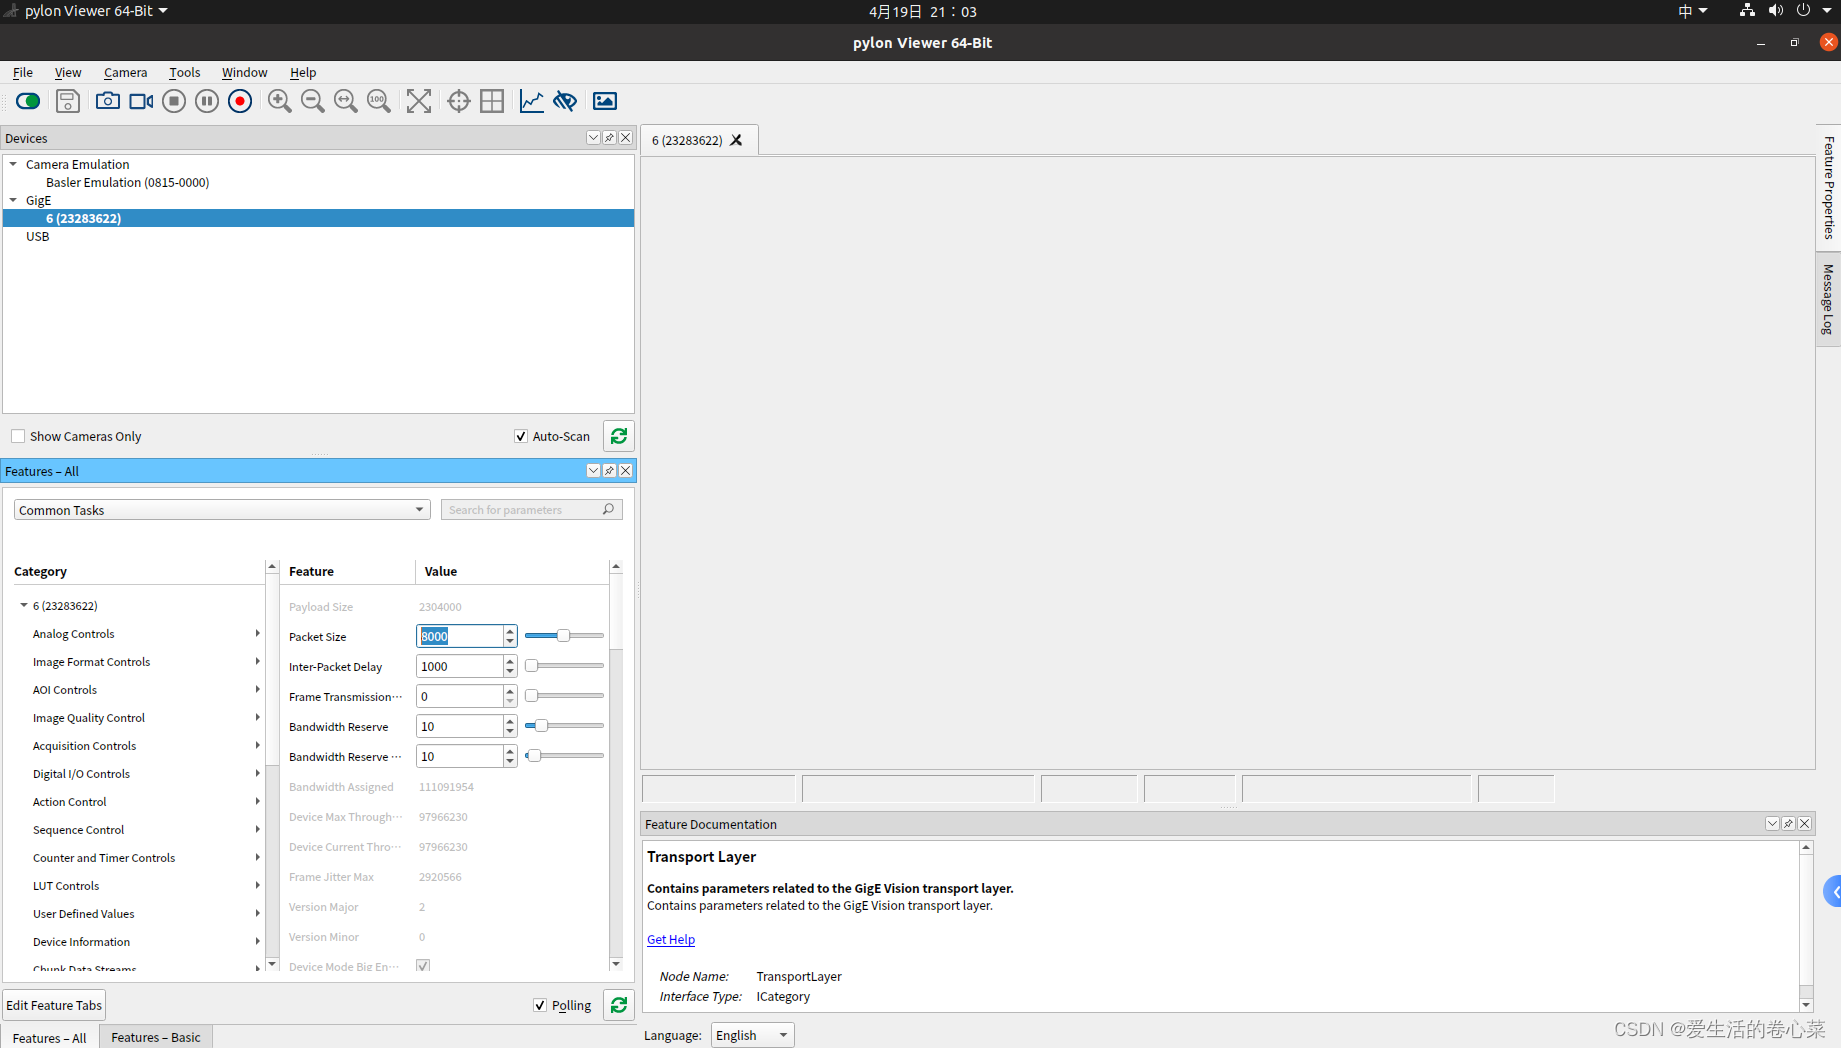
设置好了之后需要在pylonviewer里面进行相应的修改(官网说的是MTU的值大于3000,inter_pkg_delay 的值在1000比较适合)
三、最后通过launch文件启动并显示图像
source ~/catkin_ws/devel/setup.bash
roslaunch pylon_camera pylon_camera_node.launch
使用image_pipeline中的image_view节点查看图像,如果没有就直接安装:
sudo apt install ros-noetic-image-view
rosrun image_view image_view image:=/pylon_camera_node/image_raw
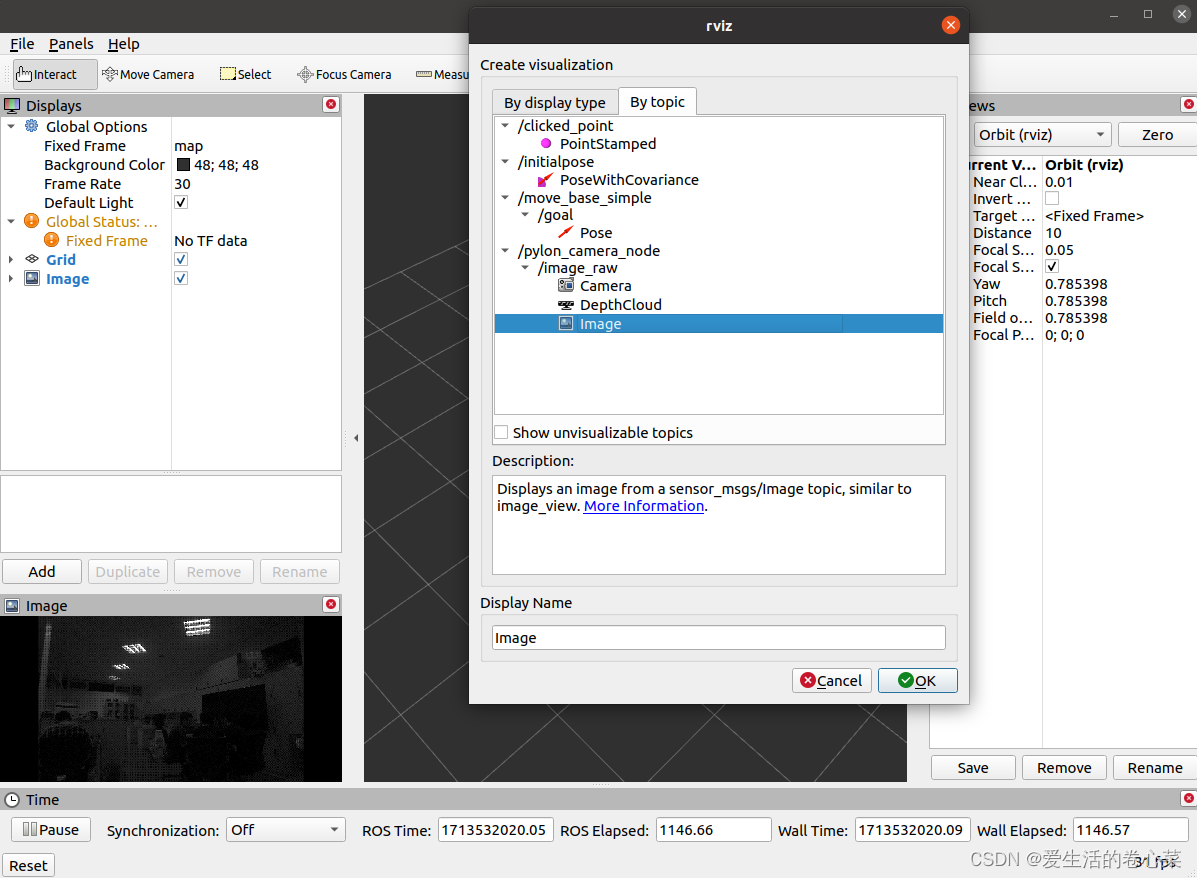
也可以使用rviz查看图像:
roscore
rosrun rviz rviz
点击左下角Add,选择对应的Image就可以在rviz里面进行显示了
启动相机成功后直接启动录包命令就可以采集数据(后续还可以和雷达进行同步采集)
rosbag record /pylon_camera_node/image_raw


 456
456

 被折叠的 条评论
为什么被折叠?
被折叠的 条评论
为什么被折叠?
 到【灌水乐园】发言


