


提示:文章仅作为自己学习过程中的记录,有问题请指出
前言
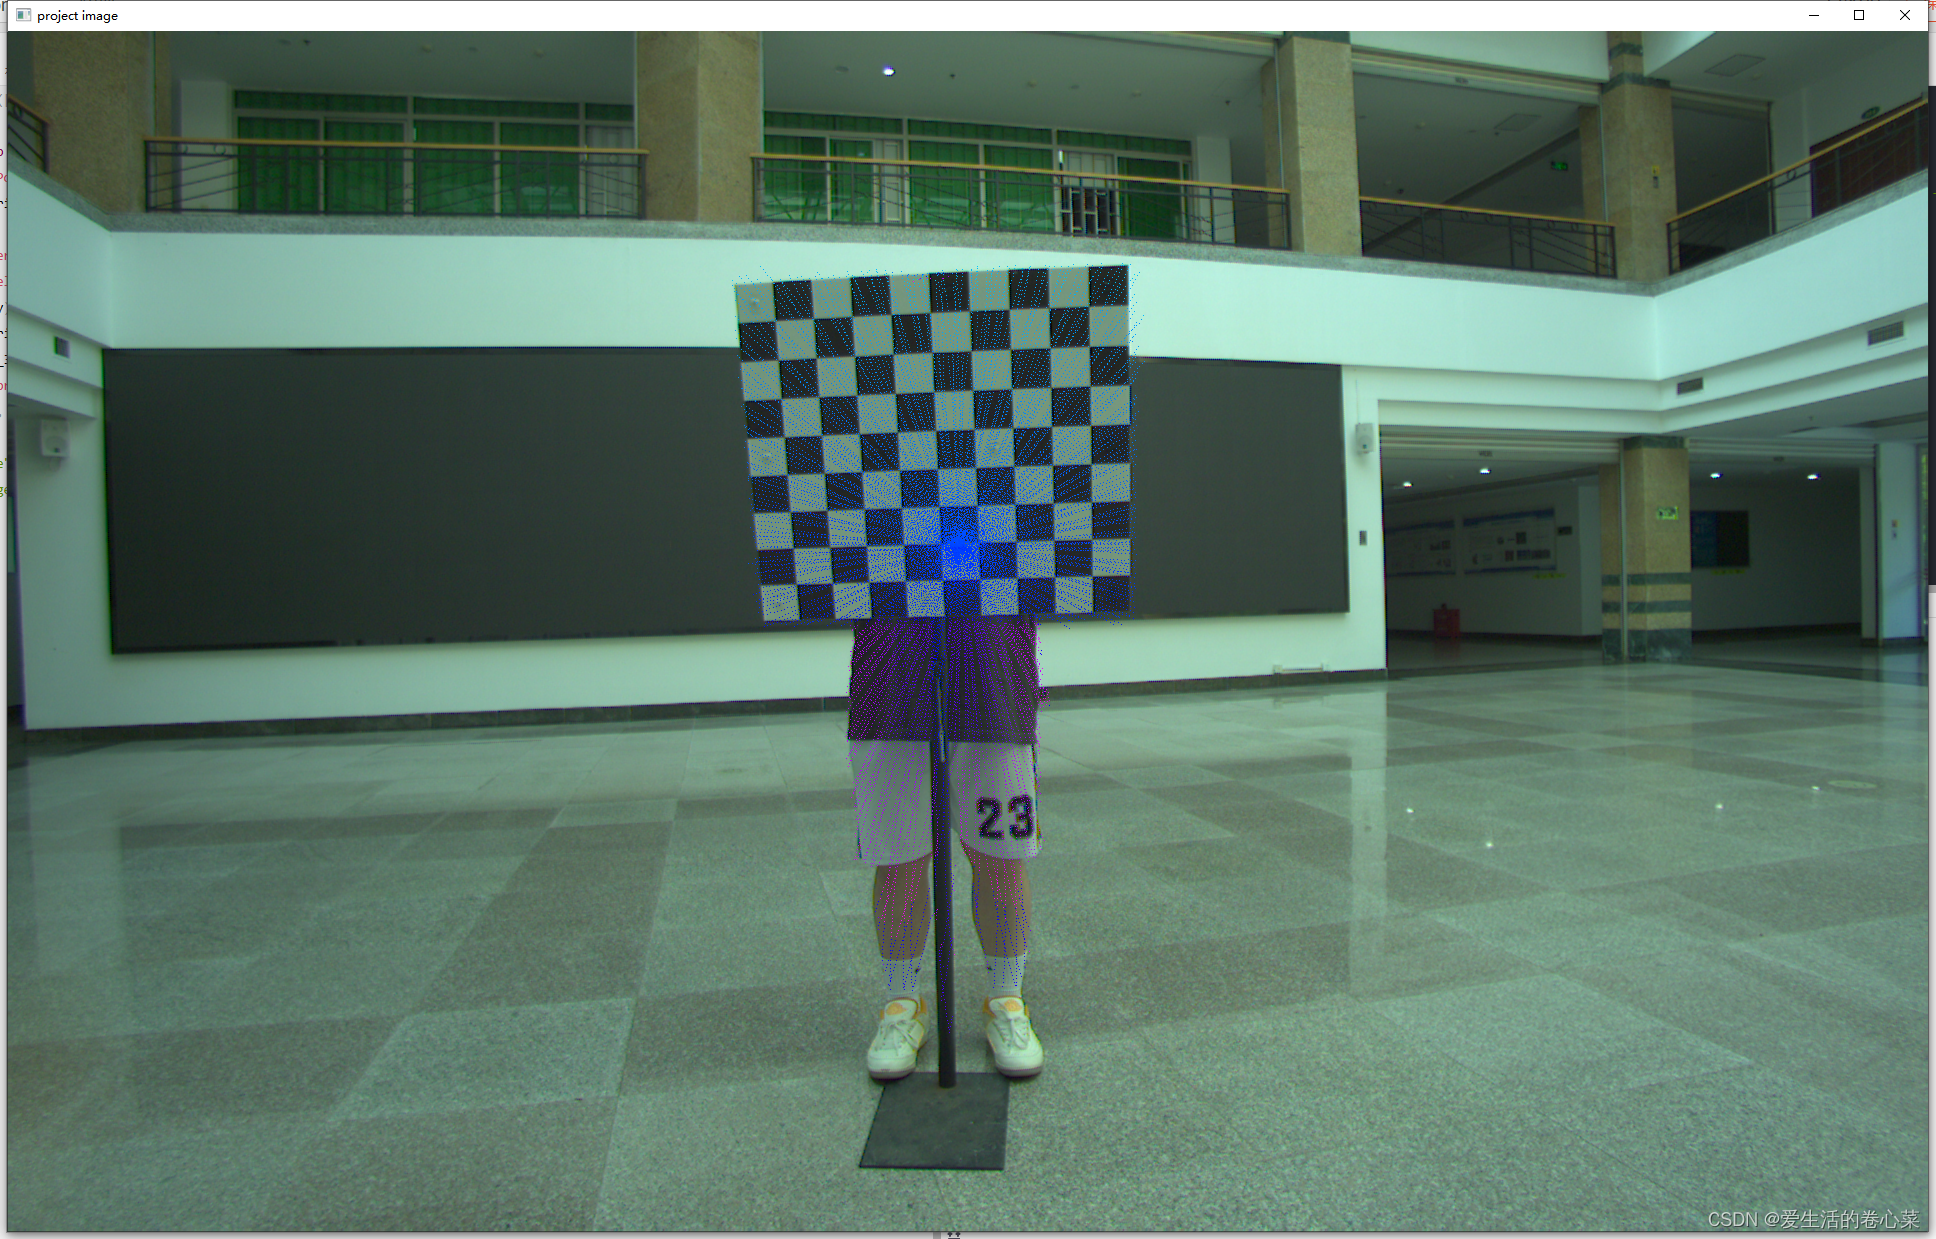
本文主要实现的是读取一张照片和一张 pcd, 根据标定的内参和外参,将点云投影到图像中,用于判断雷达相机外参标定是否准确。
提示:环境安装,这里需要导入三个库cv2,numpy,open3d
安装环境记得自己换源,使用pip在终端安装的时候记得把VPN关掉。
pip install opencv-python
pip install numpy
pip install open3d
安装open3d的时候可能会遇到pip版本比较低的问题,直接更新就好了
pip install --upgrade pip
提示:以下是本篇文章正文内容,下面案例可供参考
一、使用步骤
在使用之前,代码里面有几个地方需要修改:
1.读取的图像和雷达点云的文件路径。
2.point_3d里面的索引分别对应x,y,z的坐标,可以在雷达采集的时候查看坐标信息,对想要的点云范围进行筛选。
3.R_mat是雷达和相机联合标定得到的旋转矩阵R(matlab标定的话需要进行转置),tvec是联合标定的平移矩阵T。
4.camera_matrix是对应的相机内参,distCoeffs是对应的畸变系数[k1,k2,p1,p2,k3]。
具体的相机内参和与雷达之间的外参以及畸变系数获取方法请查看我的另外两篇博客:
Matlab双目标定和opencv+C++双目标定
Matlab雷达和相机联合标定
python代码如下:
import cv2
import numpy as np
import open3d as o3d

# Read image and point cloud
image_origin = cv2.imread("C:/Users/wk/Desktop/image/2/image2/6.png")
cloud_origin = o3d.io.read_point_cloud("C:/Users/wk/Desktop/image/2/pcd0/6.pcd")


# Extract 3D points within a certain range
pts_3d = []
for point_3d in np.asarray(cloud_origin.points):
    if 0 < point_3d[0] < 5 and -1 < point_3d[2] < 10: #筛选x,y,z坐标
        pts_3d.append((point_3d[0], point_3d[1], point_3d[2]))

# 初始化最小值和最大值为第一个点的x坐标
min_x = 0
max_x = 0

# 遍历所有点,更新最小值和最大值
for point_3d in pts_3d:
    x = point_3d[0]
    if x < min_x:
        min_x = x
    elif x > max_x:
        max_x = x

max_depth = max_x
min_depth = min_x

# 定义函数根据深度获取颜色
def get_color(cur_depth):
    scale = (max_depth - min_depth) / 10
    if cur_depth < min_depth:
        return (0, 0, 255)  # 返回蓝色
    elif cur_depth < min_depth + scale:
        green = int((cur_depth - min_depth) / scale * 255)
        return (0, green, 255)  # 返回蓝到黄的渐变色
    elif cur_depth < min_depth + scale * 2:
        red = int((cur_depth - min_depth - scale) / scale * 255)
        return (0, 255, 255 - red)  # 返回黄到红的渐变色
    elif cur_depth < min_depth + scale * 4:
        blue = int((cur_depth - min_depth - scale * 2) / scale * 255)
        return (blue, 255, 0)  # 返回红到绿的渐变色
    elif cur_depth < min_depth + scale * 7:
        green = int((cur_depth - min_depth - scale * 4) / scale * 255)
        return (255, 255 - green, 0)  # 返回绿到黄的渐变色
    elif cur_depth < min_depth + scale * 10:
        blue = int((cur_depth - min_depth - scale * 7) / scale * 255)
        return (255, 0, blue)  # 返回黄到蓝的渐变色
    else:
        return (255, 0, 255)  # 返回紫色

#旋转矩阵
R_mat = np.array([
    [0.0365958974785997	 , -0.998981637477457 , -0.0263899274458185],
    [-0.0251928961571891, 0.0254769710122496, -0.999357914828944],
    [0.999012541598427, 0.0372372384972455 , -0.0242348880366787]])

rvec, _ = cv2.Rodrigues(R_mat)
#平移矩阵
tvec = np.float64([-0.0612030428149487, -0.0761790853419216, -0.0842042141776793])
#内参矩阵
camera_matrix = np.float64([[1065.06490929240, 0, 943.708774324735],
                            [0, 1065.74343330661, 585.079123834662],
                            [0, 0, 1]])
#畸变系数
distCoeffs = np.float64([-0.154519186388221, 0.103337624722541, 0.000502124315184303, 0.000284721916113073, -0.0273292121348871])

# Project 3D points into image view
pts_2d, _ = cv2.projectPoints(np.array(pts_3d), rvec, tvec, camera_matrix, distCoeffs)
image_project = image_origin.copy()

for i, point_2d in enumerate(pts_2d):
    x, y = point_2d.ravel()
    x, y = int(x), int(y)
    if 0 <= x < image_origin.shape[1] and 0 <= y < image_origin.shape[0]:
        cur_depth = pts_3d[i][0]  # 获取当前点的深度
        color = get_color(cur_depth)  # 根据深度获取颜色
        image_project[y, x] = color  # 设置点云的颜色

cv2.imshow("origin image", image_origin)
cv2.imshow("project image", image_project)
cv2.waitKey(0)
最终投影效果:(我这里对x和z方向进行了限制,仅保留了人和标定板上的点云,可以看到效果还是不错的)


 1514
1514


 被折叠的 条评论
为什么被折叠?
被折叠的 条评论
为什么被折叠?
 到【灌水乐园】发言


