


 本文介绍了如何使用ModelSim进行FPGA图像处理的Verilog代码仿真,并通过Matlab处理仿真后的.txt数据,将其转换为.jpg格式,展示了从Verilog代码到图像处理结果的完整流程,包括灰度转换和结果验证。
前言
在使用FPGA进行图像处理时,常常需要对所写的Verilog代码进行功能性仿真,在很多情况下,对图像处理效果的判断单从数据上观察并不明显,故使用Model Sim进行图像数据的处理后,将处理后的数据保存到 .txt 中,通过Matlab将存储图像的数据的文本文件转为图像格式的 .jpg等等。
软件准备
ModelSim 2020.4,Matlab 2023a。这是我目前所使用的软件版本,不同版本均可。
仿真实施
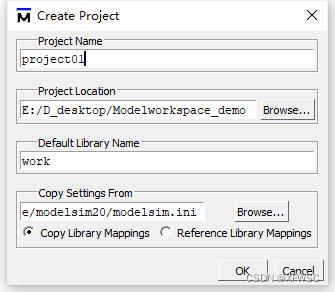
搭建ModelSim工程。File >> ChangeDirectory... ,选择一个ModelSim的工程文件夹。

File>>new>>project, 输入project name, project Loction则是刚才所选择的工程文件夹,其余默认。>>ok.
点击Create New File创建Verilog文件即可。
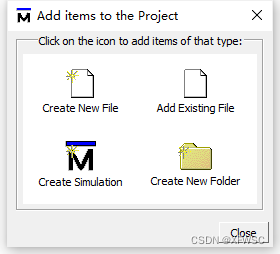
或者直接在project界面右键>>add to project>>New File....
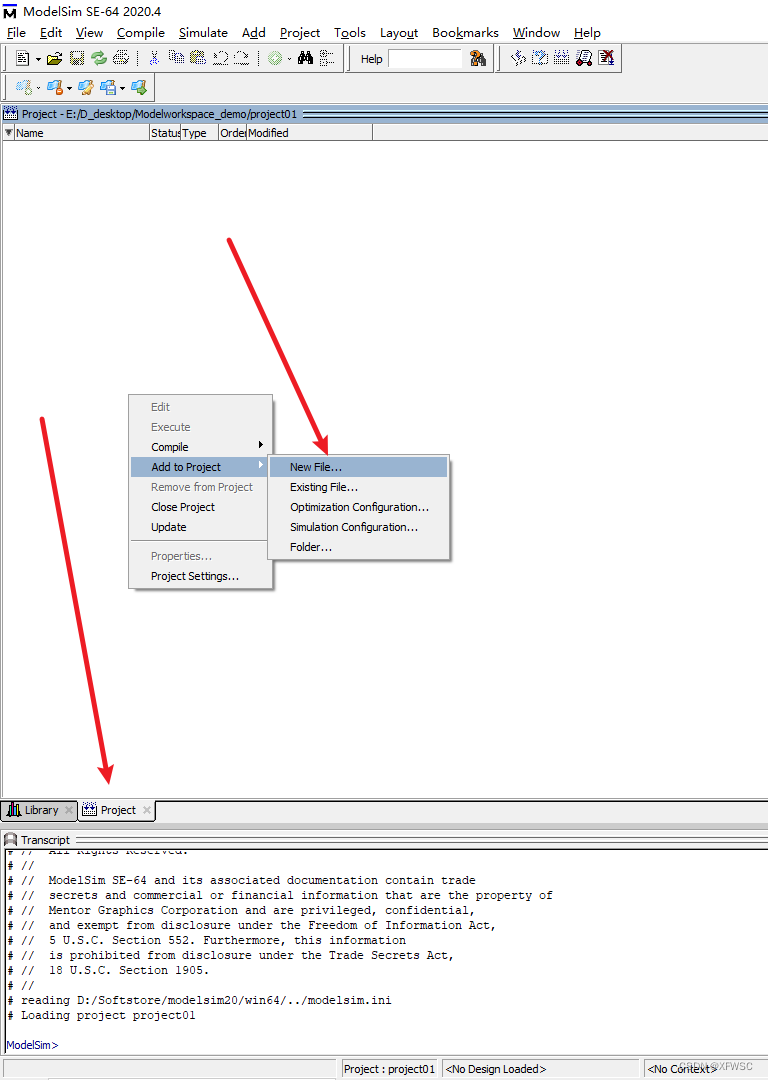
新建红色箭头所指的文件,可以当作以后的模板使用。
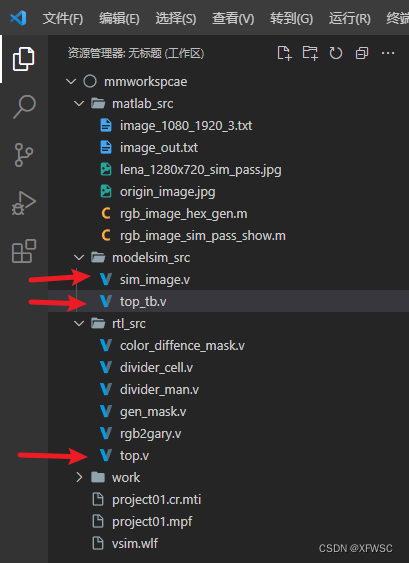
编写 top_tb.v文件
将 top.v 产生的图像数据存入到文件 image_out.txt。例程所提供的代码图像的大小为1920*1080,若使用的图像格式不一样需要更改。
`timescale 1ns/1ps
//
module top_tb();
reg                 clk;
reg                 rstn;
integer             image_txt;
reg     [31:00]     pixel_cnt;
wire    [23:00]     data;
wire    [02:00]     vs_o;
top top(
    .pclk           (clk    ),
    .rstn           (rstn   ),
    .vs_o           (vs_o   ),
    .ds_o           (data   )
);
always #1 clk = ~clk;
initial begin
    clk = 1;
    rstn = 0;
    #100
    rstn = 1;
end
initial begin
    image_txt = $fopen("E:/D_desktop/mmworkspcae/matlab_src/image_out.txt");
end
always @(posedge clk or negedge rstn)begin
    if (!rstn) begin
        pixel_cnt <= 0;
    end
    else if (vs_o[0]) begin
        pixel_cnt = pixel_cnt + 1;
        $fwrite(image_txt,"%h\n",data);
    end
end
always @(posedge clk)begin
    if (pixel_cnt == 1080*1920) begin
        $display("********************************************************************");
        $display("*** Success save image handle : image_out.txt ! %t",$realtime,"ps***");
        $display("********************************************************************");
            $fclose(image_txt);
        $stop;
    end
end
endmodule
编写sim_image.v文件
用于将测试图像文件转换成视频流格式,用于后面的图像处理。使用时需要更改测试图文件的位置。例程中所放至的位置在E:/D_desktop/mmworkspcae/matlab_src/image_1080_1920_3.txt
`timescale 1ns/1ps
`define VIDEO_1920_1080
module sim_image(
    input       wire                    pclk    ,
    output      wire            [02:00] vs_o    ,
    output      wire            [23:00] ds_o
);

//1920x1080 148.5Mhz
`ifdef VIDEO_1920_1080
parameter   H_ACTIVE        = 1920; // 行数据有效时间
parameter   H_FRONT_PORCH   = 88;   // 行消隐前肩时间
parameter   H_SYNC_TIME     = 44;   // 行同步信号时间
parameter   H_BACK_PORCH    = 148;  // 行消隐后肩时间

parameter   V_ACTIVE        = 1080; // 列数据有效时间
parameter   V_FRONT_PORCH   = 4;    // 列消隐前肩时间
parameter   V_SYNC_TIME     = 5;    // 列同步信号时间
parameter   V_BACK_PORCH    = 36;   // 列消隐后肩时间
`endif
//1280X720 74.25MHZ
`ifdef  VIDEO_1280_720
parameter  H_ACTIVE 		= 1280; // 行数据有效时间
parameter  H_FRONT_PORCH 	= 110;  // 行消隐前肩时间
parameter  H_SYNC_TIME 		= 40;   // 行同步信号时间
parameter  H_BACK_PORCH 	= 220;  // 行消隐后肩时间

parameter  V_ACTIVE 		= 720;  // 列数据有效时间
parameter  V_FRONT_PORCH 	= 5;    // 列消隐前肩时间
parameter  V_SYNC_TIME  	= 5;    // 列同步信号时间
parameter  V_BACK_PORCH 	= 20;   // 列消隐后肩时间
`endif

parameter  H_TOTAL_TIME 	= H_ACTIVE + H_FRONT_PORCH + H_SYNC_TIME + H_BACK_PORCH;
parameter  V_TOTAL_TIME 	= H_ACTIVE + V_FRONT_PORCH + V_SYNC_TIME + V_BACK_PORCH;


reg             o_hs;
reg             o_vs;
reg             o_de,o_deo;
reg     [07:00] o_rr;
reg     [07:00] o_gg;
reg     [07:00] o_bb;
reg     [12:00] h_syn_cnt   = 'd0;
reg     [12:00] v_syn_cnt   = 'd0;
reg     [23:00] image [0:H_ACTIVE*H_ACTIVE - 1];
reg     [31:00] image_cnt = 'd0;


initial begin
    $readmemh("E:/D_desktop/mmworkspcae/matlab_src/image_1080_1920_3.txt",image);
end

always @(posedge pclk) begin
    if (h_syn_cnt == H_TOTAL_TIME - 1)
        h_syn_cnt <= 0;
    else
        h_syn_cnt <= h_syn_cnt + 1;
end

always @(posedge pclk) begin
    if (h_syn_cnt == H_TOTAL_TIME - 1) begin
        if (v_syn_cnt == V_TOTAL_TIME - 1)
            v_syn_cnt <= 0;
        else
            v_syn_cnt <= v_syn_cnt + 1;
    end
end

always @(posedge pclk) begin
    if (h_syn_cnt < H_SYNC_TIME)
        o_hs <= 0;
    else
        o_hs <= 1;
end

always @(posedge pclk) begin
    if (v_syn_cnt < V_SYNC_TIME)
        o_vs <= 0;
    else
        o_vs <= 1;
end

always@(posedge pclk)begin
    if(v_syn_cnt >= V_SYNC_TIME + V_BACK_PORCH && v_syn_cnt < V_SYNC_TIME + V_BACK_PORCH + V_ACTIVE)
    begin
        if(h_syn_cnt >= H_SYNC_TIME + H_BACK_PORCH && h_syn_cnt < H_SYNC_TIME + H_BACK_PORCH + H_ACTIVE)
            o_de <= 1;
        else
            o_de <= 0;
    end
    else
        o_de <= 0;
end

always @(posedge pclk) begin
    if (o_de) begin
        o_rr <= image[image_cnt][23:16];
        o_gg <= image[image_cnt][15:08];
        o_rr <= image[image_cnt][07:00];
        image_cnt <= image_cnt + 1;
    end
    else if (image_cnt == H_ACTIVE*V_ACTIVE) begin
		o_rr <= 8'h00;
		o_gg <= 8'h00;
		o_bb <= 8'h00;
        image_cnt <= 'd0;
    end
    else begin
		o_rr <= 8'h00;
		o_gg <= 8'h00;
		o_bb <= 8'h00;
        image_cnt <= image_cnt;
    end
end

always @(posedge pclk) o_deo <= o_de;

assign vs_o = {o_hs,o_vs,o_de};
assign ds_o = {o_rr,o_gg,o_bb};
endmodule
编写 top.v 文件
该模块将测试图生成模块 sim_image()和 以及需要对图像处理的模块例化到top.v文件中。
`timescale 1ns/1ps

module top(
    input   wire                pclk,
    input   wire                rstn,
    output  wire        [02:00] vs_o,
    output  wire        [23:00] ds_o
);

wire            [02:00]     vs_i;
wire            [23:00]     ds_i;
sim_image sim_image(
    .pclk                       (pclk       ),
    .vs_o                       (vs_i       ),
    .ds_o                       (ds_i       )
);
rgb2gary rgb2gary(
    .pclk                       (pclk       ),
    .rstn                       (rstn       ),
    .vs_i                       (vs_i       ),
    .ds_i                       (ds_i       ),
    .vs_o                       (vs_o       ),
    .ds_o                       (ds_o       )
);


endmodule
将编写完成的4个文件编译,编译成功可以看到文件后Status。

使用 Matlab 将jpg格式的图像数据转换成rgb格式的txt文件。将原始图像origin_image.jpg转换为RGB数据后存入image_1080_1920_3.txt。
clear;clear all;clc;

image_in = imread('origin_image.jpg');

imshow(image_in),title('The original image');

FileName=['image_',num2str(size(image_in,1)),'_',num2str(size(image_in,2)),'_',num2str(size(image_in,3)),'.txt'];

[row,col,n] = size(image_in);

fid = fopen(FileName,'w');

for x = 1:row
	for y = 1:col
		image_R = dec2hex(image_in(x,y,1));
		image_G = dec2hex(image_in(x,y,2));
		image_B = dec2hex(image_in(x,y,3));

		[rm,rn]=size(image_R);
		[gm,gn]=size(image_G);
		[bm,bn]=size(image_B);

		if rn == 1
			image_R =['0',image_R];
		elseif rn == 0
			image_R ='00';
		end
		if gn == 1
			image_G =['0',image_G];
		elseif gn == 0
			image_G ='00';
		end
		if bn == 1
			image_B =['0',image_B];
		elseif bn == 0
			image_B ='00';
		end

		image_hex=[image_R,image_G,image_B];
		fprintf(fid,'%s\n',image_hex);
	end
end
fclose(fid);
运行成功后可以查看原始图像

运行ModelSim。
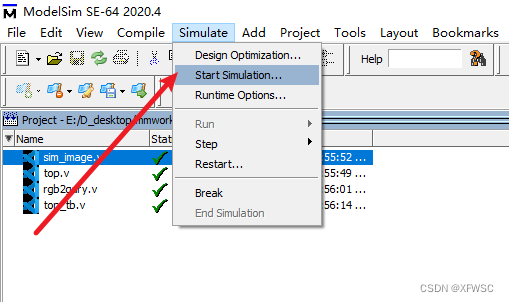
选择顶层文件top_tb.v,取消勾选enable optimization。

若出现如下错误(笔者也未彻底解决),可以使用命令行启动仿真。
vsim -voptargs=+acc work.top_tb
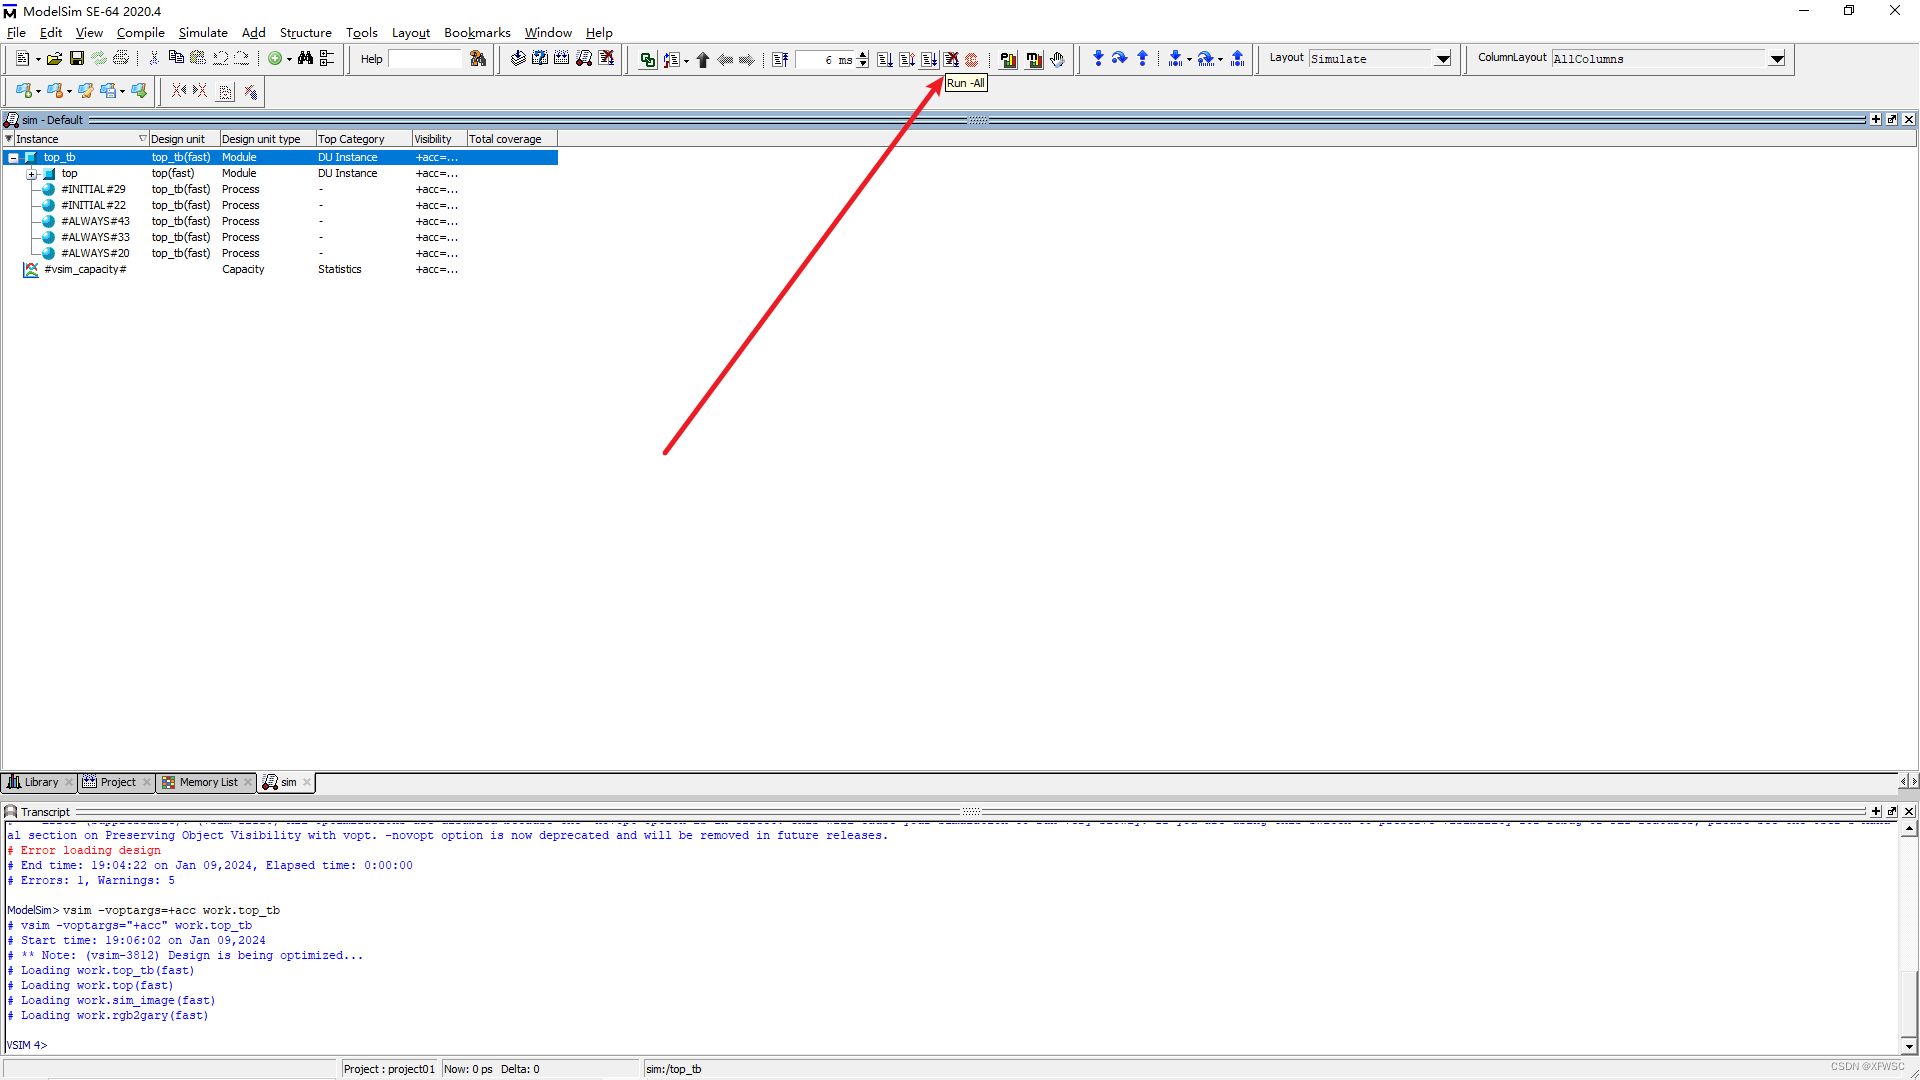
成功启动仿真后,点击启动 RUN-ALL开始仿真。
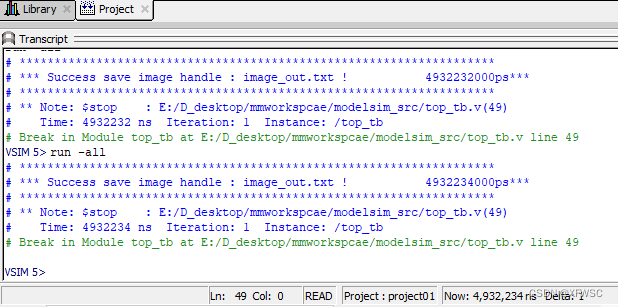
程序运行成功,停在 $stop; 语句位置。
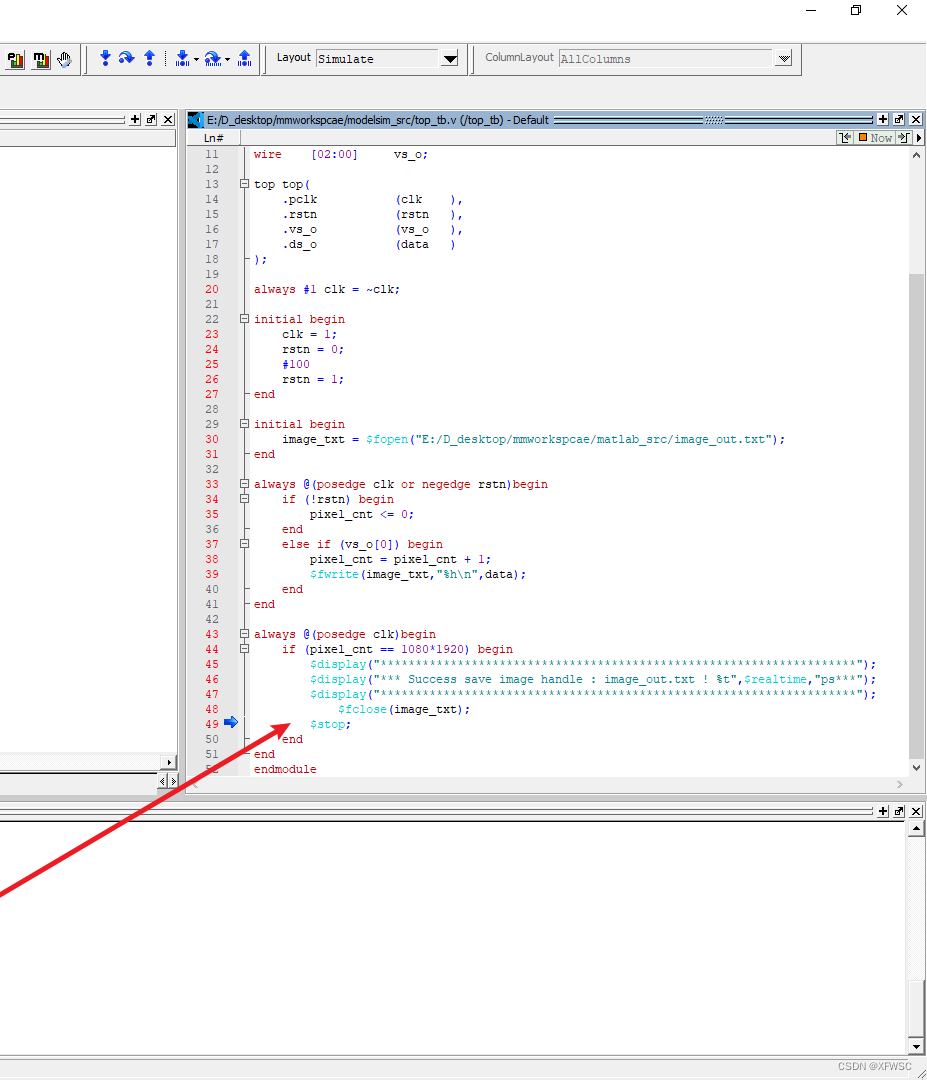
并可以查看打印信息,处理后的图像数据存储在image_out.txt中。
回到Matlab软件中,将仿真产生的 文本数据转换成jpg格式的图像。
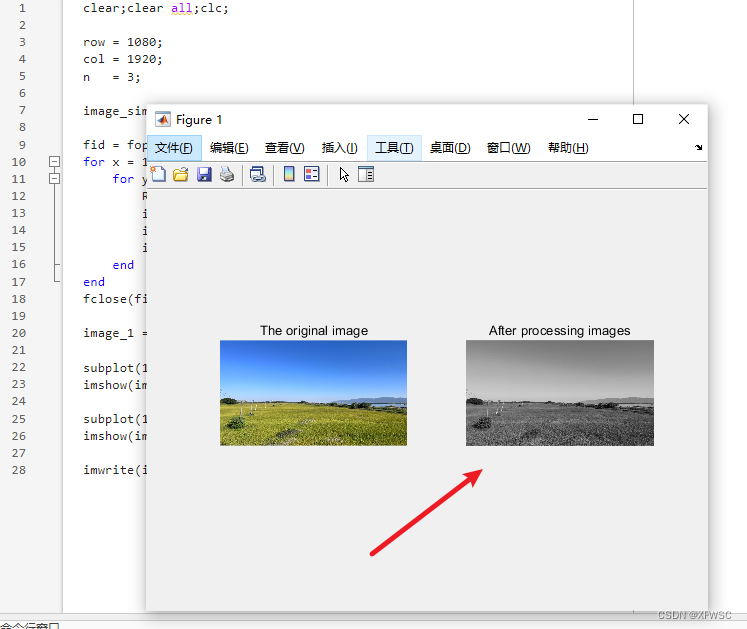
clear;clear all;clc;

row = 1080;
col = 1920;
n   = 3;

image_sim_pass = uint8(zeros(row,col,n));

fid = fopen('image_out.txt','r');
for x = 1:row
    for y = 1:col
        RGB = fscanf(fid,'%s',1);
        image_sim_pass(x,y,1) = uint8(hex2dec(RGB(1:2)));
        image_sim_pass(x,y,2) = uint8(hex2dec(RGB(3:4)));
        image_sim_pass(x,y,3) = uint8(hex2dec(RGB(5:6)));
    end
end
fclose(fid);

image_1 = imread('origin_image.jpg');

subplot(121);
imshow(image_1), title('The original image');

subplot(122);
imshow(image_sim_pass),title('After processing images');

imwrite(image_sim_pass,'simhandle_pass.jpg');
可以在matlab软件中查看生成后的图像,例程中进行图像的灰度转换。也可以用图片编辑器打开保存的jpg格式文件查看。


 215
215


 被折叠的 条评论
为什么被折叠?
被折叠的 条评论
为什么被折叠?
 到【灌水乐园】发言


