


Anchor策略:
yolov3延续了yolov2的anchor策略,基本没有变化。
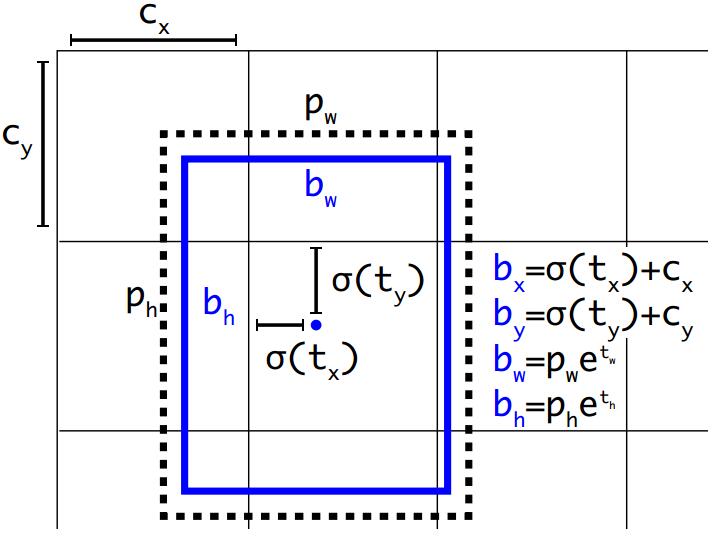
边框的表示方式通过框的中心坐标bx,by,和框的宽bw,高bh这4个变量来表示。实际预测的值为tx,ty,tw,th。
由tx,ty,tw,th得到bx,by,bw,bh的详细公式如上图,其中,
cx,cy为框的中心坐标所在的grid cell 距离左上角第一个grid cell的cell个数。
tx,ty为预测的边框的中心点坐标。
σ()函数为logistic函数,将坐标归一化到0-1之间。最终得到的bx,by为归一化后的相对于grid cell的值
tw,th为预测的边框的宽,高。
pw,ph为anchor的宽,高。实际在使用中,作者为了将bw,bh也归一化到0-1,实际程序中的 pw,ph为anchor的宽,高和featuremap的宽,高的比值。最终得到的bw,bh为归一化后相对于feature map的比值
σ(t0)表示预测的边框的置信度,为预测的边框的概率和预测的边框与ground truth的IOU值的乘积。
这里有别于faster系列,yolov3只为ground truth 匹配一个最优的边界框。
分类损失函数:
yolov3中将yolov2中多分类损失函数softmax cross-entropy loss 换为2分类损失函数binary cross-entropy loss 。因为当图片中存在物体相互遮挡的情形时,一个box可能属于好几个物体,而不是单单的属于这个不属于那个,这时使用2分类的损失函数就更有优势。
多尺度预测:
Yolov3采用了类似SSD的mul-scales策略,使用3个scale(13*13,26*26,52*52)的feature map进行预测。
有别于yolov2,这里作者将每个grid cell预测的边框数从yolov2的5个减为yolov3的3个。最终输出的tensor维度为N × N × [3 ∗ (4 + 1 + 80)] 。其中N为feature map的长宽,3表示3个预测的边框,4表示边框的tx,ty,tw,th,1表示预测的边框的置信度,80表示分类的类别数。
和yolov2一样,anchor的大小作者还是使用kmeans聚类得出。在coco数据集上的9个anchor大小分别为:(10× 13); (16× 30); (33× 23); (30× 61); (62× 45); (59×119); (116 × 90); (156 × 198); (373 × 326)
其中在yolov3中,最终有3个分支输出做预测,输出的特征图大小分别为13*13,26*26,52*52,每个特征图使用3个anchor,
13*13的特征图使用(116 × 90); (156 × 198); (373 × 326);这3个anchor
26*26的特征图使用(30× 61); (62× 45); (59×119);这3个anchor
52*52的特征图使用(10× 13); (16× 30); (33× 23);这3个anchor
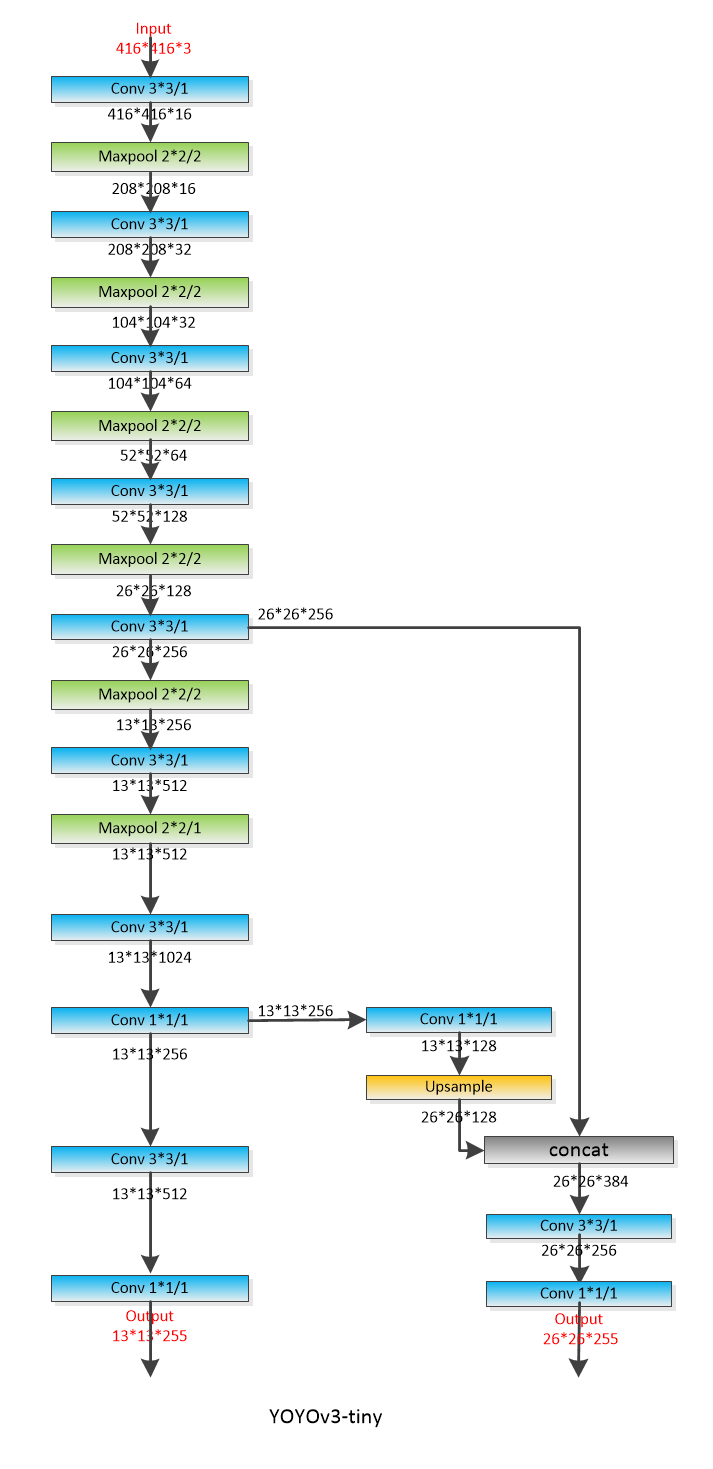
而在yolov3-tiny中,一共有6个anchor,(10,14), ( 23,27), (37,58), (81,82), (135,169), (344,319),
yolov3-tiny最终有2给分支输出作预测,特征图大小分别为13*13,26*26。每个特征图使用3个anchor做预测。
13*13的特征图使用(81,82), (135,169), (344,319)这3个anchor
26*26的特征图使用( 23,27), (37,58), (81,82)这3个anchor
plus:
faster rcnn:3个scale(128*128,256*256,512*512),3个aspect ratio(1:1,1:2,2:1)共9个anchor
ssd:5个aspect ratio(1:1,1:2,1:3,2:1,3:1),再加一个中间的default box,一共6个anchor
yolov3:一共9个anchor
tiny-yolov3:一共6个anchor
FPN:5个scale(32*32; 64*64; 128*128; 256*256; 512*512),3个aspect ratio(1:1,1:2,2:1),共15个anchor
ctpn:anchor宽度固定为16,高度为11-283之间的10个数,每次处以0.7得到,最终得到[11, 16, 23, 33, 48, 68, 97, 139, 198, 283]共10个anchor
plus:
假设都是用voc数据集
faster rcnn:最后的输出层分类部分的全连接层输出的个数是21。虽然faster已经先经过前面的RPN的2分类,过滤掉了大部分背景类别,但是后续仍然有可能存在背景类别。
SSD:分类的类别为21类,因为,使用softmax loss,肯定会有一个值最大,所以必须得加背景类别。
yolov3:20类,因为使用的是多个sigmoid来代替softmax,本质上每一个sigmoid都是前景,背景分类问题。
使用多尺度融合的策略,使得yolov3的召回率和准确性都有大的提升。
Backbone骨架:
和yolov2的19层的骨架(Darknet-19 )不同,yolov3中,作者提出了53层的骨架(Darknet-53 ),并且借鉴了ResNet的shortcut结构。
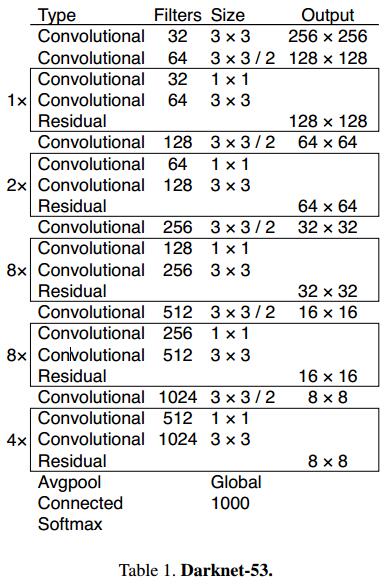
上图为论文中的网络结构,但是卷积层只有52层,和作者实际的程序还是有点出入。为此,自己根据作者的程序撸了一个,主干网络还是52层。
一个需要注意的地方,yolov3-tiny 有max pooling,而yolov3使用stride=2的卷积代替pooling操作
yolov3-tiny:
yolov3:

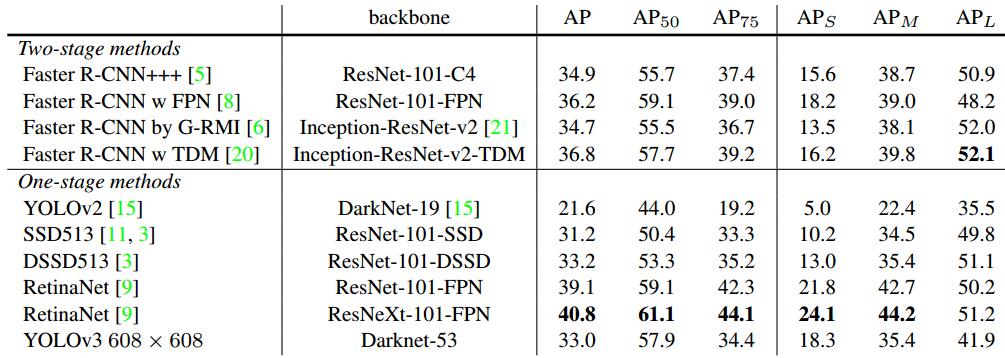
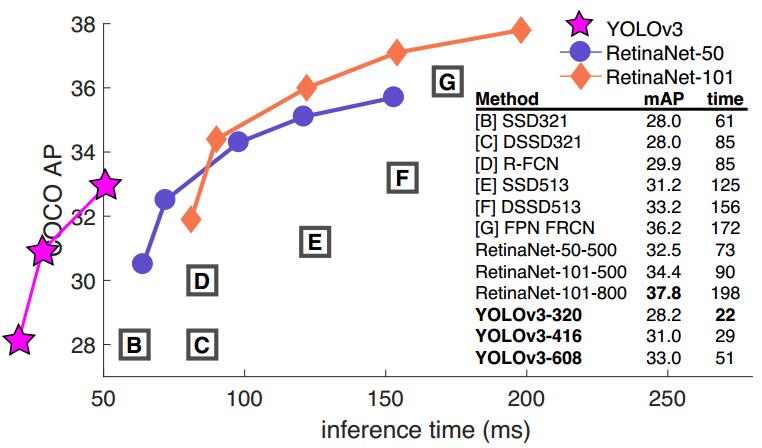
精度vs速度:
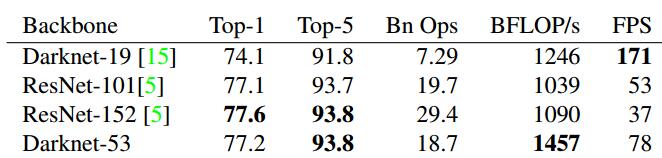
Yolov3的精度和速度都达到的空前的高快。
在分类任务中,以darknet-53的骨架网络,速度是ResNet-152的2倍,精度也基本相当。
在检测任务中,当IOU标准定为0.5时,只比RetinaNet低3.2%个点。在IOU标准定为0.75时,比RetinaNet低9.7%个点。其实这个问题也是yolo一直存在的一个问题,在相对比较小的检测物体上,会存在检测框不是很准的想象。速度方面比RetinaNet快出3倍多。
RUN:(测试显卡为P40)
git clone https://github.com/pjreddie/darknet
cd darknet
Make -j32
wget https://pjreddie.com/media/files/yolov3.weights
wget https://pjreddie.com/media/files/yolov3-tiny.weights

./darknet detect cfg/yolov3.cfg yolov3.weights data/dog.jpg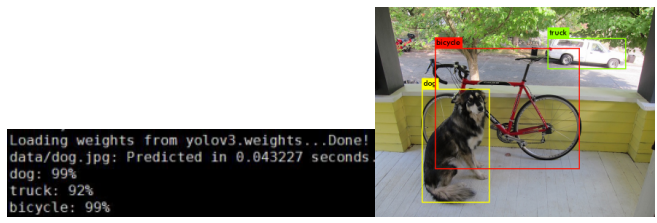
./darknet detect cfg/yolov3-tiny.cfg yolov3-tiny.weights data/dog.jpg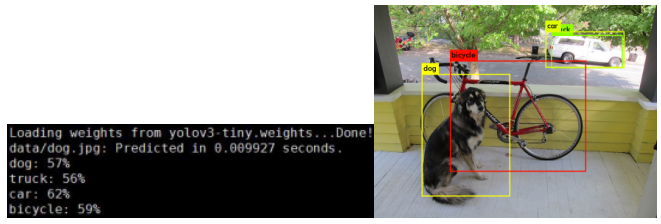
训练自己数据:
这里假定我要实现一个简单的3个类别检测(3个类别)。
(1)首先就是数据集的准备,这里建议使用python+QT开发的抠图小工具,labelImg。保存的时候可以选择保存为voc格式,也可以保存为yolo格式。建议保存为VOC格式,因为格式更加标准通用。
(2)模仿VOC的格式建立相应的文件夹,执行,
cd darknet
mkdir VOCdevkit
cd VOCdevkit
mkdir VOC2019
mkdir Annotations ImageSets JPEGImages labels
cd ImageSets/
mkdir Main
tree -d
目录结构显示如下,

其中,VOC2019为我自己的数据集起的名字,你也可以起别的名字,Annotations存放XML文件,Main中存放,train.txt,val.txt,test.txt,txt中只写图片的名字,一行一个。JPEGImages中存放图片。labels中存放由XML生成的txt文件。
(3)修改scripts下面的voc_label.py,将数据集的目录修改为自己的目录,
开始几行
sets=[('2019', 'train'), ('2019', 'val'),('2019', 'test')]
classes = ["apple", "banana", "orange"]
最后2行
os.system("cat 2019_train.txt > train.txt")
os.system("cat 2019_train.txt > train.all.txt")
然后执行
Python3 scripts/voc_label.py
就会生成labels文件夹,以及文件夹下面的txt标记,以及train.txt 和train.all.txt
其中,train.txt中存储路径+图片名,一行一个
/data/darknet/VOCdevkit/VOC2019/JPEGImages/55000087.jpg
/data/darknet/VOCdevkit/VOC2019/JPEGImages/43000097.jpg
/data/darknet/VOCdevkit/VOC2019/JPEGImages/14000107.jpg
Labels文件夹下每个图片对应一个txt文件,里面存储类别 框坐标的归一化值
2 0.368896484375 0.14908854166666666 0.03076171875 0.03515625
2 0.328125 0.18359375 0.0283203125 0.03515625
0 0.190185546875 0.6207682291666666 0.03173828125 0.026692708333333332
1 0.40625 0.21028645833333331 0.193359375 0.16666666666666666
(4)修改,cfg/voc.data
class为训练的类别数
train为训练集train.txt
valid为验证集val.txt
names为voc.names,里面为自己训练的目标名称
backup为weights的存储位置
classes= 3
train  = /DATA/darknet/VOCdevkit/2019_train.txt
valid  = /DATA/darknet/VOCdevkit/2019_test.txt
names = /DATA/darknet/data/voc.names
backup = /DATA/darknet/weights
(5)修改cfg/yolov3.cfg
修改每个classes=3(610,696,783共3处修改)
修改最后一个卷基层,filters和最后一个region的classes,num参数是因为yolov3有3给分支,每个分支3个anchor。
其中,filters=num×(classes + coords + 1)=3*(3+4+1)=24,这里我有3个类别。(603,689,776行,共3处修改)
(6)执行下面的语句进行训练
./darknet detector train ./cfg/voc.data ./cfg/yolov3.cfg ./ yolov3.weights -clear-clear参数可以加载作者的预训练模型,重新进行微调训练。
训练完毕就可以生成weights文件,
(7)测试,执行下面语句,
./darknet detect ./cfg/yolov3.cfg weights/yolov3_final.weights 1.jpg(8)anchor修改,根据自己的数据集重新kmeans设置anchor,自己撸的程序
import matplotlib.pyplot as plt
from sklearn.datasets.samples_generator import make_blobs
from sklearn.cluster import KMeans
from sklearn import metrics
import xml.etree.ElementTree as ET
import os


def parse_xml(xmlpath,train_input_width,train_input_height):
    tree = ET.parse(xmlpath)
    root = tree.getroot()

    for size in root.iter('size'):
        width_text = int(size.find('width').text)
        height_text = int(size.find('height').text)

    width_list=[]
    height_list=[]
    for box in root.iter('bndbox'):
        x1 = int(box.find('xmin').text)
        y1 = int(box.find('ymin').text)
        x2 = int(box.find('xmax').text)
        y2 = int(box.find('ymax').text)
        width=(x2-x1)/width_text*train_input_width#经过resize后的长宽
        height=(y2-y1)/height_text*train_input_height#经过resize后的长宽
        width_list.append(width)
        height_list.append(height)

    return width_list,height_list


xml_path_lists=["./VOC2012/Annotations/","./VOC2017/Annotations/"]#xml位置
kmeans_num=6#聚类类别数
train_input_width=320#训练网络输入图片宽度
train_input_height=320#训练网络输入图片高度


width_list_all=[]
height_list_all=[]
for xml_path in xml_path_lists:
    for xml in os.listdir(xml_path):
        width_list,height_list=parse_xml(xml_path+xml,train_input_width,train_input_height)
        width_list_all.extend(width_list)
        height_list_all.extend(height_list)

plt.scatter(width_list_all, height_list_all, marker='o')  # 假设暂不知道y类别,不设置c=y,使用kmeans聚类
plt.show()


kmeans  = KMeans(n_clusters=kmeans_num, random_state=9).fit(list(zip(width_list_all,height_list_all)))
y_pred = KMeans(n_clusters=kmeans_num, random_state=9).fit_predict(list(zip(width_list_all,height_list_all)))
plt.scatter(width_list_all, height_list_all, c=y_pred)
plt.show()

print (kmeans.cluster_centers_)
print(metrics.calinski_harabaz_score(list(zip(width_list_all,height_list_all)), y_pred))
最终输出结果,


官方程序:
'''
Created on Feb 20, 2017

@author: jumabek
'''
from os import listdir
from os.path import isfile, join
import argparse
#import cv2
import numpy as np
import sys
import os
import shutil
import random
import math

width_in_cfg_file = 416.
height_in_cfg_file = 416.

def IOU(x,centroids):
    similarities = []
    k = len(centroids)
    for centroid in centroids:
        c_w,c_h = centroid
        w,h = x
        if c_w>=w and c_h>=h:
            similarity = w*h/(c_w*c_h)
        elif c_w>=w and c_h<=h:
            similarity = w*c_h/(w*h + (c_w-w)*c_h)
        elif c_w<=w and c_h>=h:
            similarity = c_w*h/(w*h + c_w*(c_h-h))
        else: #means both w,h are bigger than c_w and c_h respectively
            similarity = (c_w*c_h)/(w*h)
        similarities.append(similarity) # will become (k,) shape
    return np.array(similarities)

def avg_IOU(X,centroids):
    n,d = X.shape
    sum = 0.
    for i in range(X.shape[0]):
        #note IOU() will return array which contains IoU for each centroid and X[i] // slightly ineffective, but I am too lazy
        sum+= max(IOU(X[i],centroids))
    return sum/n

def write_anchors_to_file(centroids,X,anchor_file):
    f = open(anchor_file,'w')

    anchors = centroids.copy()
    print(anchors.shape)

    for i in range(anchors.shape[0]):
        anchors[i][0]*=width_in_cfg_file/32.
        anchors[i][1]*=height_in_cfg_file/32.


    widths = anchors[:,0]
    sorted_indices = np.argsort(widths)

    print('Anchors = ', anchors[sorted_indices])

    for i in sorted_indices[:-1]:
        f.write('%0.2f,%0.2f, '%(anchors[i,0],anchors[i,1]))

    #there should not be comma after last anchor, that's why
    f.write('%0.2f,%0.2f\n'%(anchors[sorted_indices[-1:],0],anchors[sorted_indices[-1:],1]))

    f.write('%f\n'%(avg_IOU(X,centroids)))
    print()

def kmeans(X,centroids,eps,anchor_file):

    N = X.shape[0]
    iterations = 0
    k,dim = centroids.shape
    prev_assignments = np.ones(N)*(-1)
    iter = 0
    old_D = np.zeros((N,k))

    while True:
        D = []
        iter+=1
        for i in range(N):
            d = 1 - IOU(X[i],centroids)
            D.append(d)
        D = np.array(D) # D.shape = (N,k)

        print("iter {}: dists = {}".format(iter,np.sum(np.abs(old_D-D))))

        #assign samples to centroids
        assignments = np.argmin(D,axis=1)

        if (assignments == prev_assignments).all() :
            print("Centroids = ",centroids)
            write_anchors_to_file(centroids,X,anchor_file)
            return

        #calculate new centroids
        centroid_sums=np.zeros((k,dim),np.float)
        for i in range(N):
            centroid_sums[assignments[i]]+=X[i]
        for j in range(k):
            centroids[j] = centroid_sums[j]/(np.sum(assignments==j))

        prev_assignments = assignments.copy()
        old_D = D.copy()

def main(argv):
    parser = argparse.ArgumentParser()
    parser.add_argument('-filelist', default = '\\path\\to\\voc\\filelist\\train.txt',
                        help='path to filelist\n' )
    parser.add_argument('-output_dir', default = 'generated_anchors/anchors', type = str,
                        help='Output anchor directory\n' )
    parser.add_argument('-num_clusters', default = 0, type = int,
                        help='number of clusters\n' )


    args = parser.parse_args()

    if not os.path.exists(args.output_dir):
        os.mkdir(args.output_dir)

    f = open(args.filelist)

    lines = [line.rstrip('\n') for line in f.readlines()]

    annotation_dims = []

    size = np.zeros((1,1,3))
    for line in lines:

        line = line.replace('JPEGImages','labels')


        line = line.replace('.jpg','.txt')
        line = line.replace('.png','.txt')
        print(line)
        f2 = open(line)
        for line in f2.readlines():
            line = line.rstrip('\n')
            w,h = line.split(' ')[3:]
            #print(w,h)
            annotation_dims.append(tuple(map(float,(w,h))))
    annotation_dims = np.array(annotation_dims)

    eps = 0.005

    if args.num_clusters == 0:
        for num_clusters in range(1,11): #we make 1 through 10 clusters
            anchor_file = join( args.output_dir,'anchors%d.txt'%(num_clusters))

            indices = [ random.randrange(annotation_dims.shape[0]) for i in range(num_clusters)]
            centroids = annotation_dims[indices]
            kmeans(annotation_dims,centroids,eps,anchor_file)
            print('centroids.shape', centroids.shape)
    else:
        anchor_file = join( args.output_dir,'anchors%d.txt'%(args.num_clusters))
        indices = [ random.randrange(annotation_dims.shape[0]) for i in range(args.num_clusters)]
        centroids = annotation_dims[indices]
        kmeans(annotation_dims,centroids,eps,anchor_file)
        print('centroids.shape', centroids.shape)

if __name__=="__main__":
    main(sys.argv)
输出结果,

2个结果有一些差异,但是相差不是很大。
Python接口:
Python/darknet.py
注意这里Python检测输出的结果为中心坐标和宽高。
原始的接口读取图片为作者自己的结构体IMAGE方式,这里增加numpy转IMAGE的接口。
1、在darkenet.py中自定义一个函数,大概48行
def nparray_to_image(img):
    data = img.ctypes.data_as(POINTER(c_ubyte))
    image = ndarray_image(data, img.ctypes.shape, img.ctypes.strides)
return image
2、在darknet.py中增加如下行代码,大概127行
ndarray_image = lib.ndarray_to_image
ndarray_image.argtypes = [POINTER(c_ubyte), POINTER(c_long), POINTER(c_long)]
ndarray_image.restype = IMAGE
3、在src/image.c中增加如下代码段,增加位置大概550行,
#ifdef NUMPY
image ndarray_to_image(unsigned char* src, long* shape, long* strides)
{
    int h = shape[0];
    int w = shape[1];
    int c = shape[2];
    int step_h = strides[0];
    int step_w = strides[1];
    int step_c = strides[2];
    image im = make_image(w, h, c);
    int i, j, k;
    int index1, index2 = 0;

    for(i = 0; i < h; ++i){
            for(k= 0; k < c; ++k){
                for(j = 0; j < w; ++j){

                    index1 = k*w*h + i*w + j;
                    index2 = step_h*i + step_w*j + step_c*k;
                    //fprintf(stderr, "w=%d h=%d c=%d step_w=%d step_h=%d step_c=%d \n", w, h, c, step_w, step_h, step_c);
                    //fprintf(stderr, "im.data[%d]=%u data[%d]=%f \n", index1, src[index2], index2, src[index2]/255.);
                    im.data[index1] = src[index2]/255.;
                }
            }
        }

    rgbgr_image(im);

    return im;
}
#endif
4、在src/image.h的23行后面加如下代码
#ifdef NUMPY
image ndarray_to_image(unsigned char* src, long* shape, long* strides);
#endif
5、在makefile的47行后面中加如下代码
ifeq ($(NUMPY), 1)
COMMON+= -DNUMPY -I/usr/include/python3.6/ -I /usr/lib/python3/dist-packages/numpy/core/include/numpy/
CFLAGS+= -DNUMPY
Endif
在makefile的第1行后面中加如下代码NUMPY =1
CUDNN=1
OPENCV=1
OPENMP=0
NUMPY=1
DEBUG=0
6、重新编译make clean + make
7、修改darknet.py的后续处理
if __name__ == "__main__":
    net = load_net(b"cfg/yolov3.cfg", b"yolov3.weights", 0)
    meta = load_meta(b"cfg/coco.data")
    image = cv2.imread(b'data/dog.jpg')
    im=nparray_to_image(image)
    r = detect(net, meta, im)
    print(r)
    for newbox in r:
        p1 = (int(newbox[0]), int(newbox[1]))
        p2 = (int(newbox[2]), int(newbox[3]))
        cv2.rectangle(image, p1, p2, (255,0,0))

    cv2.imshow('tracking', image)
    cv2.waitKey()
References:
https://pjreddie.com/darknet/yolo/
https://github.com/pjreddie/darknet


 1万+
1万+


 被折叠的 条评论
为什么被折叠?
被折叠的 条评论
为什么被折叠?
 到【灌水乐园】发言


