


Unreal Engine 4 C++ AI 粗略探究
好记性不如烂笔头啊,还是记录一下!
在Unreal Engine 4的AI在C++中有两种实现方式
- 用AI控制器(AIController)执行已经创建的行为树(BehaviorTree)
- 用AI控制器(AIController)执行自己写的行为逻辑
这两种方式都可是实现强大的逻辑,第一种方式是用蓝图创建行为树(BehaviorTree)编译完成后用C++来执行,第二种方式就是纯C++写行为模式了。
1.行为树(BehaviorTree)
行为树主要包含以下三个方面:
- AIController AI的行动控制者
- BehaviorTree AI的行动逻辑
- Blackboard AI的记忆数据
运行行为树需要添加AIModule的依赖
PublicDependencyModuleNames.AddRange(
    new string[] {
        "Core",
        "CoreUObject",
        "Engine",
        "InputCore",
        "AIModule"
    }
);
运行行为树的代码为
MyAIController->RunBehaviorTree(BehaviorTree);
即可运行行为树
关于行为树的构建
2.AI控制器(AIController)
用AIController来写AI,可以实现最强大的功能,因为全部可以用C++实现
一样要在工程里添加AIModule的依赖
PublicDependencyModuleNames.AddRange(
    new string[] {
        "Core",
        "CoreUObject",
        "Engine",
        "InputCore",
        "AIModule"
    }
);
简单的实现个走动的AI
- MyAIController.h
#include "AIController.h"
#include "Navigation/PathFollowingComponent.h"
#include "Actions/PawnAction_Move.h"
#include "MyAIController.generated.h"

/**
 *
 */
UCLASS()
class TESTMOBILE_API AMyAIController : public AAIController
{
    GENERATED_BODY()

    // 设置基本属性的构造函数
    AMyAIController(const FObjectInitializer& ObjectInitializer = FObjectInitializer::Get());

public:
    // 开始控制角色的函数
    virtual void Possess(APawn* inPawn) override;
    virtual void UnPossess() override;
    // 结束控制角色的函数

    /** Action Event */
    void OnActionEvent(UPawnAction&, EPawnActionEventType::Type);
};
- MyAIController.cpp
#include "MyCharacter.h"
#include "MyAIController.h"


// 初始化设置
AMyAIController::AMyAIController(const FObjectInitializer & ObjectInitializer)
    : Super(ObjectInitializer)
{
    BrainComponent = CreateDefaultSubobject<UBrainComponent>(TEXT("BrainComponent"));

}


// 开始控制
void AMyAIController::Possess(APawn * inPawn)
{
    Super::Possess(inPawn);

    GetActionsComp()->SetControlledPawn(inPawn);
    BrainComponent->RegisterComponent();

    FVector NewLocation = FVector(0.0f);
    FVector OffsetLocation = FVector(900.0f, 0.0f, 0.0f);

    AMyCharacter* const MyCharacter = Cast<AMyCharacter>(GetPawn());
    if (MyCharacter != NULL && MyCharacter->GetCharacterMovement() != NULL)
    {
        MyCharacter->GetCharacterMovement()->SetMovementMode(MOVE_Walking);
        MyCharacter->SetCharacterState(CharacterState::Walk);
        FVector OldLocation = MyCharacter->GetActorLocation();
        NewLocation = OldLocation + OffsetLocation;
    }

    UPawnAction* Action = UPawnAction_Move::CreateAction(*GetWorld(), NewLocation, EPawnActionMoveMode::Type::StraightLine);
    Action->SetActionObserver(FPawnActionEventDelegate::CreateUObject(this, &AMyAIController::OnActionEvent));
    this->PerformAction(*Action, EAIRequestPriority::Logic);
}


// 结束控制
void AMyAIController::UnPossess()
{
    Super::UnPossess();
}


// 动作事件
void AMyAIController::OnActionEvent(UPawnAction& Action, EPawnActionEventType::Type EventType)
{
    if ( EPawnActionEventType::Type::FinishedExecution == EventType )
    {
        AMyCharacter* const MyCharacter = Cast<AMyCharacter>(GetPawn());
        if (MyCharacter != NULL)
        {
            MyCharacter->SetCharacterState(CharacterState::Idle);
        }
    }
}
上面的代码主要需要注意的是,
一定要设置ActionComponent的控制的角色,PawnAction的处理都在ActionComponent中。
以及一定要注册BrainComponent,AI的消息处理都在BrainComponent中。
GetActionsComp()->SetControlledPawn(inPawn);
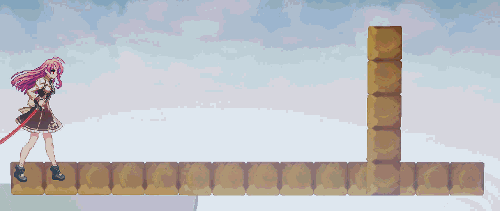
BrainComponent->RegisterComponent();上面的代码完成后会达成如下效果:


 1034
1034

 被折叠的 条评论
为什么被折叠?
被折叠的 条评论
为什么被折叠?
 到【灌水乐园】发言


