


一、数据集加载
来自:NeRF 源码分析解读(一)_nerf代码解读-CSDN博客
一些概念:
一些参考:NeRF论文笔记_nerf的采样near far-CSDN博客
images:[N, H, W, 3]。表示N张宽高为W,H的彩色图
pose:[N, 3,4]。表示N张图片的位姿
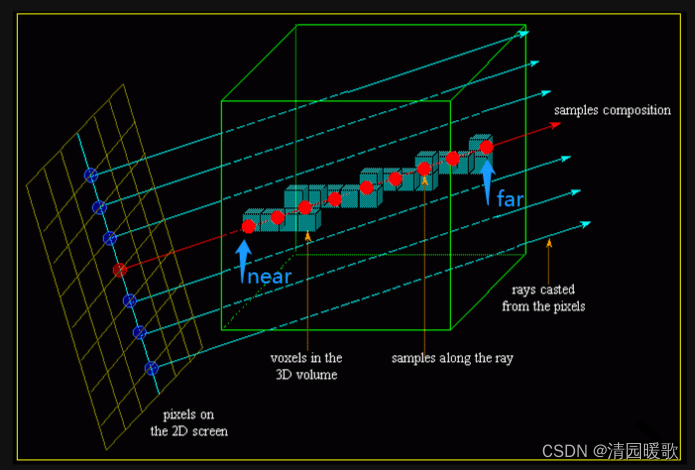
bds:[N,2]—>near, far 相当于光线的采样最近点与最远点(如下图所示,far和near根据真实场景的距离确定)
hwf:图像宽、高、焦距
本文以加载合成数据集中 lego 图像为例。
首先我们观察 ./data/nerf_synthetic/lego 文件夹下的树结构:

train、test、val 三个文件夹下包含了训练要用到的 .png 图像,每个文件夹下包含 100 个文件。.json 文件包含了相机的 camera2word 转置矩阵,下图展示了部分文件中的内容。关于此转置矩阵不再展开叙述,具体知识可查看 SLAM 14 讲。了解以上基本信息后解析数据加载的代码。
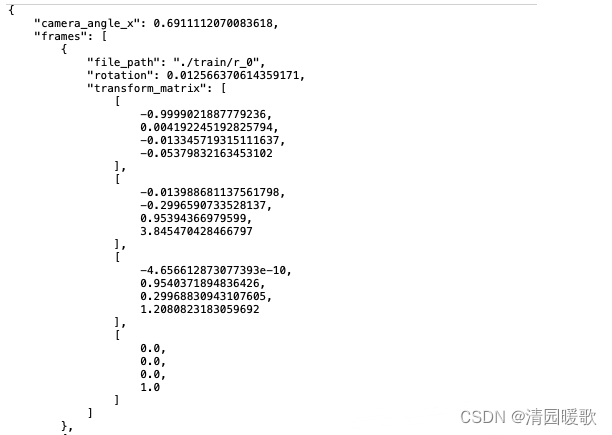
frame 的值是一个列表,其中列表中的值是字典
def train():

    # 设置参数
    parser = config_parser()
    args = parser.parse_args()

    ...

    elif args.dataset_type == 'blender':
	    images, poses, render_poses, hwf, i_split = load_blender_data(args.datadir, args.half_res, args.testskip)
	    print('Loaded blender', images.shape, render_poses.shape, hwf, args.datadir)
	    i_train, i_val, i_test = i_split

		# 设定边界框的远近边界
	    near = 2.
	    far = 6.

		# 将 RGBA 转换成 RGB 图像
	    if args.white_bkgd:
	    	# 如果使用白色背景
	        images = images[...,:3]*images[...,-1:] + (1.-images[...,-1:])
	    else:
	        images = images[...,:3]
我们通过 load_blender_data() 函数得到了指定文件夹下的所有图像、pose、测试渲染的pose、宽高焦距以及分割数组。下面对数据加载函数进行分析。
def load_blender_data(basedir, half_res=False, testskip=1):
	"""
	:param basedir: 数据文件夹路径
    :param half_res: 是否对图像进行半裁剪
    :param testskip: 挑选测试数据集的跳跃步长
    :return:
	"""
    splits = ['train', 'val', 'test']
    metas = {}
    for s in splits:
    	# 分别加载三个 .json 文件,保存到字典中
        with open(os.path.join(basedir, 'transforms_{}.json'.format(s)), 'r') as fp:
            metas[s] = json.load(fp)

    all_imgs = []
    all_poses = []
    counts = [0]

    for s in splits:
        meta = metas[s]  # 加载 .json 文件中的内容
        imgs = []
        poses = []
        # 如果是 train 文件夹,连续读取图像数据
        if s=='train' or testskip==0:
            skip = 1
        else:
            skip = testskip

        for frame in meta['frames'][::skip]:
        	# 以指定步长读取列表中的字典
            fname = os.path.join(basedir, frame['file_path'] + '.png')

            imgs.append(imageio.imread(fname))  # 将读取到的图像文件添加到图像列表中
            poses.append(np.array(frame['transform_matrix']))  # 读取转置矩阵
        imgs = (np.array(imgs) / 255.).astype(np.float32) # 此时 图像数组是一个 [n, H, W, 4] 的数组
        poses = np.array(poses).astype(np.float32)  # [n, 4, 4]
        counts.append(counts[-1] + imgs.shape[0])  # 用于标定到train、test、val

        all_imgs.append(imgs)  # 包含了 train、test、val 的图像的列表
        all_poses.append(poses)

    i_split = [np.arange(counts[i], counts[i+1]) for i in range(3)]

    imgs = np.concatenate(all_imgs, 0)  # 把列表聚合称为一个数组 [N, H, W, 4]
    poses = np.concatenate(all_poses, 0)

    H, W = imgs[0].shape[:2]
    camera_angle_x = float(meta['camera_angle_x'])
    focal = .5 * W / np.tan(.5 * camera_angle_x)  # 计算焦距

    # 制作用于测试训练效果的 渲染pose
    render_poses = torch.stack([pose_spherical(angle, -30.0, 4.0) for angle in np.linspace(-180,180,40+1)[:-1]], 0)

    # 为了节省内存开销可以选择只加载一半的数据,这里不再展开解释
    if half_res:
        H = H//2
        W = W//2
        focal = focal/2.

        imgs_half_res = np.zeros((imgs.shape[0], H, W, 4))
        for i, img in enumerate(imgs):
            imgs_half_res[i] = cv2.resize(img, (W, H), interpolation=cv2.INTER_AREA)
        imgs = imgs_half_res
        # imgs = tf.image.resize_area(imgs, [400, 400]).numpy()


    return imgs, poses, render_poses, [H, W, focal], i_split
通过对以上代码的分析,我们可以得到以下结果:
imgs : 根据 .json 文件加载到的所有图像数据。(N,H,W,4)N 代表用于 train、test、val 的总数量
poses : 转置矩阵。(N,4,4)
render_poses : 用于测试的 pose 。(40,4,4)
i_split : [[0:train], [train:val], [val:test]]
二、光线的生成
NeRF 源码分析解读(二)_nerf代码解读-CSDN博客
由上一章节我们得到了加载到的数据,包括读取图像的数组、图像的高宽焦距、相机的 pose 、以及用于分割测试集、训练集的分割数组。得到这些数据后,我们开始进行生成光线的步骤。
生成光线的步骤
 最低0.47元/天 解锁文章


 8894
8894

 被折叠的 条评论
为什么被折叠?
被折叠的 条评论
为什么被折叠?
 到【灌水乐园】发言


