


第七章 OpenGL ES 基础-输入输出框架思维
第一章 OpenGL ES 基础-屏幕、纹理、顶点坐标
第二章 OpenGL ES 基础-GLSL语法简单总结
第三章 OpenGL ES 基础-GLSL渲染纹理
第四章 OpenGL ES 基础-位移、缩放、旋转原理
第五章 OpenGL ES 基础-透视投影矩阵与正交投影矩阵
第六章 OpenGL ES 基础-FBO、VBO理解与运用
第七章 OpenGL ES 基础-输入输出框架思维
第八章 OpenGL ES 基础-MVP矩阵理解
第九章 OpenGL ES 基础-高斯模糊原理
第十章 OpenGL ES 基础-图像USM锐化
第十一章 OpenGL ES 基础-基础光照
第十二章 OpenGL ES 基础-色温、色调、亮度、对比度、饱和度、高光
第十三章 OpenGL ES-RGB、HSV、HSL模型介绍
第十四章 OpenGL ES-方框模糊(均值模糊)
第十五章 OpenGL ES-VR 全景模式原理
第十六章 OpenGL ES-桶形畸变算法-常用VR
FBO框架用法
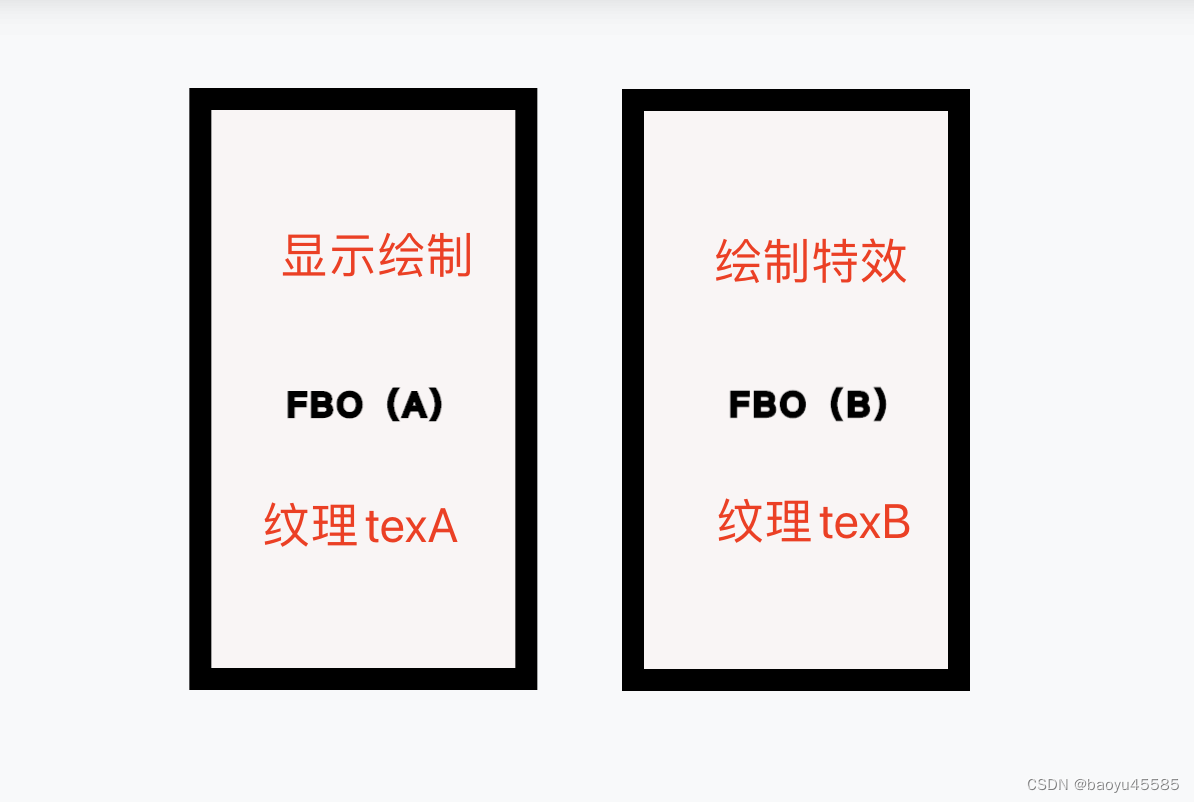
**思维:**渲染正常以一个FBO为住,把它当显示的一条线用,FBO(A),另外一个FBO把它当绘制各种特效还是其他的大杂烩的一条线用,FBO(B),最后要显示时候FBO(A)和FBO(B)可以交换。
FBO拆分
创建FBO方法如下(不懂可以看第六章)
/**
 * 创建fbo
 * @param fboTex 纹理的id数组
 * @param fboId fbo的id数组
 * @param width 宽
 * @param height 高
 */
 void createFBO(GLuint* fboTex, GLuint* fboId, int width, int height) {
//generate fbo id
   glGenFramebuffers(1, fboId);
//generate texture
   glGenTextures(1, fboTex);

//Bind Frame buffer
    glBindFramebuffer(GL_FRAMEBUFFER, fboId[0]);
//Bind texture
    glBindTexture(GL_TEXTURE_2D, fboTex[0]);
//Define texture parameters
    glTexImage2D(GL_TEXTURE_2D, 0, GL_RGBA, width, height, 0, GL_RGBA, GL_UNSIGNED_BYTE, NULL);
    glTexParameteri(GL_TEXTURE_2D,GL_TEXTURE_WRAP_S, GL_CLAMP_TO_EDGE);
    glTexParameteri(GL_TEXTURE_2D, GL_TEXTURE_WRAP_T, GL_CLAMP_TO_EDGE);
    glTexParameteri(GL_TEXTURE_2D, GL_TEXTURE_MAG_FILTER, GL_LINEAR);
    glTexParameteri(GL_TEXTURE_2D, GL_TEXTURE_MIN_FILTER, GL_LINEAR);
//Attach texture FBO color attachment
    glFramebufferTexture2D(GL_FRAMEBUFFER, GL_COLOR_ATTACHMENT0, GL_TEXTURE_2D, fboTex[0], 0);
//we are done, reset
    glBindTexture(GL_TEXTURE_2D, 0);
    glBindFramebuffer(GL_FRAMEBUFFER, 0);
}
FBO分别有纹理Id和FBO的Id 的拆开
正常初始化纹理、图片数据转纹理和绑定FBO、纹理如下分别三个方法:
   /**
     * 初始化绑定纹理
     * @param width
     * @param height
     * @param textureId
     * @param type
     * @return
     */
    public static int initEffectTexture(int width, int height, int[] textureId, int type) {
        GLES20.glGenTextures(1, textureId, 0);
        GLES20.glBindTexture(type, textureId[0]);
        GLES20.glTexParameterf(type,
                GLES20.GL_TEXTURE_MAG_FILTER, GLES20.GL_LINEAR);
        GLES20.glTexParameterf(type,
                GLES20.GL_TEXTURE_MIN_FILTER, GLES20.GL_LINEAR);
        GLES20.glTexParameterf(type,
                GLES20.GL_TEXTURE_WRAP_S, GLES20.GL_CLAMP_TO_EDGE);
        GLES20.glTexParameterf(type,
                GLES20.GL_TEXTURE_WRAP_T, GLES20.GL_CLAMP_TO_EDGE);
        GLES20.glTexImage2D(type, 0, GLES20.GL_RGBA, width, height, 0,
                GLES20.GL_RGBA, GLES20.GL_UNSIGNED_BYTE, null);
        return textureId[0];
    }

    /**
     * Creates a texture from raw data.
     *创建一张图片纹理
     * @param data   Image data, in a "direct" ByteBuffer.
     * @param width  Texture width, in pixels (not bytes).
     * @param height Texture height, in pixels.
     * @param format Image data format (use constant appropriate for glTexImage2D(), e.g. GL_RGBA).
     * @return Handle to texture.
     */
    public static int createImageTexture(ByteBuffer data, int width, int height, int format) {
        int[] textureHandles = new int[1];
        int textureHandle;

        GLES20.glGenTextures(1, textureHandles, 0);
        textureHandle = textureHandles[0];
        GlUtil.checkGlError("glGenTextures");

        // Bind the texture handle to the 2D texture target.
        GLES20.glBindTexture(GLES20.GL_TEXTURE_2D, textureHandle);

        // Configure min/mag filtering, i.e. what scaling method do we use if what we're rendering
        // is smaller or larger than the source image.
        GLES20.glTexParameteri(GLES20.GL_TEXTURE_2D, GLES20.GL_TEXTURE_MIN_FILTER,
                GLES20.GL_LINEAR);
        GLES20.glTexParameteri(GLES20.GL_TEXTURE_2D, GLES20.GL_TEXTURE_MAG_FILTER,
                GLES20.GL_LINEAR);
        GlUtil.checkGlError("loadImageTexture");

        // Load the data from the buffer into the texture handle.
        GLES20.glTexImage2D(GLES20.GL_TEXTURE_2D, /*level*/ 0, format,
                width, height, /*border*/ 0, format, GLES20.GL_UNSIGNED_BYTE, data);
        GlUtil.checkGlError("loadImageTexture");

        return textureHandle;
    }


bool GLUtils::bindFBO(GLuint texture, GLuint fbo, int width, int hegiht) {
    if (fbo != INVALID_FRAMEBUFFER && texture != INVALID_TEXTURE) {
        glBindFramebuffer(GL_FRAMEBUFFER, fbo);
        glFramebufferTexture2D(GL_FRAMEBUFFER, GL_COLOR_ATTACHMENT0, GL_TEXTURE_2D, texture, 0);
        if(glCheckFramebufferStatus(GL_FRAMEBUFFER) != GL_FRAMEBUFFER_COMPLETE) {
            LOGE("GLUtils::bindFBO: bindFBO failed !");
            return false;
        }
        glViewport(0, 0, width, hegiht);
        return true;
    } else {
        LOGE("GLUtils::bindFBO: texture is null or fbo is null !");
    }
    return false;
}
通过观察是不是合成正常初始化纹理和绑定FBO、纹理对应方法就是创建一个完整FBO
举例:
假如照相机在OpenGL出来纹理是不是和图片数据转纹理方法出来一种原理,我们createFBO方法执行的没有绘制纹理,而图片数据转纹理方法和绑定FBO、纹理方法组合是绑定一张有图片的纹理。
FBO(A)和FBO(B)运用
下面代码把输入和输出的FBO给创建了,以下代码,我们显示可以FBO(A),绘制各种特效就在FBO(B),为什么要这么麻烦呢,一个更好理解,一个GPU在绘制需要时间,你在绘制特效时候也不影响显示到屏幕,相当一个离线的,等FBO(B)绘制完后就可以交换到FBO(A),这样框架比较使用而且容易理解,并且低消耗。
举例:
正常绘制 普通贴纸、背景贴纸在创建各自绘制类加载相关的fbo的时候统一FBO(B)后,最后在到FBO(A),OpenGL是单线程串行的,在普通贴纸绘制后就可以拿到有贴纸的FBO(A)对应的纹理texA,然后在对背景贴纸贴纸后会生成有普通贴纸、背景贴纸FBO(A)
		//绘制照相机的纹理ID设置texA
        int texA = mGLRender.preProcess(mTextureId, null);//绘制
        //错误回退
        if (texA == OpenGlUtils.NO_TEXTURE) {
            return;
        }
        //纹理管理类查看纹理texB,如果为空创建空的纹理和FBO
        if (mTextureManager.getOrginOutputTextureId() == OpenGlUtils.NO_TEXTURE) {
            int[] tex = new int[1];
            //空创建空的纹理texB
            GlUtil.initEffectTexture(getImageWidth(), getImageHeight(), tex, GL_TEXTURE_2D);
            //纹理texB输入管理类
            mTextureManager.setOrginOutputTextureId(tex[0]);
            int[] fbo = new int[2];
            //纹理创建FBO(A)和FBO(B)
            GLES20.glGenFramebuffers(2, fbo, 0);
            mTextureManager.setFbo(fbo[0], fbo[1]);
        }
       //纹理texA和纹理texB输入管理类
        mTextureManager.resetTexture(texA, mTextureManager.getOrginOutputTextureId());


 1083
1083

 被折叠的 条评论
为什么被折叠?
被折叠的 条评论
为什么被折叠?
 到【灌水乐园】发言


