


MCP
本文主要记录了在学习MCP (Model Context Protocol,模型上下文协议)过程中的相关知识,并用python实现了一个调用deepseek-v3的mcp-client。
介绍
什么是MCP?
MCP 起源于 2024 年 11 月 25 日 Anthropic 发布的文章:Introducing the Model Context Protocol。
MCP (Model Context Protocol,模型上下文协议)定义了应用程序和 AI 模型之间交换上下文信息的方式。这使得开发者能够以一致的方式将各种数据源、工具和功能连接到 AI 模型(一个中间协议层),就像 USB-C 让不同设备能够通过相同的接口连接一样。MCP 的目标是创建一个通用标准,使 AI 应用程序的开发和集成变得更加简单和统一。
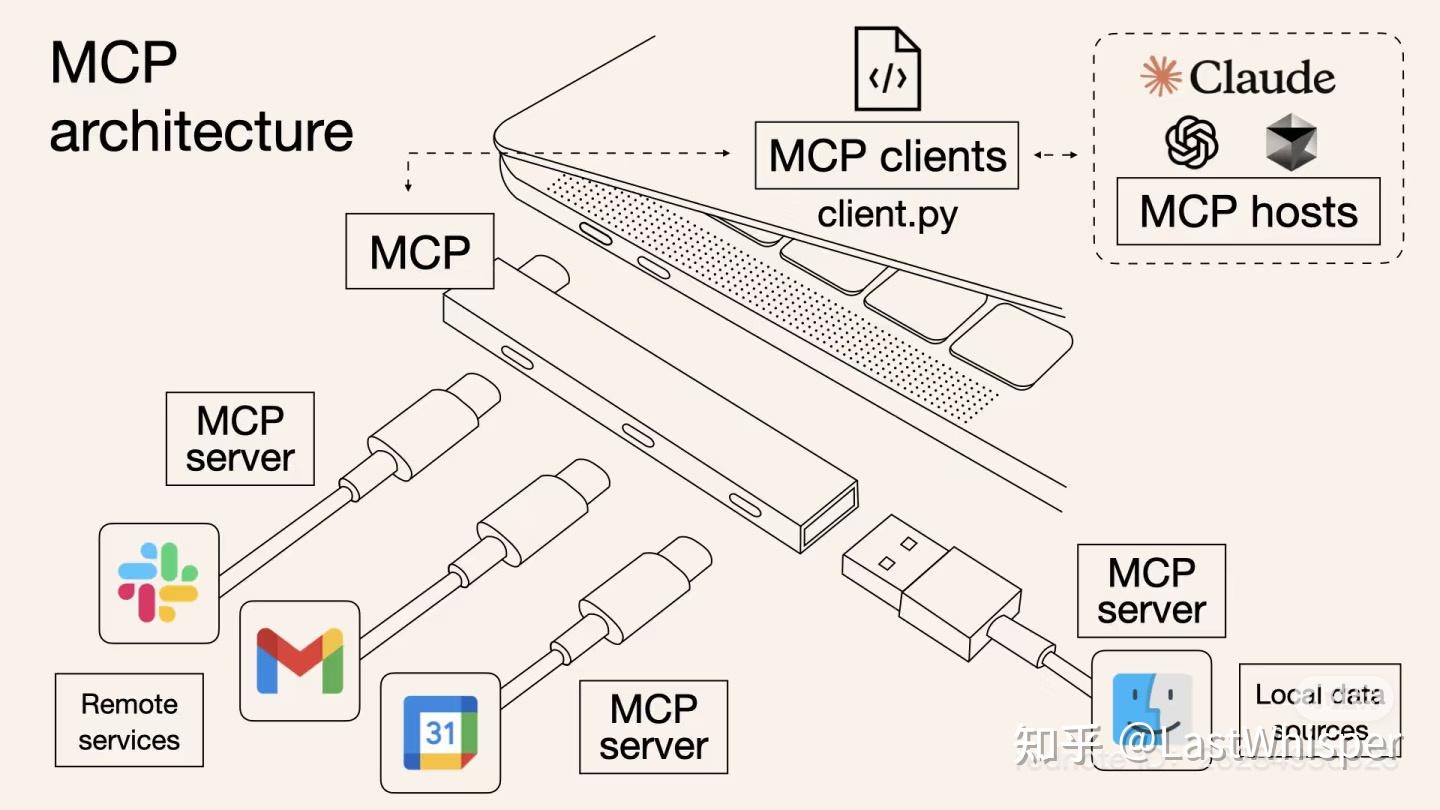
官方架构图:

MCP的核心组件一般有MCP host、MCP clients、MCP server,下图很好的形容了mcp组件间的关系:
-
MCP hosts:如 Claude Desktop, IDEs, or AI tools 等应用程序
-
MCP clients:与服务器保持 1:1 连接的协议客户端,图中为client.py, 只不过Claude Desktop也内置集成了mcp-client的能力
-
MCP:MCP在图中表示为连接笔记本电脑的扩展坞,作为中间协议层,提供了标准的接口供client连接不同的mcp-server。
-
MCP server:如左下角的gmail,或右下角的访达图标,实际上是一个轻量级程序,每个程序都通过标准化模型上下文协议公开特定功能,如mcp-gmail作为服务端运行时,可能公开提供获取邮件列表、查询邮件的能力或工具。
-
**Remote service:**远程服务,MCP 服务器可以通过互联网(例如通过 API)连接到的外部系统,例如gmial服务器
-
**Local data sources:**本地数据源,MCP 服务器可以安全访问的您计算机上的文件、数据库和服务,例如如文件系统
让我们通过一个实际场景来理解这些组件如何协同工作:
假设你正在使用 Claude Desktop (Host) 询问:“我桌面上有哪些文档?”
- Host:Claude Desktop 作为 Host,负责接收你的提问并与 Claude 模型交互。
- Client:当 Claude 模型决定需要访问你的文件系统时,Host 中内置的 MCP Client 会被激活。这个 Client 负责与适当的 MCP Server 建立连接。
- Server:在这个例子中,文件系统 MCP Server 会被调用。它负责执行实际的文件扫描操作,访问你的桌面目录,并返回找到的文档列表。
整个流程是这样的:你的问题 → Claude Desktop(Host) → Claude 模型 → 需要文件信息 → MCP Client 连接 → 文件系统 MCP Server → 执行操作 → 返回结果 → Claude 生成回答 → 显示在 Claude Desktop 上。
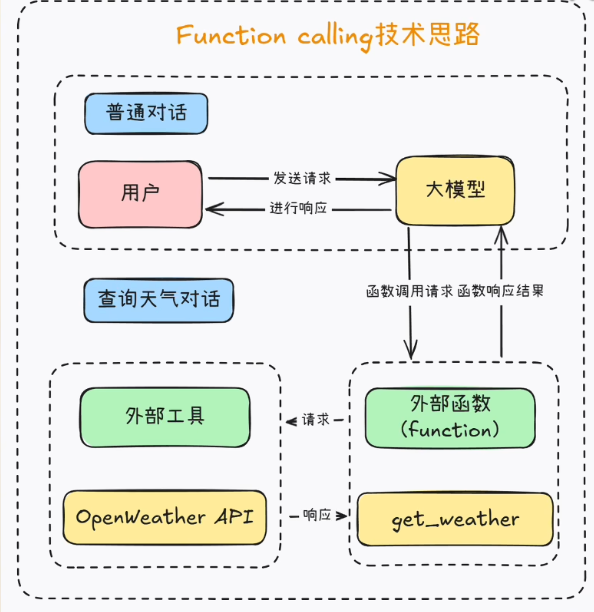
why MCP?(Function Calling 和 MCP)
大模型进化为智能体agent的关键是能调用外部工具,Function Calling是openai于2023年6月首次提出的技术方案,通过创建一个外部函数作为中介,大模型通过调用外部函数和外部工具进行交互,从而使大模型拥有调用外部工具的能力。
以下内容提取自视频:
😫 智能体开发痛点
但目前通用的借助function calling方法实现外部工具调用存在开发难度高的问题。编写外部函数工作量大,一个简单的外部函数可能上百行代码,还要为每个外部函数编写功能说明和设计提示词模板,像manus处理任务需调用几十个外部工具,编写对应外部函数工作量巨大。
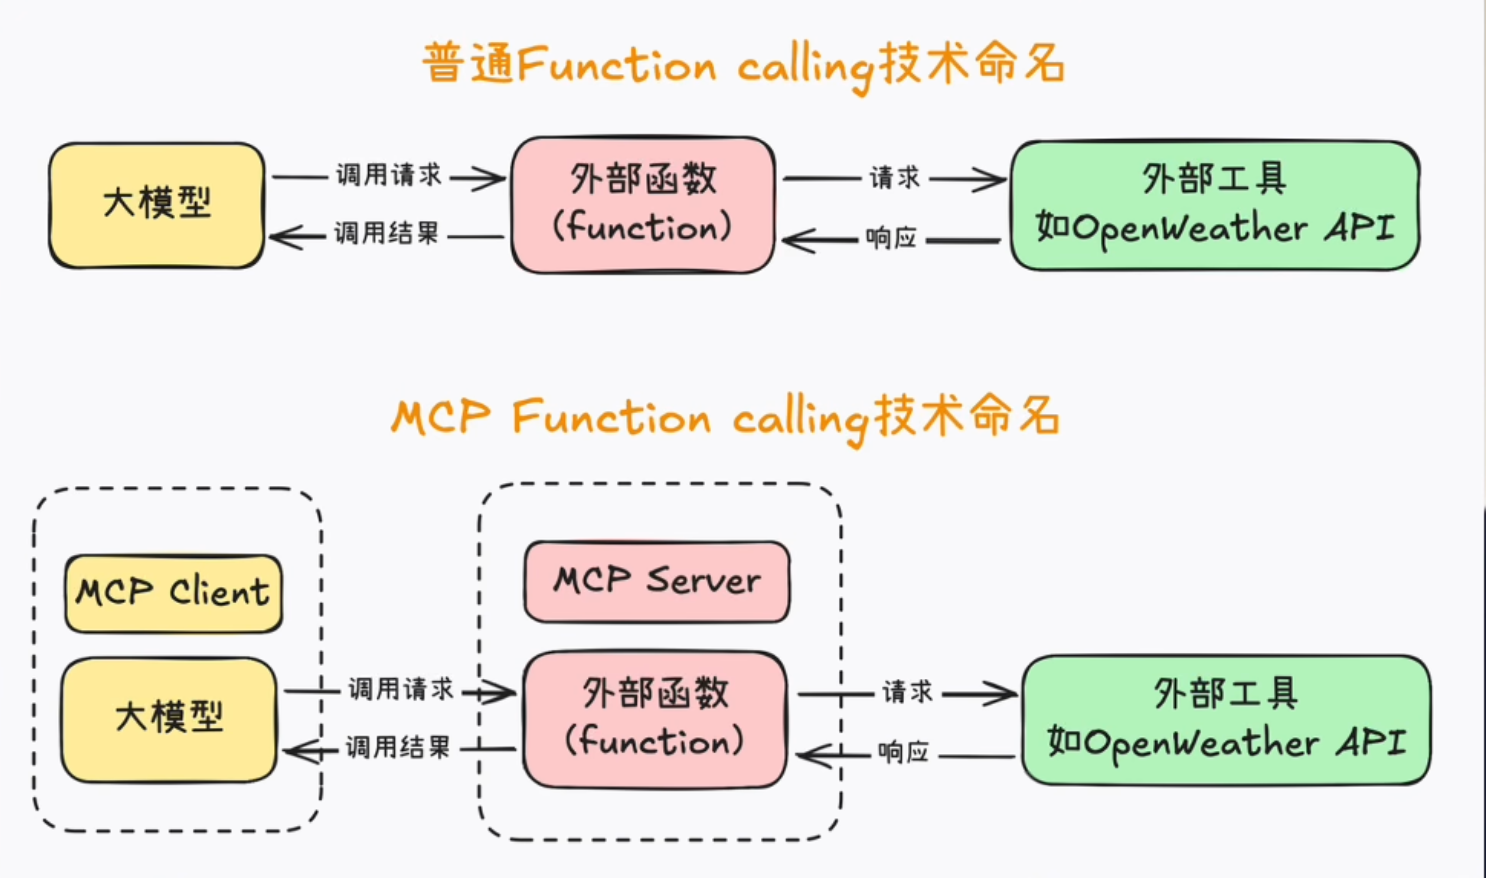
💡 MCP解决方案
本质就是统一Function calling的运行规范、统一mcp客户端和服务器的运行规范,且要求mcp客户端和服务端间按照既定的提示词模版通信。避免了mcp-server(外部函数)的重复开发。
提供SDK:提供一整套MCP客户端服务器开发的SDK,支持Python、tapscript和Java等多种开发语言。借助SDK几行代码就能快速开发MCP服务器,可接入任意MCP客户端构建智能体。
参考链接: https://www.bilibili.com/video/BV1uXQzYaEpJ/?share_source=copy_web&vd_source=6ecbe9c068eb72567e4c32361d4a4b34
https://zhuanlan.zhihu.com/p/29001189476
Mcp开发实践
了解了上面的内容后,我们下面看如何实现一个调用deepseek-api查询clickhouse数据库的场景。
工具安装
首先安装uv(uv是一个用 Rust 编写的极快的 Python 包和项目管理器)
执行以下命令安装:
#macos或linux
curl -LsSf https://astral.sh/uv/install.sh | sh
#windows
powershell -ExecutionPolicy ByPass -c "irm https://astral.sh/uv/install.ps1 | iex"
更多信息参考官方文档:https://docs.astral.sh/uv/
Mcp-server
mcp-server开发教程:https://modelcontextprotocol.io/quickstart/server
mcp-server案例:https://github.com/punkpeye/awesome-mcp-servers
在MCP协议出现后,互联网上出现了大量的通用mcp-server,除了特殊需求需要定制开发以外,一般都可以找到对应功能的mcp-server,clickhouse官方也提供了clickhouse的mcp-server,能够满足我们的需求。
项目地址:https://github.com/ClickHouse/mcp-clickhouse
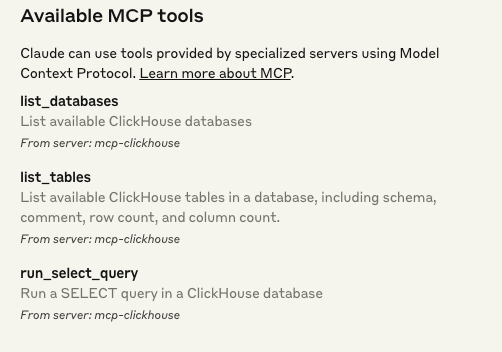
mcp-clickhouse实现了的主要功能:
- 使用FastMCP框架创建一个服务器,提供三个主要工具(API端点):
list_databases(): 列出所有可用的ClickHouse数据库list_tables(): 列出指定数据库中的所有表,包括它们的模式、注释、行数和列数run_select_query(): 在ClickHouse数据库中执行SELECT查询
- 一些辅助函数:
create_clickhouse_client(): 创建与ClickHouse的连接get_readonly_setting(): 确保查询以只读模式运行,防止数据修改execute_query(): 执行查询并格式化结果
- 配置了线程池执行器来处理异步查询,并设置了30秒的查询超时时间
MCP-client
我们一般不需要单独开发MCP-client,像claude,curosr等桌面应用都内置了client能力
还有一些开源的client:https://github.com/punkpeye/awesome-mcp-clients
Claude Desktop
下面演示通过Claude Desktop连接mcp-clickhouse服务
- 打开位于以下位置的 Claude Desktop 配置文件:
- 在 macOS 上:
~/Library/Application Support/Claude/claude_desktop_config.json - 在 Windows 上:
%APPDATA%/Claude/claude_desktop_config.json
- 在 macOS 上:
- 添加以下内容:
{
  "mcpServers": {
    "mcp-clickhouse": {
      "command": "uv",
      "args": [
        "run",
        "--with",
        "mcp-clickhouse",
        "--python",
        "3.13",
        "mcp-clickhouse"
      ],
      "env": {
        "CLICKHOUSE_HOST": "<clickhouse-host>",
        "CLICKHOUSE_PORT": "<clickhouse-port>",
        "CLICKHOUSE_USER": "<clickhouse-user>",
        "CLICKHOUSE_PASSWORD": "<clickhouse-password>",
        "CLICKHOUSE_SECURE": "true",
        "CLICKHOUSE_VERIFY": "true",
        "CLICKHOUSE_CONNECT_TIMEOUT": "30",
        "CLICKHOUSE_SEND_RECEIVE_TIMEOUT": "30"
      }
    }
  }
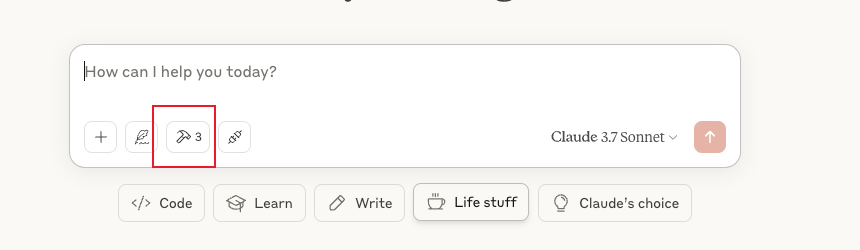
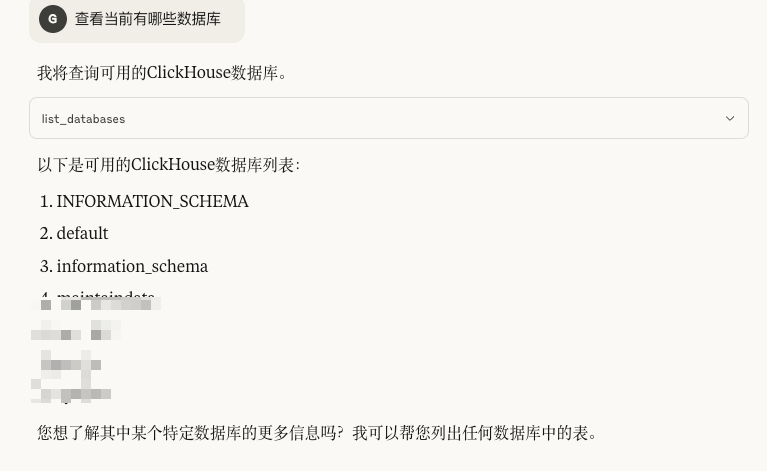
重启 Claude Desktop,如果配置正确,会出现锤头图标,点击后能列出mcp可用工具。
测试
MCP-client代码实现
mcp-server开发教程:https://modelcontextprotocol.io/quickstart/client
假设需要自己定制一个client,以下通过代码实现了一个使用deepseek API的mcp-client
代码解释
完整代码可在此获取
代码主要由以下部分组成:
import asyncio
from typing import Optional
from contextlib import AsyncExitStack
import json

from mcp import ClientSession, StdioServerParameters
from mcp.client.stdio import stdio_client

from openai import OpenAI
import os
from dotenv import load_dotenv

load_dotenv()  # load environment variables from .env

class MCPClient:
    def __init__(self, config_path: str = "config.json"):
        """初始化 MCP 客户端"""
        self.exit_stack = AsyncExitStack()
        self.config_path = config_path
        self.config = self.load_config()
        # 从环境变量读取配置
        self.openai_api_key = os.getenv("OPENAI_API_KEY")  # 读取 OpenAI API Key
        self.base_url = os.getenv("BASE_URL")  # 读取 BASE URL
        self.model = os.getenv("MODEL")  # 读取模型名称

        if not self.openai_api_key:
            raise ValueError("❌ 未找到 OpenAI API Key,请在 .env 文件中设置 OPENAI_API_KEY")

        # 初始化 OpenAI 客户端
        self.client = OpenAI(api_key=self.openai_api_key, base_url=self.base_url)
        self.session: Optional[ClientSession] = None
    def load_config(self):
        """加载 JSON 配置文件"""
        try:
            with open(self.config_path, 'r') as f:
                config = json.load(f)
            return config
        except FileNotFoundError:
            raise FileNotFoundError(f"❌ 配置文件 {self.config_path} 未找到")
        except json.JSONDecodeError:
            raise ValueError(f"❌ 配置文件 {self.config_path} 格式错误")
[!NOTE]
MCPClient核心类,负责加载配置、连接 MCP 服务器、处理用户查询以及清理资源。
    def load_config(self):
        """加载 JSON 配置文件"""
        try:
            with open(self.config_path, 'r') as f:
                config = json.load(f)
            return config
        except FileNotFoundError:
            raise FileNotFoundError(f"❌ 配置文件 {self.config_path} 未找到")
        except json.JSONDecodeError:
            raise ValueError(f"❌ 配置文件 {self.config_path} 格式错误")

    def get_server_name_and_config(self):
        """自动获取服务器名称和配置"""
        try:
            mcp_servers = self.config.get("mcpServers", {})
            if not mcp_servers:
                raise ValueError("❌ 配置文件中未找到 MCP 服务器配置")
            server_name, server_config = next(iter(self.config["mcpServers"].items()))
            return server_name, server_config
        except Exception as e:
            raise ValueError(f"❌ 获取服务器名称和配置失败: {str(e)}")
[!NOTE]
服务端配置处理、
async def connect_to_server(self, server_name: str = "mcp-clickhouse"):
    """连接到 MCP 服务器"""
    server_name, server_config = self.get_server_name_and_config()
    print(f"Connecting to server: {server_name}")

    command = server_config.get("command")
    args = server_config.get("args", [])
    env = server_config.get("env", {})
    print("Server Command:", command)
    print("Server Args:", args)
    print("Server Env:", env)

    server_params = StdioServerParameters(
        command=command,
        args=args,
        env=env
    )

    stdio_transport = await self.exit_stack.enter_async_context(stdio_client(server_params))
    self.stdio, self.write = stdio_transport
    self.session = await self.exit_stack.enter_async_context(ClientSession(self.stdio, self.write))

    await self.session.initialize()

    response = await self.session.list_tools()
    tools = response.tools
    print("\nConnected to server with tools:", [tool.name for tool in tools])
[!NOTE]
与服务器建立连接
async def process_query(self, query: str) -> str:
    """处理用户查询并调用 MCP 工具"""
    messages = [{"role": "user", "content": query}]
    response = await self.session.list_tools()
    available_tools = [{
        "type": "function",
        "function": {
            "name": tool.name,
            "description": tool.description,
            "input_schema": tool.inputSchema
        }
    } for tool in response.tools]

    response = self.client.chat.completions.create(
        model=self.model,
        messages=messages,
        tools=available_tools
    )

    content = response.choices[0]
    if content.finish_reason == "tool_calls":
        tool_call = content.message.tool_calls[0]
        tool_name = tool_call.function.name
        tool_args = json.loads(tool_call.function.arguments)
        result = await self.session.call_tool(tool_name, tool_args)
        messages.append(content.message.model_dump())
        messages.append({
            "role": "tool",
            "content": result.content[0].text,
            "tool_call_id": tool_call.id,
        })
        response = self.client.chat.completions.create(
            model=self.model,
            messages=messages,
        )
        return response.choices[0].message.content

    return content.message.content
[!NOTE]
处理用户输入,判断是否调用工具
    async def chat_loop(self):
        """Run an interactive chat loop"""
        print("\nMCP Client Started!")
        print("Type your queries or 'quit' to exit.")

        while True:
            try:
                query = input("\nQuery: ").strip()

                if query.lower() == 'quit':
                    break

                response = await self.process_query(query)
                print("\n" + response)

            except Exception as e:
                print(f"\nError: {str(e)}")
[!NOTE]
提供一个命令行界面,用户可以输入查询并获取响应。
async def cleanup(self):
  """清理资源"""
  await self.exit_stack.aclose()
[!NOTE]
关闭所有异步上下文,释放资源。
async def main():
    client = MCPClient()
    try:
        await client.connect_to_server()
        await client.chat_loop()
    finally:
        await client.cleanup()

if __name__ == "__main__":
    asyncio.run(main())
[!NOTE]
主函数,创建 MCPClient 实例,连接到服务器并启动聊天循环
config.json文件存储 MCP 服务器的配置信息,包括命令、参数和环境变量。
这段代码实现了一个功能完整的 MCP 客户端,支持动态加载配置、连接服务器、调用工具和交互式聊天,适合需要结合 OpenAI API 和 MCP 工具的场景。
快速使用
执行以下内容:
uv init MCP_client_by_openai
cd MCP_client_by_openai
uv venv
source .venv/bin/activate

uv add mcp openai
复制以上代码到项目文件夹
创建.env文件加载OPENAI_API_KEY、BASE_URL、MODEL等环境变量,例如:
❯ cat .env
OPENAI_API_KEY=<your_openai_api_key>
BASE_URL="https://api.deepseek.com"
MODEL="deepseek-chat"
**注意:**请将.evn加入.gitignore
mcp_server运行配置
通过config.json执行运行的mcp服务端启动命令参数及环境变量
❯ cat config.json.example
{
  "mcpServers": {
    "mcp-clickhouse": {
      "command": "uv",
      "args": [
        "run",
        "--with",
        "mcp-clickhouse",
        "--python",
        "3.13",
        "mcp-clickhouse"
      ],
      "env": {
        "CLICKHOUSE_HOST": "<clickhouse-host>",
        "CLICKHOUSE_PORT": "<clickhouse-port>",
        "CLICKHOUSE_USER": "<clickhouse-user>",
        "CLICKHOUSE_PASSWORD": "<clickhouse-password>",
        "CLICKHOUSE_SECURE": "true",
        "CLICKHOUSE_VERIFY": "true",
        "CLICKHOUSE_CONNECT_TIMEOUT": "30",
        "CLICKHOUSE_SEND_RECEIVE_TIMEOUT": "30"
      }
    }
  }
}
注意:请将config.json加入.gitignore
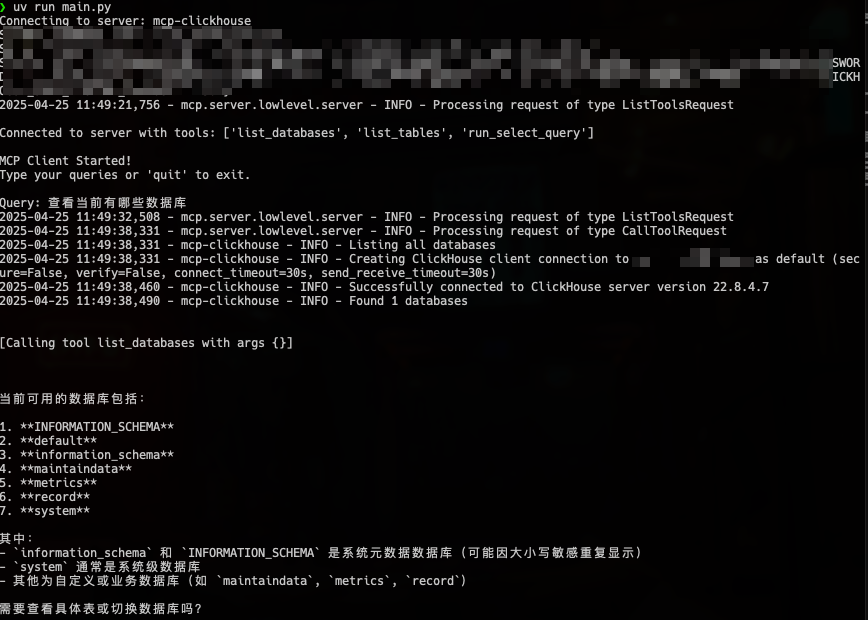
配置好以上信息后执行
uv run main.py


 1845
1845

 被折叠的 条评论
为什么被折叠?
被折叠的 条评论
为什么被折叠?
 到【灌水乐园】发言


