


 本文详细介绍ArduPilot地面站的功能及使用方法,包括任务规划、航迹规划、坐标系说明等核心内容,并针对MissionPlanner和mavproxy进行了具体操作指导。

不义而富且贵于我如浮云
ardupilot目前支持的开源地面站包括 Mission planner、QGC、mavproxy。
1. mission planner 篇
前言
- 免费、开源、有社区支持。
- 地面站的功能主要有这几大块:
- 飞机状态信息反馈(第一人称视角)
- 参数配置、固件下载
- 任务规划(航迹规划)
- 日志和分析
其他的在其他篇章中都已经有涉及这里不在赘叙,主要讲解任务规划部分的内容。
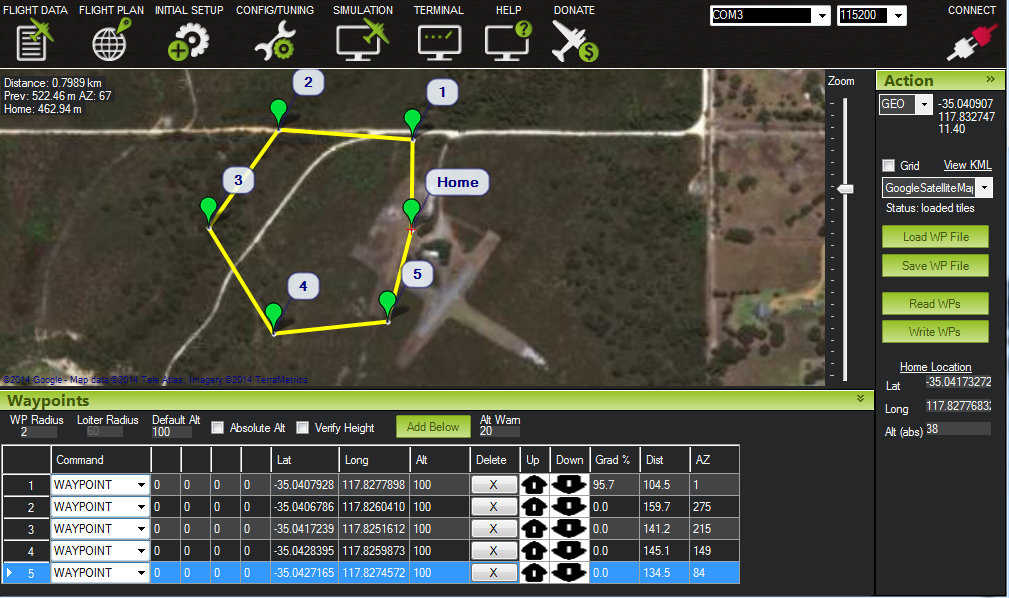
任务规划、航迹规划(Mission Planning)
所谓的Mission包括:“飞行任务”或“航线任务”、拍照任务。
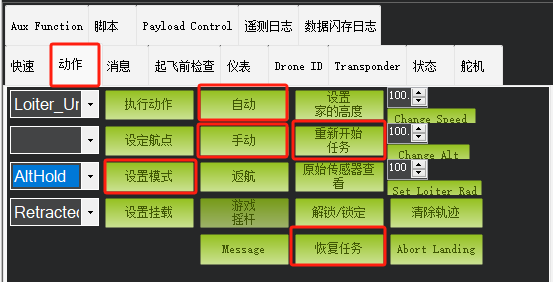
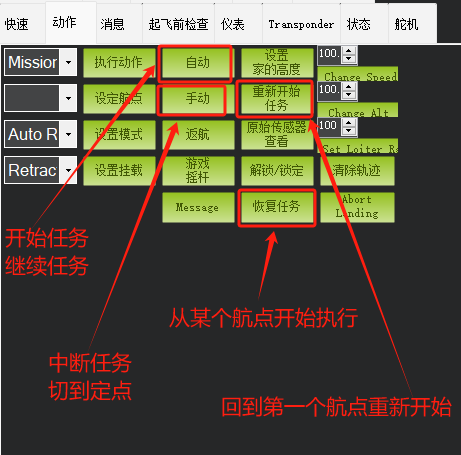
步骤:任务规划 ~> 下载任务文件(航点文件)到飞控 ~> 切到AUTO模式 ~> 出现异常状况 ~> 切到手动模式(如loiter、althold) ~> 解决异常 ~> 切到AUTO继续任务 | 重新开始任务 | 恢复任务
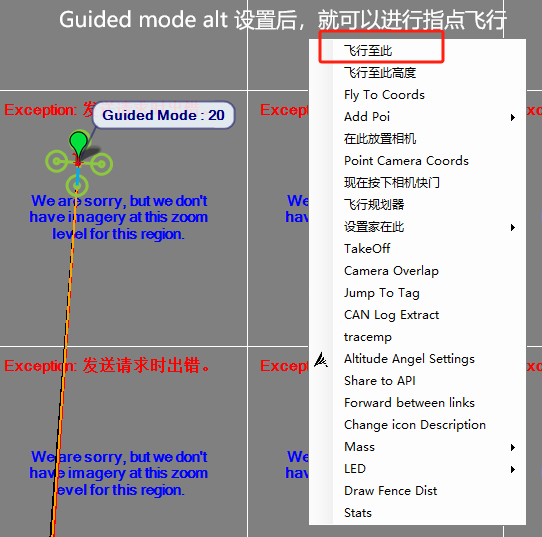
指点飞行
实质上就是guided模式
(1)先飞行到指定高度,此时Guided mode alt 会被设置成这个高度。
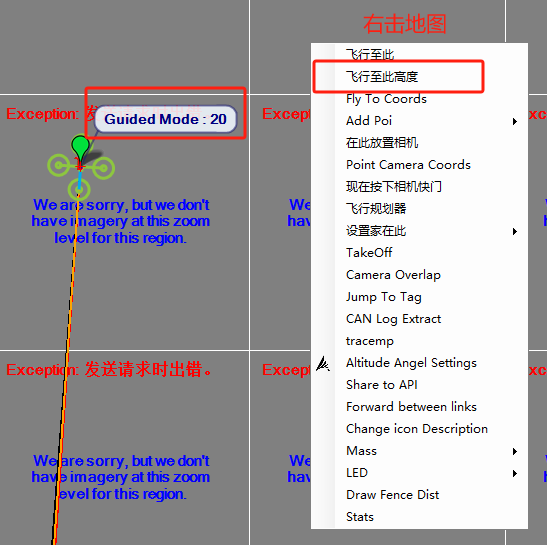
(2)再指点飞行
坐标系说明
Mission Command List
下面的每个命令都是“导航”命令或“执行”命令。导航命令(例如“起飞”和“航路点”)会影响车辆的位置,而“执行”命令(例如,“执行伺服设置”和“执行凸轮触发距离”)用于辅助功能,不会影响车辆位置。
在执行任务期间,一次最多可以运行一个“导航”命令和一个“执行”命令。在前面的导航命令完成之前,“Do”命令将立即按顺序运行。
几个重要的命令
Takeoff 一般作为第一个命令;
Waypoint
飞机将直线飞行到指定的纬度、经度和高度(以米为单位)。
- Delay 在执行下一个命令之前,在航路点等待的时间(以秒为单位);
- Script Time: Lua脚本运行指定的时间,之后它将转到下一个命令。“command”、“arg1”和“arg2”参数由脚本进行解释。下面的演示使用这个SCRIPT_TIME命令在自动模式下执行“快速下降”脚本。
- 控制云台和相机的指令?参考文档;
- 其他参数请参考文档;
Navigation commands 中的坐标系字段说明
Many of the commands (in particular the NAV_ commands) include position/location information. The information is provided relative to a particular “frame of reference”, which is specified in the message’s Frames of reference field. Copter and Rover Mission use MAV_CMD_DO_SET_HOME command to set the “home position” in the global coordinate frame (MAV_FRAME_GLOBAL), WGS84 coordinate system, where altitude is relative to mean sea level. All other commands use the MAV_FRAME_GLOBAL_RELATIVE_ALT frame, which uses the same latitude and longitude, but sets altitude as relative to the home position (home altitude = 0).
Plane commands can additionally use MAV_FRAME_GLOBAL_TERRAIN_ALT frame of reference. This again has the same WGS84 frame of reference for latitude/Longitude, but specifies altitude relative to ground height (as defined in a terrain database).
查看Mavlink消息
可以实时查看mavlink消息,甚至可以绘制曲线。

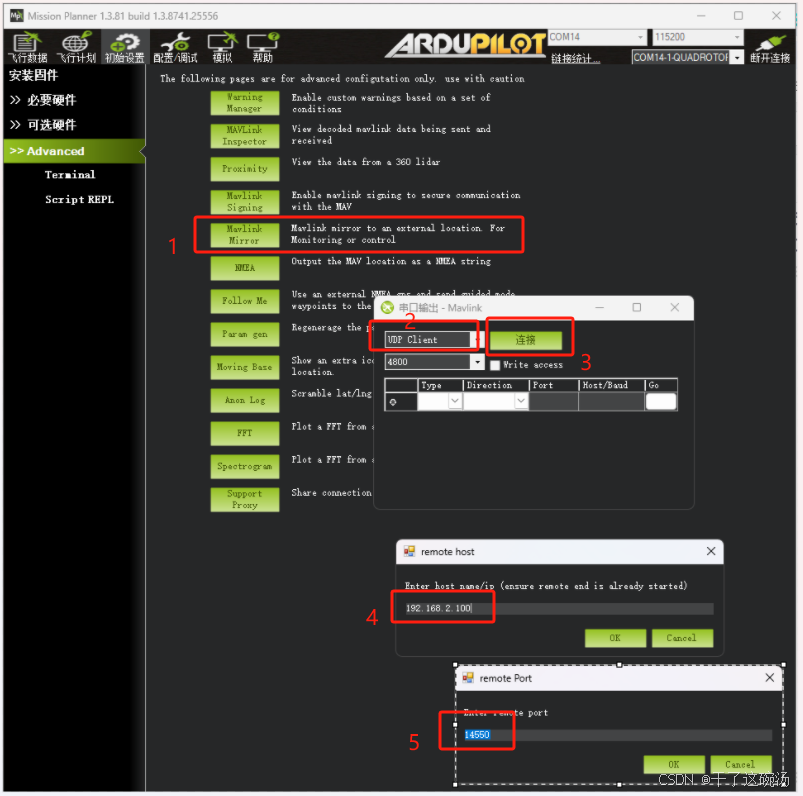
Mavlink转发
可以通过TCP、UDP协议向某个本地或远程 IP:端口 转发mavlink消息包。
mission palnner 和 mavproxy 都可以实现 mavlink包的转发功能,或称 mavlink forward 功能!!
实时调试曲线

查看RTSP视频流
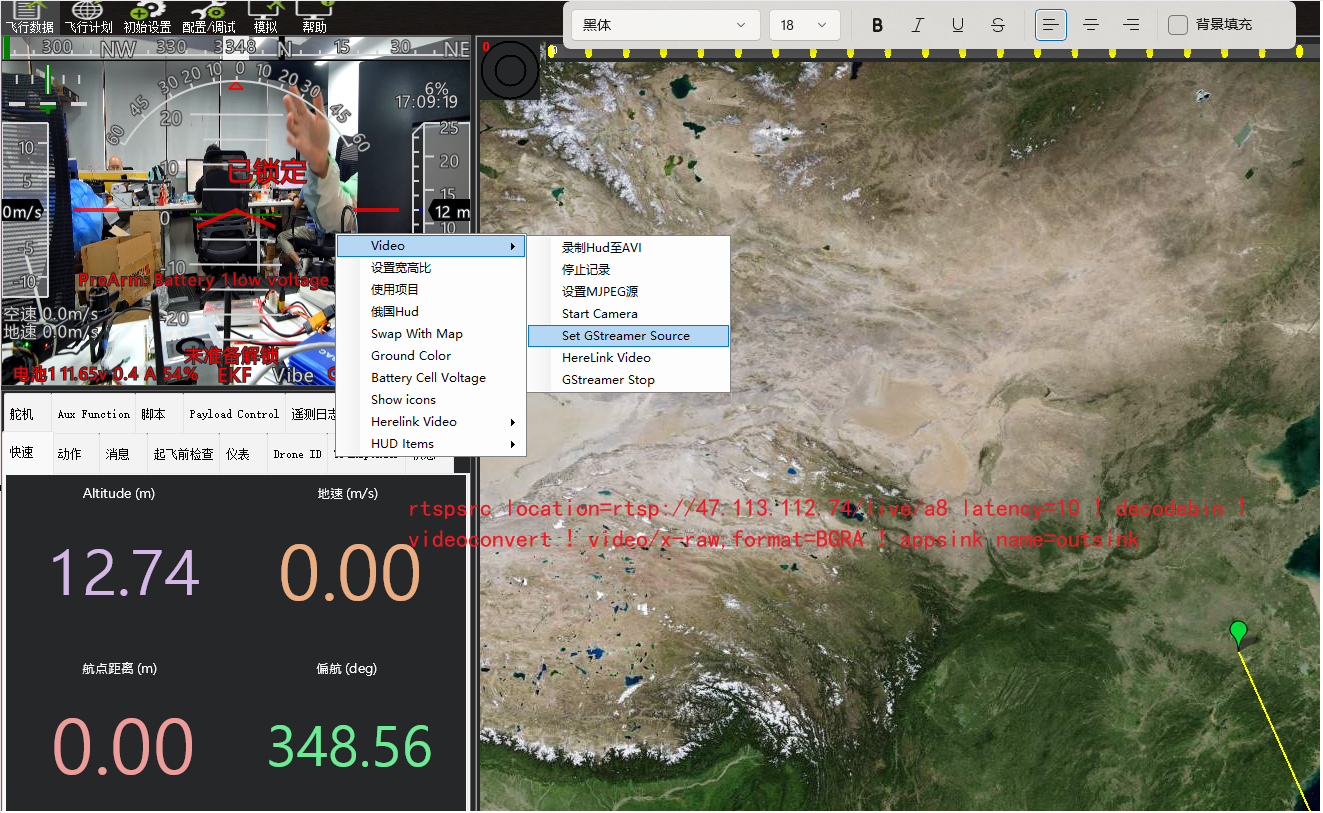
例如:
rtspsrc location=rtsp://47.113.112.74/live/a8 latency=10 ! rtph264depay ! avdec_h264 ! videoconvert ! video/x-raw,format=BGRA ! appsink name=outsink
rtspsrc location=rtsp://47.113.112.74/live/a8 latency=10 ! decodebin ! videoconvert ! video/x-raw,format=BGRA ! appsink name=outsink
# decodebin 是是一个非常强大的元素,它能够自动检测和解析输入流的编码格式,并相应地选择合适的解码器进行解码。
其他
待续…
http://modouwo.cn/AiHaoZhe/Tutorial/Detail/UAV/3199292/48
航点文件 xxx.waypoints 解析
- vscode 打开源码:https://github.com/huangyangl/MissionPlanner
- 搜索按钮文本“加载航点文件”
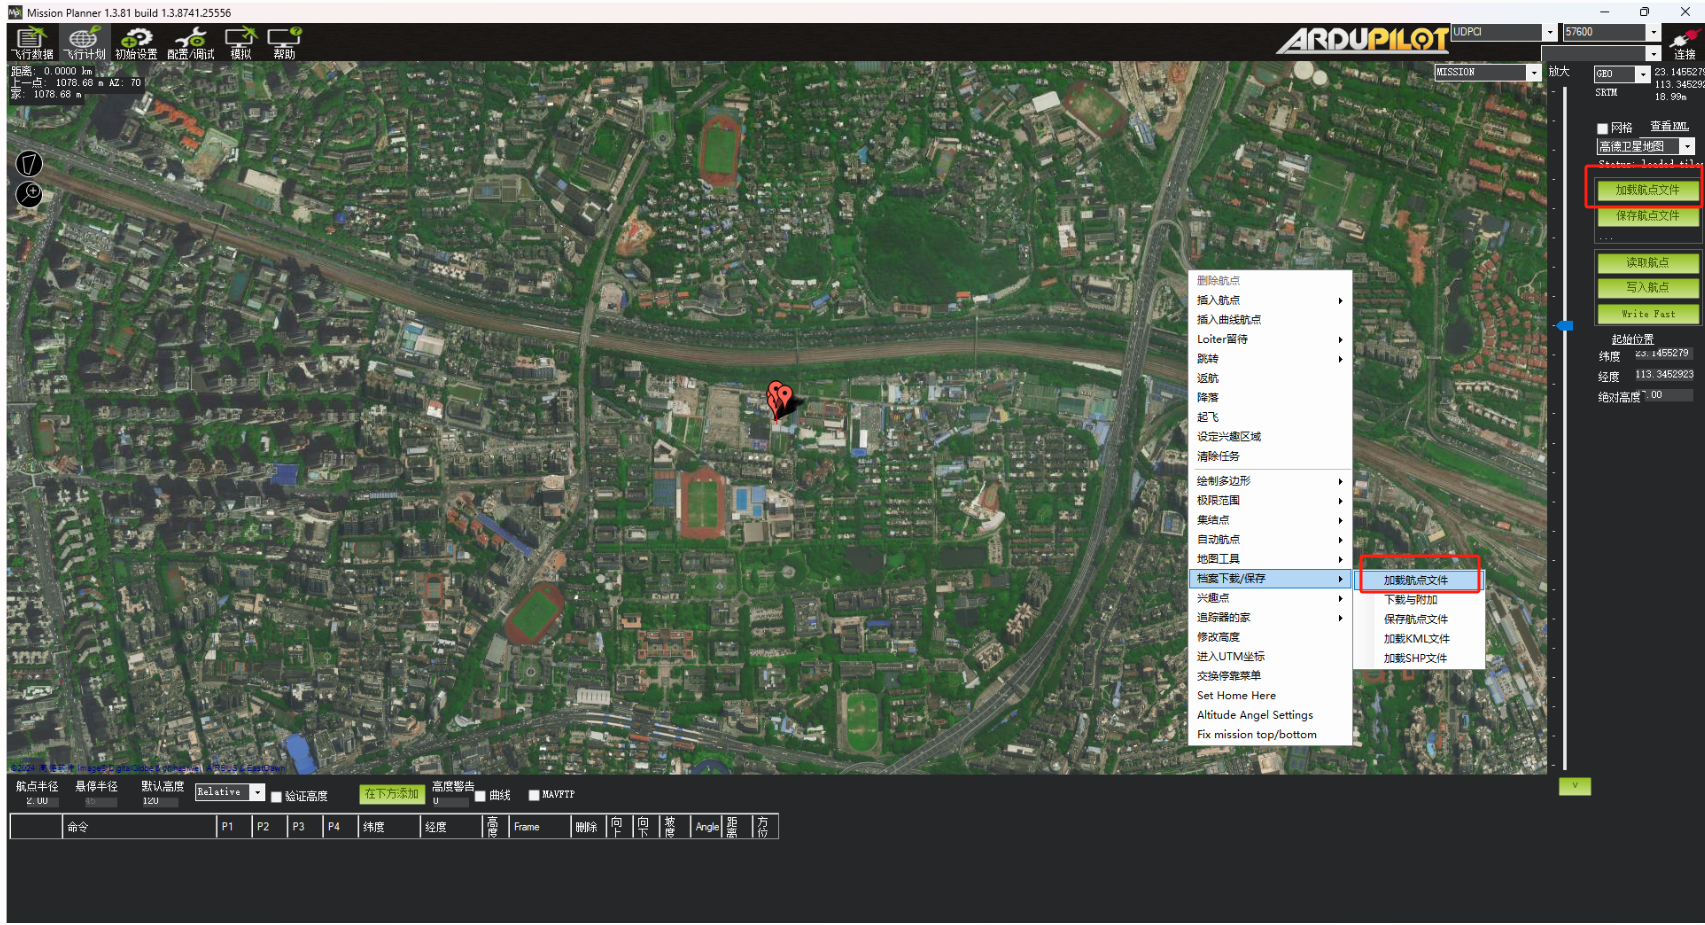
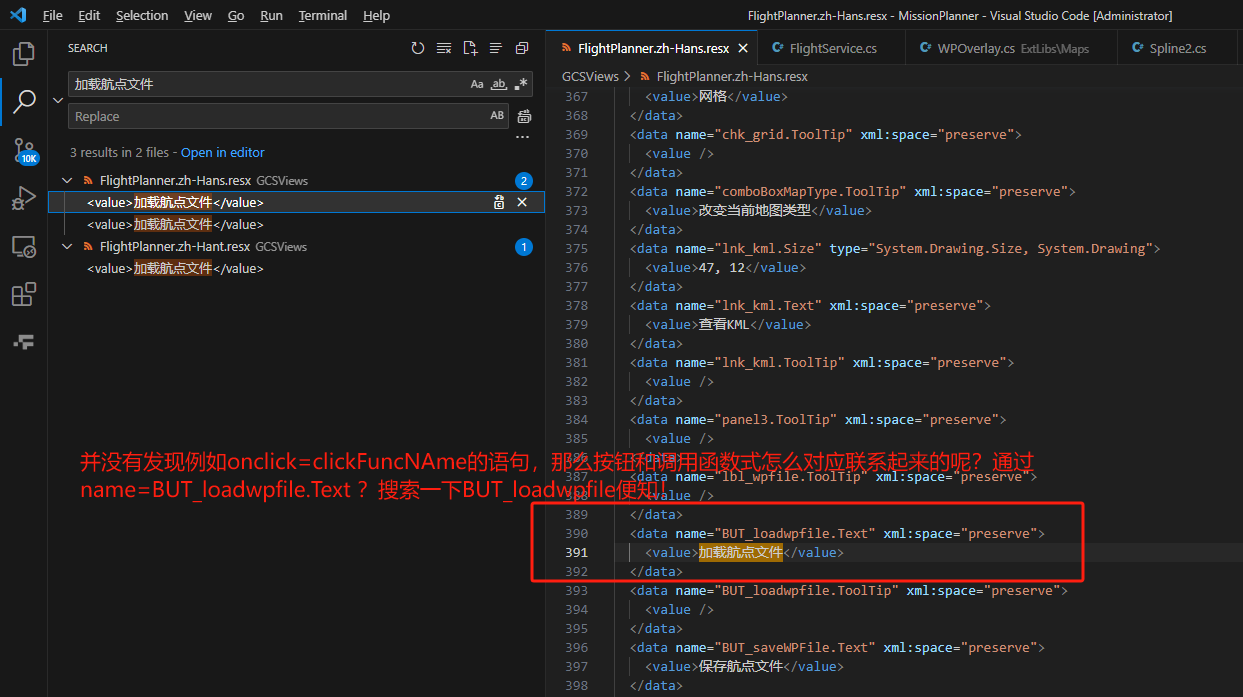
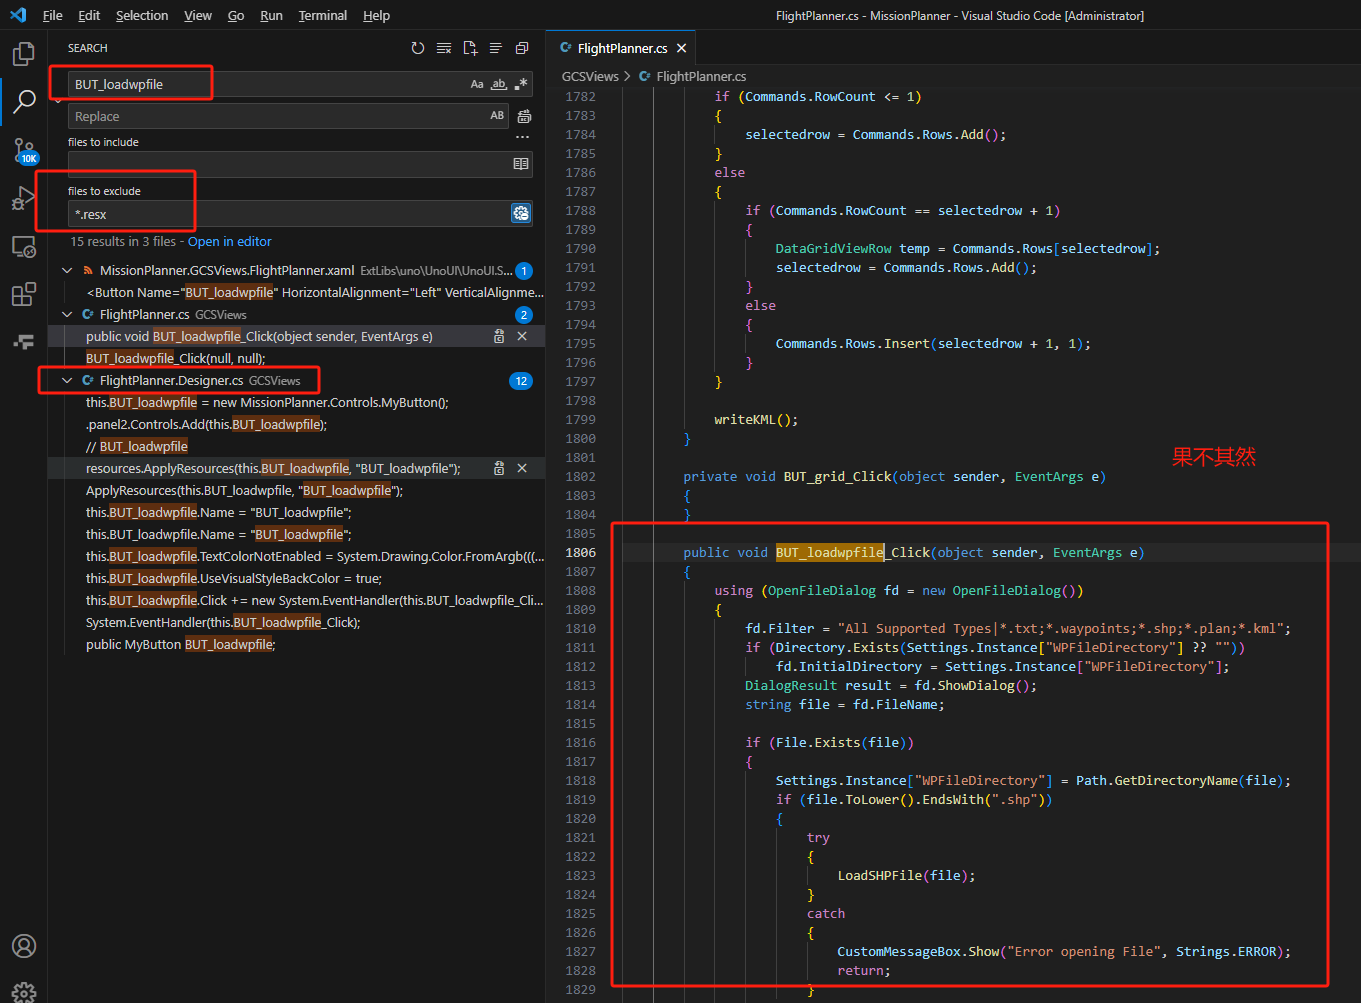
果不其然,航点文件解析位于:GCSViews\FlightPlanner.cs中的BUT_loadwpfile_Click函数:
加载航点文件
BUT_loadwpfile
BUT_loadwpfile_Click
readQGC110wpfile
processToScreen
xx.waypoints:List
每一行数据结构:Locationwp
ExtLibs\Utilities\locationwp.cs
每一列数据的含义如下:
private ushort _seq;
public byte frame;
public object Tag;

public ushort id;				// command id
public float p1;				// param 1
public float p2;				// param 2
public float p3;				// param 3
public float p4;				// param 4
public double lat;				// Lattitude * 10**7
public double lng;				// Longitude * 10**7
public float alt;				// Altitude in centimeters (meters * 100)
坐标系frame的取值说明:https://mavlink.io/en/messages/common.html#MAV_FRAME
xxx.waypoints示例:
QGC WPL 110
0	1	0	16	0	0	0	0	23.1455279	113.3452923	47.000000	1
1	0	3	16	0.00000000	0.00000000	0.00000000	0.00000000	23.15136410	113.34612370	120.000000	1
2	0	3	16	0.00000000	0.00000000	0.00000000	0.00000000	23.15064550	113.34833000	120.000000	1
3	0	3	16	0.00000000	0.00000000	0.00000000	0.00000000	23.14955520	113.34870490	120.000000	1
4	0	3	16	0.00000000	0.00000000	0.00000000	0.00000000	23.14908830	113.34777320	120.000000	1
5	0	0	16	0.00000000	0.00000000	0.00000000	0.00000000	23.14963760	113.34659500	120.000000	1
6	0	3	16	0.00000000	0.00000000	0.00000000	0.00000000	23.14947360	113.35036500	120.000000	1
7	0	3	16	0.00000000	0.00000000	0.00000000	0.00000000	23.15072120	113.35025780	120.000000	1
注意:
第2行表示home点的wgs84经纬度、绝对高度!
第二列的tag=1表示不在Mission planner中显示该行数据!
参考文献
【1】http://modouwo.cn/AiHaoZhe/Tutorial/Detail/UAV/3199292/48
2. mavproxy 篇
文档:https://ardupilot.org/mavproxy/index.html
连接
- 通过USB连接
mavproxy.py --master=/dev/ttyXXX # 如:ttyUSB0 或 ttyACM0 - 通过网络连接
注意:想要让两个处在各自内网的主机能够相互通讯,必须要将两个主机进行组网,例如使用VPN、虚拟局域网(VLAN)、zerotier等方案!- 读取本地TCP、UDP数据流
读取本地主机某端口的mavlink数据流,包括TCP、UDP。
此时指定的IP地址必须是本地主机的IP,参数使用udp或tcp,如:
192.168.0.1(通过ifconfig得到的本机网络适配器的IP)
127.0.0.1(回送地址loopback address,也可表示本机IP)
0.0.0.0(自动查询本地IP并应用)mavproxy.py --master=tcp:localIP:port mavproxy.py --master=udp:localIP:port mavproxy.py --master=tcp:192.168.0.1:14550 mavproxy.py --master=udp:127.0.0.1:14550 mavproxy.py --master=tcp:0.0.0.0:14550 - 读取远程TCP、UDP数据流
此时指定的IP和端口必须是远程主机的IP和端口,参数使用udpout或tcpout,如:
注意:此处的远程主机是运行了UDP forward 或 mavlink forward、mavlink转发的远程主机。mavproxy.py --master=udpout:remoteIP:Port mavproxy.py --master=tcpout:remoteIP:Port mavproxy.py --master=udpout:10.10.1.1:14550 mavproxy.py --master=tcpout:10.10.1.1:14550
- 读取本地TCP、UDP数据流


 2298
2298

 被折叠的 条评论
为什么被折叠?
被折叠的 条评论
为什么被折叠?
 到【灌水乐园】发言


