


文章目录
前言
全局注意力机制(GAM),通过减少信息减少和放大全局交互表示来提高深度神经网络的性能。引入了带有多层感知器的 3D 排列,用于通道注意力以及卷积空间注意力子模块,GAM注意机制理论详解可以参考链接: 论文地址)
一、YOLOv8原始版本代码下载
源码下载地址 :链接: link
源码提取码: rpe7
二、GAM代码
# -*- coding: utf-8 -*-
"""
@Auth : 挂科边缘
@File :GAM.py
@IDE :PyCharm
@Motto:学习新思想,争做新青年
@Email :179958974@qq.com
@qq :179958974
"""
import torch.nn as nn


class GAM(nn.Module):
    def __init__(self, in_channels, rate=4):
        super(GAM, self).__init__()

        self.channel_attention = nn.Sequential(
            nn.Linear(in_channels, int(in_channels / rate)),
            nn.ReLU(inplace=True),
            nn.Linear(int(in_channels / rate), in_channels)
        )

        self.spatial_attention = nn.Sequential(
            nn.Conv2d(in_channels, int(in_channels / rate), kernel_size=7, padding=3),
            nn.BatchNorm2d(int(in_channels / rate)),
            nn.ReLU(inplace=True),
            nn.Conv2d(int(in_channels / rate), in_channels, kernel_size=7, padding=3),
            nn.BatchNorm2d(in_channels)
        )

    def forward(self, x):
        b, c, h, w = x.shape
        x_permute = x.permute(0, 2, 3, 1).view(b, -1, c)
        x_att_permute = self.channel_attention(x_permute).view(b, h, w, c)
        x_channel_att = x_att_permute.permute(0, 3, 1, 2).sigmoid()
        x = x * x_channel_att
        x_spatial_att = self.spatial_attention(x).sigmoid()
        out = x * x_spatial_att

        return out
三、在YOLOv8添加GAM代码
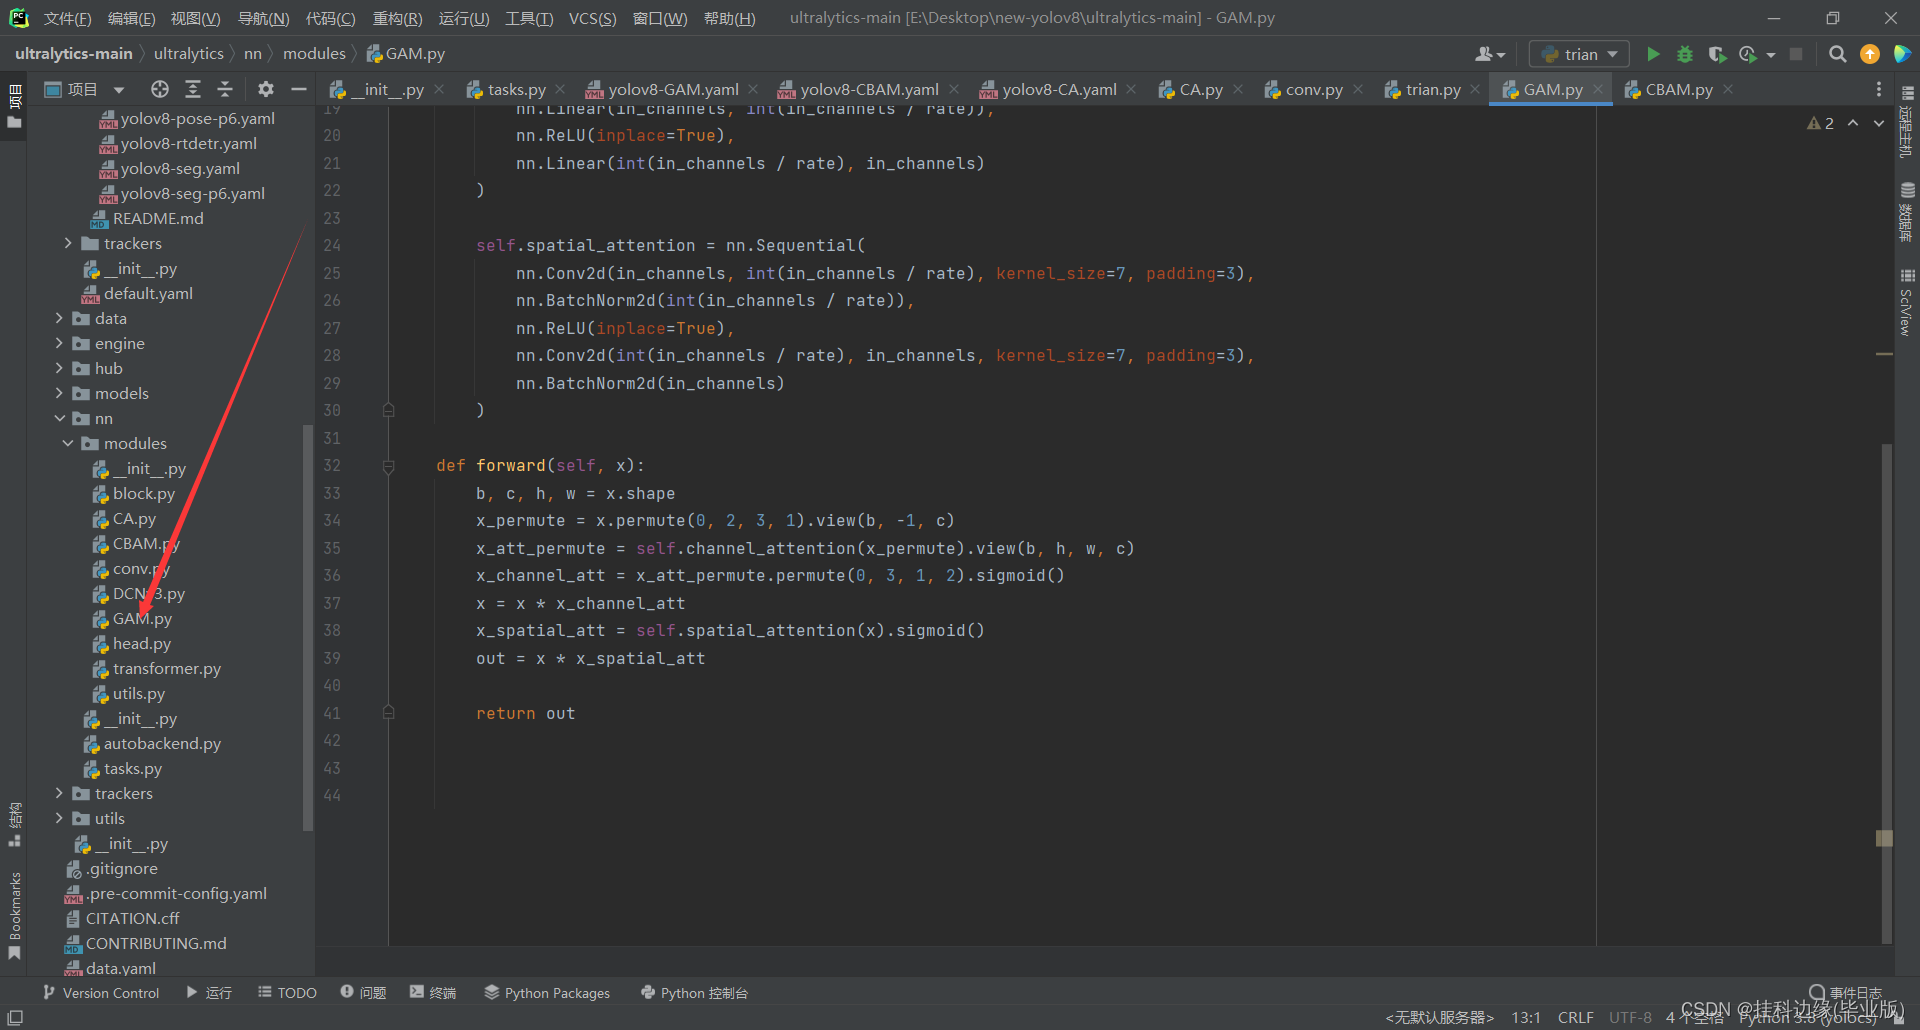
1.在modules目录下添加上述的GAM代码
在ultralytics/nn/modules目录下,新建一个文件名,我这里取名为GAM.py,把上面代码复制进去,如图所示
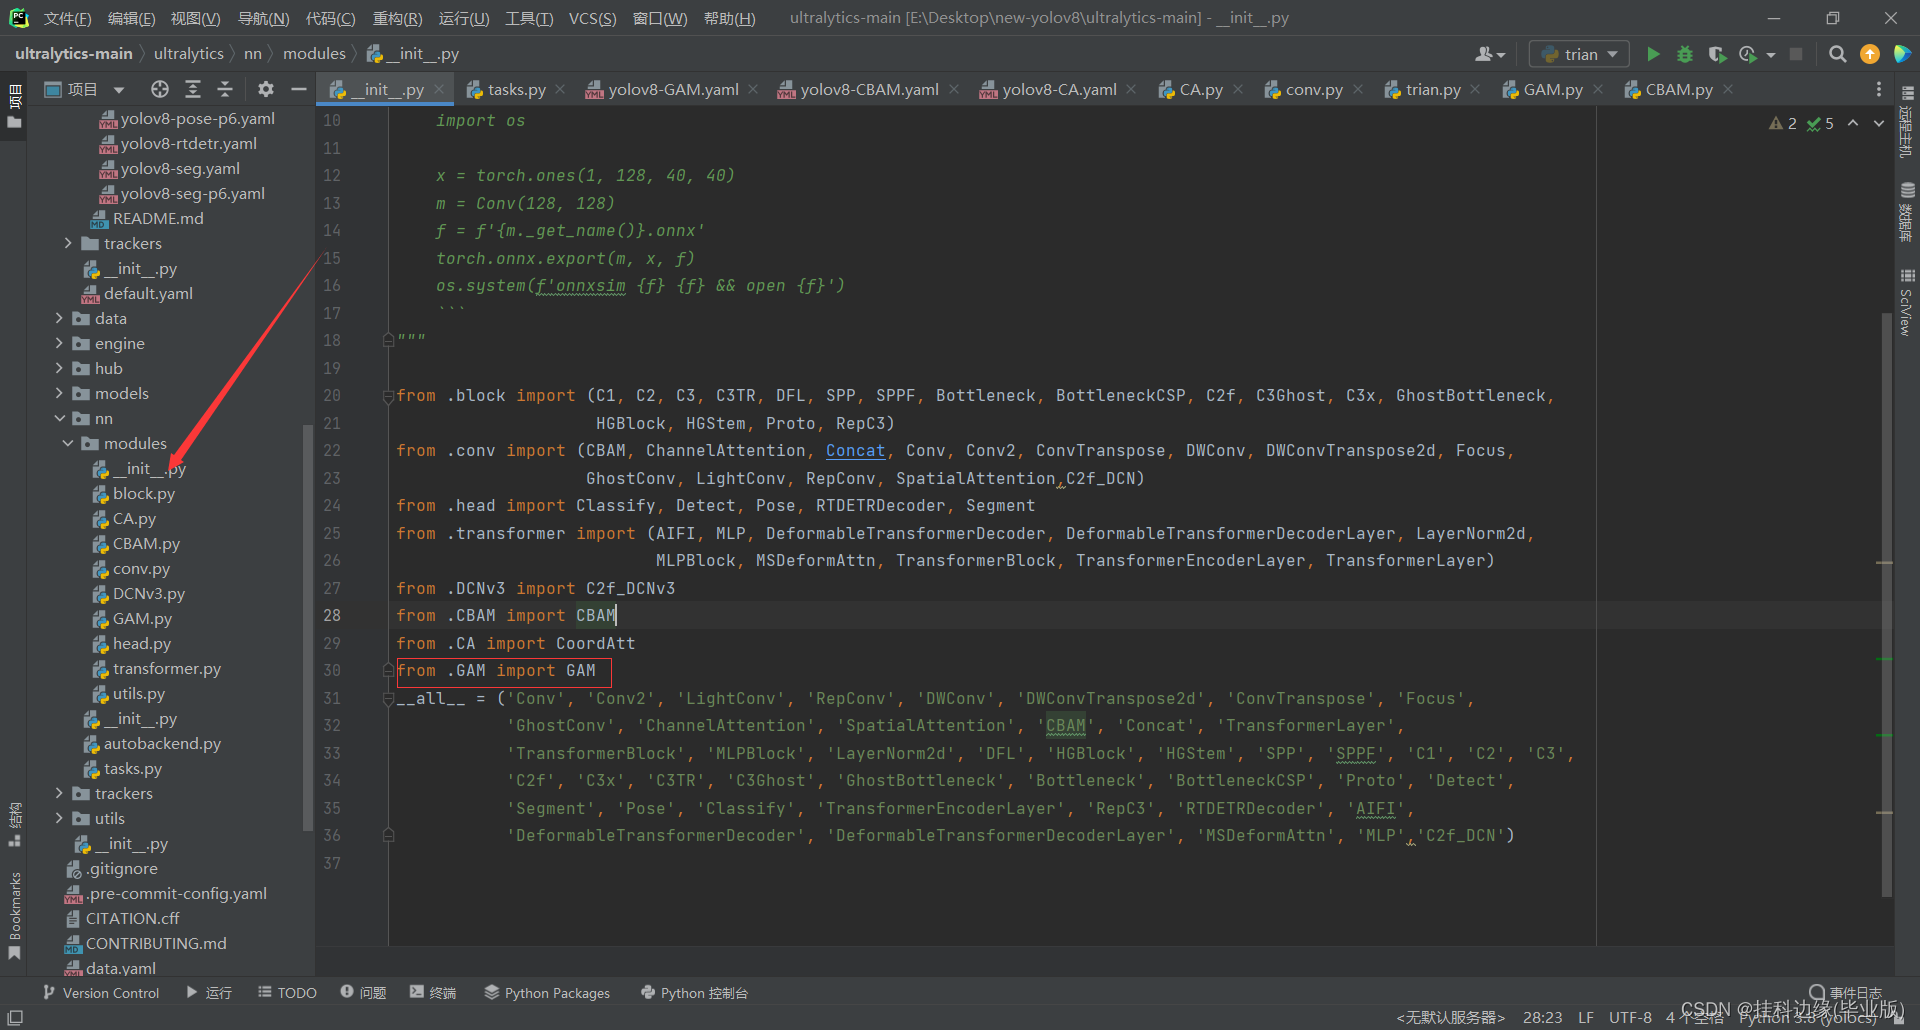
在__init__.py文件导入GAM模块,
文件路径为:ultralytics/nn/modules/init.py,在__init__.py开头导入GAM,导入截图所示
from .GAM import GAM
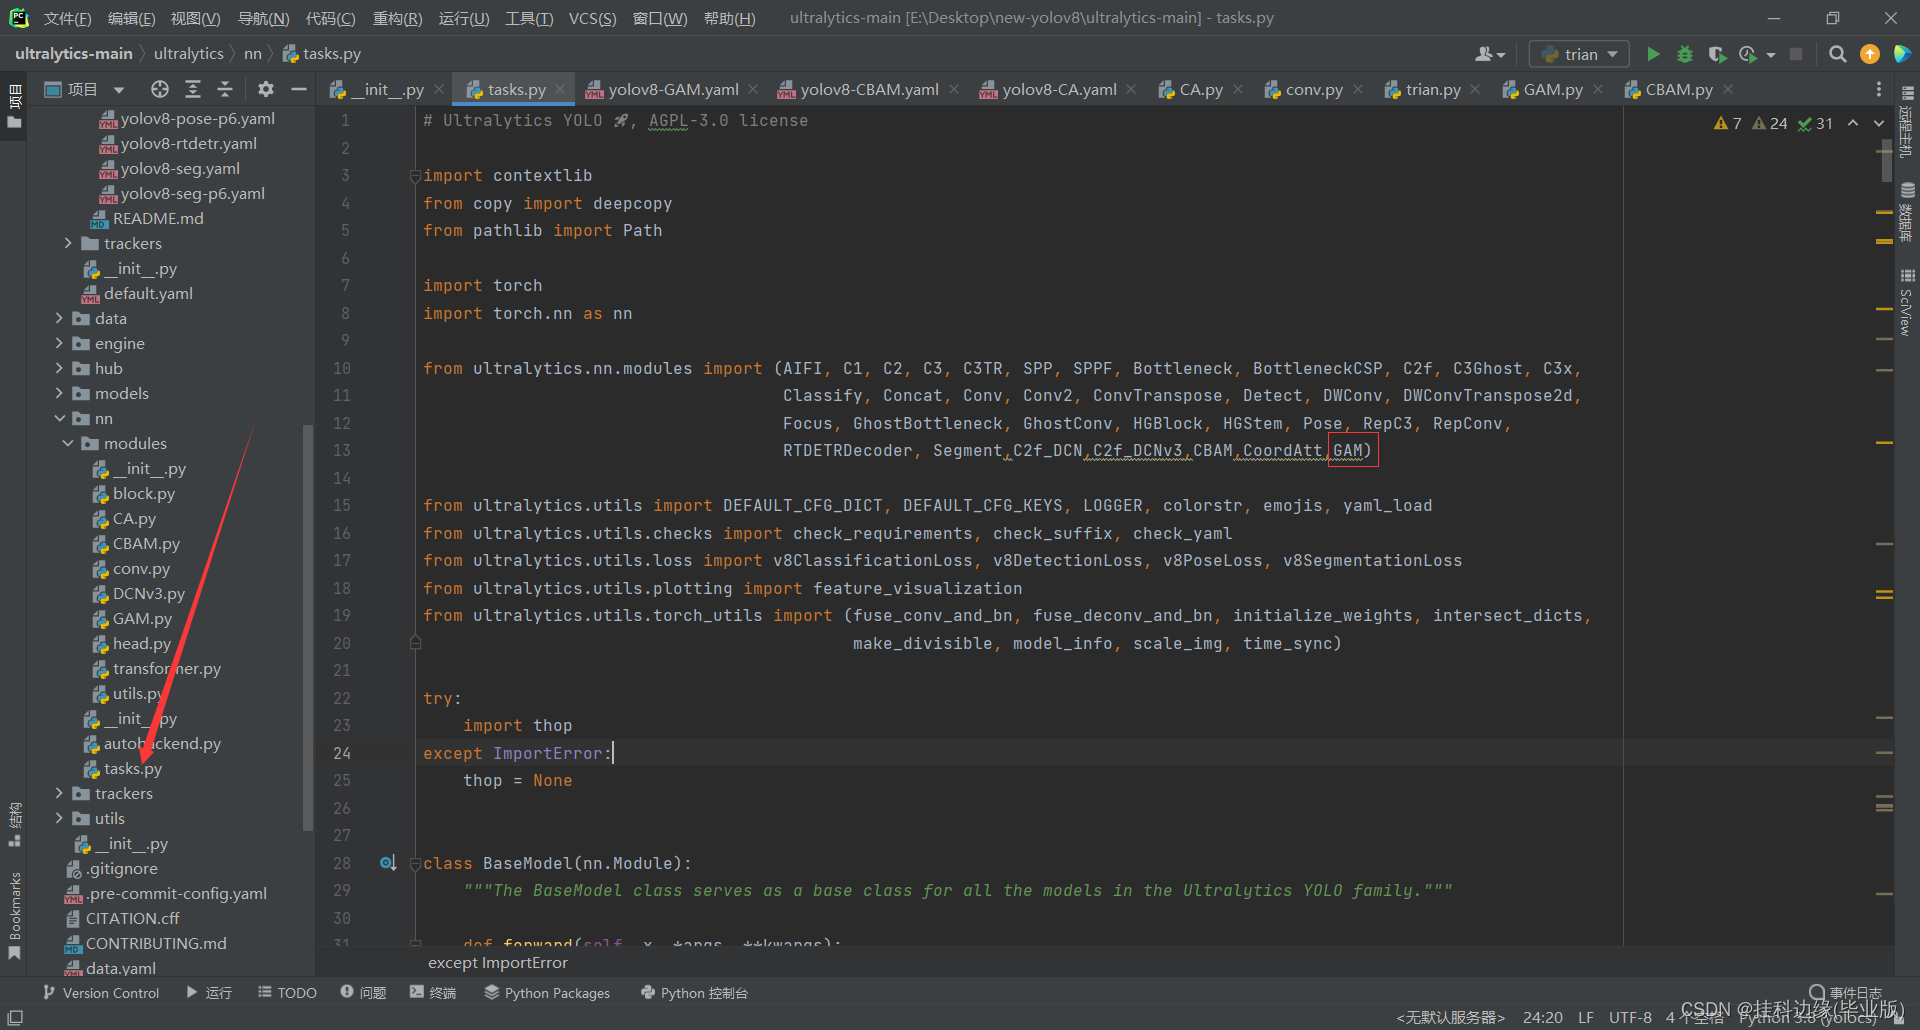
3.在tasks.py文件注册GAM
该文件路径为:ultralytics/nn/tasks.py,在开头导入GAM,添加如截图所示
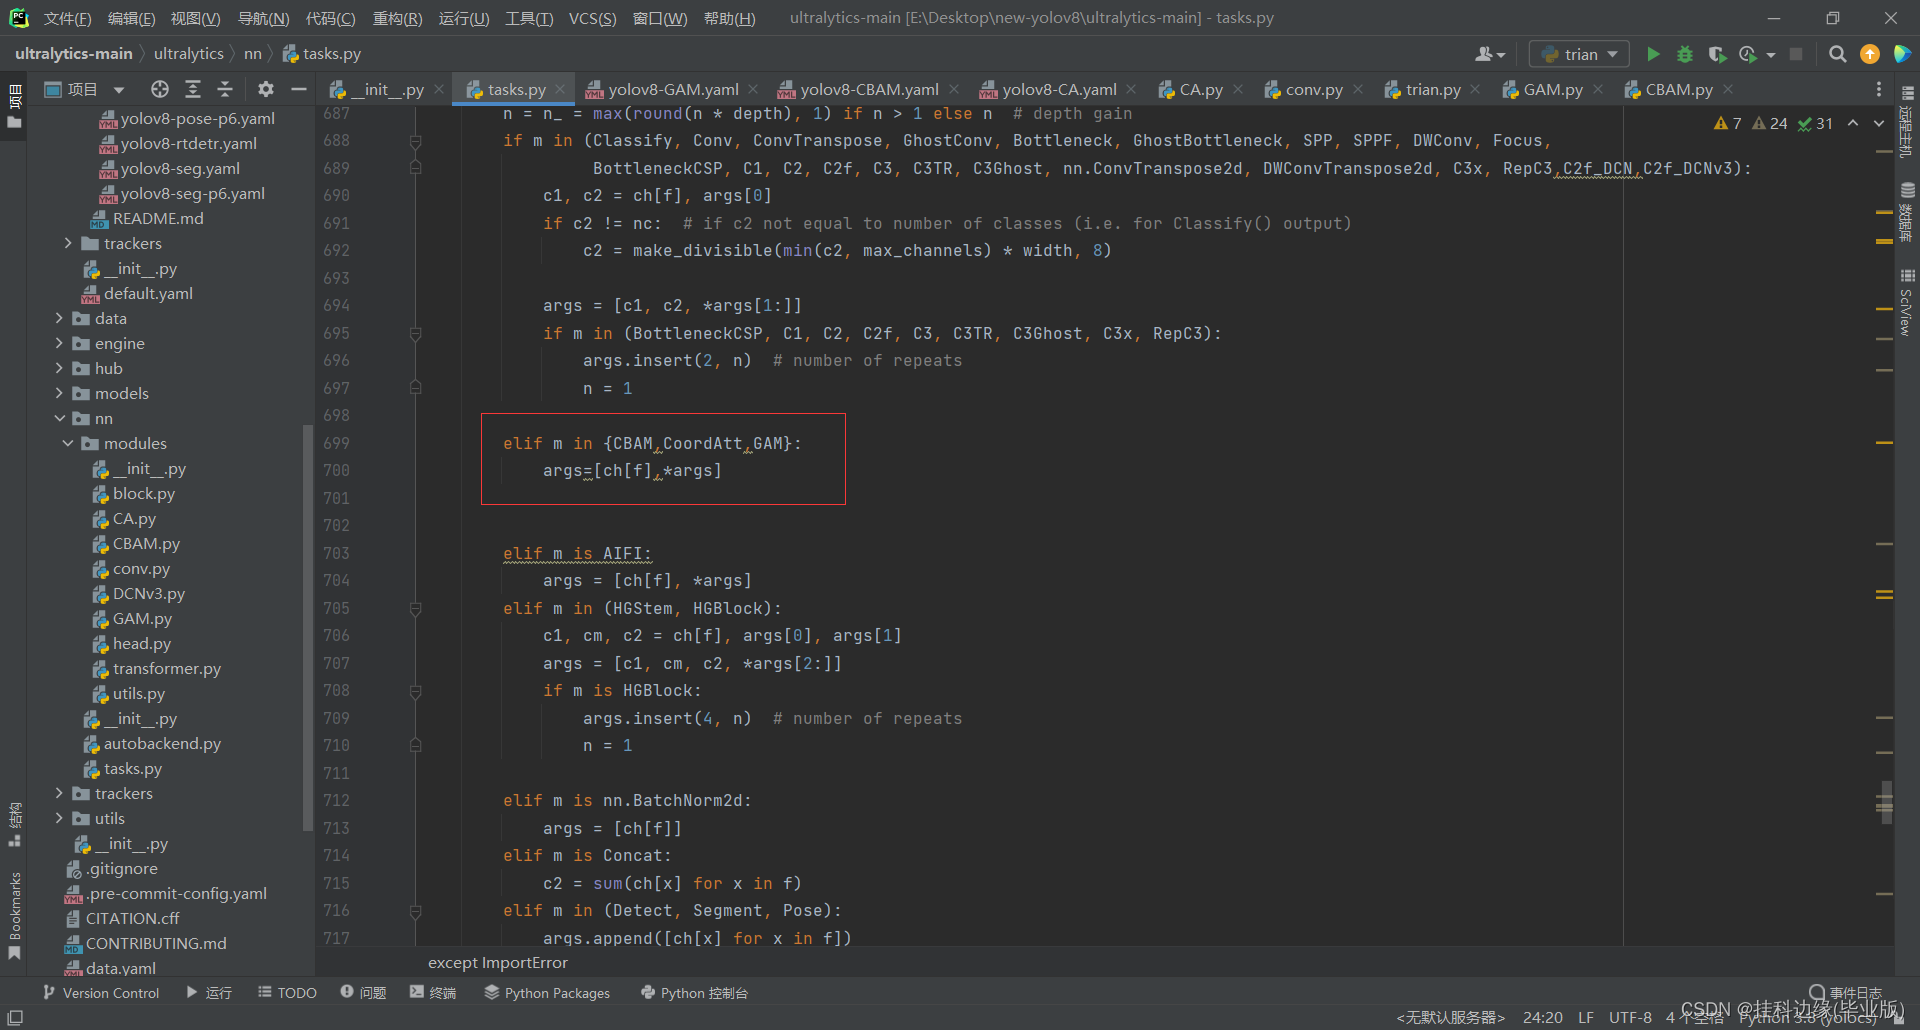
之后在这个文件的parse_model方法,添加GAM,如果有其它注意机制添加到{}里面就行,所用的参数是一样的,所示只需在{}添加其它注意机制就行,添加如截图所示
看到这里已经成功把改进的模块添加进YOLOv8源码了,接下来配置yaml文件调用改进的模块就行了
四、yaml文件修改
在ultralytics/cfg/models/v8目录下,新建一个yaml文件,复制yolov8.yaml文件,然后取名为yolov8-GAM.yaml,我这个文件代码如下所示:
下面将展示在头部添加和主干网络添加的配置文件,你也在其它地方添加,即插即用,多多实验出结果
在头部添加
yolov8-GAM.yaml全部代码如下:
# Ultralytics YOLO 🚀, AGPL-3.0 license
# YOLOv8 object detection model with P3-P5 outputs. For Usage examples see https://docs.ultralytics.com/tasks/detect

# Parameters
nc: 80  # number of classes
scales: # model compound scaling constants, i.e. 'model=yolov8n.yaml' will call yolov8.yaml with scale 'n'
  # [depth, width, max_channels]
  n: [0.33, 0.25, 1024]  # YOLOv8n summary: 225 layers,  3157200 parameters,  3157184 gradients,   8.9 GFLOPs
  s: [0.33, 0.50, 1024]  # YOLOv8s summary: 225 layers, 11166560 parameters, 11166544 gradients,  28.8 GFLOPs
  m: [0.67, 0.75, 768]   # YOLOv8m summary: 295 layers, 25902640 parameters, 25902624 gradients,  79.3 GFLOPs
  l: [1.00, 1.00, 512]   # YOLOv8l summary: 365 layers, 43691520 parameters, 43691504 gradients, 165.7 GFLOPs
  x: [1.00, 1.25, 512]   # YOLOv8x summary: 365 layers, 68229648 parameters, 68229632 gradients, 258.5 GFLOPs

# YOLOv8.0n backbone
backbone:
  # [from, repeats, module, args]
  - [-1, 1, Conv, [64, 3, 2]]  # 0-P1/2
  - [-1, 1, Conv, [128, 3, 2]]  # 1-P2/4
  - [-1, 3, C2f, [128, True]]
  - [-1, 1, Conv, [256, 3, 2]]  # 3-P3/8
  - [-1, 6, C2f, [256, True]]
  - [-1, 1, Conv, [512, 3, 2]]  # 5-P4/16
  - [-1, 6, C2f, [512, True]]
  - [-1, 1, Conv, [1024, 3, 2]]  # 7-P5/32
  - [-1, 3, C2f, [1024, True]]
  - [-1, 1, SPPF, [1024, 5]]  # 9

# YOLOv8.0n head
head:
  - [-1, 1, nn.Upsample, [None, 2, 'nearest']]
  - [[-1, 6], 1, Concat, [1]]  # cat backbone P4
  - [-1, 3, C2f, [512]]  # 12

  - [-1, 1, nn.Upsample, [None, 2, 'nearest']]
  - [[-1, 4], 1, Concat, [1]]  # cat backbone P3
  - [-1, 3, C2f, [256]]  # 15 (P3/8-small)
  - [-1, 1, GAM, []]  # 16

  - [-1, 1, Conv, [256, 3, 2]]
  - [[-1, 12], 1, Concat, [1]]  # cat head P4
  - [-1, 3, C2f, [512]]  # 19 (P4/16-medium)
  - [-1, 1, GAM, []]  # 20

  - [-1, 1, Conv, [512, 3, 2]]
  - [[-1, 9], 1, Concat, [1]]  # cat head P5
  - [-1, 3, C2f, [1024]]  # 23 (P5/32-large)
  - [-1, 1, GAM, []]  # 24

  - [[16, 20, 24], 1, Detect, [nc]]  # Detect(P3, P4, P5)
在主干添加
yolov8-GAM.yaml全部代码如下:
# Ultralytics YOLO 🚀, AGPL-3.0 license
# YOLOv8 object detection model with P3-P5 outputs. For Usage examples see https://docs.ultralytics.com/tasks/detect

# Parameters
nc: 80  # number of classes
scales: # model compound scaling constants, i.e. 'model=yolov8n.yaml' will call yolov8.yaml with scale 'n'
  # [depth, width, max_channels]
  n: [0.33, 0.25, 1024]  # YOLOv8n summary: 225 layers,  3157200 parameters,  3157184 gradients,   8.9 GFLOPs
  s: [0.33, 0.50, 1024]  # YOLOv8s summary: 225 layers, 11166560 parameters, 11166544 gradients,  28.8 GFLOPs
  m: [0.67, 0.75, 768]   # YOLOv8m summary: 295 layers, 25902640 parameters, 25902624 gradients,  79.3 GFLOPs
  l: [1.00, 1.00, 512]   # YOLOv8l summary: 365 layers, 43691520 parameters, 43691504 gradients, 165.7 GFLOPs
  x: [1.00, 1.25, 512]   # YOLOv8x summary: 365 layers, 68229648 parameters, 68229632 gradients, 258.5 GFLOPs

# YOLOv8.0n backbone
backbone:
  # [from, repeats, module, args]
  - [-1, 1, Conv, [64, 3, 2]]  # 0-P1/2
  - [-1, 1, Conv, [128, 3, 2]]  # 1-P2/4
  - [-1, 3, C2f, [128, True]]
  - [-1, 1, Conv, [256, 3, 2]]  # 3-P3/8
  - [-1, 6, C2f, [256, True]]
  - [-1, 1, Conv, [512, 3, 2]]  # 5-P4/16
  - [-1, 6, C2f, [512, True]]
  - [-1, 1, GAM,[]]
  - [-1, 1, Conv, [1024, 3, 2]]  # 7-P5/32
  - [-1, 3, C2f, [1024, True]]
  - [-1, 1, GAM,[]]
  - [-1, 1, SPPF, [1024, 5]]  # 9

# YOLOv8.0n head
head:
  - [-1, 1, nn.Upsample, [None, 2, 'nearest']]
  - [[-1, 6], 1, Concat, [1]]  # cat backbone P4
  - [-1, 3, C2f, [512]]  # 12

  - [-1, 1, nn.Upsample, [None, 2, 'nearest']]
  - [[-1, 4], 1, Concat, [1]]  # cat backbone P3
  - [-1, 3, C2f, [256]]  # 15 (P3/8-small)

  - [-1, 1, Conv, [256, 3, 2]]
  - [[-1, 14], 1, Concat, [1]]  # cat head P4
  - [-1, 3, C2f, [512]]  # 18 (P4/16-medium)

  - [-1, 1, Conv, [512, 3, 2]]
  - [[-1, 11], 1, Concat, [1]]  # cat head P5
  - [-1, 3, C2f, [1024]]  # 21 (P5/32-large)

  - [[17, 20, 23], 1, Detect, [nc]]  # Detect(P3, P4, P5)
五、训练文件修改
YOLOv8训练方式跟YOLOv5是有区别的,但是训练数据集格式跟YOLOv5一样的,你只需把处理好的数据集就行,这里就不在阐述了,废话不多说,我的训练文件如下,根据你训练需求修改指定参数就行,圈起来的修改成你的路径就行

import warnings
warnings.filterwarnings('ignore')
from ultralytics import YOLO

if __name__ == '__main__':
    model = YOLO(r'E:\Desktop\new-yolov8\ultralytics-main\ultralytics\cfg\models\v8\yolov8-DCNv2.yaml')
    model.train(data=r'data.yaml',
                cache=False,
                imgsz=640,
                epochs=5,
                single_cls=False,
                batch=4,
                close_mosaic=10,
                workers=0,
                device='cpu',
                optimizer='SGD',
                project='runs/train',
                name='exp',
                )
device=‘cpu’,参数意思是:你电脑是GPU你就填0,CPU就填cpu,GPU是有英伟达显卡的电脑使用的,如果没有英伟达显卡训练非常慢,因为我电脑没有英伟达显卡,这里训练只用了几张数据集进行测试,你们也可以租云服务器训练,方法都是一样的,后期有空会出一起环境配置视频,我以前的作品也有环境配置教程的,你们可以翻一下看看
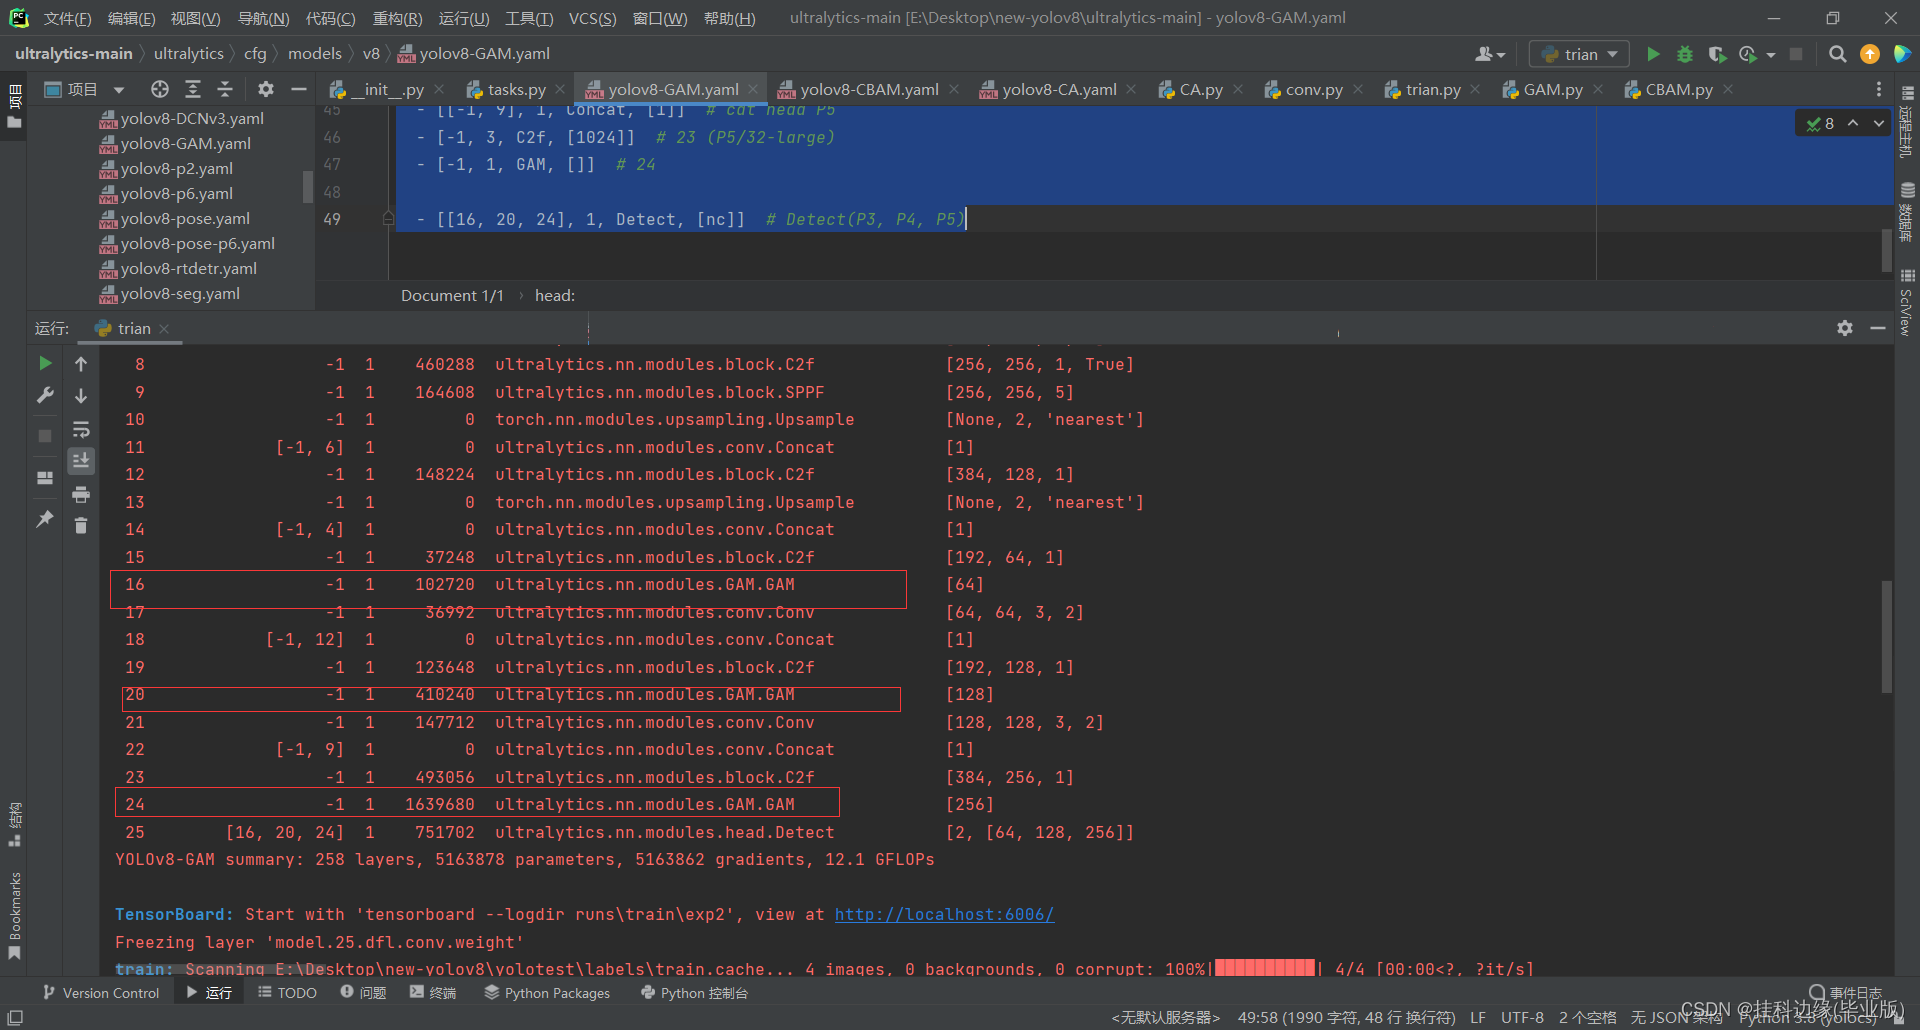
测试一下训练,打印出来的YOLOv8结构可以看到添加GAM注意机制成功
总结
请在我提供的YOLOv8代码修改,把环境配置好,数据集处理好,训练基本能成功,创作不易,请帮忙点一个爱心,谢谢观看


 1万+
1万+


 被折叠的 条评论
为什么被折叠?
被折叠的 条评论
为什么被折叠?
 到【灌水乐园】发言


