


目录
ImportError: cannot import name 'VoxelGenerator' from 'spconv.utils
E: Unable to locate package libboost-all-dev
TypeError: load() missing 1 required positional argument: ‘Loader‘
前言
最近在做基于雷达的目标检测跟踪实现,阅读了同济大学最新的论文LIMOT,但论文复线时需要自己训练Detector,下面记录自己在编译CenterPoint-KITTI过程中遇到的问题以及解决方法。
LIMOT论文官方Github仓库:
CenterPoint-KITTI官方Github仓库:
GitHub - tianweiy/CenterPoint-KITTI
Python虚拟环境创建以及使用
官方编译运行CenterPoint时并没有使用Python的虚拟环境,但自己考虑之后处于虚拟环境的便捷性,还是选择使用虚拟环境实现。
- Python中虚拟环境的使用:
- 创建虚拟环境ptython3 -m virtualenv venv
- 激活虚拟环境source venv/bin/activate
- 退出虚拟环境deactivate
- Linux中如何彻底删除虚拟环境以及虚拟环境中安装的软件,记住一个原则,虚拟环境里面安装的软件全部存在于此虚拟环境中,当执行命令rm -rf venv删除对应的虚拟环境后,安装的软件也就被删除了。
最终自己创建并使用虚拟环境如下:

KITTI3D目标检测数据集
- KITTI原始3D对象预测数据集:
CenterPoint-KITTI编译遇到问题合集
ImportError: cannot import name 'VoxelGenerator' from 'spconv.utils
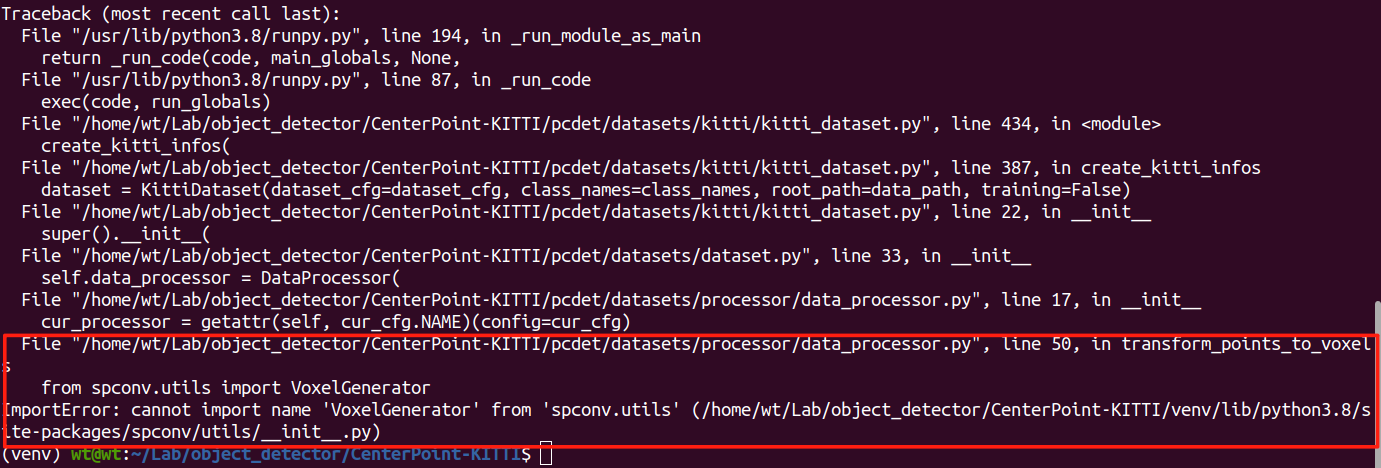
失败案例
搜索上述错误,有很多种其他参考参考,但修改代码后,又报了很多错误,如下:最终也是卸载,并安装对应版本解决。
第一次参考这篇博客,修改对应代码,大错特错,随后错误一个接着一个,直接干沉默了。
SSD 复现过程报错_importerror: cannot import name ‘voxelgenerator’ f-CSDN博客


成功解决ValueError: setting an array element with a sequence. The requested array has an...-CSDN博客
最终解决方案
如何解决,最终卸载了cuda11.8对应的spconv,将其替换为Git官网上对应的v1.1版本完美解决。
自己搜索过程中查询到另一篇Github博客所讲,将低版本在这里也就是v1.1版本的VoxelGeneratorV2的相关文件复制一份放到你安装的spconv文件中,这种方式我并没有尝试,使用重新安装v1.1的方式。
1. 查看并卸载已经安装的spconv:
#通过pip list命令查看安装的spconv以及cumm
pip list | grep spconv
pip list | grep cumm
#查询到对应的spconv以及cumm版本后使用uninstall命令卸载(这种方式仅针对于使用pip方式安装的)
pip uninstall spconv
pip uninstall cumm
#卸载后再次查看已经没有安装的spconv以及cumm
根据官方网站查看:对于cuda11.8如果使用下述方式安装是会有cumm的,自己第一次安装了cuda11.8对应的spconv,下面安装了v1.1版本就没有cumm了,所有安装后验证是否安装正确,没有出现cumm也不用慌,可以正常使用。
![]()

2. 从sponv官网拉取对应v1.1版本的spconv:
git clone -b v1.1 https://github.com/traveller59/spconv.git --recurisve-b v1.1:指定了拉取对应v1.1版本的spconv。
--recursive: 这个选项用于克隆所有子模块(submodule)。Git 子模块是指在 Git 仓库中嵌套的另一个 Git 仓库。使用
--recursive选项可以确保在克隆主仓库的同时,也会递归地克隆所有子模块。
安装步骤:(参考官网)
- if you are using pytorch 1.4+ and encounter "nvcc fatal: unknown -Wall", you need to go to torch package dir and remove flags contains "-Wall" in INTERFACE_COMPILE_OPTIONS in Caffe2Targets.cmake. This problem can't be fixed in this project (to avoid this, I need to remove all torch dependency in cuda sources and drop half support).
Use
git clone xxx.git --recursiveto clone this repo.Install boost headers to your system include path, you can use either
sudo apt-get install libboost-all-devor download compressed files from boost official website and copy headers to include path.Download cmake >= 3.13.2, then add cmake executables to PATH.
Ensure you have installed pytorch 1.0+ in your environment, run
python setup.py bdist_wheel(don't usepython setup.py install).Run
cd ./dist, use pip to install generated whl file.
第5步执行完成后,在dist目录下会生成一个文件(参考如下),执行下述命令安装spconv v1.1:
![]()
pip install spconv-1.1-cp38-cp38-linux_x86_64.whlGitHub - traveller59/spconv at v1.1
3. 验证是否安装成功:
由于我使用的时python的虚拟环境,最终安装的软件都位于venv这个虚拟环境中,按照下图第一个方框里的内容找到对应的路径查看有VoxelGeneratorV2这个类,表示成功。
对于可选参数,road plane的处理

进入对应的数据配置文件和模型配置文件,将USE_ROAD_PLANE: 由True改为False。
E: Unable to locate package libboost-all-dev
对于无法定位到软件包的问题,直接使用sudo apt-get update先更新下载源,之后再重试即可。
sudo apt-get update
sudo apt-get install libboost-all-dev
E: Unable to locate package libboost-all-dev_unable to locate package libboost-dev-CSDN博客
TypeError: load() missing 1 required positional argument: ‘Loader‘

- 将yaml.load()改为 yaml.safe_load()即可解决。
GPU内存不足如何解决:
直接搜索相应博客,我的解决方案就是将batch_size大小指定为2,也就是批量大小指定为2就可以,对于KITTI的CenterPoint的训练。
pytorch: 四种方法解决RuntimeError: CUDA out of memory. Tried to allocate ... MiB_cuda out of memory. tried to allocate 1.38 gib (gp-CSDN博客
- 如何实时查看GPU使用情况,使用命令:watch -n 0.5 nvidia-smi。
watch是一个在 Unix 和类 Unix 操作系统中常用的命令行工具,它可以用来周期性地执行一个程序,并全屏显示其输出。这对于实时监控某些操作或系统状态非常有用。watch:这是用来执行周期性命令的工具。-n 0.5:这个选项告诉watch每 0.5 秒执行一次后面的命令。-n后面的数字是间隔时间,单位是秒。
训练效果

暂时写到这里,以上方式仅供参考,后续自己实现了3D激光雷的预测,会继续更新后续。


 1358
1358

 被折叠的 条评论
为什么被折叠?
被折叠的 条评论
为什么被折叠?
 到【灌水乐园】发言


