


本系列代码来自于编成吧的小杨老师系列课
1.添加窗口菜单栏、工具栏以及输入文本框
1.1 窗口菜单栏
#-*- coding=utf-8 -*-
import sys
from PyQt4 import QtGui,QtCore


class MessageBox(QtGui.QMainWindow):
    def __init__(self,parent=None):
        QtGui.QMainWindow.__init__(self)

        self.setWindowTitle(u"My main windows")
        self.resize(550,450)
        exit = QtGui.QAction(QtGui.QIcon("exit.png"),u"exit",self)
        exit.setShortcut("Ctrl+Q")
        exit.setStatusTip(u"exit program")
        exit.connect(exit,QtCore.SIGNAL("triggered()"),QtGui.qApp,QtCore.SLOT("quit()"))

        self.statusBar()

        menubar = self.menuBar()
        file = menubar.addMenu(u"message")
        file.addAction(exit)


app = QtGui.QApplication(sys.argv)
qb = MessageBox()
qb.show()
sys.exit(app.exec_())
exit = QtGui.QAction(QtGui.QIcon("exit.png"),u"exit",self)
建立一个QAction对象,相当于一个动作,该动作有三种情况。
①有响应的“动作/Action”,使用QAction实现,这里的响应为弹出一个“消息框”。
②该“Action”可以在菜单栏、工具栏上点击。
③鼠标停留在该“动作”上时,状态栏显示关于该“动作”相关提示信息。
2.
exit.setShortcut("Ctrl+Q")
为动作建立一个快捷键。
3.
exit.setStatusTip(u"exit program")
为动作创建一个状态信息,当把鼠标放于该动作时,会提示一个状态信息于左下角。
4.
self.statusBar()
显示状态信息需要用到的东西。
5.
file = menubar.addMenu(u"message")
创建一个名为message的菜单栏
6.
file.addAction(exit)
为菜单栏添加一个exit动作
效果:
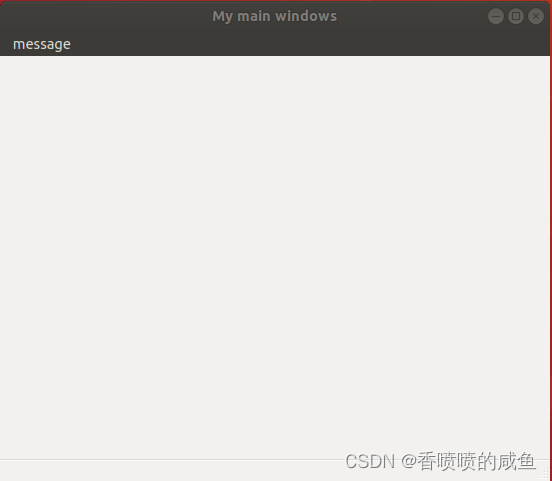
1.2 添加工具栏
在1.1的基础上添加:
        toobar = self.addToolBar(u"exit")
        toobar.addAction(exit)
toobar = self.addToolBar :创建一个工具栏对象
2.
toobar.addAction(exit) :为该工具栏添加exit这个动作
效果:

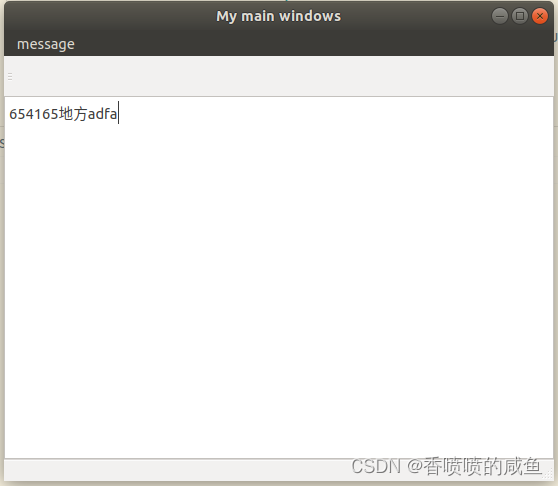
1.3 添加文档输入
在1.2的基础上添加:
textEdit = QtGui.QTextEdit()
self.setCentralWidget(textEdit)
textEdit = QtGui.QTextEdit()
创建可以输入文档的对象
2.
将其放于界面的中心位置
效果:
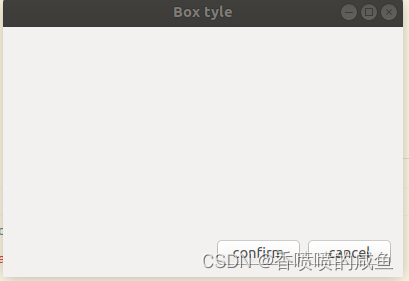
2. Box布局和网格布局
2.1 Box布局
#-*- coding=utf-8 -*-
import sys
from PyQt4 import QtGui,QtCore


class MessageBox(QtGui.QWidget):
    def __init__(self,parent=None):
        QtGui.QWidget.__init__(self)

        self.setWindowTitle(u"Box tyle")

        ok = QtGui.QPushButton(u"confirm")
        cancel = QtGui.QPushButton(u"cancel")

        hbox = QtGui.QHBoxLayout()
        hbox.addStretch(1)
        hbox.addWidget(ok)
        hbox.addWidget(cancel)

        vbox = QtGui.QVBoxLayout()
        vbox.addStretch(1)
        vbox.addLayout(hbox)

        self.setLayout(vbox)

        self.resize(400,250)


app = QtGui.QApplication(sys.argv)
qb = MessageBox()
qb.show()
sys.exit(app.exec_())
        ok = QtGui.QPushButton(u"confirm")
        cancel = QtGui.QPushButton(u"cancel")
导入元素,两个按键
2.
        hbox = QtGui.QHBoxLayout()
        hbox.addStretch(1)
        hbox.addWidget(ok)
        hbox.addWidget(cancel)
hbox = QtGui.QHBoxLayout():
添加水平布局
hbox.addWidget(ok)
hbox.addWidget(cancel):
在水平布局这个框中,在widget(界面)中添加两个元素
hbox.addStretch(1):
伸缩间隔元素,由于这是水平布局,一开始只有代码从上到下运行,即元素从左到右开始布局,其中的数字代表布局的比例,例如:当ok与cancel之间添加一个布局元素如下图,间隔便会相等。
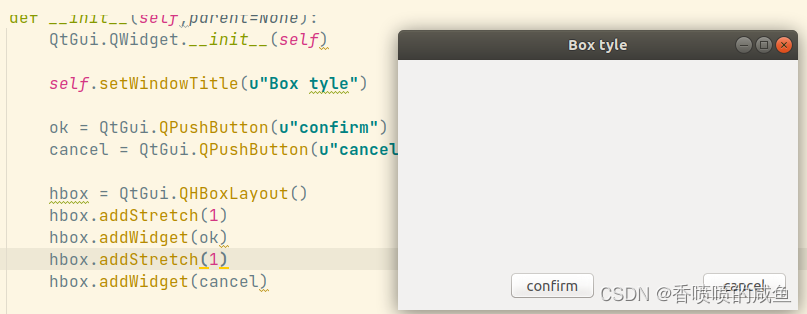
3.
        vbox = QtGui.QVBoxLayout()
        vbox.addStretch(1)
        vbox.addLayout(hbox)
vbox = QtGui.QVBoxLayout():
添加垂直布局,并将刚刚的水平布局添加至现在的垂直布局中
4.
self.setLayout(vbox)
对整个窗口实行一个垂直布局。
效果:
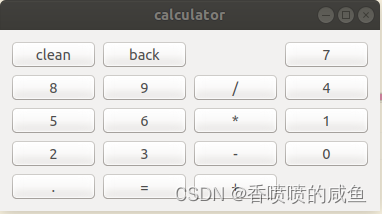
2.2 网格布局
#-*- coding=utf-8 -*-
import sys
from PyQt4 import QtGui,QtCore


class GrildLayout(QtGui.QWidget):
    def __init__(self,parent=None):
        QtGui.QWidget.__init__(self)

        self.setWindowTitle(u"calculator")

        names = [u"clean",u"back",u"exit","7","8","9","/","4","5","6","*","1","2","3","-","0",".","=","+"]
        grid = QtGui.QGridLayout()

        j = 0

        pos = [(0,0),(0,1),(0,2),(0,3),(1,0),(1,1),(1,2),(1,3),(2,0),(2,1),(2,2),(2,3),(3,0),(3,1),(3,2),(3,3),(4,0),(4,1),(4,2),(4,3)]
        for i in names:
            button = QtGui.QPushButton(i)
            if j == 2:
                grid.addWidget(QtGui.QLabel(""),0,2)
            else:
                grid.addWidget(button,pos[j][0],pos[j][1])
            j += 1

        self.setLayout(grid)

app = QtGui.QApplication(sys.argv)
g = GrildLayout()
g.show()
sys.exit(app.exec_())
1
grid = QtGui.QGridLayout()
创建网格布局这个对象,它是QtGui.QVBoxLayout()和QtGui.QHBoxLayout()的父类
2
grid.addWidget(QtGui.QLabel(""),0,2)
在(0,2)位置添加一个空标签,用于当空格
后面两个参数代表位置。
3
grid.addWidget(button,pos[j][0],pos[j][1])
在每个按钮的对应位置添加按钮
效果:


 1861
1861


 被折叠的 条评论
为什么被折叠?
被折叠的 条评论
为什么被折叠?
 到【灌水乐园】发言


