


 本文介绍如何在Unity中使用XR Interaction Toolkit插件设置VR设备手柄按键的按下事件。步骤包括导入插件,设置XR输入事件,编写代码检测按键状态,并解决常见问题,如检查手柄连接和绑定警告。
一、Unity设置
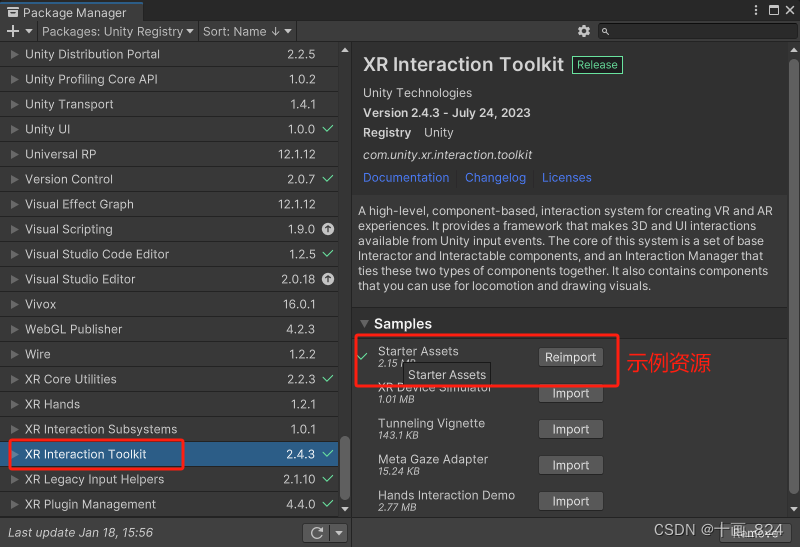
1、导入XR Interaction Toolkit插件,导入示例资源(如下图)。
2、设置新版XR输入事件
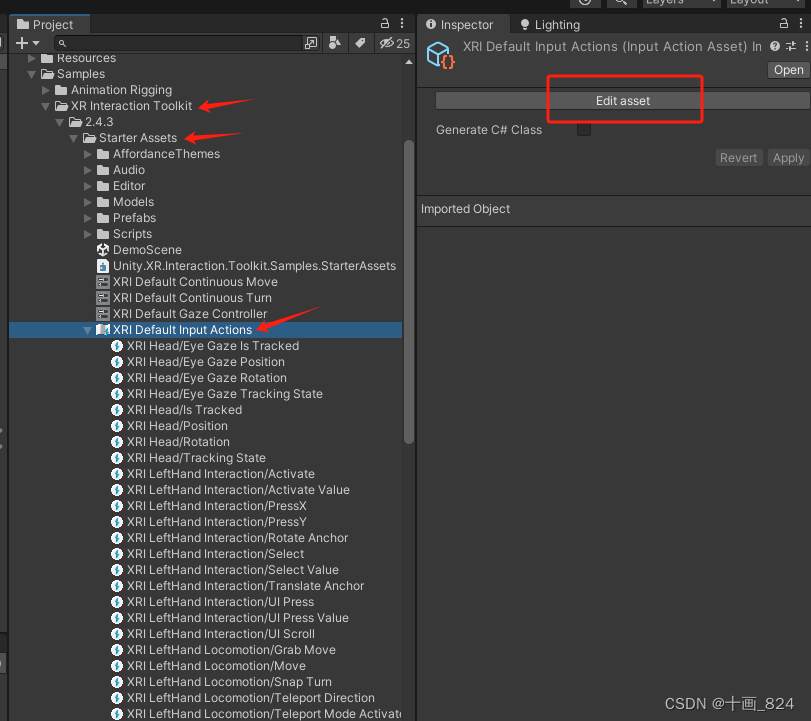
①打开XRI Default Input Action 面板。
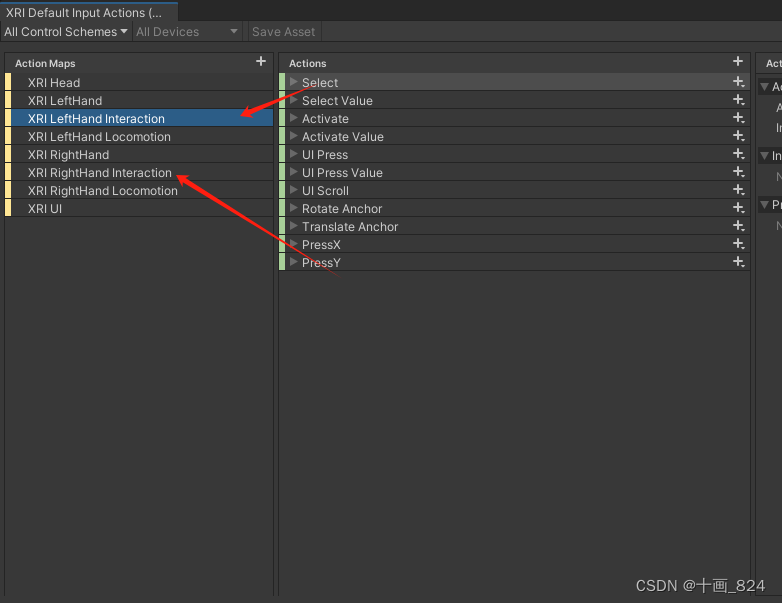
②设置左手柄上的按键就点击Action Maps 列表下的 XRI LeftHand Interaction选项,设置右手柄上的按键就点击XRI RightHand Interaction。
③以设置右手柄上的按键为例,我们将设置右手柄上的 A键、B键、摇杆按下键、摇杆上下左右推动事件、R2键(扳机键)、侧柄键(抓握键)等6个按键的绑定事件方法。
首先,点击Action列表右上方的+号新建事件,将事件命名为按键名称。

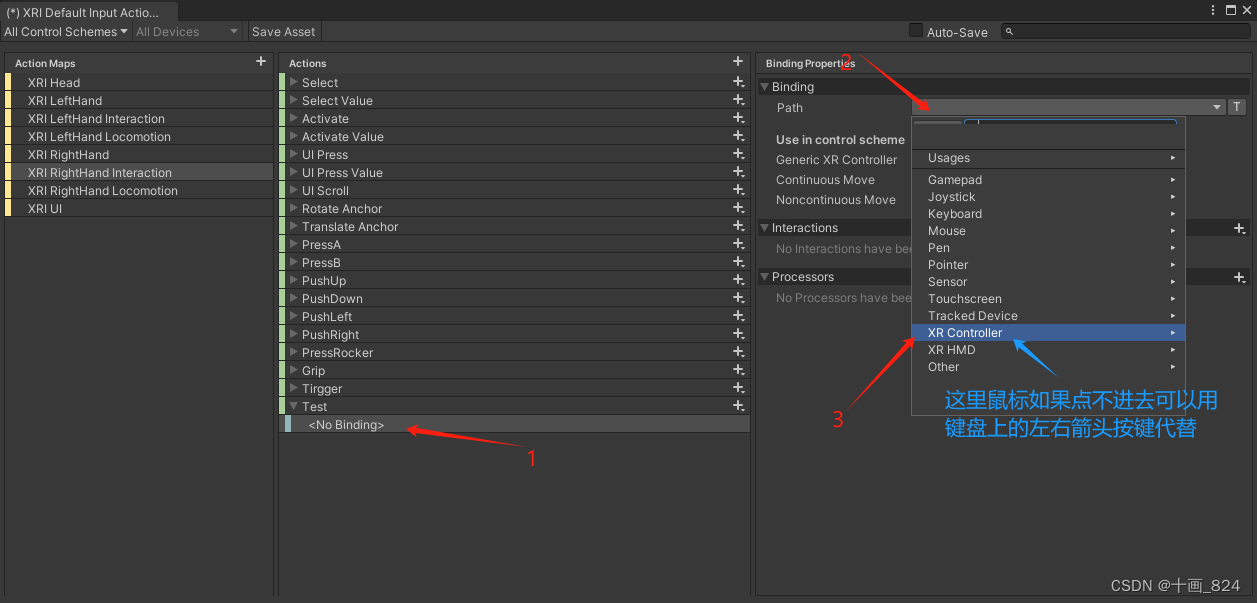
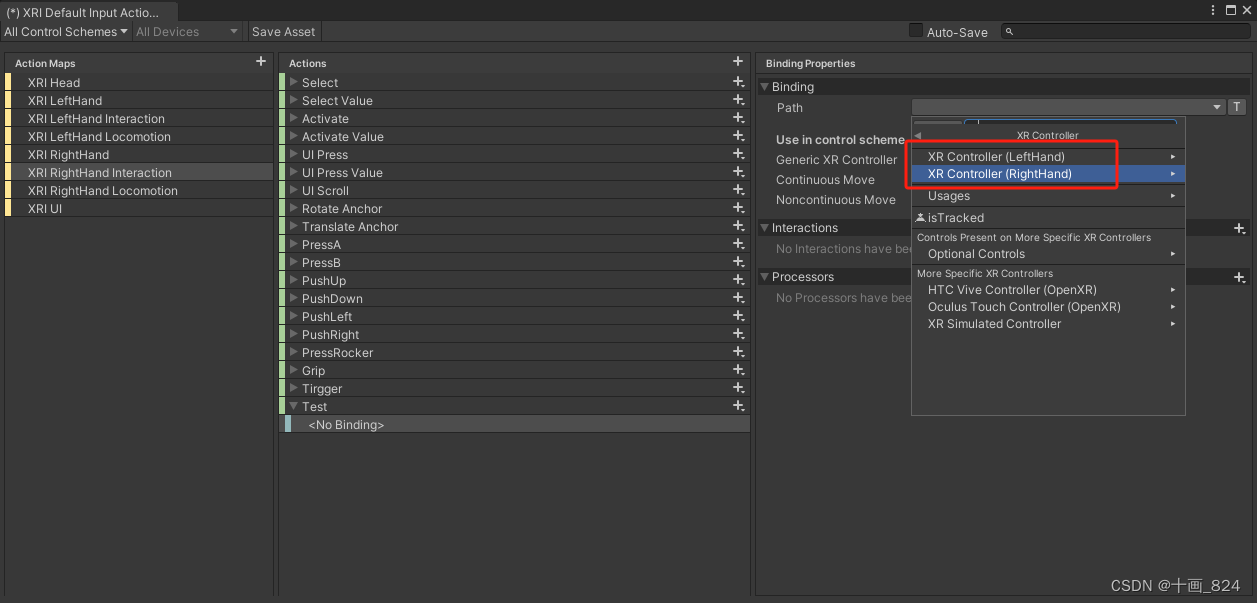
④命名完成后为每个事件绑定对应的手柄按钮。
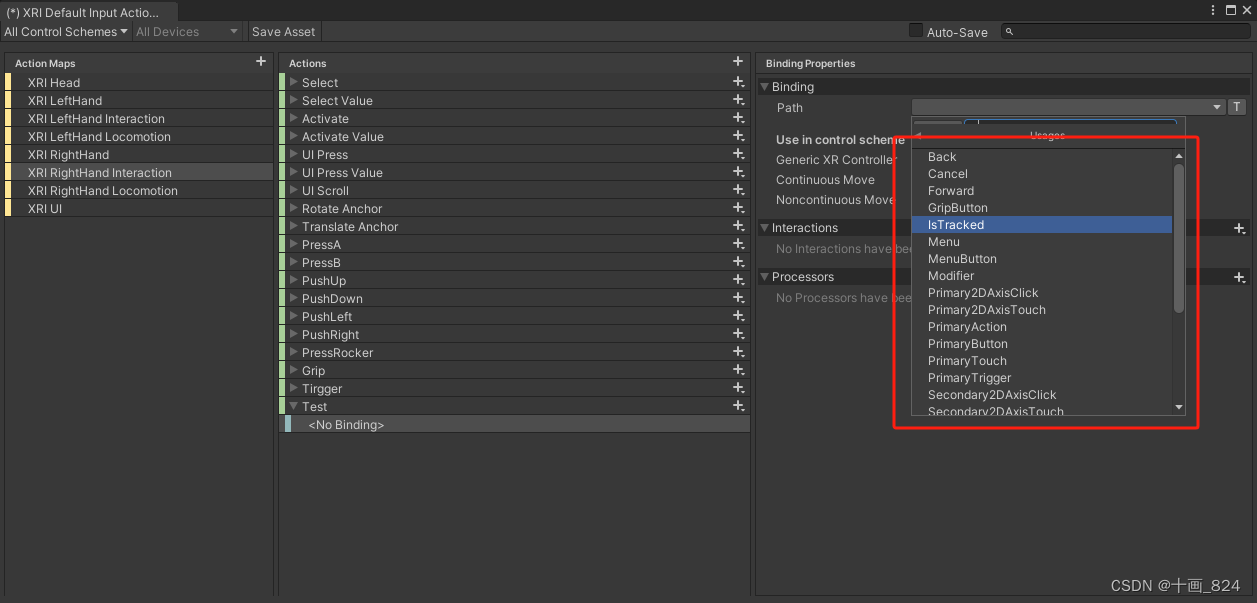
根据下面的图依次选择 XR Controller、XR Controller(RightHand)、Usage中对应的按钮。
| A键 | PrimaryButton |
| B键 | SecondaryButton |
| X键 | PrimaryButton |
| Y键 | SecondaryButton |
| 扳机键(R2键) | TirggerButton |
| 抓握键(侧柄键) | GripButton |
| 摇杆按下键 | Primary2DAxisClick |
| 摇杆上推键 | Primary2DAxis |
| 摇杆下推键 | Primary2DAxis |
| 摇杆左推键 | Primary2DAxis |
| 摇杆右推键 | Primary2DAxis |
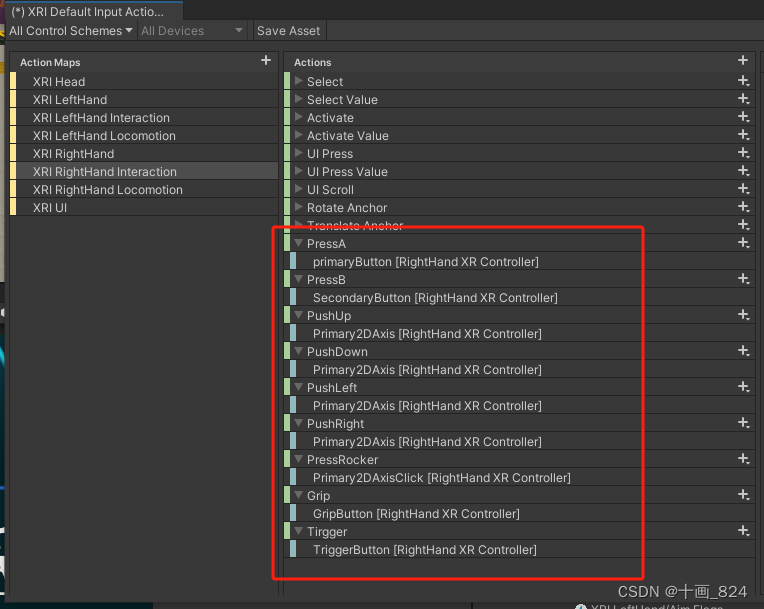
全部添加完成后如下图(本图只设置右手柄按键,所以不包含XY按键):
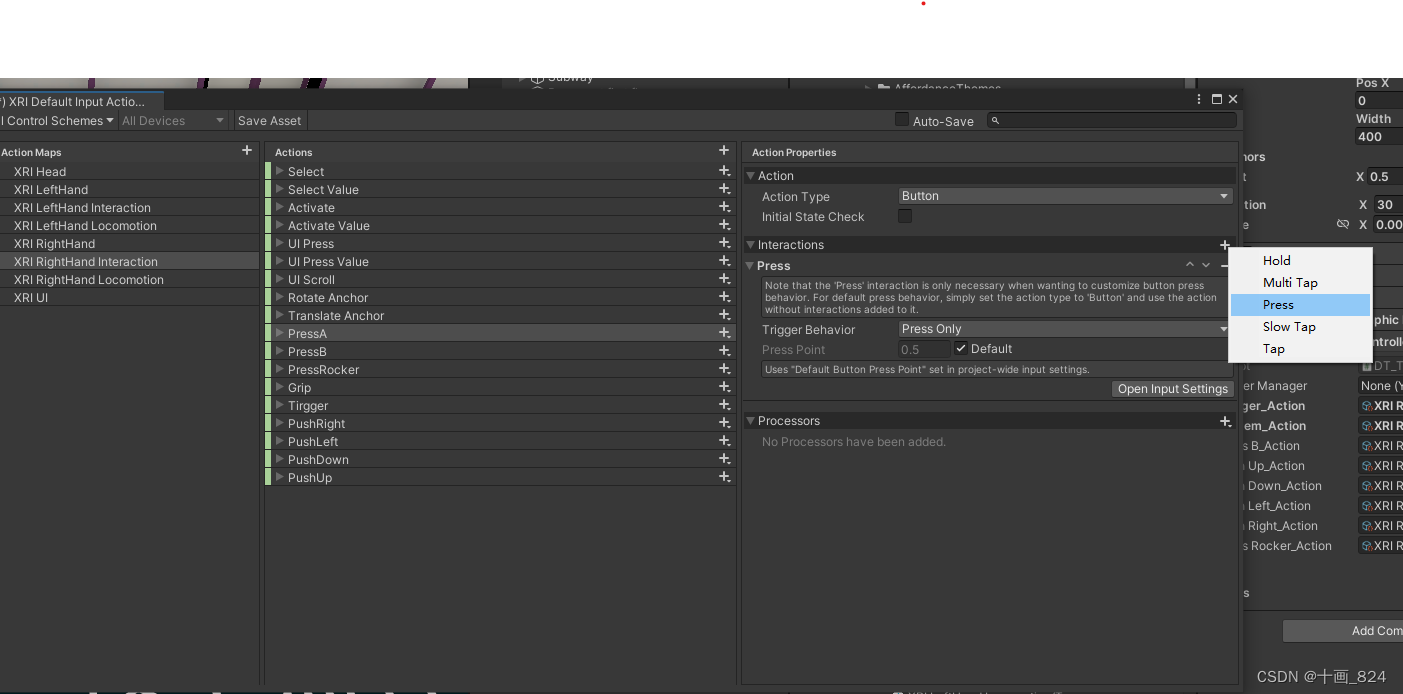
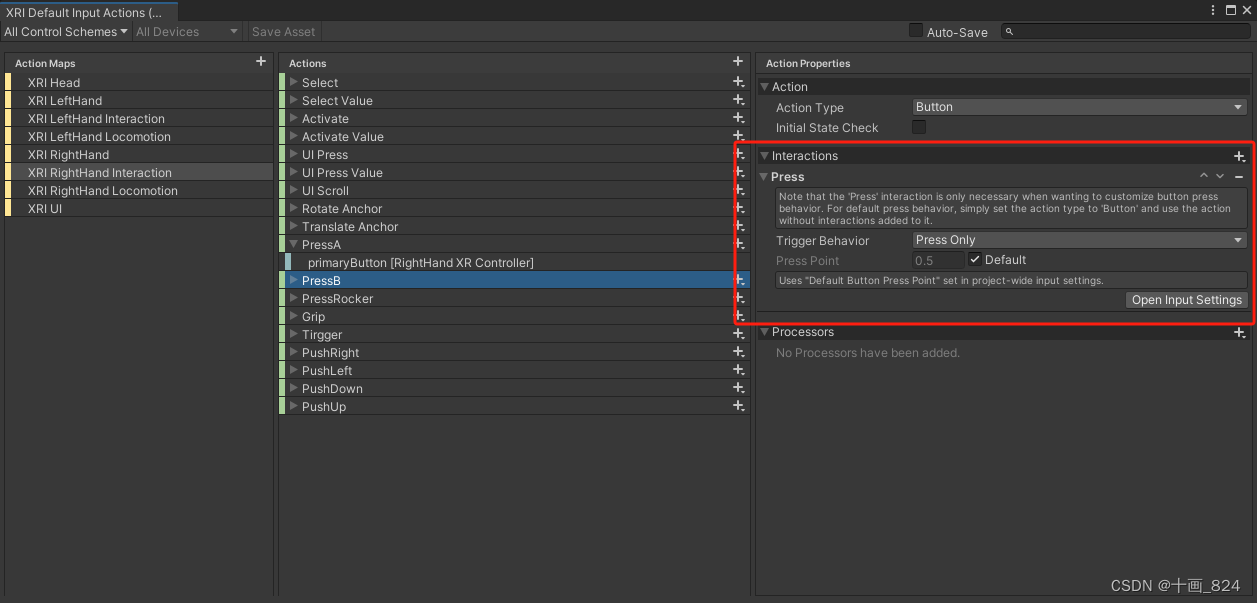
⑤设置触发方式,这里有一个注意点,就是ABXY键、扳机键、侧柄键和摇杆中心键都是通过按下触发的,但是摇杆上下左右四个方向的键是通过推动的方式触发的,所以在设置的时候要区分开来。
ABXY键、扳机键、侧柄键和摇杆中心键都是选中Action列表下的对应选项设置 Press,每一个事件上都要设置。选项下的按钮可以不设置,但如果后面测试没反应,可以在按扭上添加试一下。
如下图:
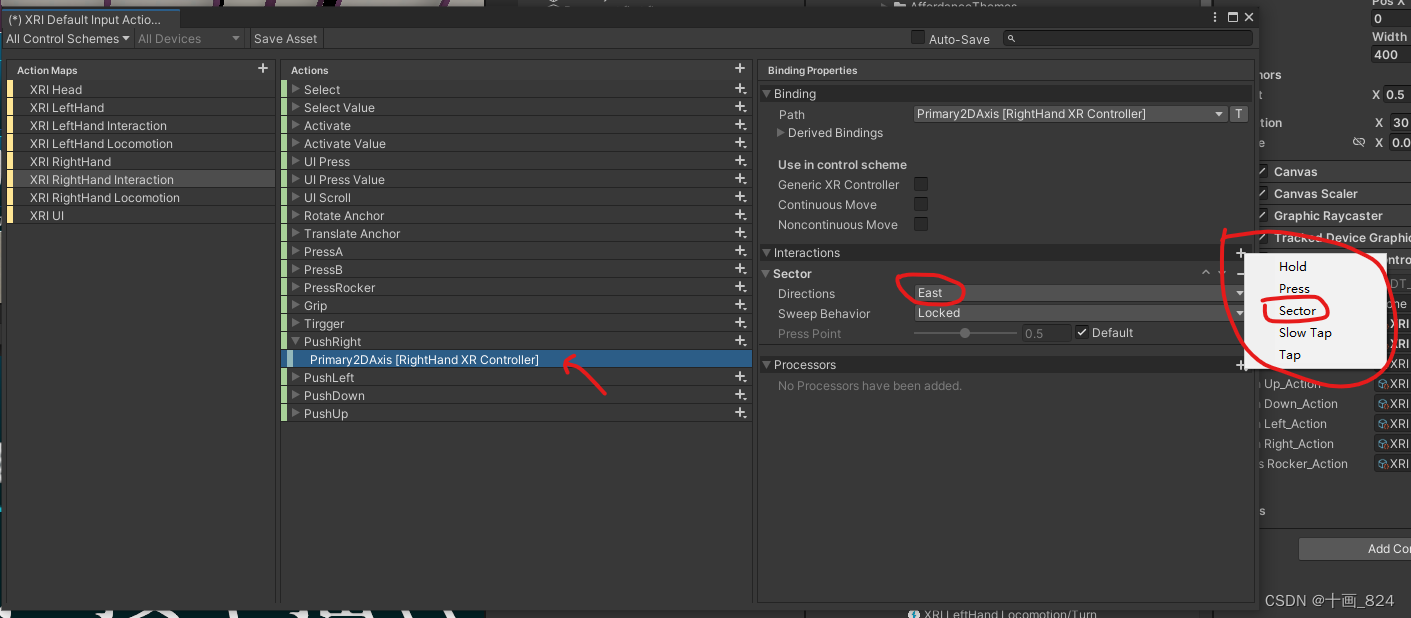
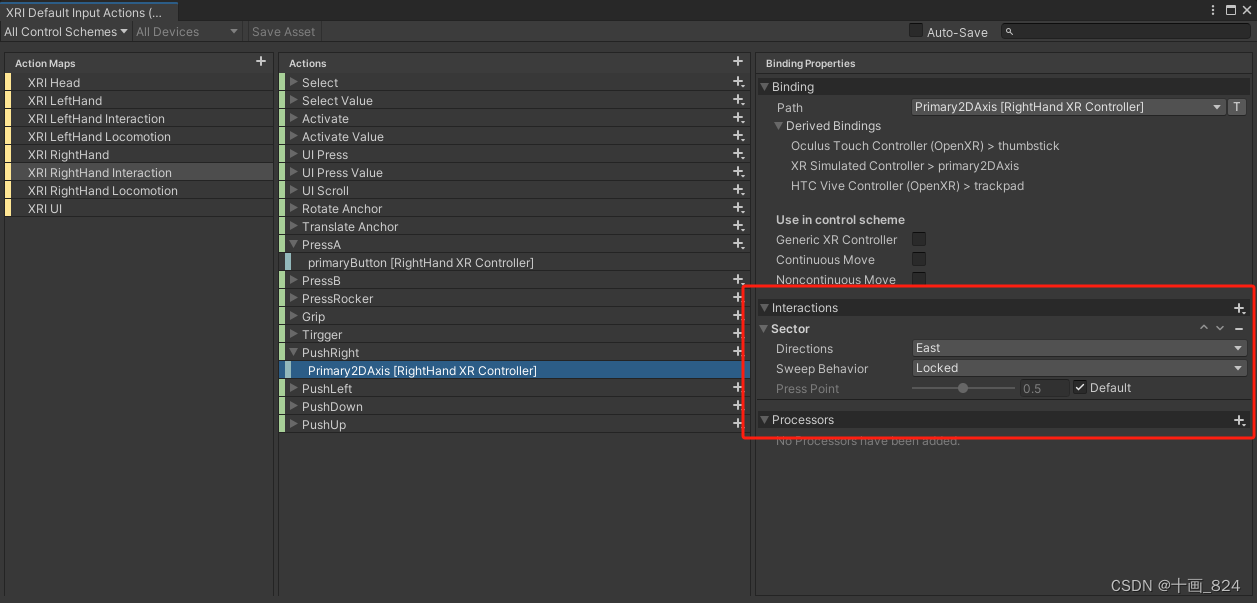
摇杆上下左右四个方向的键是选择选项下的对应按键设置Sector。在 Sector 模块下的Directions选项中选择对应的摇杆方向,向上推就是North,向下推就是South,向左推就是West,向右推就是East,和看地图一样 上北下南左西右东 。每一个都要设置对应的方向,注意不要多选。
如下图:
⑥最后要记得点击保存!!!
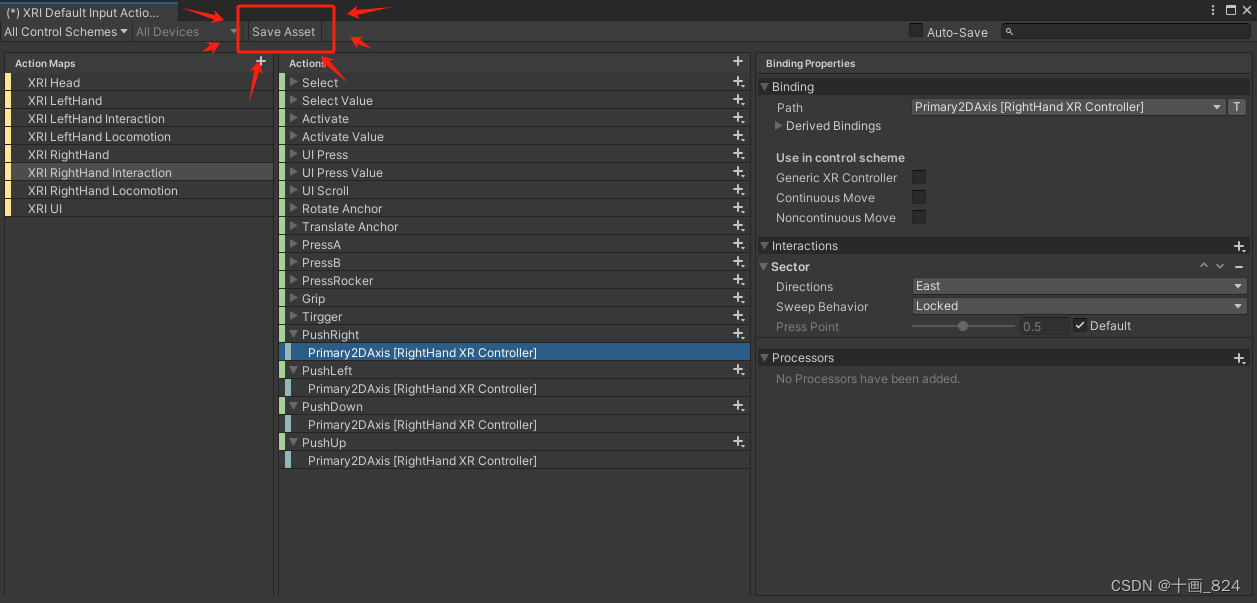
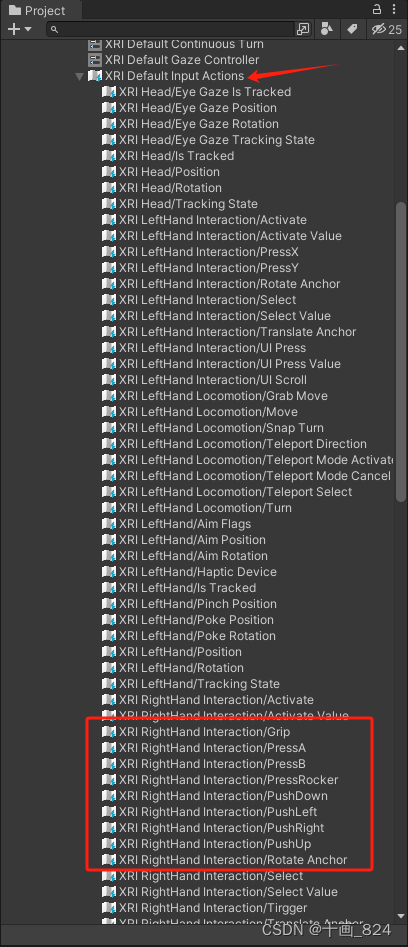
保存后就能在XRI Default Input Actions中看到相应的按钮事件项了。
二、代码编写
1、公开按钮变量
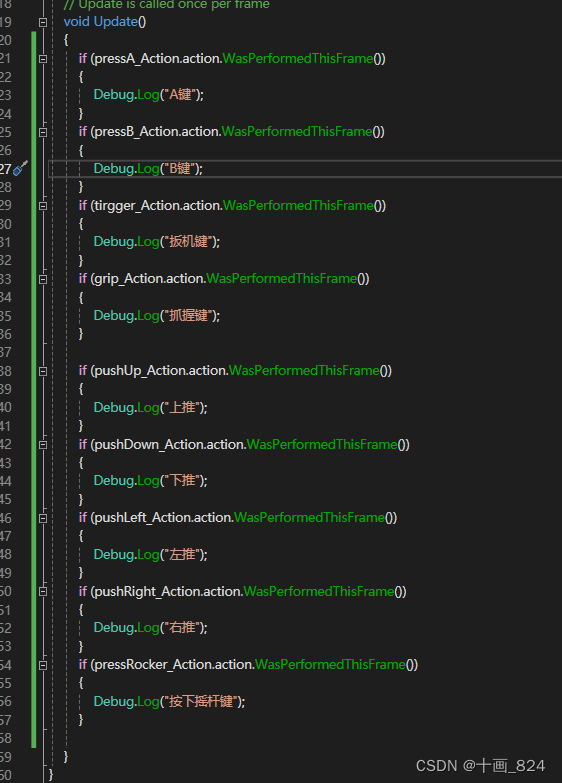
2、在Update中每帧检测
完整代码:
using System.Collections;
using System.Collections.Generic;
using UnityEngine;
using UnityEngine.InputSystem;

public class HandControllerTest : MonoBehaviour
{
    public InputActionReference tirgger_Action;
    public InputActionReference grip_Action;
    public InputActionReference pressA_Action;
    public InputActionReference pressB_Action;
    public InputActionReference pushUp_Action;
    public InputActionReference pushDown_Action;
    public InputActionReference pushLeft_Action;
    public InputActionReference pushRight_Action;
    public InputActionReference pressRocker_Action;

    // Update is called once per frame
    void Update()
    {
        if (pressA_Action.action.WasPerformedThisFrame())
        {
            Debug.Log("A键");
        }
        if (pressB_Action.action.WasPerformedThisFrame())
        {
            Debug.Log("B键");
        }
        if (tirgger_Action.action.WasPerformedThisFrame())
        {
            Debug.Log("扳机键");
        }
        if (grip_Action.action.WasPerformedThisFrame())
        {
            Debug.Log("抓握键");
        }

        if (pushUp_Action.action.WasPerformedThisFrame())
        {
            Debug.Log("上推");
        }
        if (pushDown_Action.action.WasPerformedThisFrame())
        {
            Debug.Log("下推");
        }
        if (pushLeft_Action.action.WasPerformedThisFrame())
        {
            Debug.Log("左推");
        }
        if (pushRight_Action.action.WasPerformedThisFrame())
        {
            Debug.Log("右推");
        }
        if (pressRocker_Action.action.WasPerformedThisFrame())
        {
            Debug.Log("按下摇杆键");
        }

    }
}
3、外部赋值
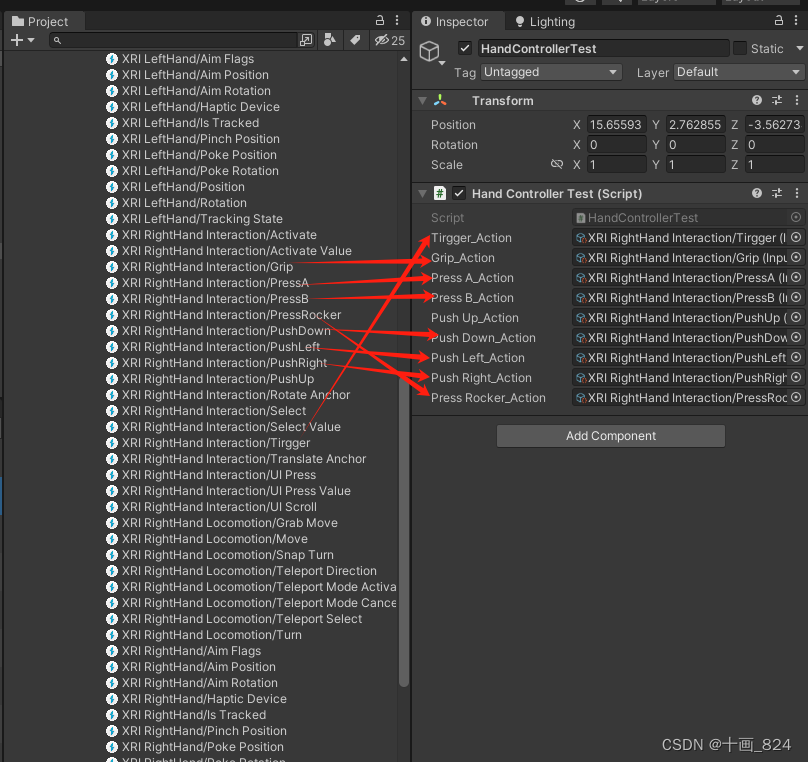
这样就可以了,运行设备测试看看吧!
4、测试结果

5、第二种代码编写方式
使用注册事件的方式添加,可根据个人需求使用。
using System;
using System.Collections;
using System.Collections.Generic;
using UnityEngine;
using UnityEngine.InputSystem;

public class HandControllerTest : MonoBehaviour
{
    public InputActionReference tirgger_Action;

    private void OnEnable()
    {
        SetupInteractorEvents();
    }
    private void OnDisable()
    {
        TeardownInteractorEvents();
    }
    void SetupInteractorEvents()
    {
        var teleportModeActivateAction = GetInputAction(tirgger_Action);
        if (teleportModeActivateAction != null)
        {
            teleportModeActivateAction.performed += OnDownTirggerAction;
        }
    }
    void TeardownInteractorEvents()
    {
        var teleportModeActivateAction = GetInputAction(tirgger_Action);
        if (teleportModeActivateAction != null)
        {
            teleportModeActivateAction.performed -= OnDownTirggerAction;
        }

    }

    private void OnDownTirggerAction(InputAction.CallbackContext context)
    {
        Debug.Log("按下扳机键");
    }

    static InputAction GetInputAction(InputActionReference actionReference)
    {
#pragma warning disable IDE0031 // Use null propagation -- Do not use for UnityEngine.Object types
        return actionReference != null ? actionReference.action : null;
#pragma warning restore IDE0031
    }
三、常见问题排查
1、检查手柄是否开机,是否正常连接至电脑,是否有电。
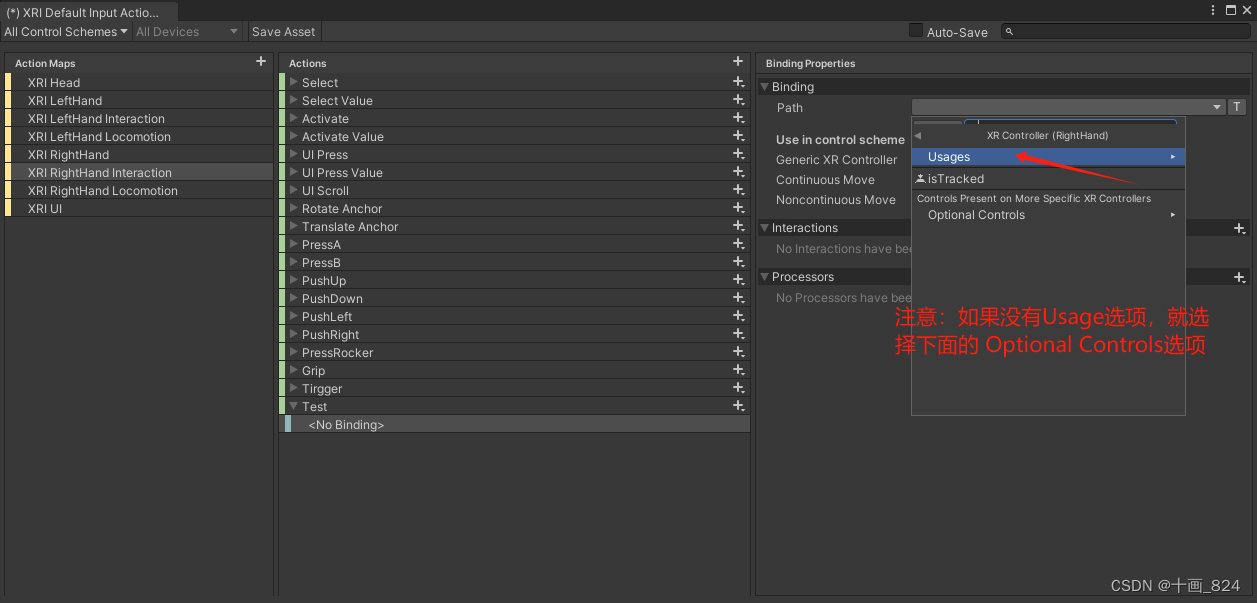
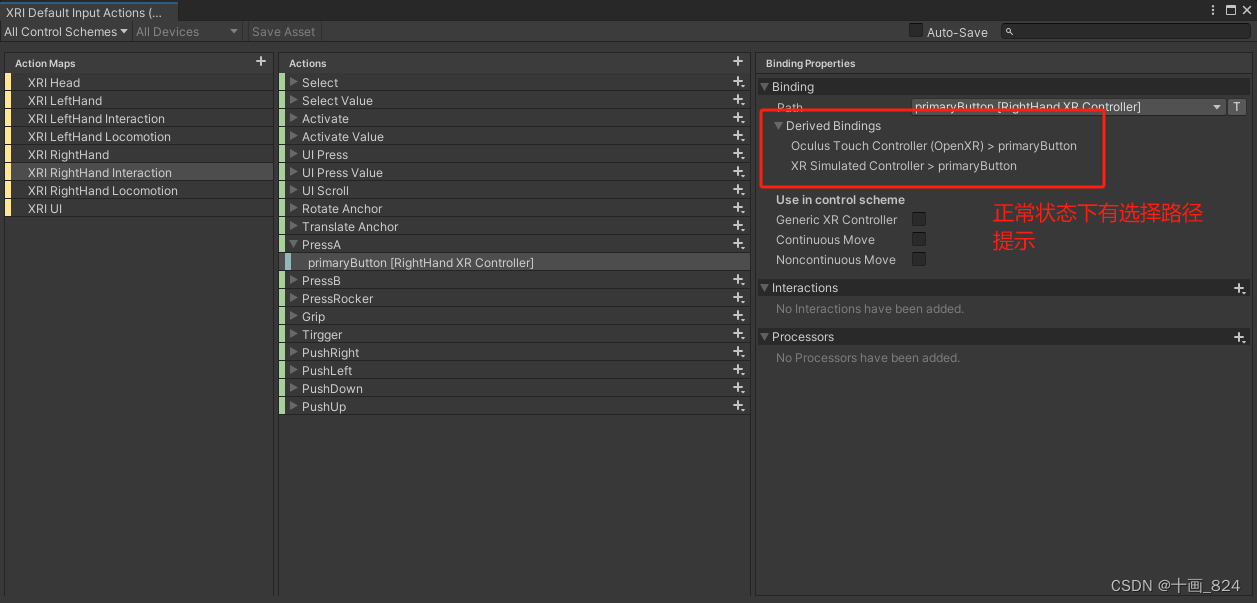
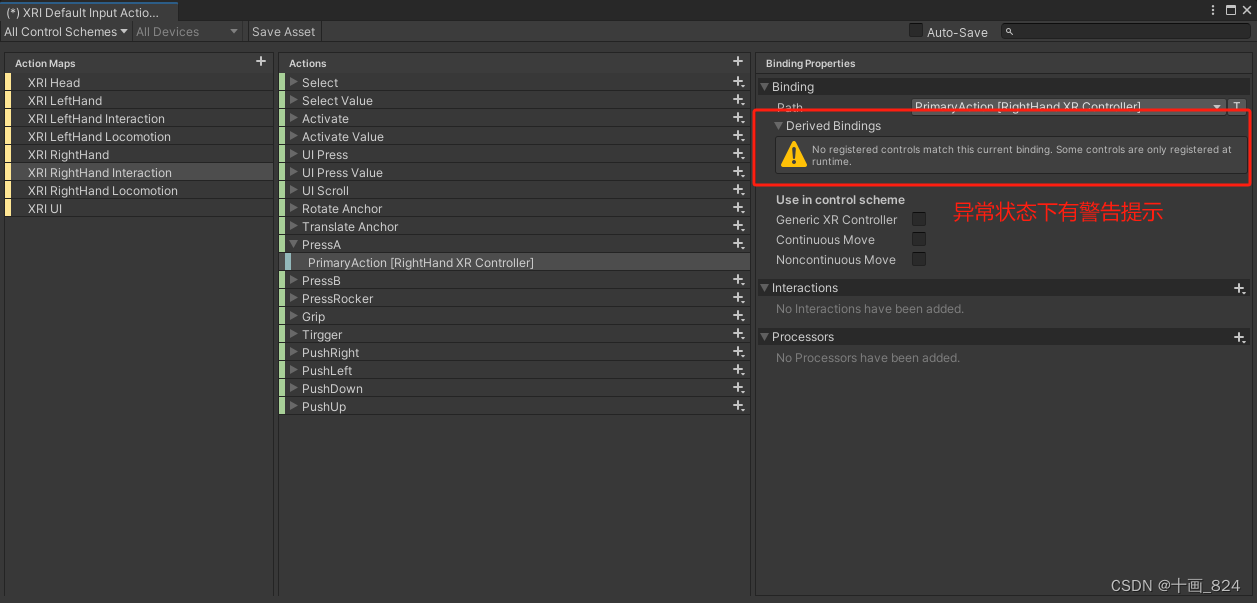
2、检查Derived Binding下是否有警告标识,如果有警告标识,则重新选择一下,或者从Usage选项切换到Optional Controls选项。 如下图:
3、检查触发事件是不是未添加或者添加位置错误。


 1687
1687

 被折叠的 条评论
为什么被折叠?
被折叠的 条评论
为什么被折叠?
 到【灌水乐园】发言


