


本篇主要介绍ViT的编码实现,想要了解ViT大模型概念的可以看之前的一篇:VIT大模型浅要了解_vit layer-CSDN博客
一、ViT模型主要构成:
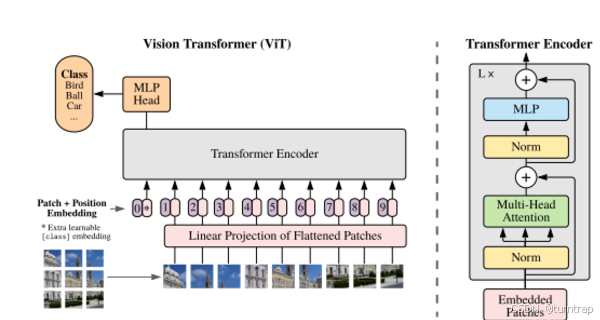
ViT大模型主要包括图形块嵌入模块和多头注意力模块,实际上就是将图像处理成序列形式之后输入一个只有编码器的Transformer架构的模型。
二、各部分实现:
1、图像嵌入:
该部分主要是一个卷积层为patch_size,步长为patch_size的卷积层,可以将输入[batch_size,num_channels,height,width]映射为[batch_size,hidden_size,height//patch_size,width//pathch_size],该部分主要实现的是vit-base-patch16-224模型,因此,输入图像的尺寸均为224x224,不满足条件的图像需要先经过处理,得到的输出为[batch_size,768,14,14],之后再把后面两维压缩得到[batch_size,768,196],再将后面两维交换位置得到[batch_size,196,768],这样是不是很熟悉,这句诗seq2seq模型的输入嘛,具体实现:
class vitPatchEmbeddings(nn.Module):

    def __init__(self, hidden_size=768, num_channels=3, patch_size=16, image_size=224):
        super().__init__()
        image_size, patch_size = image_size, patch_size
        num_channels, hidden_size = num_channels, hidden_size

        image_size = image_size if isinstance(image_size, collections.abc.Iterable) else (image_size, image_size)
        patch_size = patch_size if isinstance(patch_size, collections.abc.Iterable) else (patch_size, patch_size)
        num_patches = (image_size[1] // patch_size[1]) * (image_size[0] // patch_size[0])
        self.image_size = image_size
        self.patch_size = patch_size
        self.num_channels = num_channels
        self.num_patches = num_patches

        self.projection = nn.Conv2d(num_channels, hidden_size, kernel_size=patch_size, stride=patch_size)

    def forward(self, pixel_values: torch.Tensor, interpolate_pos_encoding: bool = False) -> torch.Tensor:
        batch_size, num_channels, height, width = pixel_values.shape
        if num_channels != self.num_channels:
            raise ValueError(
                "Make sure that the channel dimension of the pixel values match with the one set in the configuration."
                f" Expected {self.num_channels} but got {num_channels}."
            )
        if not interpolate_pos_encoding:
            if height != self.image_size[0] or width != self.image_size[1]:
                raise ValueError(
                    f"Input image size ({height}*{width}) doesn't match model"
                    f" ({self.image_size[0]}*{self.image_size[1]})."
                )
        embeddings = self.projection(pixel_values).flatten(2).transpose(1, 2)
        return embeddings
2、输入嵌入
上节提到的图像嵌入只是输入嵌入的一部分,该部分我们还要实现位置编码、标识符以及适应不同尺寸的图像。
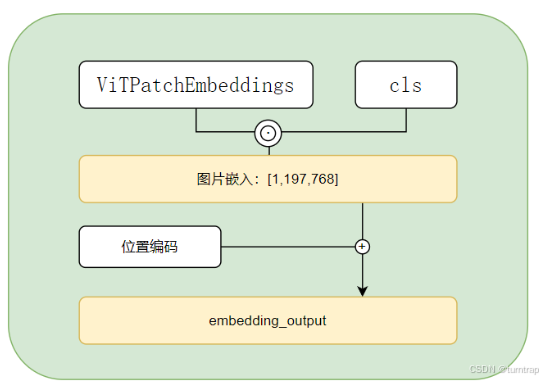
位置编码这部分原作者写的很清楚、不管是一维位置编码还是二维位置编码对最后的结果影响不大,因此只需要使用一维可学习参数即可,此外,原作者在图像分类任务中借鉴BERT的思想,加入cls_token(加在图像嵌入的前面,使得张量形状为[batch_size,196+1,768])来获取整个图像的信息以便于最后进行分类输出,为什么它可以表示整个图像的信息呢,答案是全局注意力机制。
此外,如果要预测尺寸不是224x224的图像,那么原本训练好的224x224的位置编码就不适用了,就需要对原本的位置编码进行插值处理,需要先将位置编码中属于图像位置编码的部分取出(因为位置编码还包括了cls_token的编码),之后将[batch_size,196,768]恢复成[batch_size,768,14,14],之后采用双三次插值(bicubic interpolation)对位置编码进行插值,以匹配新的高度和宽度。最后调整形状为[batch_size,196,768],与cls_token的编码拼接返回。具体实现为:
class vitEmbeddings(nn.Module):
    def __init__(self, hidden_size=768, hidden_dropout_prob=0., patch_size=16, image_size=224, num_channels=3,
                 use_mask_token: bool = False) -> None:
        super().__init__()

        self.cls_token = nn.Parameter(torch.randn(1, 1, hidden_size))
        self.mask_token = nn.Parameter(torch.zeros(1, 1, hidden_size)) if use_mask_token else None
        self.patch_embeddings = vitPatchEmbeddings(hidden_size, num_channels, patch_size, image_size)
        num_patches = self.patch_embeddings.num_patches
        self.position_embeddings = nn.Parameter(torch.randn(1, num_patches + 1, hidden_size))
        self.dropout = nn.Dropout(hidden_dropout_prob)
        self.patch_size = patch_size

    def interpolate_pos_encoding(self, embeddings: torch.Tensor, height: int, width: int) -> torch.Tensor:

        num_patches = embeddings.shape[1] - 1
        num_positions = self.position_embeddings.shape[1] - 1

        # always interpolate when tracing to ensure the exported model works for dynamic input shapes
        if not torch.jit.is_tracing() and num_patches == num_positions and height == width:
            return self.position_embeddings

        class_pos_embed = self.position_embeddings[:, :1]
        patch_pos_embed = self.position_embeddings[:, 1:]

        dim = embeddings.shape[-1]

        new_height = height // self.patch_size
        new_width = width // self.patch_size

        sqrt_num_positions = torch_int(num_positions ** 0.5)
        patch_pos_embed = patch_pos_embed.reshape(1, sqrt_num_positions, sqrt_num_positions, dim)
        patch_pos_embed = patch_pos_embed.permute(0, 3, 1, 2)

        patch_pos_embed = nn.functional.interpolate(
            patch_pos_embed,
            size=(new_height, new_width),
            mode="bicubic",
            align_corners=False,
        )

        patch_pos_embed = patch_pos_embed.permute(0, 2, 3, 1).view(1, -1, dim)

        return torch.cat((class_pos_embed, patch_pos_embed), dim=1)

    def forward(
            self,
            pixel_values: torch.Tensor,
            bool_masked_pos: Optional[torch.BoolTensor] = None,
            interpolate_pos_encoding: bool = False,
    ) -> torch.Tensor:
        batch_size, num_channels, height, width = pixel_values.shape
        embeddings = self.patch_embeddings(pixel_values, interpolate_pos_encoding=interpolate_pos_encoding)

        if bool_masked_pos is not None:
            seq_length = embeddings.shape[1]
            mask_tokens = self.mask_token.expand(batch_size, seq_length, -1)
            # replace the masked visual tokens by mask_tokens
            mask = bool_masked_pos.unsqueeze(-1).type_as(mask_tokens)
            embeddings = embeddings * (1.0 - mask) + mask_tokens * mask

        # add the [CLS] token to the embedded patch tokens
        cls_tokens = self.cls_token.expand(batch_size, -1, -1)
        embeddings = torch.cat((cls_tokens, embeddings), dim=1)

        # add positional encoding to each token
        if interpolate_pos_encoding:
            embeddings = embeddings + self.interpolate_pos_encoding(embeddings, height, width)
        else:
            embeddings = embeddings + self.position_embeddings

        embeddings = self.dropout(embeddings)

        return embeddings
3、多头自注意力机制:
该部分使用最常见的使用方式实现即可:
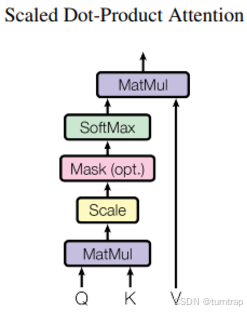
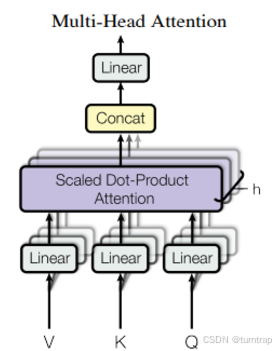
class MultiHeadAttention(nn.Module):
    def __init__(self,
                dim,
                num_heads=12,
                qkv_bias=True,
                qk_scale=None,
                attn_drop_ratio=0.,
                proj_drop_ratio=0.):

        # dim: 输入token的维度
        # num_heads: 注意力多头数量
        # qkv_bias: 是否使用偏置
        # qk_scale: 缩放因子
        # attn_drop_ratio: 注意力的比例
        # proj_drop_ratio: 投影的比例

        super(MultiHeadAttention, self).__init__()
        self.num_heads = num_heads
        head_dim = dim // num_heads  # 计算每一个头的维度
        self.scale = qk_scale or head_dim ** -0.5  # 得到根号d_k分之一的值
        self.qkv = nn.Linear(dim, dim * 3, bias=qkv_bias)  # 通过全连接层生成得到qkv
        self.attn_drop = nn.Dropout(attn_drop_ratio)
        self.proj = nn.Linear(dim, dim)
        self.proj_drop = nn.Dropout(proj_drop_ratio)

    def forward(self, x):

        # x: 输入序列
        #return: 处理后的序列
        # [batch_size, num_patches + 1, total_embed_dim]
        B, N, C = x.shape

        # qkv(): -> [batch_size, num_patches + 1, 3 * total_embed_dim]
        # reshape: -> [batch_size, num_patches + 1, 3, num_heads, embed_dim_per_head]
        # permute: -> [3, batch_size, num_heads, num_patches + 1, embed_dim_per_head]
        qkv = self.qkv(x).reshape(B, N, 3, self.num_heads, C // self.num_heads).permute(2, 0, 3, 1, 4)
        # [batch_size, num_heads, num_patches + 1, embed_dim_per_head]
        q, k, v = qkv[0], qkv[1], qkv[2]

        # transpose: -> [batch_size, num_heads, embed_dim_per_head, num_patches + 1]
        # @: multiply -> [batch_size, num_heads, num_patches + 1, num_patches + 1]
        attn = (q @ k.transpose(-2, -1)) * self.scale
        attn = attn.softmax(dim=-1)
        attn = self.attn_drop(attn)

        # @: multiply -> [batch_size, num_heads, num_patches + 1, embed_dim_per_head]
        # transpose: -> [batch_size, num_patches + 1, num_heads, embed_dim_per_head]
        # reshape: -> [batch_size, num_patches + 1, total_embed_dim]
        x = (attn @ v).transpose(1, 2).reshape(B, N, C)
        x = self.proj(x)
        x = self.proj_drop(x)
        return x
4、编码器:
编码器有12个编码器层,实现为:
class vitEncoder(nn.Module):
    def __init__(self, dim, num_hidden_layers=12) -> None:
        super().__init__()
        self.layer = nn.ModuleList([vitLayer(dim) for _ in range(num_hidden_layers)])

    def forward(self,hidden_states: torch.Tensor):
        for i, layer_module in enumerate(self.layer):
            layer_outputs = layer_module(hidden_states)
            hidden_states = layer_outputs[0]
        return (hidden_states,)
编码器层包括:
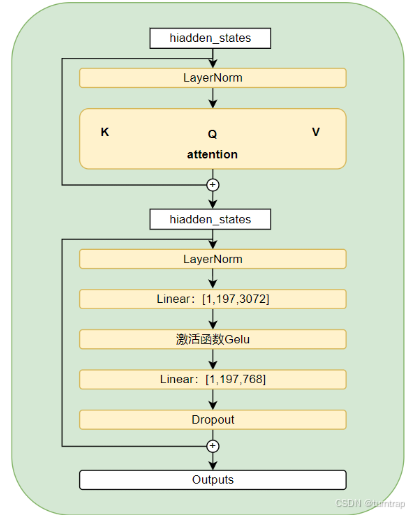
具体实现为:
class vitIntermediate(nn.Module):
    def __init__(self, hidden_size=768, mlp_ratio=4) -> None:
        super().__init__()
        intermediate_size = hidden_size * mlp_ratio
        self.dense = nn.Linear(hidden_size, intermediate_size)
        self.intermediate_act_fn = nn.GELU()

    def forward(self, hidden_states: torch.Tensor) -> torch.Tensor:
        hidden_states = self.dense(hidden_states)
        hidden_states = self.intermediate_act_fn(hidden_states)

        return hidden_states
class vitOutput(nn.Module):
def __init__(self, hidden_size=768, hidden_dropout_prob=0.0, mlp_ratio=4) -> None:
super().__init__()
intermediate_size = hidden_size * mlp_ratio
self.dense = nn.Linear(intermediate_size, hidden_size)
self.dropout = nn.Dropout(hidden_dropout_prob)
def forward(self, hidden_states: torch.Tensor, input_tensor: torch.Tensor) -> torch.Tensor:
hidden_states = self.dense(hidden_states)
hidden_states = self.dropout(hidden_states)
hidden_states = hidden_states + input_tensor
return hidden_statesclass vitLayer(nn.Module):
"""This corresponds to the Block class in the timm implementation."""
def __init__(self, dim, num_heads=12, qkv_bias=True, qk_scale=None, attn_drop_ratio=0., proj_drop_ratio=0.,
hidden_size=768, hidden_dropout_prob=0.0, mlp_ratio=4) -> None:
super().__init__()
self.seq_len_dim = 1
self.attention = MultiHeadAttention(dim, num_heads, qkv_bias, qk_scale, attn_drop_ratio, proj_drop_ratio)
self.intermediate = vitIntermediate(hidden_size, mlp_ratio)
self.output = vitOutput(hidden_size, hidden_dropout_prob, mlp_ratio)
self.layernorm_before = nn.LayerNorm(hidden_size, eps=1e-12)
self.layernorm_after = nn.LayerNorm(hidden_size, eps=1e-12)
def forward(
self,
hidden_states: torch.Tensor,
):
self_attention_outputs = self.attention(
self.layernorm_before(hidden_states),
)
attention_output = self_attention_outputs
# 第一次残差连接
hidden_states = attention_output + hidden_states
layer_output = self.layernorm_after(hidden_states)
layer_output = self.intermediate(layer_output)
# 第二次残差连接
layer_output = self.output(layer_output, hidden_states)
outputs = (layer_output,)
return outputs5、整体模型实现:
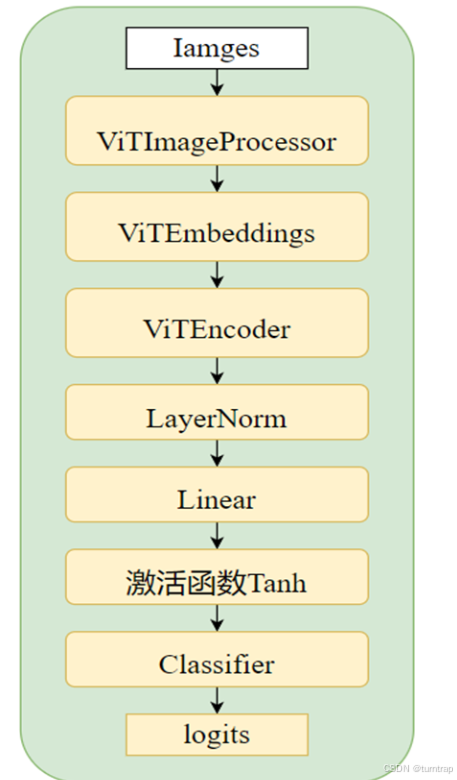
class vitForImageClassification(nn.Module):
    def __init__(self, num_labels=10, hidden_size=768, hidden_dropout_prob=0., patch_size=16, image_size=224,
                 num_channels=3, use_mask_token: bool = False) -> None:
        super().__init__()
        self.num_labels = num_labels
        self.embeddings = vitEmbeddings(hidden_size, hidden_dropout_prob, patch_size, image_size, num_channels, use_mask_token)
        self.encoder = vitEncoder(dim=hidden_size, num_hidden_layers=12)
        self.layernorm = nn.LayerNorm(hidden_size, eps=1e-12)
        # 分类:
        self.classifier = nn.Linear(hidden_size, num_labels) if num_labels > 0 else nn.Identity()

        self.apply(self._init_weights)

    def _init_weights(self, module) -> None:
        if isinstance(module, (nn.Linear, nn.Conv2d)):
            # 线性层和卷积层的权重使用截断正态分布初始化
            torch.nn.init.trunc_normal_(module.weight, mean=0.0, std=0.02)
            if module.bias is not None:
                torch.nn.init.zeros_(module.bias)
        elif isinstance(module, nn.LayerNorm):
            # LayerNorm层的权重和偏置初始化
            torch.nn.init.ones_(module.weight)
            torch.nn.init.zeros_(module.bias)
        elif isinstance(module, vitEmbeddings):
            # Embeddings层的特殊初始化
            torch.nn.init.normal_(module.cls_token, std=0.02)
            torch.nn.init.normal_(module.position_embeddings, std=0.02)
            if module.mask_token is not None:
                torch.nn.init.normal_(module.mask_token, std=0.02)

    def forward(
            self,
            pixel_values: Optional[torch.Tensor] = None,
            labels: Optional[torch.Tensor] = None,
    ):
        if pixel_values is None:
            raise ValueError("You have to specify pixel_values")

        expected_dtype = self.embeddings.patch_embeddings.projection.weight.dtype
        if pixel_values.dtype != expected_dtype:
            pixel_values = pixel_values.to(expected_dtype)

        embedding_output = self.embeddings(pixel_values)
        encoder_outputs = self.encoder(embedding_output)
        sequence_outputs = encoder_outputs[0]
        sequence_outputs = self.layernorm(sequence_outputs)

        sequence_output = sequence_outputs[:, 0]  # 使用[CLS]token的输出

        logits = self.classifier(sequence_output)

        loss = None
        if labels is not None:
            loss_fct = CrossEntropyLoss()
            loss = loss_fct(logits.view(-1, self.num_labels), labels.view(-1))

        return {"loss": loss, "logits": logits} if loss is not None else {"logits": logits}
三、模型微调:
1、数据处理:
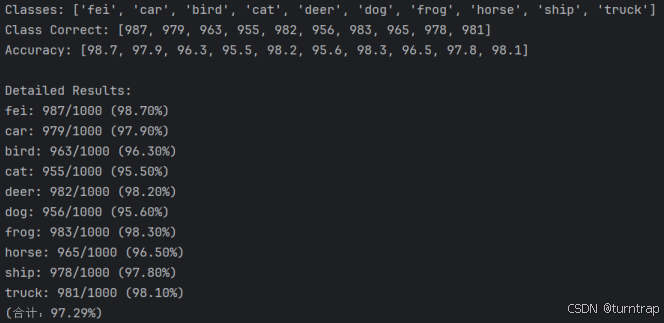
本篇使用CIFAR-10数据集,该数据集是一个常用的图像分类基准,包含 60000 张 32x32 的彩色图像,分为 10 个类别:飞机、汽车、鸟类、猫、鹿、狗、蛙类、马、船和卡车。每个类别 6000 张图像,其中 50000 张用于训练,10000 张用于测试。
本篇使用CIFAR-10数据集进行微调,将原本vit-base-patch16-224模型的1000个分类微调为10个,这里的data_path是我已经提前下载好的数据集地址,batch_size需要你根据自己的配置调整。
# 数据处理和加载数据集
transform = transforms.Compose([
    transforms.Resize((224, 224)),  # 因为vit需要224x224的输入
    transforms.ToTensor(),
    transforms.Normalize((0.5, 0.5, 0.5), (0.5, 0.5, 0.5))
])


def load_data(data_path):
    train_dataset = datasets.CIFAR10(root=data_path, train=True, download=True, transform=transform)
    test_dataset = datasets.CIFAR10(root=data_path, train=False, download=True, transform=transform)
    return train_dataset, test_dataset

itos = {k: v for k, v in enumerate(train_dataset.classes)}
stoi = {v: k for k, v in itos.items()}
train_loader = DataLoader(train_dataset, batch_size=32, shuffle=True, num_workers=4, pin_memory=True)
test_loader = DataLoader(test_dataset, batch_size=32, shuffle=False, num_workers=4, pin_memory=True)
2、加载模型:
model = ViTForImageClassification.from_pretrained(model_path, ignore_mismatched_sizes=True)这里的model_path是我提前下载好的huggingface的vit-base-patch16-224模型。
3、模型训练与验证:
def train(model, device, train_loader, optimizer, epoch, criterion, scaler):
    model.train()
    total_loss = 0
    for batch_idx, (data, target) in enumerate(train_loader):
        data, target = data.to(device), target.to(device)
        optimizer.zero_grad()

        # 使用 autocast 进行混合精度训练
        with autocast('cuda'):
            output= model(data)['logits']
            loss = criterion(output, target)
        # 使用 GradScaler 来缩放损失并进行反向传播
        scaler.scale(loss).backward()
        scaler.step(optimizer)
        scaler.update()

        total_loss += loss.item()
        if batch_idx % 100 == 0:
            current_avg_loss = total_loss / (batch_idx + 1)
            print(
                f'Train Epoch: {epoch} [{batch_idx * len(data)}/{len(train_loader.dataset)} ({100. * batch_idx / len(train_loader):.0f}%)]\tAVG_Loss: {current_avg_loss:.6f}')
def test(model, device, test_loader, criterion):
    model.eval()
    test_loss = 0
    correct = 0

    # 使用tqdm添加进度条
    with torch.no_grad(), tqdm(total=len(test_loader), desc='Evaluating') as pbar:
        for data, target in test_loader:
            data, target = data.to(device, non_blocking=True), target.to(device, non_blocking=True)
            output = model(data)['logits']
            test_loss += criterion(output, target).item()
            pred = output.argmax(dim=1, keepdim=True)
            correct += pred.eq(target.view_as(pred)).sum().item()
            pbar.update(1)

    test_loss /= len(test_loader.dataset)
    accuracy = 100. * correct / len(test_loader.dataset)
    print(f"Test loss: {test_loss:.4f}, Accuracy: {correct}/{len(test_loader.dataset)}:{accuracy:.2f}%")
    return accuracy
optimizer = optim.Adam(vit_patch16_224_model.parameters(), lr=1e-5, weight_decay=0.001)
criterion = nn.CrossEntropyLoss()
scaler = GradScaler() # 用于缩放梯度
for epoch in range(1, epoch + 1):
start_time = time.time()
train(vit_patch16_224_model, device, train_loader, optimizer, epoch, criterion, scaler)
end_time = time.time()
train_time = end_time - start_time
print(f"Train Epoch: {epoch} 运行耗时:{train_time}秒")
start_time = time.time()
acc=test(vit_patch16_224_model, device, test_loader, criterion)
end_time = time.time()
test_time = end_time - start_time
print(f"Train Epoch: {epoch} 测试耗时:{test_time}秒")4、5轮训练结果:
四、模型训练:
使用第二章自己搭建的模型自己训练:
1、数据处理:
还是使用CIFAR-10数据集,其实对于ViT大模型的训练来说,这个数据集有点太小,最后的训练结果也证明了这一点。
这里与微调训练不同,对数据进行了增强:
transform_train = transforms.Compose([
    transforms.Resize((224, 224)),
    transforms.RandomHorizontalFlip(p=0.5),
    transforms.RandomRotation(15),
    transforms.RandomCrop(224, padding=4),
    transforms.ColorJitter(brightness=0.2, contrast=0.2, saturation=0.2, hue=0.1),
    transforms.ToTensor(),
    transforms.Normalize(mean=(0.4914, 0.4822, 0.4465), std=(0.2023, 0.1994, 0.2010))
])

transform_test = transforms.Compose([
    transforms.Resize((224, 224)),
    transforms.ToTensor(),
    transforms.Normalize(mean=(0.4914, 0.4822, 0.4465), std=(0.2023, 0.1994, 0.2010))
])

def load_data(data_path='/home/jiayh/data/cifar10'):
    train_dataset = datasets.CIFAR10(root=data_path, train=True, download=True, transform=transform_train)
    test_dataset = datasets.CIFAR10(root=data_path, train=False, download=True, transform=transform_test)
    return train_dataset, test_dataset
为了加快训练,在这里使用了分布式训练,使用了4块A30来训练,因此需要做一些处理:
train_dataset, test_dataset = load_data()

# 创建分布式采样器
train_sampler = DistributedSampler(train_dataset)

train_loader = DataLoader(train_dataset,
                          batch_size=32,
                          sampler=train_sampler,  # 使用分布式采样器
                          num_workers=4,
                          pin_memory=True)

test_loader = DataLoader(test_dataset,
                         batch_size=512,
                         shuffle=False,
                         num_workers=4,
                         pin_memory=True)
2、加载模型:
model = vitForImageClassification()
model = model.to(device)

# 将模型包装为DDP模型
model = DDP(model, device_ids=[rank])
其中rank为进程,DDP是一种用于实现分布式训练的包装器,它可以将模型复制到多个GPU上,并且每个GPU上都有一个完整的模型副本。
3、模型训练与验证:
def train(model, device, train_loader, optimizer, epoch, criterion, scaler,rank):
    model.train()
    total_loss = 0
    for batch_idx, (data, target) in enumerate(train_loader):
        data, target = data.to(device), target.to(device)
        optimizer.zero_grad()

        with autocast('cuda'):
            output = model(data)['logits']
            loss = criterion(output, target)

        scaler.scale(loss).backward()
        scaler.step(optimizer)
        scaler.update()

        total_loss += loss.item()
        if batch_idx % 100 == 0:
            current_avg_loss = total_loss / (batch_idx + 1)
            if rank == 0:
                print(
                f'Train Epoch: {epoch} [{batch_idx * len(data)}/{len(train_loader.dataset)} ({100. * batch_idx / len(train_loader):.0f}%)]\tAVG_Loss: {current_avg_loss:.6f}')
def test(model, device, test_loader, criterion):
model.eval()
test_loss = 0
correct = 0
with torch.no_grad(), tqdm(total=len(test_loader), desc='Evaluating') as pbar:
for data, target in test_loader:
data, target = data.to(device, non_blocking=True), target.to(device, non_blocking=True)
output = model(data)['logits']
test_loss += criterion(output, target).item()
pred = output.argmax(dim=1, keepdim=True)
correct += pred.eq(target.view_as(pred)).sum().item()
pbar.update(1)
test_loss /= len(test_loader.dataset)
accuracy = 100. * correct / len(test_loader.dataset)
print(f"Test loss: {test_loss:.4f}, Accuracy: {correct}/{len(test_loader.dataset)}:{accuracy:.2f}%")
return accuracydef main(rank, world_size):
setup(rank, world_size)
print(f"Running on rank {rank}")
data_path = '你的数据集地址'
model_save_path = '你的模型要保存的地址'
# 设置当前进程的设备
torch.cuda.set_device(rank)
device = torch.device(f"cuda:{rank}")
epoch_num = 50
if rank == 0:
print('==> Preparing data...')
train_dataset, test_dataset = load_data()
# 创建分布式采样器
train_sampler = DistributedSampler(train_dataset)
train_loader = DataLoader(train_dataset,
batch_size=32,
sampler=train_sampler, # 使用分布式采样器
num_workers=4,
pin_memory=True)
test_loader = DataLoader(test_dataset,
batch_size=512,
shuffle=False,
num_workers=4,
pin_memory=True)
if rank == 0:
print('Building model...')
model = vitForImageClassification()
model = model.to(device)
# 将模型包装为DDP模型
model = DDP(model, device_ids=[rank])
optimizer = optim.Adam(model.parameters(), lr=1e-5, weight_decay=0.001)
criterion = nn.CrossEntropyLoss()
scaler = GradScaler()
best_acc = 0
best_epoch = 0
for epoch in range(1, epoch_num + 1):
train_sampler.set_epoch(epoch) # 确保每个epoch的数据顺序都不同
start_time = time.time()
train(model, device, train_loader, optimizer, epoch, criterion, scaler,rank)
end_time = time.time()
train_time = end_time - start_time
if rank == 0:
print(f"Train Epoch: {epoch} 运行耗时:{train_time}秒")
if rank == 0: # 只在主进程上进行测试和保存模型
start_time = time.time()
acc = test(model, device, test_loader, criterion)
end_time = time.time()
test_time = end_time - start_time
print(f"Train Epoch: {epoch} 测试耗时:{test_time}秒")
if acc > best_acc:
best_acc = acc
best_epoch = epoch
torch.save({
'epoch': epoch,
'model_state_dict': model.module.state_dict(), # 注意这里要用.module来获取原始模型
'optimizer_state_dict': optimizer.state_dict(),
'accuracy': acc,
}, model_save_path)
if rank == 0:
print('Finished Training')
print(f'Best Epoch: {best_epoch} Best Accuracy: {best_acc:.2f}%')
print('Finished!')
cleanup()def setup(rank, world_size):
os.environ['MASTER_ADDR'] = 'localhost'
os.environ['MASTER_PORT'] = '12355'
dist.init_process_group("nccl", rank=rank, world_size=world_size)
def cleanup():
dist.destroy_process_group()if __name__ == '__main__':
world_size = 4 # 使用4个GPU
available_gpus = [0, 1, 2, 3] # 可用的GPU列表
# 设置可见的GPU设备
os.environ["CUDA_VISIBLE_DEVICES"] = ",".join(map(str, available_gpus))
# 使用multiprocessing启动多个进程
mp.spawn(main,
args=(world_size,),
nprocs=world_size,
join=True)4、50轮训练结果:
一部分截图:
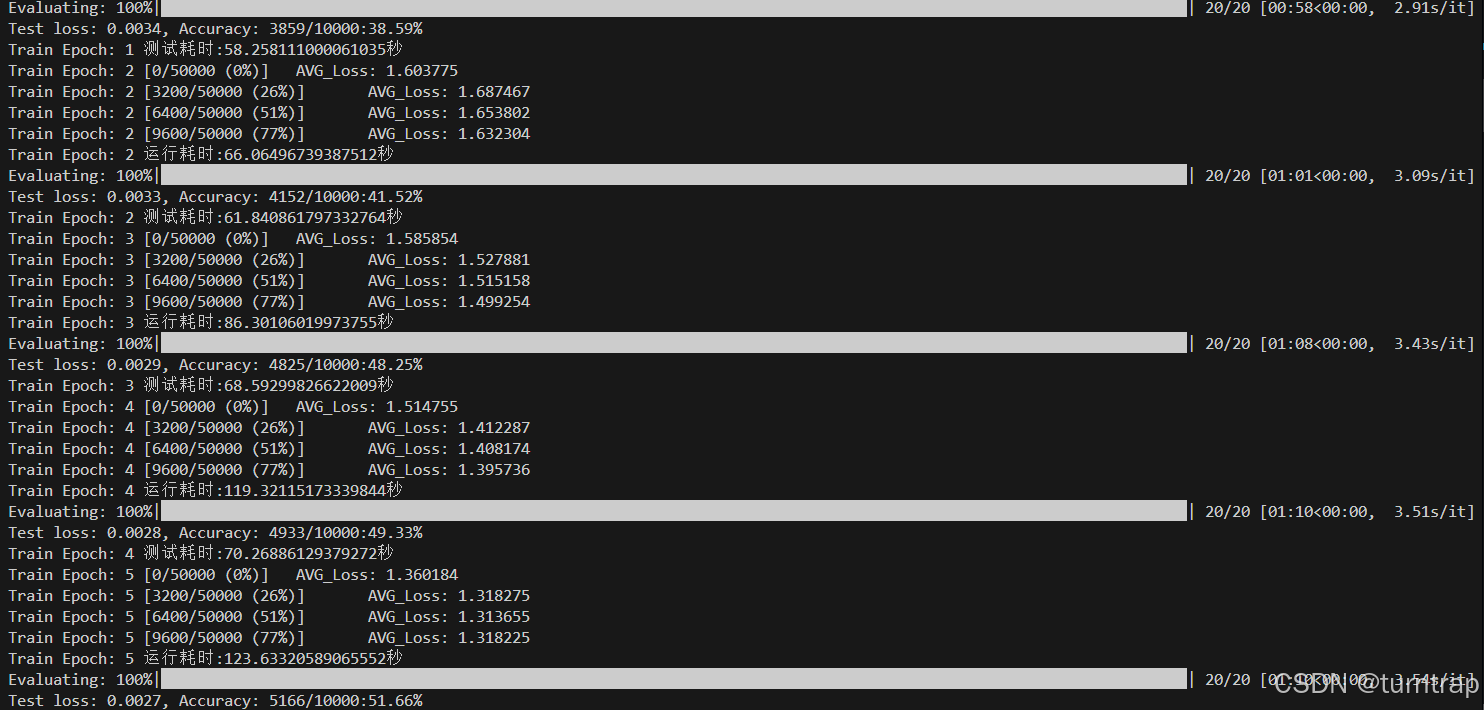
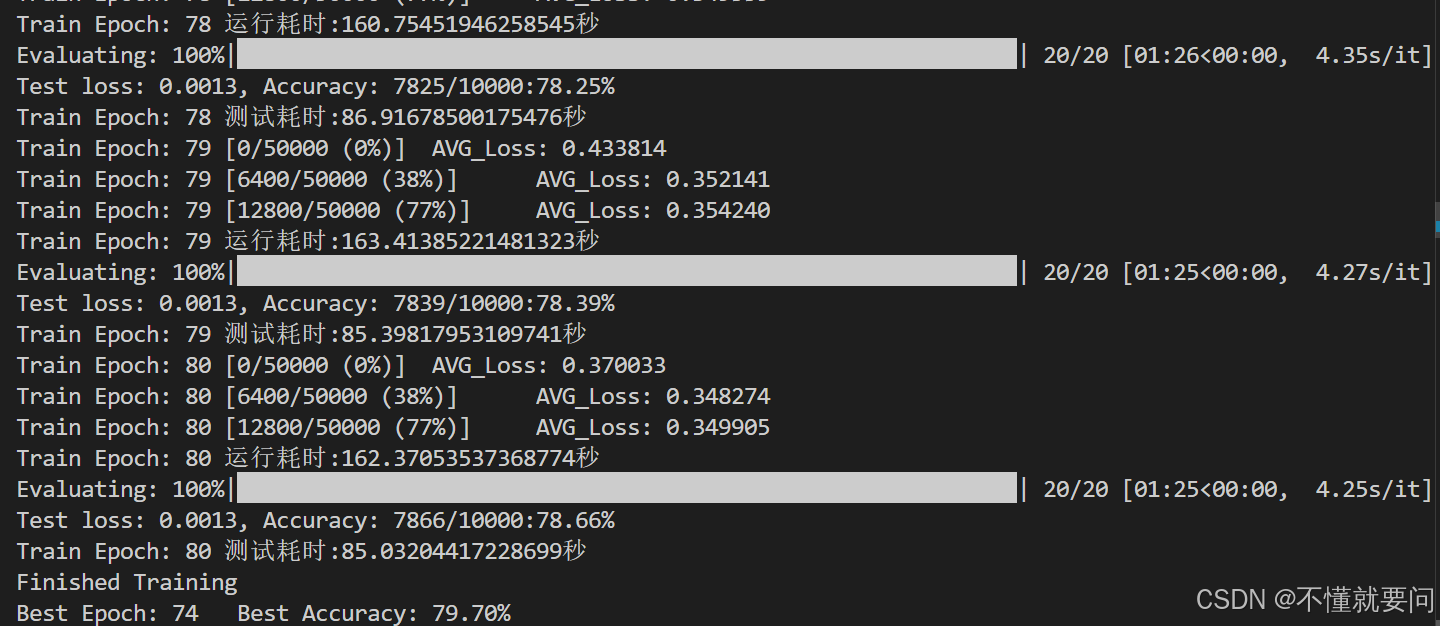
当训练了80轮时,准确率为79.70%,训练5轮准确率只有51.66%,相比于第三章微调的准确率差得多。要想提高准确率,要么使用更大的数据集、要么增加训练epoch、要么改进优化器。


 3742
3742

 被折叠的 条评论
为什么被折叠?
被折叠的 条评论
为什么被折叠?
 到【灌水乐园】发言


