


环境安装以及配置:
本文用来记录自己使用Python远程控制Vrep进行两轮小车,进行差速运动仿真。模拟小车沿二维码运动
Vrep配置
Vrep官网下载速度比较慢这里推荐网盘下载coppeliasim/vrep官网软件安装包(免费百度网盘链接)-CSDN博客
我ubuntu系统版本用的18.04,这里下载的是4.0版本的,经过测试最新的4.5版本在进行多台AGV控制的时候,出现了无法获取句柄。而且网上资料也多是旧版本的。
下载完之后解压,并配置环境
echo 'export VREP_ROOT="$HOME/V-REP_PRO_EDU_V3_5_0_Linux"' >> ~/.bashrc
source ~/.bashrc
ubuntu使用命令vrep打开软件
![]()
python配置:
需要在安装目录导出3个文件
如果Vrep3.6版本
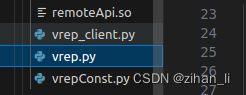
1.找到 vrep.py和 vrepConst.py两个文件
安装目录/programming/remoteApiBindings/python/python
2.找到编译文件
如果是ubuntu系统找到 remoteApi.so
在 安装目录/programming/remoteApiBindings/lib/lib/Linux/64Bit
如果是window系统找到 remoteApi.dll
在 安装目录/programming/remoteApiBindings/lib/lib/Windows/64Bit
如果Vrep4.0版本
1.找到 sim.py 和 simConst.py 两个文件
安装目录/programming/legacyRemoteApi/remoteApiBindings/python/python
2.找到编译文件
如果是ubuntu系统找到 remoteApi.so
在 安装目录/programming/legacyRemoteApi/remoteApiBindings/lib/lib/Ubuntu18_04
如果是window系统找到 remoteApi.dll
在 安装目录/programming/legacyRemoteApi/remoteApiBindings/lib/lib/Windows
将3个文件和你的脚本放在一起

Vrep软件操作:
打开软件后在左下角可以拉取模型

建模过程不做演示了,具体建模可以在B站看视频学习,我这里弄了12辆小车,地上的红色方块是建立的平面,用来模拟地面贴的二维码

在信息栏中可以看到小车的属性,python是用过这些属性对小车进行句柄控制

1.设置连接端口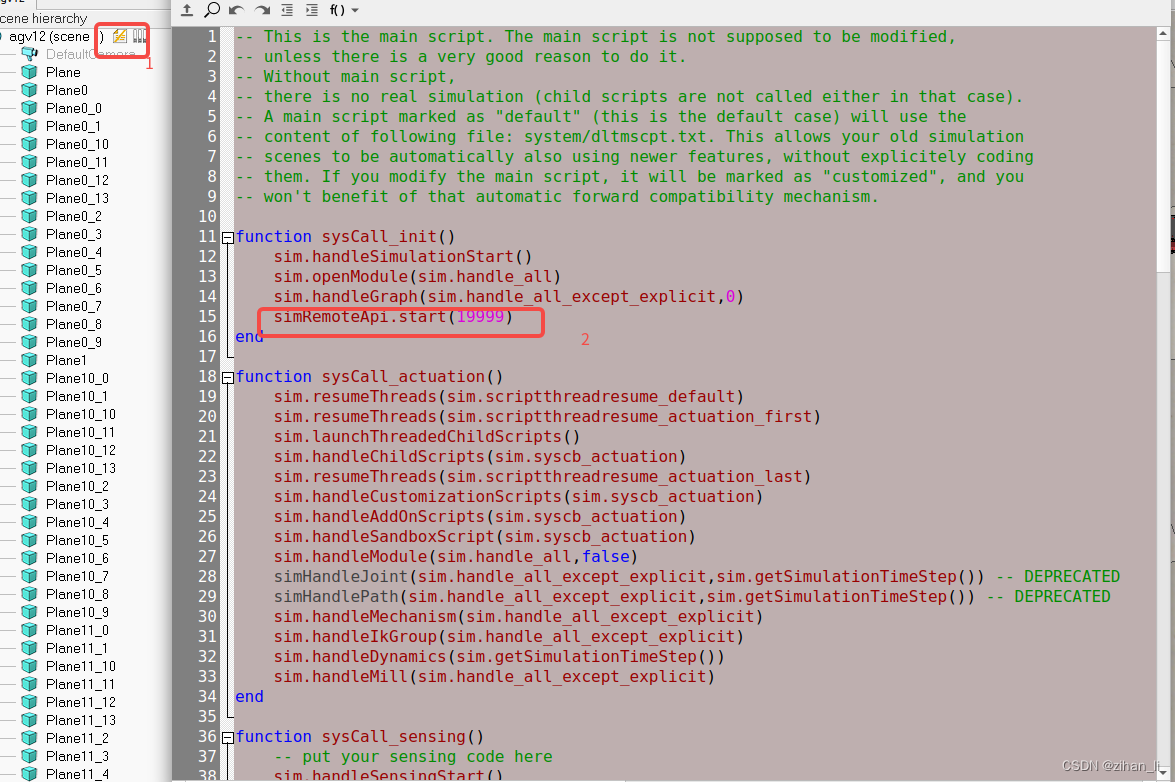
class VREP():
    def __init__(self) -> None:
        self.lock = threading.Lock()
        self.linear_velocity = 1
        self.speed = 0.026781272888183594  # m/s
        try:
            vrep.simxFinish(-1)  # 关掉之前连接
            self.clientID = vrep.simxStart(
                '127.0.0.1', 19997, True, True, 5000, 5)  # Connect to CoppeliaSim
            if self.clientID != -1:
                print('connect successfully')
            else:
                # Terminar este script
                sys.exit("[Error]:  no se puede conectar")
        except:
            print('[Error]: Check if CoppeliaSim is open')
        self.running = False
        # self.start_sim()
2.设置小车属性,多台小车名字需要不同,与代码中的小车名字要一致

每辆小车都有一个脚本,需要将脚本的disable打钩,否则在使用脚本控制的时候会发生冲突,启动仿真的时候小车会自动前进

更改小车轮子属性

在python脚本中使用simxGetObjectHandle函数获取句柄
获取小车和左右轮的句柄
    def creat_agv(self, i):
        """
        return agv = (agv1_handle,leftMotor1_handle, rightMotor1_handle)
        """
        _agv_name = "Pioneer_p3dx#"+str(i)
        _left_motor = "Pioneer_p3dx_leftMotor#"+str(i)
        _right_motor = "Pioneer_p3dx_rightMotor#"+str(i)

        agv = (self.get_handle(_agv_name),
               self.get_handle(_left_motor), self.get_handle(_right_motor))
        return agv
def get_handle(self, name):
with self.lock:
e, handle = vrep.simxGetObjectHandle(
self.clientID, name, vrep.simx_opmode_oneshot_wait)
if e != 0:
print("[Error]: get {} handle error !!!".format(name))
return handle至此Vrep相关配置已经完成。
Python接口介绍:
写一个vrep_client.py和导入的3个脚本放在一起
from . import vrep
import threading
import time
import numpy as np
import sys
class VREP():
def __init__(self) -> None:
self.lock = threading.Lock()
self.linear_velocity = 1
self.speed = 0.026781272888183594 # m/s
try:
vrep.simxFinish(-1) # 关掉之前连接
self.clientID = vrep.simxStart(
'127.0.0.1', 19997, True, True, 5000, 5) # Connect to CoppeliaSim
if self.clientID != -1:
print('connect successfully')
else:
# Terminar este script
sys.exit("[Error]: no se puede conectar")
except:
print('[Error]: Check if CoppeliaSim is open')
self.running = False
# self.start_sim()
def __del__(self):
# if self.clientID:
# 断开与V-REP仿真的连接
self.running = False
vrep.simxStopSimulation(
self.clientID, vrep.simx_opmode_blocking) # 关闭仿真
vrep.simxFinish(self.clientID)
time.sleep(1) # 仿真开启延时5s
vrep.simxFinish(-1) # 关闭连接
def start_sim(self):
with self.lock:
res = vrep.simxStartSimulation(
self.clientID, vrep.simx_opmode_oneshot_wait)
if res == vrep.simx_return_ok:
self.running = True
print("仿真环境已启动")
else:
print("[Error]: 仿真环境启动失败")
def finish_sim(self):
with self.lock:
vrep.simxStopSimulation(
self.clientID, vrep.simx_opmode_blocking) # 关闭仿真
self.running = False
    def get_handle(self, name):
        with self.lock:
            e, handle = vrep.simxGetObjectHandle(
                self.clientID, name, vrep.simx_opmode_oneshot_wait)
            if e != 0:
                print("[Error]: get {} handle error !!!".format(name))
            return handle
def stop_sim(self):
with self.lock:
res = vrep.simxStopSimulation(
self.clientID, vrep.simx_opmode_oneshot)
if res == vrep.simx_return_ok:
print("仿真环境已关闭")
else:
print("[Error]: 仿真环境关闭失败")
def get_pose(self, handle):
"""
agv_name: handle
return : agv pose [x, y, z]
"""
with self.lock:
e, res = vrep.simxGetObjectPosition(
self.clientID, handle, -1, vrep.simx_opmode_oneshot_wait)
if e != 0:
return [None, None, None]
else:
return res
def get_ori(self, handle):
with self.lock:
e, res = vrep.simxGetObjectOrientation(
self.clientID, handle, -1, vrep.simx_opmode_blocking)
if e != 0:
return [None, None, None]
else:
return np.rad2deg(res)
def get_joint(self, handle):
with self.lock:
e, res = vrep.simxGetJointPosition(
self.clientID, handle, vrep.simx_opmode_oneshot_wait)
if e != 0:
return [None, None, None]
else:
return res
def get_obj_matrix(self, obj_name):
with self.lock:
_, obj_handle = vrep.simxGetObjectHandle(
self.clientID, obj_name, vrep.simx_opmode_oneshot_wait)
return vrep.getObjectMatrix(obj_handle)
def set_joint_velocity(self, handle, speed):
with self.lock:
res = vrep.simxSetJointTargetVelocity(
self.clientID, handle, speed, vrep.simx_opmode_oneshot)
运动控制:
两轮小车其实是用的一个差速控制,其实就是通过给两个轮子不同的速度让他进行运动,这里就不进行赘述了,具体可以参照
奔驰的战猪 两轮差速机器人运动学模型_两轮差速运动学模型-CSDN博客
python控制接口,通过函数set_joint_velocity进行速度控制,传入两个轮子不同的句柄。
    def run(self, agv_num, lspeed, rspeed):
        """
        speed:     0.029628699166434153 m/s
                或 0.3070062009269009 弧度/s
                或 17.59015959745676 角度/s

        轮子直径: 0.19411166926398632
        """
        left_motor_handle = self.agvs[agv_num][1]
        right_motor_handle = self.agvs[agv_num][2]
        r_res = self.set_joint_velocity(right_motor_handle, rspeed)
        l_res = self.set_joint_velocity(left_motor_handle, lspeed)
Pid部分:
小车在运动的时候受外界因素的影响,需要进行pid控制
class PIDControl:
    def __init__(self, Kp=0.25, Ki=0.0, Kd=0.1, integral_upper_limit=20, integral_lower_limit=-20):
        self.Kp = Kp  #影响相应速度
        self.Ki = Ki  #补偿
        self.Kd = Kd  #消除震荡
        self.integral_upper_limit = integral_upper_limit
        self.integral_lower_limit = integral_lower_limit
        self.prev_error = 0
        self.integral = 0

    def update(self, setpoint, actual_position, dt):
        error = setpoint - actual_position
        self.integral += error * dt
        derivative = self.Kd * (error - self.prev_error) / dt
        self.prev_error = error
        proportional = self.Kp * error
        integral = self.Ki * self.clip(self.integral, self.integral_lower_limit, self.integral_upper_limit)
        control_increment = proportional + derivative + integral
        print("[PID]: 比例:{:.3f}, 积分:{:.3f}, 微分:{:.3f}, error:{:.3f}, p: {:.3f}"\
            .format(proportional,integral, derivative,error,control_increment))
        return control_increment

    @staticmethod
    def clip(value, lower_limit, upper_limit):
        if value < lower_limit:
            # print(f"lower_limit:{lower_limit}, upper_limit:{upper_limit}")
            return lower_limit
        elif value > upper_limit:
            # print(f"lower_limit:{lower_limit}, upper_limit:{upper_limit}")
            return upper_limit
        else:
            return value

    def clear(self):
        self.integral = 0
        self.prev_error = 0
直线运动调用,根据目标的位置和小车的当前角度差进行修正小车方向,
    def move_l(self, agv_num, tar_pose, s=5, e=0.1, rate=0.01):
        pid = PIDControl(0.05, 0.02, 0.0, 5,-5)
        print(f"[Dispath]:agv-{agv_num} runing new potint--target:{tar_pose}")
        time_start = time.time()
        distance = 100
        agv_handle = self.agvs[agv_num][0]
        car_pose = self.get_pose(agv_handle)
        car_angle = self.get_ori(agv_handle)[2]
        car_radians = np.radians(car_angle)
        rotation_matrix = np.array([[np.cos(car_radians), -np.sin(car_radians), 0],
                                    [np.sin(car_radians), np.cos(car_radians), 0],
                                    [0, 0, 1]])
        vector_ = np.array(
            [tar_pose[0] - car_pose[0], tar_pose[1] - car_pose[1], 0])
        # 将向量差转换到B坐标系中
        transformed_vector = np.dot(rotation_matrix.T, vector_)
        dif_angle = np.degrees(np.arctan2(
                    transformed_vector[1], transformed_vector[0]))
        while distance > e:
            time.sleep(rate)
            car_pose = self.get_pose(agv_handle)
            car_angle = self.get_ori(agv_handle)[2]
            car_radians = np.radians(car_angle)
            rotation_matrix = np.array([[np.cos(car_radians), -np.sin(car_radians), 0],
                                        [np.sin(car_radians), np.cos(car_radians), 0],
                                        [0, 0, 1]])
            vector_ = np.array(
                [tar_pose[0] - car_pose[0], tar_pose[1] - car_pose[1], 0])
            # 将向量差转换到B坐标系中
            transformed_vector = np.dot(rotation_matrix.T, vector_)
            # 计算旋转角度(方位角度)
            dif_angle = np.degrees(np.arctan2(
                    transformed_vector[1], transformed_vector[0]))
            # TODO use pid
            distance = np.linalg.norm(vector_)
            p = pid.update(0, dif_angle, rate)
            print(f"[AGV] movel====>> pid: {p},tar_angle: {0}, dif_angle: {dif_angle}, distanc:{distance} \n")
            #   减速
            if distance < 0.5:
                print(f"[AGV] movel==== 0.5 distance:{distance}")
                self.run(agv_num, (s+p)/2, (s-p)/2)
            elif distance < 0.1:
                print(f"[AGV] movel==== 0.5 distance:{distance}")
                self.run(agv_num, (s+p)/3, (s-p)/3)
            else:
                self.run(agv_num, s+p, s-p)
        self.run(agv_num, 0, 0)
        # time.sleep(1)
        return time.time() - time_start
原地旋转,传参为最终目标角,也就是世界坐标系角度。例如tar_angle=180,将车头转向世界坐标系的180。
    def move_c(self, agv_num, tar_angle, e=0.25, rate=0.01):
        pid = PIDControl(Kp=0.05, Ki=0.0, Kd=0.0005)
        time_start = time.time()
        cur_angle = self.get_ori(self.agvs[agv_num][0])[2]
        tar_matrix = R.from_euler('xyz', [0,0,tar_angle], degrees=True).as_matrix()
        while abs(tar_angle - cur_angle) > e:
            time.sleep(rate)
            cur_angle = self.get_ori(self.agvs[agv_num][0])[2]
            cur_rotation_matrix = R.from_euler('xyz', [0,0,cur_angle], degrees=True).as_matrix()
            C = np.dot(np.linalg.inv(tar_matrix), cur_rotation_matrix)
            yaw = R.from_matrix(C).as_euler('xyz')
            yaw = np.degrees(yaw)[-1]
            vl = pid.update(0, yaw, rate)
            print("[AGV] movec vl:{:.3f}, 误差角:{:.3f}, tar_angle:{:.3f}, cur_angle:{:.3f}\n"\
                .format(vl, yaw,tar_angle,cur_angle))
            self.run(agv_num, -vl, vl)
        self.run(agv_num, 0, 0)
        pid.clear()
        return time.time() - time_start
原地旋转,传参为沿自身偏转角。例如tar_angle=90,将车头逆时针旋转90度。
    def move_offset_c(self, agv_num, angle, e=0.5, rate=0.01):
        pid = PIDControl(Kp=0.05, Ki=0.0, Kd=0.0005)
        time_start = time.time()
        cur_angle = self.get_ori(self.agvs[agv_num][0])[2]
        cur_rotation_matrix = R.from_euler('xyz', [0,0,cur_angle], degrees=True).as_matrix()
        angle_matrix = R.from_euler('xyz', [0,0,angle], degrees=True).as_matrix()
        tar_matrix = np.dot(cur_rotation_matrix,angle_matrix)
        tar_angle = R.from_matrix(tar_matrix).as_euler('xyz')[-1]
        yaw = 10
        while abs(yaw) > e:
            time.sleep(rate)
            cur_angle = self.get_ori(self.agvs[agv_num][0])[2]
            cur_rotation_matrix = R.from_euler('xyz', [0,0,cur_angle], degrees=True).as_matrix()
            C = np.dot(np.linalg.inv(tar_matrix), cur_rotation_matrix)
            yaw = R.from_matrix(C).as_euler('xyz')
            yaw = np.degrees(yaw)[-1]
            vl = pid.update(0, yaw, rate)
            print("[AGV] movec vl:{:.3f}, 误差角:{:.3f}, tar_angle:{:.3f}, cur_angle:{:.3f}\n"\
                .format(vl, yaw,tar_angle,cur_angle))
            self.run(agv_num, -vl, vl)
        self.run(agv_num, 0, 0)
        pid.clear()
        return time.time() - time_start


 2846
2846


 被折叠的 条评论
为什么被折叠?
被折叠的 条评论
为什么被折叠?
 到【灌水乐园】发言


