


/

Hybrid Renderer provides systems and components for rendering ECS entities. Hybrid Renderer is not a render pipeline: it is a system that collects the data necessary for rendering ECS entities, and sends this data to Unity's existing rendering architecture.
The Universal Render Pipeline (URP) and High Definition Render Pipeline (HDRP) are responsible for authoring the content and defining the rendering passes.
DOTS technology is in preview. If your Project aims to be production ready in 2021, the GameObject-based technology stack is much more suitable.
Requirements
For information about Hybrid Renderer's requirements, see Requirements and compatibility.
Getting started with Hybrid Renderer
For information on getting started with Hybrid Renderer, see the Getting started section.
Requirements and compatibility
This page contains information on system requirements and compatibility of the Hybrid Renderer package.
Hybrid Renderer render pipeline compatibility
The following table shows the compatibility of Hybrid Renderer with different render pipelines.
| Render pipeline | Compatibility |
|---|---|
| Built-in Render Pipeline | Not supported |
| High Definition Render Pipeline (HDRP) | HDRP version 9.0.0 and above, with Unity 2020.1 and above |
| Universal Render Pipeline (URP) | URP version 9.0.0 and above, with Unity 2020.1 and above |
Unity Player system requirements
This section describes the Hybrid Renderer package’s target platform requirements. For platforms or use cases not covered in this section, general system requirements for the Unity Player apply.
For more information, see System requirements for Unity.
Currently, Hybrid Renderer does not support desktop OpenGL or GLES. For Android and Linux, you should use Vulkan. However, be aware that the Vulkan drivers on many older Android devices are in a bad shape and will never be upgraded. This limits the platform coverage Hybrid Renderer can currently offer on Android devices. OpenGL and GLES3.1 support are planned for a future version of Hybrid Renderer.
Hybrid Renderer is not yet validated on mobile and console platforms. The main focus of the team is to improve the editor platforms, support the remaining URP and HDRP features, and continue to improve the stability, performance, test coverage, and documentation to make Hybrid Renderer production ready. For mobile and console platforms, the aim is to gradually improve test coverage.
Hybrid Renderer is not yet tested or supported on XR devices. XR support is intended in a later version.
Hybrid Renderer does not currently support ray-tracing (DXR).
DOTS feature compatibility
Hybrid Renderer does not support multiple DOTS Worlds. Limited support for multiple Worlds is intended in a later version. The current plan is to add support for creating multiple rendering systems, one per renderable World, but then only have one World active for rendering at once.
Hybrid Renderer overview
Hybrid Renderer acts as a bridge between DOTS and Unity's existing rendering architecture. This allows you to use ECS entities instead of GameObjects for significantly improved runtime memory layout and performance in large scenes, while maintaining the compatibility and ease of use of Unity's existing workflows.
Hybrid Renderer versions
This package contains two versions of Hybrid Renderer. For more information about the different versions of Hybrid Renderer, see Hybrid Renderer versions.
The GameObject conversion system
Hybrid Renderer includes systems that convert GameObjects into equivalent DOTS entities. You can use these systems to convert the GameObjects in the Unity Editor, or at runtime. Conversion in the Unity Editor results in significantly better scene loading performance.
To convert entites in the Unity Editor, put them in a SubScene. The Unity Editor performs the conversion, and saves the results to disk. To convert your GameObjects to entities at runtime, add a ConvertToEntity component to them.
Unity performs the following steps during conversion:
- The conversion system converts MeshRenderer and MeshFilter components into a DOTS RenderMesh component on the entity. Depending on the render pipeline your Project uses, the conversion system might also add other rendering-related components.
- The conversion system converts LODGroup components in GameObject hierarchies to DOTS MeshLODGroupComponents. Each entity referred by the LODGroup component has a DOTS MeshLODComponent.
- The conversion system converts the Transform of each GameObject into a DOTS LocalToWorld component on the entity. Depending on the Transform's properties, the conversion system might also add DOTS Translation, Rotation, and NonUniformScale components.
Runtime functionality
At runtime, the Hybrid Renderer processes all entities that have LocalToWorld, RenderMesh, and RenderBounds DOTS components. Many HDRP and URP features require their own material property components. These components are added during the MeshRenderer conversion. Processed entities are added to batches. Unity renders the batches using the SRP Batcher.
Note that if you add entities to your Scene at runtime, it is better to instantiate Prefabs than to create new entities from scratch. Prefabs are already converted to an optimal data layout during DOTS conversion, which results in improved performance. Converted prefabs also automatically contain all the necessary material property components for enabling all supported HDRP and URP features. As Hybrid Renderer frequently adds new features, it is best practice to use the conversion pipeline and prefabs instead of manually building entities from scratch, to avoid compatibility issues when updating to new Hybrid Renderer package versions.
Creating a new Hybrid Renderer project
Hybrid Renderer
- Create a new project. Depending on which render pipeline you want to use with Hybrid Renderer, the project should use a specific template:
- For the Built-in Render Pipeline, use the 3D template.
- For the Universal Render Pipeline (URP), use the Universal Render Pipeline template.
- For the High Definition Render Pipeline (HDRP), use the High Definition RP template.
- Install the Hybrid Renderer package. Since this is an experimental package, later versions of Unity do not show it in the Package Manager window. The most consistent way to install this package for all versions of Unity is to use the manifest.json.
- In the Project window, go to Packages and right-click in an empty space.
- Click Show in Explorer then, in the File Explorer window, open Packages > manifest.json.
- Add
"com.unity.rendering.hybrid": "*<package version>*"to the list of dependencies where <version number> is the version of the Hybrid Renderer Package you want to install. For example:"com.unity.rendering.hybrid": "0.14.0-preview.27" - Installing the Hybrid Renderer package also installs all of its dependencies including the DOTS packages.
- If you are using either URP or HDRP, make sure SRP Batcher is enabled in your Project's URP or HDRP Assets. Creating a Project from the URP or HDRP template enables SRP Batcher automatically.
- URP: Select the URP Asset and view it in the Inspector, go to Advanced and make sure SRP Batcher is enabled.
- HDRP: Select the HDRP Asset and view it in the Inspector, enter Debug Mode for the Inspector, and make sure SRP Batcher is enabled.
- Hybrid Renderer does not support gamma space, so your Project must use linear color space, To do this:
- Go to Edit > Project Settings > Player > Other Settings and locate the Color Space property.
- Select Linear from the Color Space drop-down.
- Hybrid Renderer is now installed. As of Hybrid Renderer version 0.14 and above, Hybrid Renderer V2 is the default.
Hybrid Renderer versions
This package used to contain two versions of Hybrid Renderer, called V1 and V2. This is no longer the case, and the package now contains only a single version of Hybrid Renderer (Hybrid Renderer V2) which is always enabled.
A future version of the package will contain a new version of Hybrid Renderer that will support all the features marked as "No" on this page.
Feature support
The tables in this section show the render pipeline feature support of Hybrid Renderer.
URP features
| Feature | Supported by Hybrid Renderer |
|---|---|
| Material property overrides | Yes |
| Built-in property overrides | Yes |
| Shader Graph | Yes |
| Lit shader | Yes |
| Unlit shader | Yes |
| RenderLayer | Yes |
| TransformParams | Yes |
| DisableRendering | Yes |
| Sun light | Yes |
| Point + spot lights | No |
| Ambient probe | Yes |
| Light probes | Yes |
| Reflection probes | No |
| Lightmaps | Yes |
| LOD crossfade | No |
| Viewport shader override | No |
| Transparencies (sorted) | Yes |
| Occlusion culling (dynamic) | Experimental |
| Skinning / mesh deform | Experimental |
HDRP features
| Feature | Supported by Hybrid Renderer |
|---|---|
| Material property overrides | Yes |
| Built-in property overrides | Yes |
| Shader Graph | Yes |
| Lit shader | Yes |
| Unlit shader | Yes |
| Decal shader | Yes |
| LayeredLit shader | Yes |
| RenderLayer | Yes |
| TransformParams | Yes |
| DisableRendering | Yes |
| Motion blur | Yes |
| Temporal AA | Yes |
| Sun light | Yes |
| Point + spot lights | Yes |
| Ambient probe | Yes |
| Light probes | Yes |
| Reflection probes | Yes |
| Lightmaps | Yes |
| LOD crossfade | No |
| Viewport shader override | No |
| Transparencies (sorted) | Yes |
| Occlusion culling (dynamic) | Experimental |
| Skinning / mesh deform | Experimental |
Material overrides
Hybrid Renderer V2 enables you to override the property values of various HDRP and URP material properties. It also enables you to override material properties for custom Shader Graphs. There are two ways to do this, either:
Sample scenes
Hybrid Renderer provides sample scenes to show you material overrides using both the Universal Render Pipeline (URP) and the High Definition Render Pipeline (HDRP). For information on where to download the samples from, see Sample Projects.
The paths to the per-render pipeline sample scenes are as follows:
- HDRP: HybridHDRPSamples > SampleScenes > MaterialOverridesSample
- URP: HybridURPSamples > SampleScenes > MaterialOverridesSample
Material overrides using C#
Hybrid Renderer V2 supports per-entity overrides of various HDRP and URP material properties as well as overrides for custom Shader Graphs. You can write C#/Burst code to setup and animate material override values at runtime. For more information on Material overrides, see Material overrides.
Built-in Material overrides
Hybrid Renderer contains a built-in library of IComponentData components that you can add to your entities to override their material properties.
Supported HDRP Material overrides:
- AlphaCutoff
- AORemapMax
- AORemapMin
- BaseColor
- DetailAlbedoScale
- DetailNormalScale
- DetailSmoothnessScale
- DiffusionProfileHash
- EmissiveColor
- Metallic
- Smoothness
- SmoothnessRemapMax
- SmoothnessRemapMin
- SpecularColor
- Thickness
- ThicknessRemap
- UnlitColor (HDRP/Unlit)
Supported URP Material overrides:
- BaseColor
- BumpScale
- Cutoff
- EmissionColor
- Metallic
- OcclusionStrength
- Smoothness
- SpecColor
If you want to override a built-in HDRP or URP property not listed here, you can do that with custom Shader Graph Material overrides.
Custom Shader Graph Material overrides
You can create your own custom Shader Graph properties, and expose them to DOTS as IComponentData. This allows you to write C#/Burst code to setup and animate your own shader inputs. To do this, see the following steps:
Shader Graph Asset
- Select your Shader Graph custom property and view it in the Graph Inspector.
- Open the Node Settings tab.
- Next, the method changes depending on the Unity version:
- Unity 2020.1: enable Hybrid Instanced (experimental).

- From Unity 2020.2: Enable Override Property Declaration then set Shader Declaration to Hybrid Per Instance.

- Unity 2020.1: enable Hybrid Instanced (experimental).
IComponentData
For the DOTS IComponentData struct, use the MaterialProperty Attribute, passing in the Reference and type for the Shader Graph property. For example, the IComponentData for the color (float4) property in the above step would be:
[MaterialProperty("_Color", MaterialPropertyFormat.Float4)]
public struct MyOwnColor : IComponentData
{
   public float4 Value;
}
Ensure that the Reference name in Shader Graph and the string name in MaterialProperty attribute match exactly. The type declared in the MaterialPropertyFormat should also be compatible with both the Shader Graph and the struct data layout. If the binary size doesn't match, you will see an error message in the console window.
Burst C# system
Now you can write Burst C# system to animate your Material property:
class AnimateMyOwnColorSystem : SystemBase
{
   protected override void OnUpdate()
  {
       Entities.ForEach((ref MyOwnColor color, in MyAnimationTime t) =>
          {
               color.Value = new float4(
                   math.cos(t.Value + 1.0f),
                   math.cos(t.Value + 2.0f),
                   math.cos(t.Value + 3.0f),
                   1.0f);
          })
          .Schedule();
  }
}
Important: You need to create a matching IComponentData struct (described above) for every custom Shader Graph property that has Hybrid Instanced (experimental) enabled. If you fail to do so, Hybrid Renderer will not fill these properties: Hybrid Renderer V1 leaves the data uninitialized (flickering), and Hybrid Renderer V2 zero fills the data.
Material overrides using the Material Override Asset
In Hybrid Renderer V2, you can override material properties without writing any code. This document describes the process on how to setup Material overrides for a material without writing any code. For more information on Material overrides, see Material overrides.
Setting up Material overrides
This section explains how to set up overrides for a material.
- Select the material you want to override. If one does not exists, create a new one (menu: Assets > Create > Material) and select it.
- If the material uses a Shader Graph, make sure to enable Exposed and make it hybrid instanced. The method to do this changes depending on the Unity version:
- Unity 2020.1: enable Hybrid Instanced (experimental)

- From Unity 2020.2: Enable Override Property Declaration then set Shader Declaration to Hybrid Per Instance.

- Unity 2020.1: enable Hybrid Instanced (experimental)
- Create a new Material Override Asset (menu: Assets > Create > Shader > Material Override Asset) and select it.
- In the Inspector, add your material to the Material property.

- Click Add Property Override and select the properties you want this asset to override. Note that, if the material uses custom properties from a Shader Graph, you may have to wait for an asset data refresh and import to happen after you select the properties. When you add the property overrides, Unity creates a C# script next to your material in the Project window. Do not touch this file.

- After you add the property overrides, modify them to be the values you want.
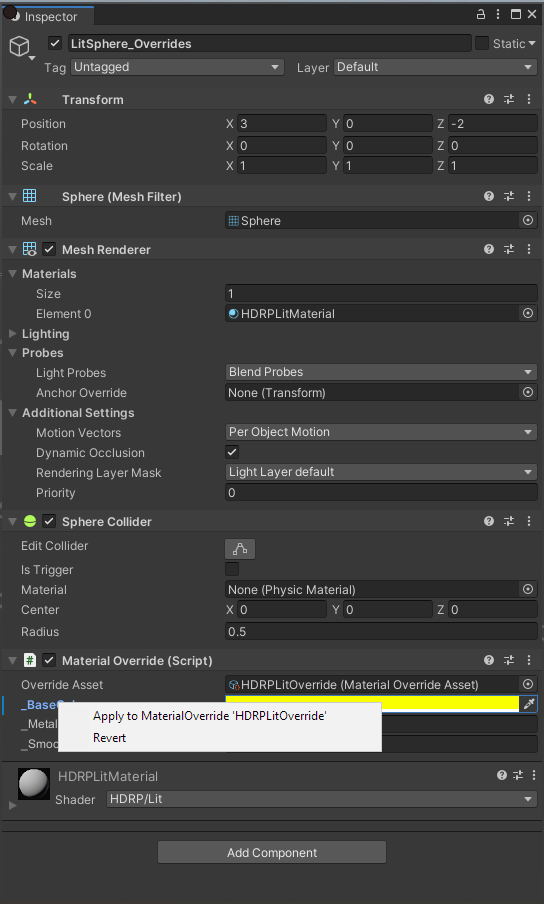
- Select a GameObject that uses the material (or assign the material to a GameObject in your scene). Then, in the Inspector, click Add Component and select Material Override.
- In the Inspector for that component, add your new Material Override Asset to the Override Asset field.

- You can add this asset to all GameObjects you want to give this set of overrides. Editing the material properties from the Inspector while the Material Override Asset is selected updates all the corresponding GameObjects.
- You can also edit the properties on a GameObject's Material Override component as well to only affect that instance. When you do this, the margin turns blue and the property text becomes bold. This means you have overridden the defaults of the Material Override Asset.
- You can either push the instance's setting to the asset to update all other GameObjects or reset it to the asset's default by right clicking on the property. This does not affect GameObjects that also override the asset's default values.
- You can create more Material Override Assets for the same material with the same or a different set of properties and then modify those properties per-GameObject as well. It does not interfere with other Material Override Assets.
Hybrid entities
Hybrid entities is a new DOTS feature. This feature allows you to attach MonoBehaviour components to DOTS entities, without converting them to IComponentData. A conversion system calls AddHybridComponent to attach a managed component to DOTS entity.
The following graphics related hybrid components are supported by Hybrid Renderer:
- Light + HDAdditionalLightData (HDRP)
- Light + UniversalAdditionalLightData (URP)
- ReflectionProbe + HDAdditionalReflectionData (HDRP)
- TextMesh
- SpriteRenderer
- ParticleSystem
- VisualEffect
- DecalProjector (HDRP)
- DensityVolume (HDRP)
- PlanarReflectionProbe (HDRP)
- Volume
- Volume + Sphere/Box/Capsule/MeshCollider pair (local volumes)
Note that the conversion of Camera (+HDAdditionalCameraData, UniversalAdditionalCameraData) components is disabled by default, because the scene main camera can't be a hybrid entity. To enable this conversion, add HYBRID_ENTITIES_CAMERA_CONVERSION define to your project settings.
Unity updates the transform of a hybrid entity whenever it updates the DOTS LocalToWorld component. Parenting a hybrid entity to a standard DOTS entity is supported. Hybrid entities can be included in DOTS subscenes. The managed component is serialized in the DOTS subscene.
You can write DOTS ECS queries including both IComponentData and managed hybrid components. However, these queries cannot be Burst compiled and must run in the main thread, as managed components are not thread safe. Use WithoutBurst(), and call .Run() instead of .Schedule().
An example of setting HDRP Light component intensity:
class AnimateHDRPIntensitySystem : SystemBase
{
    protected override void OnUpdate()
    {
        Entities.WithoutBurst().ForEach((HDLightAdditionalData hdLight) =>
            {
                hdLight.intensity = 1.5f;
            })
            .Run();
    }
}
The BatchRendererGroup API
BatchRendererGroup is the Unity Engine API that the Hybrid Renderer uses. If you are using the Hybrid Renderer, you don't need to interact with this API directly; however, if you are an advanced rendering engineer and you want to build your own renderer on top of this API, this section will give you some advice.
Important: This API is experimental and changes frequently. We are adding support for all the remaining URP and HDRP features, and making the data model more efficient to provide AAA class performance. We do not guarantee that the current API will remain stable, and we have a long term plan to rewrite it completely to make it more flexible, efficient, and straightforward to use.
The APIs described here no longer exist in Unity version 2022.1 and newer, which contain a completely rewritten and improved version of this API.
The BatchRendererGroup class actually presents two different versions of the API: one used by an earlier version of Hybrid Renderer (Hybrid Renderer V1, which no longer exists), and one used by Hybrid Renderer V2. You cannot mix and match V1 and V2 API calls inside a single BatchRendererGroup instance.
Common APIs:
- AddBatch
- RemoveBatch
- GetNumBatches
- SetBatchBounds
- SetBatchFlags
- SetInstancingData(MaterialPropertyBlock) (not implemented)
Hybrid Renderer V1 APIs:
- GetBatchMatrices
- GetBatchMatrixArray
- GetBatchScalarArray
- GetBatchScalarArrayInt
- GetBatchVectorArray
- GetBatchVectorArrayInt
Hybrid Renderer V2 APIs:
Setting per-instance shader property input data
The SetInstancingData(MaterialPropertyBlock) API has never been implemented. To set per-instance shader property input data, you should use the V1 GetBatch..Array APIs listed above, or the V2 SetBatchPropertyMetadata API.
The GetBatch..Array APIs return a NativeArray. You write per-instance data to these native arrays. The data is persistent, so you don't need to rewrite data that's not changed.
The SetBatchPropertyMetadata API is more complex. You first call HybridV2ShaderReflection.GetDOTSInstancingCbuffers, and HybridV2ShaderReflection.GetDOTSInstancingProperties to find out the data layout that the shader is expecting. Then you fill out an array of constant buffer lengths, and another array containing all constant buffer metadata. Each integer in the metadata array tells the start offset of an shader property array. All properties are sub-allocated in a big compute buffer. You bind a global compute buffer named unity_DOTSInstanceData using Shader.SetGlobalBuffer, and load all the instance data from this compute buffer.
You are responsible for filling this compute buffer yourself, using the existing Unity APIs or using a custom compute shader. We have some helper classes to make the implementation easier: you can use HeapAllocator to sub-allocate the compute buffer, and you can use SparseUploader to upload sparse data from the CPU to the GPU.
When using the BatchRendererGroup you are responsible for calculating and filling all the unity_XXX built-in shader properties. When you call HybridV2ShaderReflection.GetDOTSInstancingProperties you will get a list of all the properties the shader expects.
Here's a list of all the properties you need to compute:

When implementing your own rendering on top of the BatchRendererGroup API, you also need to implement a culling callback function. This function is called N times each frame after the SRP C# script setups all the viewports. The culling callback function takes the camera and frustum planes as input and is responsible for writing out visible instance indices for each batch.
For more information look at source files HybridV2RenderSystem.cs, HybridV2Culling.cs, SparseUploader.cs and HeapAllocator.cs.
Mesh deformations
This page describes how to deform meshes using skinning and blendshapes, similar to what the SkinnedMeshRenderer does. Generally, you want to use this in combination with DOTS Animation. For samples of setups and usage of the systems, see DOTS Animation Samples.
Disclaimer
This version is highly experimental. This means that it is not yet ready for production use and parts of the implementation will change.
Setup
To use mesh deformations in your Unity Project, you need to correctly set up:
Project setup
Follow these steps to set your Unity Project up to support mesh deformation.
- Make sure your Unity Project uses Scriptable Render Pipeline (SRP) version 7.x or higher.
- If you intend to use Compute Deformation (required for blendshapes), go to Project Settings (menu: Edit > Project Settings) and, in the Player section, add the
ENABLE_COMPUTE_DEFORMATIONSdefine to Scripting Define Symbols.
Material setup
Follow these steps to create a material that Hybrid Renderer can use to render mesh deformations:
- Create a Shader Graph and open it. You can use any Shader Graph from the High Definition Render Pipeline (HDRP) or the Universal Render Pipeline (URP).
- Add either the Compute Deformation or Linear Blend Skinning node to the Shader Graph.
-
Connect the position, normal, and tangent outputs of the node to the vertex position, normal, and tangent slots in the master node respectively. Save the Shader Graph.
-
Create a material that uses the new Shader Graph. To do this, right-click on the Shader Graph asset and click Create > Material.
- If you already have a mesh set up, assign the material to all material slots on the SkinnedMeshRenderer. If not, see Mesh setup.
- Now Hybrid Renderer is able to fetch the result of the deformation when the Entity renders. However, for the mesh to actually deform, you must set it up correctly. For information on how to do this, see Mesh setup.
Mesh setup
Follow these steps to set up a mesh that Hybrid Renderer can animate using mesh deformation:
- Make sure your GameObject or Prefab is suitable for mesh deformations. This means it uses the SkinnedMeshRenderer component and not the MeshRenderer component. Furthermore, the mesh you assign to a SkinnedMeshRenderer needs to have blendshapes and/or a valid bind pose and skin weights. If it does not, an error appears in the SkinnedMeshRenderer component Inspector.
- Assign the material you created in Material setup to all material slots on the SkinnedMeshRenderer(s).
- When Unity converts the GameObject or Prefab into an entity, it adds the correct deformation components. Furthermore, the deformation systems dispatch and apply the deformations to the mesh. Note that to create motion you should either use Dots Animation or write to the SkinMatrix and BlendShapeWeights components directly.
Vertex shader skinning
Skins the mesh on the GPU in the vertex shader.
Features
- Linear blend skinning with four influences per vertex.
- Does not support blendshapes. #### Requirements
- Unity 2019.3b11 or newer (recommended)
- Hybrid Renderer 0.4.0 or higher (recommended)
- SRP version 7.x.x or higher (recommended)
- HDRP & URP are supported
Compute shader deformation
Applies mesh deformations on the GPU using compute shaders.
Features
- Linear blend skinning, supports up to 255 sparse influences per vertex
- Supports sparse blendshapes #### Requirements
- Add the
ENABLE_COMPUTE_DEFORMATIONSdefine to Scripting Define Symbols in your Project Settings (menu: Edit > Project Settings > Player) - Unity 2020.1.0b6 or higher (recommended)
- Hybrid Renderer 0.5.0 or higher (recommended)
- SRP version 9.x.x or higher (recommended)
- HDRP & URP are supported
Known limitations
- Wire frame mode and other debug modes do not display mesh deformations.
- Render bounds are not resized or transformed based on the mesh deformations.
- No frustum or occlusion culling, Unity processes mesh deformation for everything that uses it in the scene.
- Visual glitches may appear on the first frame.
- Live link is still untested with many of the features.
- Deformed meshes can disappear or show in their bind pose when Unity renders them as GameObjects.
- Compute deformation performance varies based on GPU.
Runtime entity creation
To render an entity, Hybrid Renderer requires that the entity contains a specific minimum set of components. The list of components Hybrid Renderer requires is substantial and may change in the future. To allow you to flexibly create entities at runtime in a way that is consistent between package versions, Hybrid Renderer provides the RenderMeshUtility.AddComponents API.
RenderMeshUtility - AddComponents
This API takes an entity and adds the components Hybrid Renderer requires based on a RenderMeshDescription, which is a struct that describes how to render the entity. A RenderMeshDescription includes a RenderMesh and additional rendering settings. To create a RenderMeshDescription, there are two constructors:
- The first uses a Renderer and a Mesh then builds the description from that.
- The second uses properties that you explicitly declare.
This API tries to be as efficient as possible, but it is still a main-thread only API and therefore not suitable for creating a large number of entities. Instead, it is best practice to use Instantiate to efficiently clone existing entities then set their components (e.g. Translation or LocalToWorld) to new values afterward. This workflow has several advantages:
- You can convert the base entity from a Prefab, or create it at runtime using
RenderMeshUtility.AddComponents. Instantiation performance does not depend on which approach you use. InstantiateandSetComponent/SetComponentDatadon't cause resource-intensive structural changes.- You can use
InstantiateandSetComponentfrom Burst jobs usingEntityCommandBuffer.ParallelWriter, which efficiently scales to multiple cores. - Internal Hybrid Renderer components are pre-created for the entities, which means that Hybrid Renderer does not need to create those components at runtime.
Example usage
The following code example shows how to use RenderMeshUtility.AddComponents to create a base entity and then instantiate that entity many times in a Burst job:
using Unity.Collections;
using Unity.Entities;
using Unity.Jobs;
using Unity.Mathematics;
using Unity.Rendering;
using Unity.Transforms;
using UnityEngine;
using UnityEngine.Rendering;

public class AddComponentsExample : MonoBehaviour
{
    public Mesh Mesh;
    public Material Material;
    public int EntityCount;

    // Example Burst job that creates many entities
    [BurstCompatible]
    public struct SpawnJob : IJobParallelFor
    {
        public Entity Prototype;
        public int EntityCount;
        public EntityCommandBuffer.ParallelWriter Ecb;

        public void Execute(int index)
        {
            // Clone the Prototype entity to create a new entity.
            var e = Ecb.Instantiate(index, Prototype);
            // Prototype has all correct components up front, can use SetComponent to
            // set values unique to the newly created entity, such as the transform.
            Ecb.SetComponent(index, e, new LocalToWorld {Value = ComputeTransform(index)});
        }

        public float4x4 ComputeTransform(int index)
        {
            return float4x4.Translate(new float3(index, 0, 0));
        }
    }

    void Start()
    {
        var world = World.DefaultGameObjectInjectionWorld;
        var entityManager = world.EntityManager;

        EntityCommandBuffer ecb = new EntityCommandBuffer(Allocator.TempJob);

        // Create a RenderMeshDescription using the convenience constructor
        // with named parameters.
        var desc = new RenderMeshDescription(
            Mesh,
            Material,
            shadowCastingMode: ShadowCastingMode.Off,
            receiveShadows: false);

        // Create empty base entity
        var prototype = entityManager.CreateEntity();

        // Call AddComponents to populate base entity with the components required
        // by Hybrid Renderer
        RenderMeshUtility.AddComponents(
            prototype,
            entityManager,
            desc);
        entityManager.AddComponentData(prototype, new LocalToWorld());

        // Spawn most of the entities in a Burst job by cloning a pre-created prototype entity,
        // which can be either a Prefab or an entity created at run time like in this sample.
        // This is the fastest and most efficient way to create entities at run time.
        var spawnJob = new SpawnJob
        {
            Prototype = prototype,
            Ecb = ecb.AsParallelWriter(),
            EntityCount = EntityCount,
        };

        var spawnHandle = spawnJob.Schedule(EntityCount, 128);
        spawnHandle.Complete();

        ecb.Playback(entityManager);
        ecb.Dispose();
        entityManager.DestroyEntity(prototype);
    }
}
Sample projects
To explore more use cases of the Hybrid Render, the EntityComponentSystemSamples repository contains various samples.
This repository is hosted here on Unity Technology's GitHub.
When you clone the Project's repository, make sure to use git or a git client. This is because if you use the Green button on the GitHub website, it does not download all the Assets.
The Hybrid Renderer sample projects can be found at:
- HDRP: HybridHDRPSamples
- URP: HybridURPSamples
Project folder structure:
- SampleScenes: Contains all sample scenes, showcasing the supported features.
- StressTestScenes: Contains stress test scenes for benchmarking.
- Tests: Graphics tests (for image comparisons).
Sample projects use Hybrid Renderer V2 and require Unity 2020.2.3f1 or later and version 10.2.2 or later of the HDRP and URP packages.


 714
714


 被折叠的 条评论
为什么被折叠?
被折叠的 条评论
为什么被折叠?
 到【灌水乐园】发言


