


作者主页(文火冰糖的硅基工坊):文火冰糖(王文兵)的博客_文火冰糖的硅基工坊_CSDN博客
本文网址:https://blog.csdn.net/HiWangWenBing/article/details/122101231
目录
第1章 网络的定义
1.1 网络结构
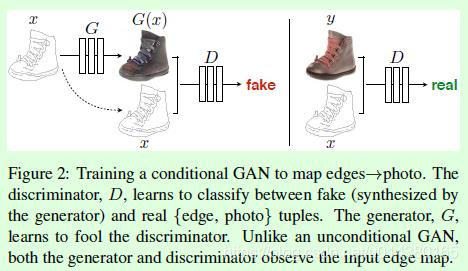
相对于基础型的GAN网络,pix2pix网络,并没有增加新的网络结构,只在基础型的GAN基础上做了如下的优化:
- 判决网络的输入:增加了输入图片,与输出fake图片一起参与判决
- 判决网络的输出:不仅仅需要参与判决网络的判决,还需要与样本标签图片进行像素级的比较。
1.2 代码来源
pytorch-CycleGAN-and-pix2pix\models\pix2pix_model.py
1.3 网络结构代码解读
   def __init__(self, opt):
        """Initialize the pix2pix class.

        Parameters:
            opt (Option class)-- stores all the experiment flags; needs to be a subclass of BaseOptions
        """
        BaseModel.__init__(self, opt)
        # specify the training losses you want to print out. The training/test scripts will call <BaseModel.get_current_losses>
        self.loss_names = ['G_GAN', 'G_L1', 'D_real', 'D_fake']
        # specify the images you want to save/display. The training/test scripts will call <BaseModel.get_current_visuals>
        self.visual_names = ['real_A', 'fake_B', 'real_B']
        # specify the models you want to save to the disk. The training/test scripts will call <BaseModel.save_networks> and <BaseModel.load_networks>
        if self.isTrain:
            self.model_names = ['G', 'D']
        else:  # during test time, only load G
            self.model_names = ['G']
        # define networks (both generator and discriminator)
        self.netG = networks.define_G(opt.input_nc, opt.output_nc, opt.ngf, opt.netG, opt.norm,
                                      not opt.no_dropout, opt.init_type, opt.init_gain, self.gpu_ids)

        if self.isTrain:  # define a discriminator; conditional GANs need to take both input and output images; Therefore, #channels for D is input_nc + output_nc
            self.netD = networks.define_D(opt.input_nc + opt.output_nc, opt.ndf, opt.netD,
                                          opt.n_layers_D, opt.norm, opt.init_type, opt.init_gain, self.gpu_ids)

        if self.isTrain:
            # define loss functions
            self.criterionGAN = networks.GANLoss(opt.gan_mode).to(self.device)
            self.criterionL1 = torch.nn.L1Loss()
            # initialize optimizers; schedulers will be automatically created by function <BaseModel.setup>.
            self.optimizer_G = torch.optim.Adam(self.netG.parameters(), lr=opt.lr, betas=(opt.beta1, 0.999))
            self.optimizer_D = torch.optim.Adam(self.netD.parameters(), lr=opt.lr, betas=(opt.beta1, 0.999))
            self.optimizers.append(self.optimizer_G)
            self.optimizers.append(self.optimizer_D)
- train模式下需要定义G + D网络, 而在测试或预测模式下,只需要定义G网络。
- 只有在训练模式下,才需要定义loss和优化算法。
1.4 输入数据集处理代码解读
    def set_input(self, input):
        """Unpack input data from the dataloader and perform necessary pre-processing steps.

        Parameters:
            input (dict): include the data itself and its metadata information.

        The option 'direction' can be used to swap images in domain A and domain B.
        """
        AtoB = self.opt.direction == 'AtoB'
        self.real_A = input['A' if AtoB else 'B'].to(self.device)
        self.real_B = input['B' if AtoB else 'A'].to(self.device)
self.image_paths = input['A_paths' if AtoB else 'B_paths']- pix2pix网络采用的是成对数据集(paired数据集),这个数据集是把两个图片按照字典的方式组合在一起的,因此需要先把他们分离开来。
- real_A: 真实的输入图片。
- real_B: 真实的标签图片 (标签不一定是分类的数值,也可以是一张图片)
1.5 前向运算
    def forward(self):
        """Run forward pass; called by both functions <optimize_parameters> and <test>."""
self.fake_B = self.netG(self.real_A) # G(A)- 前向运算只使用G网络,创造或生成图片。
- 前向运算的输入是真实图片Real_A,输出是生成图片fake_B, 与生成图片对应的是真实图片Real_B.
- 如果仅仅是测试训练好的模型,有前向运算就可以了,不需要训练。
第2章 网络的训练
1.1 G生成网络的结构与代码解读
(1)G网络的训练架构

- 在训练G网络时,需要锁定D网络。
(2)G网络Loss代码实现
    def backward_G(self):
        """Calculate GAN and L1 loss for the generator"""

        # First, G(A) should fake the discriminator
        # 组合real_A和fake_B
        fake_AB = torch.cat((self.real_A, self.fake_B), 1)

        # 组合后图让锁定后的D网络进行判决
        pred_fake = self.netD(fake_AB)

        # 通过调整G网络,期望能够骗过D网络,即预测值接近True(1)
        self.loss_G_GAN = self.criterionGAN(pred_fake, True)


        # Second, G(A) = B
        # 确保生成图片fake_B, 不仅仅能够骗过D网络,还需要与标签图片real_B接近。
        # 反应在代码上,采用的像素点的绝对值差L1 loss来实现的。
        self.loss_G_L1 = self.criterionL1(self.fake_B, self.real_B) * self.opt.lambda_L1

        # combine loss and calculate gradients
        # 最终的目标组合上述两个loss,优化算法使得组合后的loss最小。
        self.loss_G = self.loss_G_GAN + self.loss_G_L1

        # 反向求导,求G网络所有参数的梯度
        self.loss_G.backward()
1.2 D判决网络的结构与代码解读
(1)D网络的训练架构

(2)D网络Loss代码实现
    def backward_D(self):
        """Calculate GAN loss for the discriminator"""
        # Fake; stop backprop to the generator by detaching fake_B
        # we use conditional GANs;
        # we need to feed both input and output to the discriminator
        # 合并输入图片real_A和生成图片fake_B
        fake_AB = torch.cat((self.real_A, self.fake_B), 1)

        # 使用D网络进行判决
        pred_fake = self.netD(fake_AB.detach())

        # 通过调整D网络参数,需要识别出,该输出图片为"假"
        # 体现在代码上,就是预测结果pred_fake与False(0) 相比
        # 优化算法,使得判断结果为0
        self.loss_D_fake = self.criterionGAN(pred_fake, False)

        # Real
        # 合并真实输入图片real_A与真实的标签图片real_B
        real_AB = torch.cat((self.real_A, self.real_B), 1)

        # 使用D网络进行判决
        pred_real = self.netD(real_AB)

        # 通过调整D网络参数,需要识别出,该输出图片为"真"
        # 体现在代码上,就是预测结果pred_fake与True(1) 相比
        # 优化算法,使得判断结果为1
        self.loss_D_real = self.criterionGAN(pred_real, True)

        # combine loss and calculate gradients
        # 组合上述两种loss,并求平均
        self.loss_D = (self.loss_D_fake + self.loss_D_real) * 0.5

        # 反向求导,求G网络所有参数的梯度
        self.loss_D.backward()
1.3 pix2pix网络整体的优化算法
    def optimize_parameters(self):

        # 使用real_A进行前向运算,生出图片fake_B
        self.forward()                   # compute fake images: G(A)


        # update D
        # 使能D网络的梯度迭代
        self.set_requires_grad(self.netD, True)  # enable backprop for D

        # 复位D网络的梯度
        self.optimizer_D.zero_grad()     # set D's gradients to zero

        # 计算D网络的梯度
        self.backward_D()                # calculate gradients for D

        # 进行D网络的迭代迭代
        self.optimizer_D.step()          # update D's weights

        # update G
        # D requires no gradients when optimizing G
        # 需要手工锁定D网络
        self.set_requires_grad(self.netD, False)

        # 复位G网梯度
        self.optimizer_G.zero_grad()        # set G's gradients to zero

        # 计算G网络的新的梯度
        self.backward_G()                   # calculate graidents for G

        # G网络迭代迭代
self.optimizer_G.step() # udpate G's weights- 先优化判决网络D,鉴别出真假
- 然后优化生成网络G, 骗过优化后的D网络
- 然后在优化判决网络D,鉴别出真假
- 依次类推,不断对抗、优化、迭代、更新,直到D网络无法判决出G网络输出的真假,得到以假乱真的效果。
作者主页(文火冰糖的硅基工坊):文火冰糖(王文兵)的博客_文火冰糖的硅基工坊_CSDN博客
本文网址:https://blog.csdn.net/HiWangWenBing/article/details/122101231


 7975
7975


 被折叠的 条评论
为什么被折叠?
被折叠的 条评论
为什么被折叠?
 到【灌水乐园】发言


