第P10周:Pytorch实现车牌识别

  •    🍨 本文为🔗365天深度学习训练营 中的学习记录博客
  • 🍖 原作者:K同学啊 | 接辅导、项目定制
    from torch.autograd import Variable


    def train(model,train_loader,loss_model,optimizer):
        model=model.to(device)
        model.train()
        
        for i, (images, labels) in enumerate(train_loader, 0): #0是标起始位置的值。
    
            images = Variable(images.to(device))
            labels = Variable(labels.to(device))
    
            optimizer.zero_grad()
            outputs = model(images)
    
            loss = loss_model(outputs, labels)
            loss.backward()
            optimizer.step()
    
            if i % 1000 == 0:    
                print('[%5d] loss: %.3f' % (i, loss))
    
    def test(model, test_loader, loss_model):
        size = len(test_loader.dataset)
        num_batches = len(test_loader)
        
        model.eval()
        test_loss, correct = 0, 0
        with torch.no_grad():
            for X, y in test_loader:
                X, y = X.to(device), y.to(device)
                pred = model(X)
    
                test_loss += loss_model(pred, y).item()
                pred_classes=pred.argmax(dim=2)
                y_classes=y.argmax(dim=2)
                correct+=(pred_classes==y_classes).type(torch.float).sum().item()
        test_loss /= num_batches
        correct /=size
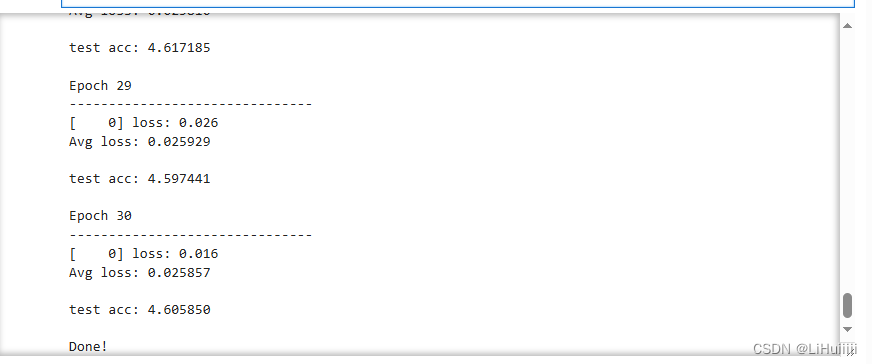
        print(f"Avg loss: {test_loss:>8f} \n")
        print(f"test acc: {correct:>8f} \n")
        return correct,test_loss
    任务完成下周继续加油

  • 14
    点赞
  • 18
    收藏
    觉得还不错? 一键收藏
  • 0
    评论
基于引用[1]和引用,使用pytorch实现车牌识别的步骤如下: 1.使用YOLOv4或YOLOv5网络进行车辆检测,得到车辆的位置信息。 2.使用LPRNet网络进行车牌检测,得到车牌的位置信息。 3.对车牌进行图像处理,例如旋转、缩放等操作,使车牌图像更加清晰。 4.使用LPRNet网络进行车牌识别,得到车牌号码。 下面是一个使用pytorch实现车牌识别的代码示例: ```python # 导入相关库 import cv2 import torch import numpy as np from models import * from utils.datasets import * from utils.utils import * # 设置相关参数 device = torch.device('cuda' if torch.cuda.is_available() else 'cpu') img_size = 416 conf_thres = 0.5 nms_thres = 0.4 # 加载YOLOv5模型 model = attempt_load('yolov5s.pt', map_location=device) model.to(device).eval() # 加载LPRNet模型 lprnet = LPRNet(class_num=len(alphabet) + 1, dropout_rate=0) lprnet.load_state_dict(torch.load('LPRNet.pth', map_location=device)) lprnet.to(device).eval() # 加载车牌字符集 alphabet = '0123456789abcdefghijklmnopqrstuvwxyz' # 加载测试图片 img = cv2.imread('test.jpg') img0 = img.copy() # 图片预处理 img = letterbox(img, new_shape=img_size)[0] img = img[:, :, ::-1].transpose(2, 0, 1) img = np.ascontiguousarray(img) # 将图片转换为Tensor img = torch.from_numpy(img).to(device).float() img /= 255.0 # 对图片进行目标检测 pred = model(img.unsqueeze(0))[0] pred = non_max_suppression(pred, conf_thres, nms_thres)[0] # 遍历所有检测到的车辆 for det in pred: if det is not None: # 获取车辆的位置信息 det[:, :4] = scale_coords(img.shape[2:], det[:, :4], img0.shape).round() # 获取车辆图像 crop_img = img0[int(det[1]):int(det[3]), int(det[0]):int(det[2])] # 对车牌进行检测 plate, _, _, _ = lprnet.inference(crop_img, 0.5) # 对车牌进行识别 plate = ''.join([alphabet[int(x)] for x in plate]) print('车牌号码:', plate) # 显示结果 cv2.imshow('result', img0) cv2.waitKey(0) cv2.destroyAllWindows() ```
评论
添加红包

请填写红包祝福语或标题

红包个数最小为10个

红包金额最低5元

当前余额3.43前往充值 >
需支付:10.00
成就一亿技术人!
领取后你会自动成为博主和红包主的粉丝 规则
hope_wisdom
发出的红包
实付
使用余额支付
点击重新获取
扫码支付
钱包余额 0

抵扣说明:

1.余额是钱包充值的虚拟货币,按照1:1的比例进行支付金额的抵扣。
2.余额无法直接购买下载,可以购买VIP、付费专栏及课程。

余额充值