


UI Toolkit介绍
UI Toolkit是Unity最新的UI系统,它主要被设计用来优化不同平台的性能,此项技术是基于标准的web技术开发的(standard web technologies),既可以使用UI Toolkit来拓展Unity Editor,也可以在打包出来的游戏和应用里使用Runtime的UI(但需要安装UI Toolkit Package)
UI Toolkit包括以下内容:
- 一个保留模式的UI系统(A retained-mode UI system),拥有创建UI的核心特性和功能
- UI资源类型,这些类型启发于标准的web格式 (Inspired by standard web formats),比如HTML、XML和CSS。使用这些资源文件可以构造出整个UI界面
- 用于学习UI Toolkit的工具和资源,这些工具和资源还可以用于创建和Debug你的interfaces
Unity想推荐UI Toolkit成为新项目的UI系统,但是它跟传统的uGUI和IMGUI相比,还是少了一些功能,后面会再提到。
UI Toolkit是一系列用于创建UI的资源、函数、特性和工具的集合,它可以被用过来创建常规的UI,也可以用来拓展Unity Editor、制作Runtime的Debug工具和创建Runtime的游戏UI。
UI Toolkit受standard web technologies启发得到,很多核心的概念是类似的。
UI Toolkit分为以下三类:
- UI System: 包含了核心features and functionality
- UI Assets: 受标准web格式启发得到的文件类型,可以被用来structure and style UI
- Tools and resources: Create and debug your interfaces, 还可以用于帮助学习UI Toolkit
UI System
UI Toolkit的核心是一个retained-mode UI system based on recognized web technologie。它支持stylesheets,和dynamic and contextual event handling.
UI System有以下内容:
- Visual tree:定义了所有UI Toolkit创建的UI(Defines every user interface you build with the UI Toolkit),A visual tree即是一个object graph,graph由轻量级node组成,这些node存储了所有在窗口或panel里的UI元素。
- Controls:提供了标准的UI Control库,比如buttons、popups、list views和color pickers,可以直接原样使用它们、自定义(customize)它们或创建自己的controls。
- Data binding system:可以把相关的property link到Control上,从而通过UI改变它们的值
- Layout Engine:一个基于CSS的Flexbox模型的Layout系统,它可以基于layout和styling properties来放置UI元素
- Event System:事件交互,包括:input、touch and pointer interactions(应该是触碰操作吧?),drag和drop操作等。系统包括了:a dispatcher,a handler,a synthesizer和一大堆event类型
- UI Renderer:直接在Unity的graphics device layer上创建的渲染系统
- UI Toolkit Runtime Support(via the UI Toolkit package):包含了用于runtime的相关组件,不过UI Toolkit package is currently in preview.
UI Assets
UI Assets也就是UI Toolkit里用到的资源文件,UI Toolkit提供了两种资源文件来帮助构建UI,与web应用类似:
- UXML documents,文件后缀是.uxml
- USS,文件后缀是.uss
UXML全称为Unity eXtensible Markup Lauguage,是受HTML和XML启发得到的一种markup(标记)语言,用于定义UI结构和可复用的UI模板,Unity推荐使用UXML来创建UI,而不是在C#脚本里进行
USS全称为Unity Style Sheets:可以对UI使用可视的style和behaviours,与web的CSS类似,跟上面相同,Unity推荐用USS文件来定义style,而不是直接在C#脚本里对style这个property进行修改
UI Tools and resources
提供了以下工具和资源:
- UIDebugger:类似web浏览器的debug窗口,可以看到对应的UXML结构和USS对应的style相关的hierarchy的信息,在Window->UI Toolkit -> Debugger下
- UI Builder(package):帮助用可视化的方式创建UI资源文件,比如uss和hxml documents,需要安装对应package
- UI Samples:Window->UI Toolkit -> Samples下可看到很多关于UI Control的代码示例
Accessing UI Toolkit
UI Toolkit有两种获取方法,或者说有两个版本:
- 直接在Unity Editor里获取,也就是Unity提供的引擎编辑器里自带的内置版本
- 从Unity Package里获取(com.unity.ui)
二者的区别如下:
- 目的不同,内置的UI Tooklit旨在加强Unity Editor的编辑,很多Unity Editor的自带功能都是用的内置的UI Toolkit,而Unity Package里的版本添加了很多特性,用于制作runtime下的UI
- 二者使用方式是相同的,都是在UnityEditor.Elements和UnityEngine.Elements的命名空间下使用
该选择UI Toolkit两个版本的哪一个
如果相关UI只会在Editor下使用的话,那么使用内置的UI Toolkit,如果该UI需要既能在Editor,也能在Runtime下使用的话,那么使用对应的Package的版本,而且对应的版本也能安装最新的
安装 UI Toolkit package
打开Unity Editor的Package Manager:
- Click Add (+)
- From the menu, choose Add package from git URL…
- In the text field, type com.unity.ui
- Click Add
The Visual Tree
UI Toolkit里UI的最基本构建单元被称为Visual Element,这些elements会被排序,形成一个有层次结构的树,称为Visual Tree,下图是一个例子:
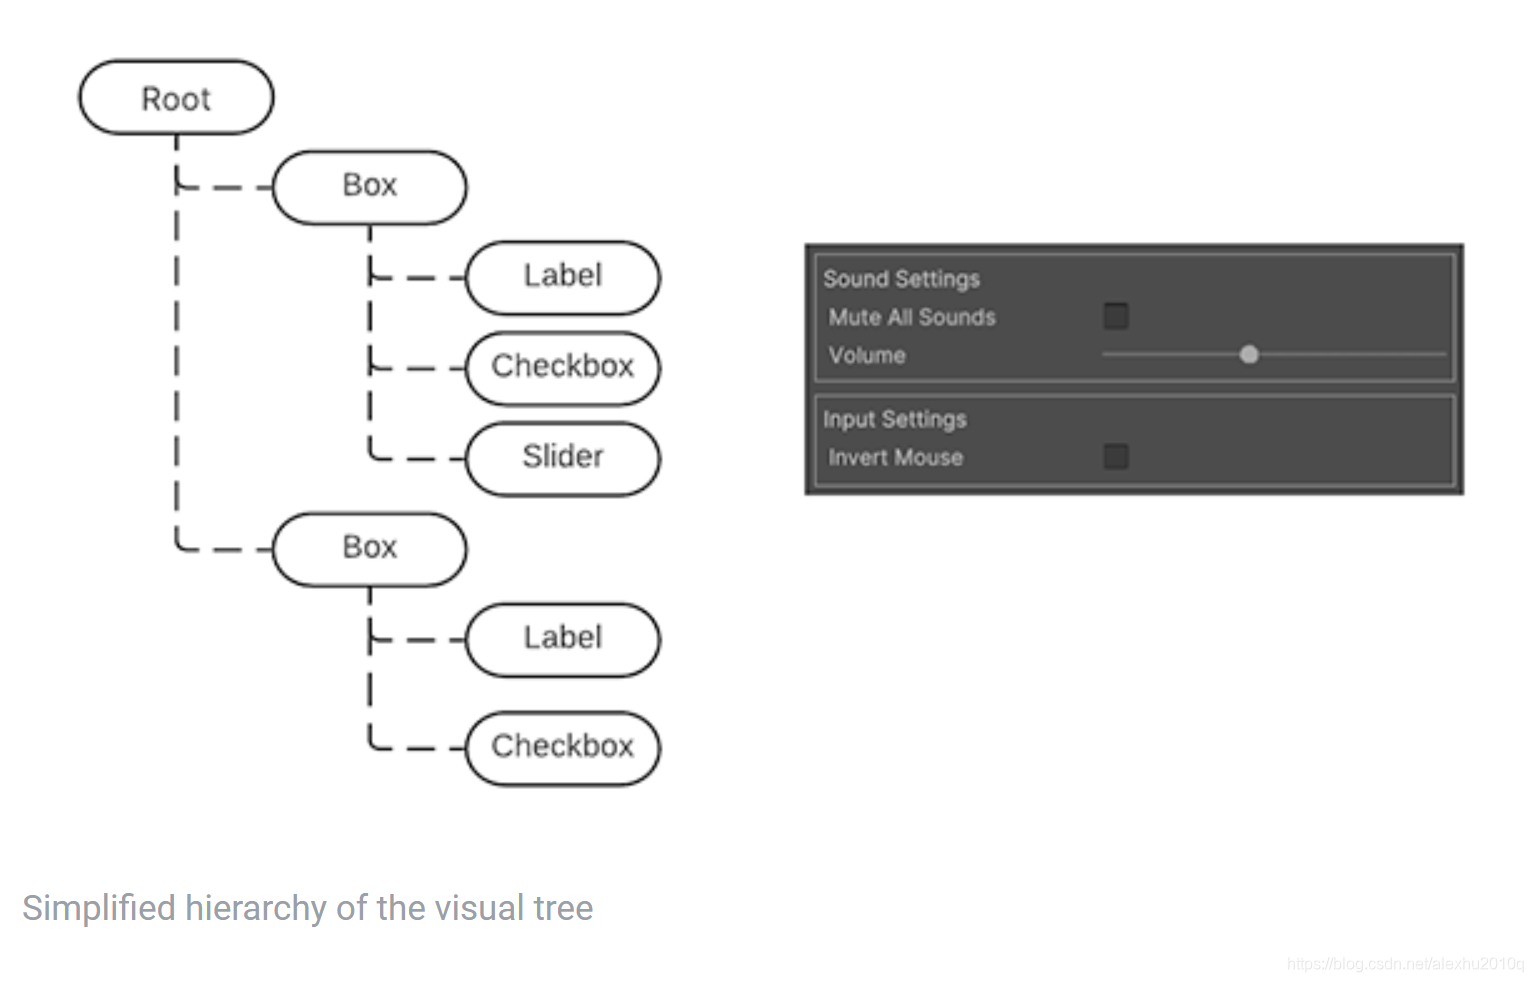
Visual elements
VisualElement类是所有出现在Visual Tree里节点的基类,它定义了通用的properties,比如style、layout data和event handles。可以使用
stylesheet来自定义Visual Element的形状,也可以使用event callback来自定义Visual Element的行为
VisualElement的派生类可以再添加behaviour和功能,比如UI Controls,下面的这些都是基于Visual Element派生出来的:
- Button
- Toggles
- Text Input fields
后面还会介绍更多的内置的Controls
Panels
panel是Visual Tree的父object,对于一个Visual Tree,它需要连接到panel上才能被渲染出来,所有的Panels都从属于Window,比如EditorWindow,Panel除了处理Visual Tree的渲染外,还会处理相关的focus control和event dispatching。
每一个在Visual Tree里的Visual Element都会记录该Panel的引用,VisualElement对象里叫panel的property可以用于检测Element是否与Panel相连,若panel为null说明不相连
Draw Order
Visual Tree里默认是按深度遍历的顺序绘制Element的,如果想要改顺序,可以使用以下函数:
VisualElement e;

// 注意,下面的front和back都是视觉上的绘制关系,front意味着重叠部分不会被遮挡
// 会把该元素移到它原本的parent的children列表的最后面,所以该元素最后画,所以在top
e.BringToFront();
// 同上,正好反过来
e.SendToBack();

// 在parent的childrenn列表里,把e放到sbling的前面,即先画e再画sibling,所以e在底层
e.PlaceBehind(UIElements.VisualElement sibling);
// 同上,正好反过来
e.PlaceInFront(UIElements.VisualElement sibling);
Coordinate and position systems
UI Toolkit有一个强大的layout系统,根据每一个Visual Element里名为style的property,就能自动计算出每个Element的位置和size,后面还会详细提到Layout Engine.
UI Toolkit有两种坐标(coordinates):
- Relative:基于element被计算好的position的相对坐标(Coordinates relative to the element’s calculated position.),也就是说,element的位置等于其parent的位置加上coordinates对应的offset,在这种情况下,子element的位置会影响父element的位置(因为Layout系统需要合理的安排区间,来摆放所有的element)
- Absolute:基于parent element的绝对坐标(Coordinates relative to the parent element). 这种方式下,element的位置不再由layout系统自动计算,而是直接会被设置position。同一个element下的子elements之间的位置不会受互相的影响,也就是说,element与其parent的位置关系是确定不变的(有点Anchor的意思)
设置一个Element的Coordinates的方法如下所示:
var newElement = new VisualElement();
    newElement.style.position = Position.Relative;
    newElement.style.left = 15;
    newElement.style.top = 35;
在实际计算pos的时候,layout system会为每个element计算位置和size,再把前面的relative或absolute的coordinate offset加进去,最后的结果计算出来,存到element.layout里(类型是Rect)
The layout.position is expressed in points, relative to the coordinate space of its parent.
VisualElement类还有一个继承的Property,叫做ITransform,修改它可以添加额外的Local的position和rotation的变化,相关的变化不会显示在layout属性里,ITransform默认是Identity.
VisualElement.worldBounds代表Element在窗口空间的最终坐标bounds,它既考虑了layout,也考虑了ITransform,This position includes the height of the header of the window.
下面介绍一个例子,使用内置的UI Toolkit来创建Editor下的窗口。首先可以创建一个脚本,脚本内容如下:
using UnityEditor;
using UnityEngine;
using UnityEngine.UIElements;

public class PositioningTestWindow : EditorWindow
{
    [MenuItem("Window/UI Toolkit/Positioning Test Window")]
    public static void ShowExample()
    {
        var wnd = GetWindow<PositioningTestWindow>();
        wnd.titleContent = new GUIContent("Positioning Test Window");
    }

    public void CreateGUI()
    {
    	// 创建两个数据一模一样的Element, 注意这里没有指定位置,因为位置是Layout系统自己算的
        for (int i = 0; i < 2; i++)
        {
            // 创建两个Element, 为一个正方形, 背景是灰色
            var temp = new VisualElement();
            temp.style.width = 70;
            temp.style.height = 70;
            // marginBottom代表当Layout系统计算布局时, 此Element下方会预留20个像素的距离
            temp.style.marginBottom = 20;
            temp.style.backgroundColor = Color.gray;
            rootVisualElement.Add(temp);
        }
	}
}
点击对应的menu操作,就能出现窗口,如下图所示:
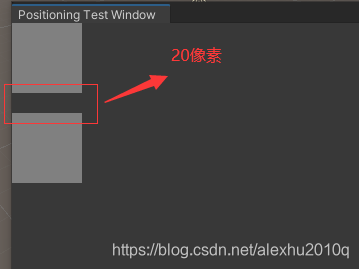
继续补充CreateGUI代码,现在画一个Label,而且更改它的style里的pos,代码如下:
public void CreateGUI()
{
    // 创建两个数据一模一样的Element, 注意这里没有指定位置,因为位置是Layout系统自己算的
	...//原本的不变

    // 创建一个Label, Label是VisualElement的派生类
    var relative = new Label("Relative\nPos\n25, 0");
    // relative.style.position = Position.Relative;// 默认的就是Relative的方式, 所以不用刻意去写
    relative.style.width = 70;
    relative.style.height = 70;
    relative.style.left = 25;
    relative.style.marginBottom = 20;
    relative.style.backgroundColor = Color.red;
    rootVisualElement.Add(relative);
}
现在的结果变成了下图所示的样子,可以看到,原本Label应该是跟之前的一样,往下20个像素绘制的,但是这里有style.left = 25,所以在原本的基础上,加上offset(25, 0),得到最后右移的位置:

展示完了Relative的方式,下面再看看Absolute的例子,代码也是类似:
public void CreateGUI()
{
	...// 画原本三个Element的代码不变

	// 又画两个相同的方块进行对比
	for (int i = 0; i < 2; i++)
    {
        var temp = new VisualElement();
        temp.style.width = 70;
        temp.style.height = 70;
        temp.style.marginBottom = 20;
        temp.style.backgroundColor = Color.gray;
        rootVisualElement.Add(temp);
    }

    // 绘制Absolute类型的方块:Absolute Positioning
    var absolutePositionElement = new Label("Absolute\nPos\n25, 25");
    // 类型是Absolute, 基准点是parent element, 其parent element就是窗口里的rootVisualElement
    absolutePositionElement.style.position = Position.Absolute;
    absolutePositionElement.style.top = 25; // 设置上方间距
    absolutePositionElement.style.left = 25; // 设置左边间距
    absolutePositionElement.style.width = 70;
    absolutePositionElement.style.height = 70;
    absolutePositionElement.style.backgroundColor = Color.black;
    rootVisualElement.Add(absolutePositionElement);
}
最后的效果如下图所示,黑色的方块:

注意,在EidtorWindow类里,有一个Property叫做public VisualElement rootVisualElement { get; },可以用于取得窗口的Visual Tree的root visual element。
Transformation between coordinate systems
VisualElement.layout.position和VisualElement.transform两个参数,决定了local coordinate system 和 the parent coordinate system直接的转换,静态类VisualElementExtensions为这些转换提供了一些方法:
- WorldToLocal:把一个Vector2或Rect,从Panel Space转换到element local space
- LocalToWorld:同上,方向正好相反
- ChangeCoordinatesTo:把Vector2或Rect从一个Element的local space转换到另外一个Element的local space
The Layout Engine
Layout Engine可以基于Visual Elements的layout和style属性自动计算UI布局,它是基于Github上的开源项目Yoga开发的(Yoga implements a subset of Flexbox: a HTML/CSS layout system)。
要学习Yoga和Flexbox,还需要到文档上提供的链接里去看,这里就不挂链接了。
Layout System默认有以下特点:
- 一个container会竖直分布其children(container具体定义是什么?)
- 一个container rectangle的position会包含其chidren的rectangles,此特点可以被其他的layout属性影响
- 带有text的Visual Element,会在计算size时使用它字体的size,此特点可以被其他的layout属性影响
使用layout engine的一些方法:
- 使用width和height来指定element的size
- 通过flexGrow属性实现flexible size(in USS:
flex-grow: <value>;) ,当element的大小由其兄弟element决定时, flexGrow 属性的值用作权重。 - 通过将flexDirection属性设置为row,可以把layout从竖直变为水平分布
- 如果想要在已有的element的位置上做偏移,使用relative positioning
- 如果想让一个element像一个anchor一样,保持其与parent的位置关系,使用absolute positioning,不会影响其他的element和parent的布局
The UXML format
UXML是一种文本文件,它定义了UI的逻辑结构,本章会介绍UXML的语法、还要如何写入、读取和定义UXML模板等,还包含了一些自定义新的UI Element的方法,以及使用UQuery的方法。
In UXML 可以:
- 在XML里定义UI的structure
- 在USS styleshhets里定义UI layout
而与这些相关的资源加载部分,就留给开发者自己去做了,比如导入资产、压缩数据什么的。
如何理解USS和UXML文件
这里强调一下初次看到这的时候我不理解的问题,UI的structure和UI layout有何区别?
其实Structure代表了节点的组织关系,就是Hierarchy里的父子关系,而UI Layout则代表了每个UI节点的具体的style等参数,如下图所示,HTML文件记录是Structure,CSS文件里记录的是每个节点的绘制信息,这样一看应该就很清楚了:

类比到UI Toolkit里,UXML文件用于描述整体节点之间的Structure,也就是对应的父子连接关系,而每个节点都有自己的USS文件,用于描述那个节点的尺寸等UI信息。
自定义Visual Element
Unity的原文档连接在这里:https://docs.unity3d.com/2020.1/Documentation/Manual/UIE-UXML.html
坦白说,这一段文档官方文档居然没有配合具体的代码展示,感觉官方写的东西就是一坨屎,下面会基于这坨垃圾玩意儿,进行解释,然后加上自己的解释和样例去帮助理解。
- 创建类的基本定义
UI Toolkit是一个可拓展的工具包,可以基于Visual Element自定义UI Element,相关的代码如下:
// 需要继承于VisualElement
class StatusBar : VisualElement
{
	// 必须要实现一个默认构造函数
    public StatusBar()
    {
    }

    public string status { get; set; }
}
然后我试了试,创建了个EditorWindow窗口,代码如下:
public class MyEditorWindow :EditorWindow
{
    [MenuItem("Window/Open My Window")]
    public static void OpenWindow()
    {
        var window = GetWindow<MyEditorWindow>();

        StatusBar statusBar = new StatusBar();

        statusBar.status = "Hello World";
        statusBar.style.width = 50;
        statusBar.style.height = 50;
        window.rootVisualElement.Add(statusBar);
    }
}
然后打开EditorWindow,发现没有任何显示,但是我打开UIElements Debugger发现是有东西的,只是没有显示String和UI而已,如下图所示:
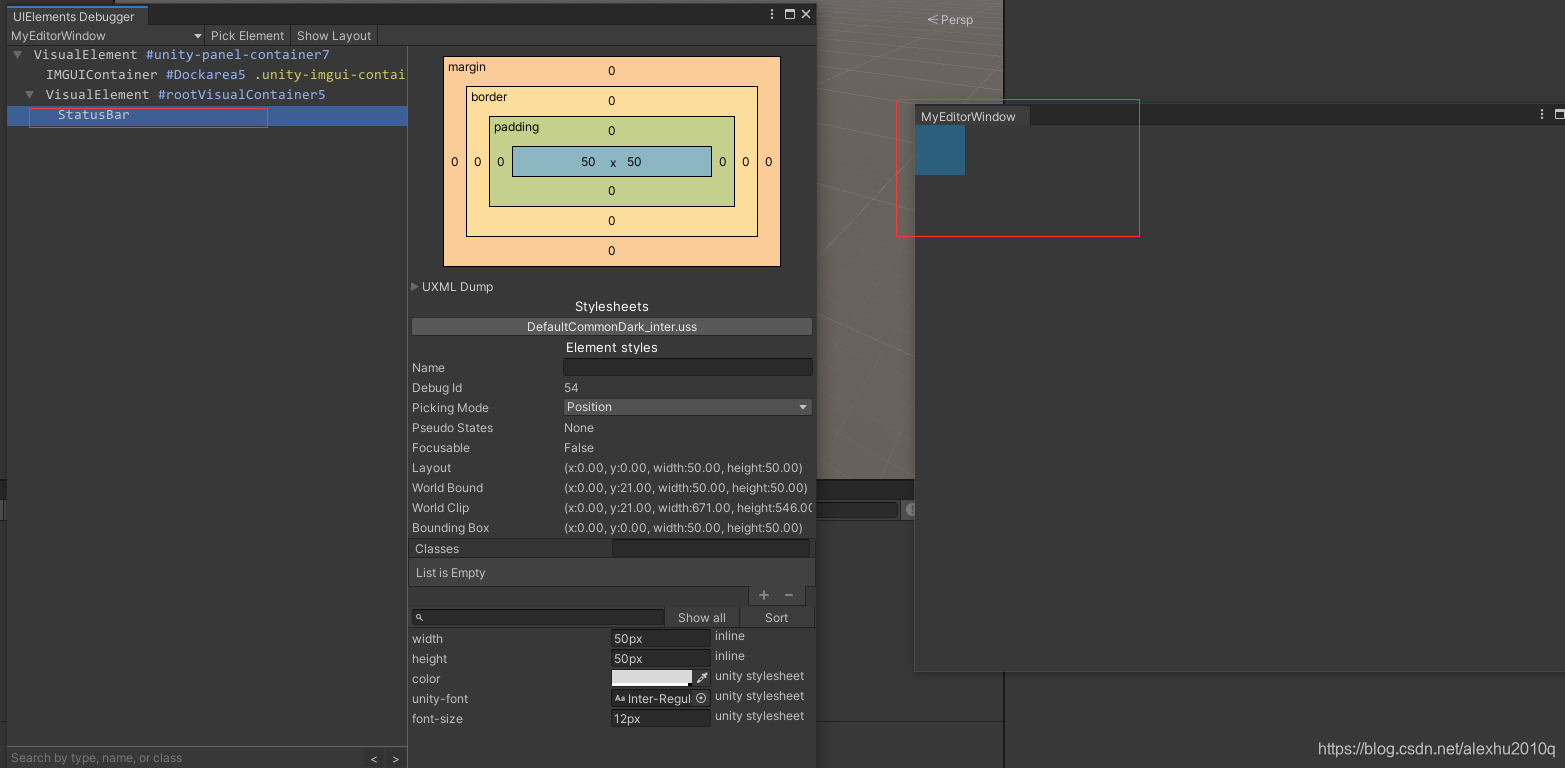
- 创建相关的factory类
虽然这个类被创建了,但是目前好像new出来,设置width和height之后,并没有在Window中有任何显示。
这是因为,还没有读取对应的UXML,来决定该element的结构。为了读取UXML文件,需要创建一个对应的factory类,这个类可以继承于UxmlFactory<T>,一般推荐在Element类内定义,代码如下:
class StatusBar : VisualElement
{
	// 在定义了这个类之后, 就可以在UXML文件里写StatusBar元素了,
	// 不过我还不熟悉这个new class的写法
	public new class UxmlFactory : UxmlFactory<StatusBar> { }
	...
};
- 创建Element的Attribute
这个Attribute的概念源自于XML,具体的可以看后面的附录。
这里需要创建一个UxmlTraits的对象,来实现相关的Attribute的创建:
class StatusBar : VisualElement
{
    public new class UxmlFactory : UxmlFactory<StatusBar, UxmlTraits> {}

	// 取的类名不变
	public new class UxmlTraits : VisualElement.UxmlTraits
    {
    	// 创建一个StringAttribute对象, StatusBar只有一个Attribute, 名字叫status
        UxmlStringAttributeDescription m_Status = new UxmlStringAttributeDescription { name = "status" };

        // 定义UxmlChildElementDescription函数
        // 函数返回空的IEnumerable,表示StatusBar的没有任何child element, 也不接受任何children
        public override IEnumerable<UxmlChildElementDescription> uxmlChildElementsDescription
        {
            get { yield break; }
        }

		// 会从XML parser里读取到对应的bag, 然后赋值给m_status
        public override void Init(VisualElement ve, IUxmlAttributes bag, CreationContext cc)
        {
	        // calls base.Init() to initialize the base class properties.
            base.Init(ve, bag, cc);
            // 把此类定义在StatusBar内部, 可以直接获取私有成员status
            ((StatusBar)ve).status = m_Status.GetValueFromBag(bag, cc);
        }
    }

	public StatusBar()
    {
        m_Status = String.Empty;
    }

    string m_Status;
    public string status { get; set; }
}
UxmlTraits类有两个作用:
- 会被Factory对象用于初始化新创建的对象
- 在schema generation过程中,可以从中获得element的信息,用于转换成XML schema directives
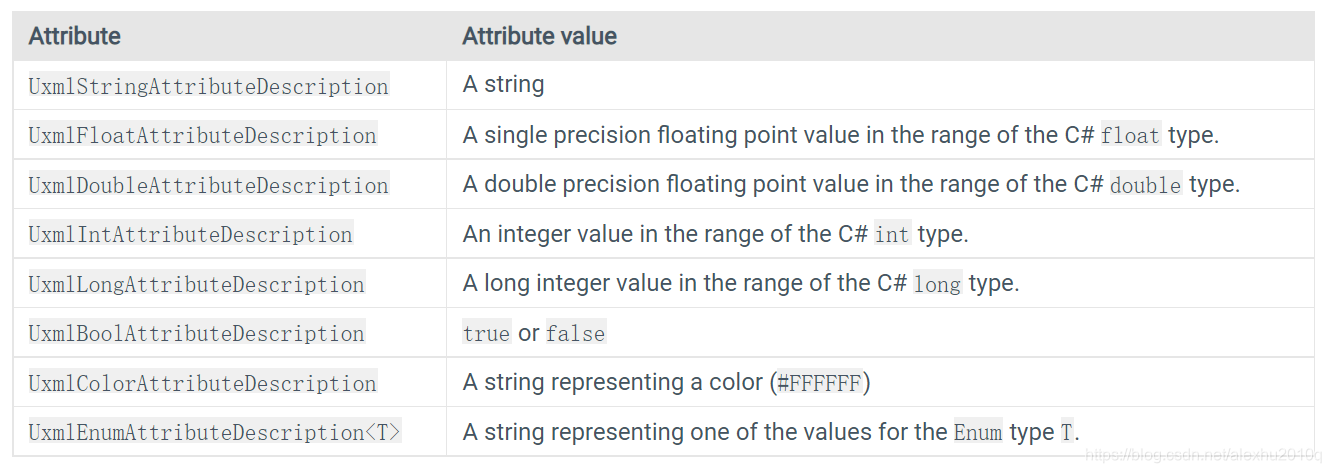
上面的Trait类里定义了UxmlStringAttributeDescription 对象代表String的Attribute,一共有以下类型:
前面的uxmlChildElementsDescription函数里,写的代码是不支持任何Children的,如果想支持任何Children,可以这么写:
public override IEnumerable<UxmlChildElementDescription> uxmlChildElementsDescription
{
    get
    {
        yield return new UxmlChildElementDescription(typeof(VisualElement));
    }
}
UxmlFactory和UxmlTraits实例
这一块内容Unity的文档居然没有给例子,真是辣鸡,这里举个例子。
- UxmlFactory类, 用于在UXML里识别此类, 并在里面创建此类对应的Tag
- UxmlTraits类用于在UXML文件里添加自定义的Attributes, 它们都可以在UI Builder里看到
举个例子,在定义这么一个类以后:
class TwoPaneSplitView : VisualElement
{
    // 定义UxmlFactory类, 用于在UXML里识别此类, 并在里面创建此类对应的Tag
    public new class UxmlFactory : UxmlFactory<TwoPaneSplitView, UxmlTraits> {}

    // UxmlTraits类用于在UXML文件里添加自定义的Attributes, 它们都可以在UI Builder里看到
    public new class UxmlTraits : VisualElement.UxmlTraits{}
}
只有在里面加上了UxmlFactory,才可以在Uxml里这么写:
<BuilderAttributesTestElement/>// 目前没有加任何Attribute
Defining a namespace prefix
在完成上面的代码后,就可以在UXML文件里使用对应的Element了,如果是在Namespace里面自定义Element,还需要做额外的处理。
需要定义一个namspace prefix, Namespace prefixes其实就是在UXML的root element上面声明的attributes,它会replace the full namespace name when scoping elements.
写法如下:
// This can be done at the root level (outside any namespace) of any C# file of the assembly.
[assembly: UxmlNamespacePrefix("My.First.Namespace", "first")]
[assembly: UxmlNamespacePrefix("My.Second.Namespace", "second")]
schema generation系统会做这些事情:
- 检查所有的attributes,使用它们创建schema,也就是XML文件里面的组织结构
- 为每一个新创建的UXML文件,在里面的
<UXML>这个element上添加namespace prefix的定义 - includes the schema file location for the namespace in its
xsi:schemaLocationattribute.
接下来,需要更新项目里的UXML schema,选择Assets > Update UXML Schema,保证text editor可以辨别出来新的element。
The defined prefix is available in the newly created UXML by selecting Create > UI Toolkit > Editor Window in the Project/Assets/Editor folder.
Advanced usage
Customizing a UXML name
可以通过override继承于UxmlFactory类的Property,代码如下:
public class FactoryWithCustomName : UxmlFactory<..., ...>
{
	// 暂时还不知道具体会展示在哪里
    public override string uxmlName
    {
        get { return "UniqueName"; }
    }

    public override string uxmlQualifiedName
    {
        get { return uxmlNamespace + "." + uxmlName; }
    }
}
Selecting a factory for an element
默认情况下,IUxmlFactory会创建一个element,然后选择根据它的名字来选择对应的element,主要是为了让它在UXML文件里能够被识别出来
Writing UXML Templates
其实就是用XML语言写的表示UI逻辑结构的uxml文件,举个例子:
<-- 第一行是XML declaration, it is optional, 只可以出现在第一行, 前面不允许有空格-->
<-- version的attribute必须要写, encoding可以不写, 如果写了, 就必须说清楚文件的字符encoding -->
<?xml version="1.0" encoding="utf-8"?>
<-- UXML 代表document root, 包含了用于namespace prefix definitions和schema的源文件位置的attributes -->
<UXML
    xmlns:xsi="http://www.w3.org/2001/XMLSchema-instance"
    <-- 下面这句话有点像是using UnityEngine.UIElements, 表示后面的Label什么的都是这个ns下的, 这里的ns是作为默认的ns -->
    xmlns="UnityEngine.UIElements"
    xsi:noNamespaceSchemaLocation="../UIElementsSchema/UIElements.xsd"
    xsi:schemaLocation="UnityEngine.UIElements ../UIElementsSchema/UnityEngine.UIElements.xsd">

	<-- 这下面的Label、Box、Button等都是Visual Element -->
	<-- 前面的Label代表继承于VisualElement的类名, 而后面的text叫做Element的Attributes--->
    <Label text="Select something to remove from your suitcase:"/>
    <Box>
        <Toggle name="boots" label="Boots" value="false" />
        <Toggle name="helmet" label="Helmet" value="false" />
        <Toggle name="cloak" label="Cloak of invisibility" value="false"/>
    </Box>
    <Box>
        <Button name="cancel" text="Cancel" />
        <Button name="ok" text="OK" />
    </Box>
</UXML>
补充几点:
xmlns:engine="UnityEngine.UIElements",这种写法,相当于是typedef,之后可以写<engine:Button />,等同于<UnityEngine.UIElements:Button />- 如果在自己的namespace下自定义了UI Element,那么需要在
<UXML>的tag里包含对应的 namespace definition and schema file location,同时还要包含Unity原本的namespaces
VisualElement通用的Attribute
一共有如下:
- name: Element的名字,应该是独一无二的
- picking-mode:Position或者Ignore,用于鼠标事件
- focus-index: (OBSOLETE) Use tabIndex and focusable.
- tabindex:一个int,决定当前element的tabbing位置?
- focusable:a boolean indicating whether the element is focusable.
- class:a space-separated list of identifiers that characterize the element. Use classes to assign visual styles to elements. You can also use classes to select a set of elements in UQuery.
- tooltip:一个string
- view-data-key:一个string,定义了序列化element的key
创建UXML template asset
When you create a new UXML template asset by selecting Asset > Create > UI Toolkit > Editor Window, the Editor automatically defines namespaces for you.
Adding styles to UXML
UXML文件可以引用USS文件,需要在任何element的声明下面使用<Style>这个element,举个例子:
<engine:UXML ...>
    <engine:VisualElement class="root">
    	<-- 意思所有的VisualElement都在调用这个style.uss作为布局? -->
        <Style src="styles.uss" />
    </engine:VisualElement>
</engine:UXML>
此时的USS文化和UXML需要在相同文件夹下,具体的style.uss文件内容如下:
#root {
    width: 200px;
    height: 200px;
    background-color: red;
}
也可以不要uss文件,直接UXML里一行代码设置style:
<engine:UXML ...>
    <engine:VisualElement style="width: 200px; height: 200px; background-color: red;" />
</engine:UXML>
Reusing UXML files
UXML文件也可以作为类似prefab的东西进行复用,举个例子,这里有个当作人像的UXML文件,它的UI里有一个图形和人名:
<engine:UXML ...>
    <engine:VisualElement class="portrait">
        <engine:Image name="portaitImage" style="--unity-image: url(\"a.png\")"/>
        <engine:Label name="nameLabel" text="Name"/>
        <engine:Label name="levelLabel" text="42"/>
    </engine:VisualElement>
</engine:UXML>
在其他的UXML文件里,就可以把这个人像的UXML作为模板使用了:
<engine:UXML ...>
	<-- 类名叫Template, 路径src为...., Element的名字为Portrait, 感觉这里是创建了一个模板的类 -->
    <engine:Template src="/Assets/Portrait.uxml" name="Portrait"/>
    <engine:VisualElement name="players">
    	<-- Instance代表模板的示例, 后面template后面是类名, 然后根据name创建具体的Instance  -->
        <engine:Instance template="Portrait" name="player1"/>
        <engine:Instance template="Portrait" name="player2"/>
    </engine:VisualElement>
</engine:UXML>
总结来说,就是使用Template和Instance关键字,可以在UXML里使用别的UXML里创建的class
Overriding UXML attributes
即使基于UXML Template创建了Instance,还是可以override其elements里默认的Attribute的值。
具体操作如下,要写一行xml语句指名下面的内容:
- 对应的想要override的Element的名字(The element-name attribute of the element whose attributes you want to override)
- 对应的想要override的Attribute的名字(The name of the attribute to override)
- override的值(The new attribute value)
举个例子,看下面这段代码:
<-- 由于override的是Instance不是Template, 所以可以输入多个参数,比如这里输入
两个参数:一个是类名,一个是Element的名字,满足这两个条件的Element, 其text的attribute都会被Override -->
<AttributeOverrides element-name="player-name-label" text="Alice" />
再举一个例子,假设有不同的玩家,他们都要展示相同的Template,但是每个人具体的数值不同:
<-- 指明namespace -->
<UXML xmlns="UnityEngine.UIElements">
		<-- 其实是UnityEngine.UIElements.Label -->
		<-- 创建两个Label, 名字分别为player-name-label和player-score-label -->
        <Label name="player-name-label" text="default name" />
        <Label name="player-score-label" text="default score" />
</UXML>
在创建完模板后,可以创建其Instance,然后override它的attributes,其实就是语法上的学习,没什么难度:
	<-- 添加两个namespace的include -->
    <UXML xmlns="UnityEngine.UIElements" xmlns:uie="UnityEditor.UIElements">
    	<-- 声明使用的模板和路径 -->
        <Template src="MyTemplate.uxml" name="MyTemplate" />
        <-- 基于名为MyTemplate模板创建Instance -->
        <Instance name="player1" template="MyTemplate">
        	<-- Override两个element的text对应的attribute -->
            <AttributeOverrides element-name="player-name-label" text="Alice" />
            <AttributeOverrides element-name="player-score-label" text="2" />
        </Instance>
        <Instance name="player2" template="MyTemplate">
            <AttributeOverrides element-name="player-name-label" text="Bob" />
            <AttributeOverrides element-name="player-score-label" text="1" />
        </Instance>
    </UXML>
Overriding multiple attributes
上面的例子都只override了一个attribute,用同样的方法还可以ovverride多个attribute:
<-- ovverride text和tooltip两个attribute -->
<AttributeOverrides element-name="player-name-label" text="Alice" tooltip="Tooltip 1" />
Nesting attribute overrides
When you override attributes in nested templates, the deepest override takes precedence.
UXML里引用其他的文件
UXML文件可以引用别的UXML文件和USS文件
其中,<Template>和Style两种Element可以接受src或者path的attribute,二者有些许差别。
src
存的是相对路径,要么是相对于Project Root路径,要么是相对于所在的UXML文件的路径。举个例子,我的UXML文件在Assets\Editor\UXML下,USS文件在Assets\Editor\USS下:
- 如果要从UXML里读取别的USS文件,那么src为
src="../USS/styles.uss",如果要读取别的UXML文件,那么src="template.uxml" - 使用Project Root的路径
src="/Assets/Editor/USS/styles.uss"orsrc="project:/Assets/Editor/UXML/template.uxml".
path
path只支持在Resources或者Editor的Resouces下的文件夹的文件:
- 如果在普通的Resources文件夹下,不需要file的拓展,比如
path="template"代表Assets/Resources/template.uxml。 - 如果是在Editor Default Resources文件夹下,需要带文件的拓展名,比如
path="template.uxml"代表Assets/Editor Default Resources/template.uxml.
C#读取UXML文件
很简单,记录下写法:
// 写法一
var template = EditorGUIUtility.Load("path/to/file.uxml") as VisualTreeAsset;
// 这里的parentElement, 可以是EditorWindow下的rootVisualElement
template.CloneTree(parentElement, slots);

// 写法二
var template = AssetDatabase.LoadAssetAtPath<VisualTreeAsset>("path/to/file.uxml");
template.CloneTree(parentElement, slots);
实际使用的时候大概是这样:
public class MyWindow : EditorWindow  {
    [MenuItem ("Window/My Window")]
    public static void  ShowWindow () {
        EditorWindow w = EditorWindow.GetWindow(typeof(MyWindow));

        VisualTreeAsset uiAsset = AssetDatabase.LoadAssetAtPath<VisualTreeAsset>("Assets/MyWindow.uxml");
        VisualElement ui = uiAsset.CloneTree(null);

        w.rootVisualElement.Add(ui);
    }

    void OnGUI () {
        // Nothing to do here, unless you need to also handle IMGUI stuff.
    }
}
UQuery
UQuery是Unity实现的自己版本的JQuery/Linq,可以使用UQuery获取VisualElement的子节点Tree里特定的Element,示例代码如下:
// 查找第一个叫foo的Button
root.Query<Button>("foo").First();
// 对每个叫foo的Button做...
root.Query("foo").Children<Button>().ForEach(//do stuff);
UXML elements reference
总结了UnityEngine.UIElements和UnityEditor.UIElements命名空间下可以用 的UXML Element:
基本的Element
就两种:
- Visual Element:
- Bindable Element:可以绑定到一个SerializedProperty上的Element,相当于把UI对象和Property绑定到一起,它有一个binding-path的Attribute,表示绑定的Property的Path
两个Base Element都在UnityEngine.UIElements下,而其实BindableElement也是VisualElement:
public class BindableElement : VisualElement, IBindable
Utilities
提供的常用的UI Element有:
- Box:可以有任意个数的Child Element,Attribute和Visual Element相同,无非是UI上,Content周围多了个方框
- TextElement:VisualElement多一个Text的Attribute,不可以有Child Element
- Label:Attribute和Visual Element相同,不可以有Child Element
- Image:Attribute和Visual Element相同,不可以有Child Element
- IMGUIContainer:继承于Visual Element,不可以有Child Element,用于绘制ImGUI的东西,添加了
focus-index和focusable两个Attribute - Foldout:可以有任意个数的Child Element,有个Toggle可以开启或者隐藏其Conten,应该本质是BinndableElement
这些Element都是在UnityEngine.UIElements下
Templates
一共三种:
- Template:
- Instance:
- TemplateContainer:
太多了,自己看吧。。。。
https://docs.unity3d.com/2021.2/Documentation/Manual/UIE-ElementRef.html
Unity style sheets (USS)
每个Visual Element都有一个style属性,可以使用USS文件来定义它的UI,规则如下:
- 后缀为.uss
- 只支持style rules(?)
- Style rules由一个Selector和一个declaration block组成
- The selector identifies which visual element the style rule affects.
- The declaration block, enclosed by curly braces, contains one or more style declarations. Each style declaration is comprised of a property and a value. Each style declaration ends with a semi-colon.
- style property是一个literal,when parsed, must match the target property name.
Style Rule
我理解的就是语法规则,如下所示:
selector {
  property1:value;
  property2:value;
}
Attaching USS to visual elements
- uss添加到visual element之后,还会应用到其所有的子elements上
- 使用
AssetDatabase.Load()或Resources.Load()加载文件,使用VisualElement.styleSheets.Add()添加stylesheet
Style matching with rules
StyleSheet可以直接添加到一个Visual Tree上,它会自动去匹配:
/* 自动匹配叫做Button的Visual Element */
Button {
  width: 200px;
}
USS Selector
参考:https://docs.unity3d.com/2020.1/Documentation/Manual/UIE-USS-Selectors-Complex.html
USS Selector负责根据uss文件里的内容名字,找到对应匹配的Style Rule,在我理解,Selector本质就是一些语法,通过不同的语法,可以实现uss里的Style Rule能应用到指定的Visual Element上
常见的写法:
#name{}
Button{}
.classlist{}

// 两个selector直接组合, 代表层级关系
#container1 .yellow 		// 名为container1的带.yellow的selector的子element
{
    background-color: yellow;
}

// 直接父element为selector1,且自身element为selector2
selector1 > selector2 {...}

// 满足任意一个selector的element,相当于 或 操作
selector1, selector2 {...}// 不太确定, 后面加不加空格

// 既满足selector1, 也满足selector2,相当于 与 操作
selector1selector2 {...}

// *代表所有的element
selector1 > * > selector2{..}
PS:奇怪的是,如果我想要同时满足两个selector,在uss里应该是selector1selector2,跟css是一样的,中间没有空格,但是我试了一下,好像会失败(应该是我的问题),我后面想了别的办法,比如通过代码添加selector和删除selector
uss里实现类似if else的判断
之前想在uss里写类似if else的判断,为了适配Unity不同的风格,因为Unity有白色和黑色两种风格,但是后来发现好像不可以写。但是我通过两种selector,可以模拟条件判断,比如我在代码里根据EditorGUIUtility.isProSkin添加whiteselector和blackselector,就可以进行区分了
附录
删除Visual Element的写法
// 删除一整个数组的UI Element
for (int i = 0; i < modelAreasUI.Count; i++)
{
    modelAreasUI[i].parent.Remove(modelAreasUI[i]);
}
modelAreasUI.Clear();
XML Elements vs. Attributes
XML的Element可以拥有Attribute,二者是从属关系,比如下面的
<person gender="female">
里的person是Element,而gender是Attribute
再看两个例子:
 <!-- 第一个例子 -->
<person gender="female">
  <firstname>Anna</firstname>
  <lastname>Smith</lastname>
</person>

 <!-- 第二个例子 -->
<person>
  <gender>female</gender>
  <firstname>Anna</firstname>
  <lastname>Smith</lastname>
</person>
第一个例子里,gender是Attribute,第二个例子里,gender是element
什么是XML Schema
参考来源:https://www.w3schools.com/xml/schema_intro.asp
https://www.differencebetween.com/difference-between-xml-and-vs-xsd/
schema翻译过来是模式、概要和议程。在计算机术语里,schema经常用于描述不同类型的数据的structure,最通用的就是数据和XML的schemas。
An XML Schema describes the structure of an XML document. The XML Schema language is also referred to as XML Schema Definition (XSD). 如下所示是一个XSD的例子:
<?xml version="1.0"?>
<xs:schema xmlns:xs="http://www.w3.org/2001/XMLSchema">

<xs:element name="note">
  <xs:complexType>
    <xs:sequence>
      <xs:element name="to" type="xs:string"/>
      <xs:element name="from" type="xs:string"/>
      <xs:element name="heading" type="xs:string"/>
      <xs:element name="body" type="xs:string"/>
    </xs:sequence>
  </xs:complexType>
</xs:element>

</xs:schema>
核心在于,xml schema旨在定义XML文档本身的结构和内容,xml和xml schema的区别,也可以认为是XML和XSD的区别。在我理解,比如说xml里的node的节点关系,element可以添加attribute这些,应该都是schema来设置的。
flex-grow属性是干嘛的
参考链接:https://css-tricks.com/snippets/css/a-guide-to-flexbox/
在VisualElement里有一个Property:
StyleFloat flexGrow: Specifies how much the item will grow relative to the rest of the flexible items inside the same container.
本质上flexGrow是一个float值,这个概念源于Flexbox Layout,用于为那些尺寸不确定、或者说是动态的Box进行布局的分配,其核心在于,在一个固定尺寸的Container里,如何灵活的变化里面的Box的尺寸,让他们能布局在Container里
The Flexbox Layout (Flexible Box) module (a W3C Candidate Recommendation as of October 2017) aims at providing a more efficient way to lay out, align and distribute space among items in a container, even when their size is unknown and/or dynamic (thus the word “flex”).
如下图所示,是Flexbox的相关概念:
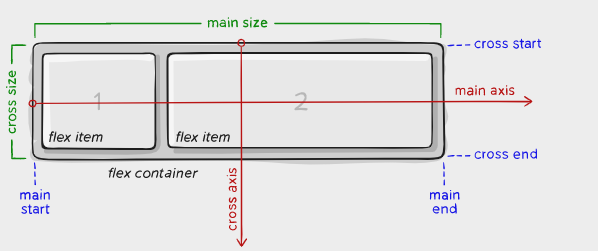
具体有以下概念:
- main axis:该轴的方向决定了flex item的摆放方向,具体是水平摆放还是竖直摆放,取决于
flex-direction属性 - main-start | main-end:代表flex items沿着main axis的摆放区间
- main size:flex container沿着main axis的尺寸
- cross开头的相关的属性与main的差不多
uss或者说css相关的layout的代码,根据作用的对象,可以分为两种,由于Visual Element,往往是Parent作为所有Children的容器,所以这里分为:
- 作用在父节点,也就是容器上的属性
- 作用在子节点上的属性
作用在父节点,也就是容器上的属性
display
如下所示,可以定义一个允许子节点灵活变化的容器:
/* 可以选择flex或者inline-flex */
.container {
  display: flex; /* or inline-flex */
}
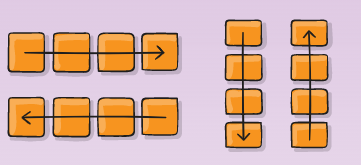
flex-direction
决定了main-axis的方向,也就是容器里的元素排列的方向,一共四种:左到右、右到左、上到下、下到上
.container {
  flex-direction: row | row-reverse | column | column-reverse;
}
如下图所示:
flex-wrap
正常情况下,flex container里的flex items会尽量放到一行(或一列),这里可以通过flex-wrap设置,允许它在需要的时候放到多行

.container {
  flex-wrap: nowrap | wrap | wrap-reverse;
}
- nowrap(default):默认下,所有的flex items都在一行
- wrap: 多行,从上到下
- wrap-reverse:多行,从下到上
flex-flow
它是flex-direction和flex-wrap的总体简称,默认的就是row nowrap:
/* main axis沿竖直方向, 而且有wrap */
.container {
  flex-flow: column wrap;
}
justify-content
This defines the alignment along the main axis. 还有一些定义,可以定义main axis上的flex items对齐的一些方法,如下图所示:

代码如下:
.container {
  justify-content: flex-start | flex-end | center | space-between | space-around | space-evenly | start | end | left | right ... + safe | unsafe;
}
align-items
This defines the default behavior for how flex items are laid out along the cross axis on the current line. 前面决定的是flex items沿着main axis的对齐,这里指的是flex items沿着cross axis的对齐,如下图所示,main-aixs是横向的,cross axis是纵向的:

写法如下:
.container {
  align-items: stretch | flex-start | flex-end | center | baseline | first baseline | last baseline | start | end | self-start | self-end + ... safe | unsafe;
}
align-content
感觉跟align-items很像,如下图所示:

代码如下:
.container {
  align-content: flex-start | flex-end | center | space-between | space-around | space-evenly | stretch | start | end | baseline | first baseline | last baseline + ... safe | unsafe;
}
子节点自身的属性
前面提到的flex属性都是针对flex container的,用于调整里面的元素的layout,下面介绍用于container里面具体的item的property
order
flex item有个属性叫order,用于确定其排序,如下图所示:

.item {
  order: 5; /* default is 0 */
}
flex-grow
This defines the ability for a flex item to grow if necessary. 其实就是在它所有的兄弟里面,它试图占有的权重值,如下图所示,权重为2的,长度也是2倍,如果所有的flex item的flex-grow都是1,那么他们的长度还会是一样的:

.item {
  flex-grow: 4; /* default 0 */
}
flex-shrink
如果有必要的话,一个flex item会收缩
.item {
  flex-shrink: 3; /* default 1 */
}
flex-basis
代表元素被分配尺寸之前的默认尺寸,代码如下:
.item {
  flex-basis:  | auto; /* default auto */
}
- auto:会基于flex-grow计算额外的空间
除了auto,还有: - content:基于item的content计算size
- 0:the extra space around content isn’t factored in.
flex
flex-grow(子节点扩大权重)、flex-shrink(允许收缩的程度)和flex-basis(基本默认尺寸)这三个属性的总体简称,代码如下:
/*It is recommended that you use this shorthand property rather than set the individual properties. The shorthand sets the other values intelligently.*/
.item {
  flex: none | [ <'flex-grow'> <'flex-shrink'>? || <'flex-basis'> ]
}
align-self
自定义一个元素的alignment:

.item {
  align-self: auto | flex-start | flex-end | center | baseline | stretch;
}
UI Element的相关layout信息的总结
// 获得Visual Element的实际尺寸
element.resolvedStyle.width //(recommended)
element.resolvedStyle.height //(recommennded)

element.worldBound //(relative to the EditorWindow)
element.transform
element.layout
但是要注意一点,这些参数都不会在第一帧创建对应的element之后马上生效,而是需要等待Unity计算每个元素的size和position之后,才可以生效。
如果想要在该值可用后的第一时间读取该值,可以在该元素上登记GeometryChangeEvent回调函数
VisualTreeAsset
在代码里看到了这个类,主要是API方面,类的定义如下:
// 此类的实例表示一个Visual Element的Tree, 这个Tree是从UXML文件里读取出来的
// 在UXML文件里, 每一个Node(xml概念里的Node)都代表一个VisualElementAsset
public class VisualTreeAsset : ScriptableObject
{
    public VisualTreeAsset();
   	...
}
其实这个类就是帮助从UXML文件里,得到对应的Visual Element的,代码如下所示:
VisualTreeAsset template = EditorGUIUtility.Load("Assets/TrainningDataViewer.uxml") as VisualTreeAsset;
VisualElement root = template.CloneTree();
Unity自带的Manipulator
如下图所示,在UnityC#的源码里去引用得到的:

分为两种,一类是在UnityEditor下用到,这里提到的Inserter、SelectionDropper、ShortcutHandler和ContentZoomer都是在GraphView的Namespace里提供的,而MouseManipulator是Unity UI Elements命名空间下的。
继承MouseManipulator的有:

其中,ElementResizer、ClickSelector、ContentDragger、Dragger、EdgeConnector、EdgeManipulator、FreehandSelector和RectangleSelector都是在GraphView的命名空间下的
UI Element如何创建Enum Field
其实在UI Samples里都有介绍,代码如下:
// 在uxml里加入Enum Field(也可以在代码里加入)
<uie:EnumField label="MyEnum" value="2D" name="MyEnum"/>

// 在C#脚本里
enum MyEnum
{
	One,
	Two
}

var enumField = rootVisualElement.Q<EnumField>("MyEnum");
enumField .Init(MyEnum.One);// 初始值
enumField .value = MyEnum.Two;// 再设别的值
UI Element的PopupField的使用
参考链接:https://docs.unity3d.com/Packages/com.unity.ui@1.0/api/UnityEditor.UIElements.PopupField-1.html
构造函数的接口:
public PopupField(string label, List<T> choices, T defaultValue, Func<T, string> formatSelectedValueCallback = null, Func<T, string> formatListItemCallback = null)
但这玩意儿好像没有对应的Factory代码,无法在UXML里使用,实际好像只能在C#里使用:
List<string> s = new List<string>();
s.Add("321");
s.Add("11");
var ClipsField = new PopupField<string>("Choose Clips", s, "11");
Add(ClipsField);// 加到一个Visual Element里
效果如下图所示,跟EnumField有点像:
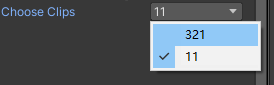
可以通过下面的方式直接进行选择:
// 相当于点选第21个choice
ClipsField.index = 20;
可以通过反射,获取里面的choices:
_graphFields = new PopupField<string>(graphNames, 0);

Type popupFieldType = typeof(PopupField<string>);
FieldInfo fieldInfo = popupFieldType.GetField("m_Choices",
	BindingFlags.NonPublic | BindingFlags.Instance);

var _graphFieldChoices = (List<string>)fieldInfo.GetValue(_graphFields);
UI Element接受Keyboard Event
参考:https://forum.unity.com/threads/any-good-way-to-find-out-if-a-keyboard-key-is-pressed-with-the-mouse-over-a-visualelement.1063190/
相关的event可以写在MouseManipulator类里,不过使用之前,一定要注意,这里的Keyboard Event只对focused element起作用,所以要保证:
focusable = true;
然后还要保证接受的Element处于focused状态
UI Element在鼠标hover的时候改变颜色
这种判断UI Element的UI状态的,Unity里叫做Pseudo-classes,有这么几种:

举个例子:
-- 连续用两个: 来表示两个状态的与
Toggle:checked:hover
{
  background-color: yellow;
}
如下图所示:

再比如我自己创建的继承于Button的类:
AnimClipButton:hover
{
  background-color: rgba(99, 99, 99, 255);
}

// 注意普通的  background-color也要写在这里,不要用脚本控制,不然脚本控制颜色的优先级永远高于stylesheets
// 也不要直接更改Button类的background-color,可能跟Unity对Button自身的Stylesheets起冲突
AnimClipButton
{
  background-color: rgba(56, 56, 56, 255);
}
样子是这样:

我还尝试在自己继承的Button类上面加,focus的代码,这么写:
// cs文件里
myBtn.focusable = true

// uss文件里
MyButton:focus
{
  background-color: rgba(99, 99, 99, 255);
}
但是没有效果,可能是只有继承了Unity的UI Element的Focusable类才可以:
禁止ScrollView的滚动
比如说我在我按住Ctrl键的时候,滚轮,不想让Unity的ScrollView自己滚动,我做了这个代码:
// MouseManipulator里
private void OnKeyDown(KeyDownEvent evt)
{
	bool _ctrlPressed = evt.keyCode == KeyCode.LeftControl;

	if (_ctrlPressed)
	{
		target.CaptureMouse();
		// 按住Ctrl时, 禁止ScrollView的滚动,  _wndRef是manipulator存的EditorWnd的引用, 其实就是target
        _wndRef.SwitchScrollViewScroll(false);
	}
}

private void OnKeyUp(KeyUpEvent evt)
{
    if (evt.keyCode == KeyCode.LeftControl)
    {
        _wndRef.SwitchScrollViewScroll(true);
        target.ReleaseMouse();
    }
}

// EditorWindow里, 它存了对应的ScrollView的引用
// 一种Trick, 用于在滚动鼠标滑轮时禁止ScrollView滚动
internal void SwitchScrollViewScroll(bool enabled)
{
    if (enabled)
        _MyScrollView.verticalPageSize = 20.0f;// 默认Unity的值为20.0f
    else
        _MyScrollView.verticalPageSize = 0.0f;
}
代码控制ScrollView的Slider滚动
代码如下:
private void _LoadTemplate()
{
	_verticalScroller = _myScrollView.Q<Scroller>(classes: "unity-scroller--vertical");
}

internal void ScrollByArrowKey(bool up)
{
    if (up)
        _verticalScroller.ScrollPageUp();
    else
        _verticalScroller.ScrollPageDown();
}

internal void ScrollByPageKey(bool up)
{
    if (up)
        _verticalScroller.ScrollPageUp(_verticalClipsAreaScroller.slider.pageSize);
    else
        _verticalScroller.ScrollPageDown(_verticalClipsAreaScroller.slider.pageSize);
}
看了下Unity的C#源码,感觉即使没有这个ScrollPageDown的接口,这么写也不是不行:
// 其实就是把ScrollPageUp的底层代码拿出来而已
float factor = inputValue;
var slider = _verticalSlider;
if (up)
    slider.value -= factor * (slider.pageSize * (slider.lowValue < slider.highValue ? 1f : -1f));
else
    slider.value += factor * (slider.pageSize * (slider.lowValue < slider.highValue ? 1f : -1f));
使用VisualElement.Query获取子节点数组
List<VisualElement> hierarchyItems = wnd._hierarchyPane.Query<VisualElement>(classes: "HierarchyItem").Build().ToList();
PropertyField里的bindingPath
参考:https://forum.unity.com/threads/setting-the-binding-path-to-a-value-inside-a-struct.839182/
参考:https://docs.unity3d.com/2019.3/Documentation/Manual/UIE-Binding.html
bindings的概念是把UI的Element与实际的SerializedProperty绑定到一起,从而我修改UI的值可以改变对应的数据。PropertyField是Unity提供的VisualElement的子类,其实就是一个带了数据的VisualElement,相当于数据的Wrapper,部分代码如下:
public class PropertyField : VisualElement, IBindable
{
    public PropertyField();
    public PropertyField(SerializedProperty property);
    public PropertyField(SerializedProperty property, string label);

	public IBinding binding { get; set; }
	public string bindingPath { get; set; }
	public string label { get; set; }
}
其bindingPath,其实也就是Property在SerializedProperty里的Path,示例代码如下:
using UnityEditor;
using UnityEngine;
using UnityEngine.UIElements;
using UnityEditor.UIElements;
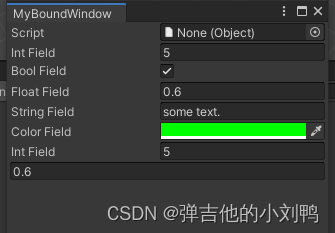
public class BindableObject : ScriptableObject
{
public int intField = 5;
public bool boolField = true;
public float floatField = 0.6f;
public string stringField = "some text.";
public Color colorField = Color.green;
}
public class MyBoundWindow : EditorWindow
{
[MenuItem("UIElements/MyBoundWindow")]
public static void ShowWindow()
{
MyBoundWindow wnd = GetWindow<MyBoundWindow>();
wnd.titleContent = new GUIContent("MyBoundWindow");
}
public BindableObject m_BindableObject = null;
public void OnEnable()
{
m_BindableObject = ScriptableObject.CreateInstance<BindableObject>();
var serializedObject = new SerializedObject(m_BindableObject);
// Each editor window contains a root VisualElement object
VisualElement root = rootVisualElement;
// 获取m_BindableObject对象的每个可序列化的Property, 为其创建PropertyField
SerializedProperty property = serializedObject.GetIterator();
// true参数为enterChildren, 对于第一个绘制的对象(serializedObject)而言, 其children
// 也就是其内部数据, 需要被绘制出来, 所以传入true
property.NextVisible(true);
do
{
// Create the UIElements PropertyField.
var uieDefaultProperty = new PropertyField(property);
root.Add(uieDefaultProperty);
}
while (property.NextVisible(false));
// Also, 额外再绘制一次intField, 这里的bindingPath是intField
property = serializedObject.FindProperty("intField");
root.Add(new PropertyField(property));
// Also, 额外再绘制一次intField
root.Add(new FloatField() { bindingPath = "floatField" });
root.Add(new PropertyField() { bindingPath = "m_BindableObject" });
// Bind the entire window.
root.Bind(serializedObject);
}
}
绘制结果如下,注意这里的m_BindableObject的默认bindingPath为m_Script:
PropertyField的回调
Unity版本为2019.4,参考:https://forum.unity.com/threads/register-callback-question.858193/
貌似不支持自定义数据类的值改变的回调,只支持primitive类型的回调,举个例子:
// assetField是一个PropertyField, Property类型为我自定义的ScriptableObject类型
assetField.RegisterCallback<ChangeEvent<string>>(OnSelectedAssetChanged);// 正确, 传入的是asset的名字
assetField.RegisterCallback<ChangeEvent<MyScriptableObject>>(OnSelectedAssetChanged);// 错误, 回调不会产生
不过这样写的话,在OnSelectedAssetChanged函数里无法直接获取新的ScriptableObject的值,因为这个时间点赋值行为还未产生,但是又无法从string里获取值(可以通过string读取资产,只要保证没有同名资产),所以可以通过EditorApplication.delayCall,保证赋值后,再进行操作。
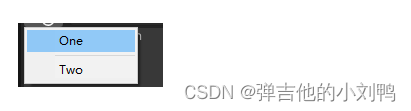
UI Element添加下拉菜单
比如是个Button:
m_AddBtn = this.Q<Button>("addButton");
m_AddBtn.clicked += OnAddBtnClicked;

private void OnAddBtnClicked()
{
    var menu = new GenericMenu();
    menu.AddItem(new GUIContent("One"), false, MyFuncCallback);

    menu.AddSeparator("");
    menu.AddItem(new GUIContent("Two"), false, MyFuncCallback);
    menu.DropDown(m_AddBtn.worldBound);
}
效果如下图所示:
UI element里添加事件
事件不一定非要在EditorWindow的派生类里的OnGui函数里去处理,也可以在UI Element里处理,应该是处于focus状态下的Element可以接受Event,代码也很简单:
private void AddCallbacksForSampleArea(VisualElement sampleArea)
{
	sampleArea.RegisterCallback<DragUpdatedEvent>(DragUpdatedCallback);
	sampleArea.RegisterCallback<DragPerformEvent>(DragPerformedCallback);
    sampleArea.RegisterCallback<KeyDownEvent>(KeyDownCallback);
    sampleArea.RegisterCallback<MouseDownEvent>(MouseDownCallback);
}


 1232
1232


 被折叠的 条评论
为什么被折叠?
被折叠的 条评论
为什么被折叠?
 到【灌水乐园】发言


