


一.introduction
目前的计算机视觉算法任务,基于输出结果是否与输入图像在同一个参考系下,可以分为两类:
• 预测结果与输入不在同一个参考系:分类
• 预测结果与输入在同一个参考系:目标检测、语义分割、全景分割
从这个角度来看,基于BEV的自动驾驶感知算法,属于前一个类别,即预测结果与输入不在同一个参考系,这个最终得到的BEV结果属于本体车辆参考系。一般的做法是,通过算法模型,把属于多个参考系下的多模态数据,进行融合预测,形成在BEV参考系下的预测结果,如下图所示。
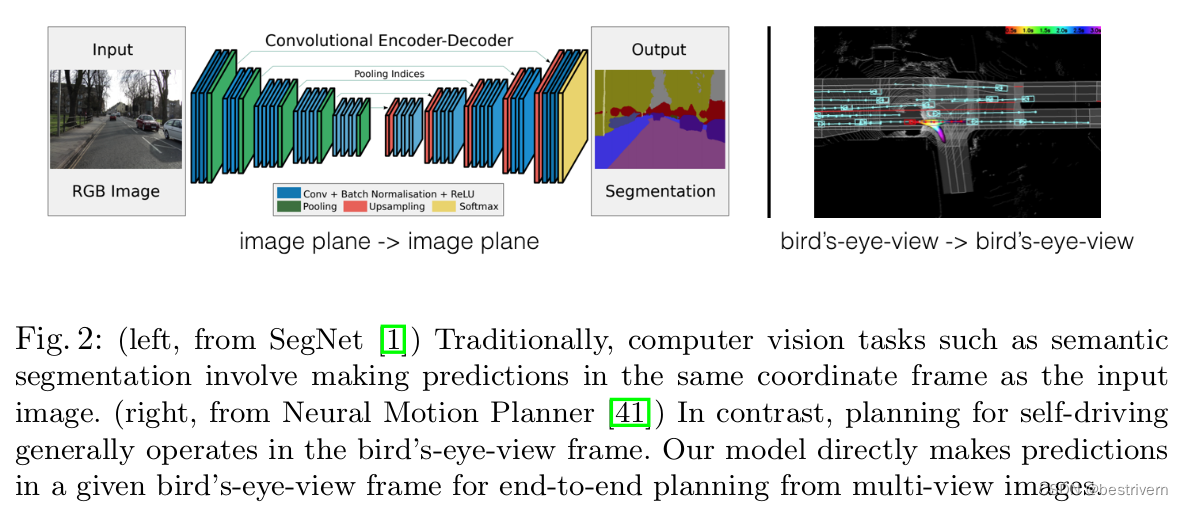
那么,多参考系转换问题,又引出了很多研究方法。例如,可以扩展传统单视图的范式,把它扩展到多视图模式上。具体来说,针对来自n个相机的图像数据,我们使用一个单视图检测器,针对每个相机的每张图像数据进行检测,然后将检测结果根据对应相机的内外参数,转换到车辆本体参考下,这样就完成了多视图的检测。
但是这样的简单后处理方法是有问题,比如,我们可能想要通过训练结果反馈,进行反向传播,并进一步调整对应相机的输入,这一步是无法完成,因为上面的转换是单向的,也就是说,我们无法反向区分不同特征的坐标系来源,因此我们无法轻易的使用一个端到端的模式来训练改善我们的自动感知系统。
那么,本文的做法就是通过,将二维图像特征生成3D特征(这一步对应论文中的Lift操作),然后把3D特征“拍扁”得到BEV特征图(这一步对应论文中的Splat),最终在BEV特征图上进行相关任务操作(这一步对应于Shooting)。
二.Methods
bev的区域设置为[-50, 50, 0.5]也就是一个200*200的区域,高度是[-10, 10, 20],
1.lift
从2D的图像特征获取其3D特征的表示形式,从而将各个相机从各自独立的2D图像坐标系转换到共享的3D坐标系。
图像输入是128*352
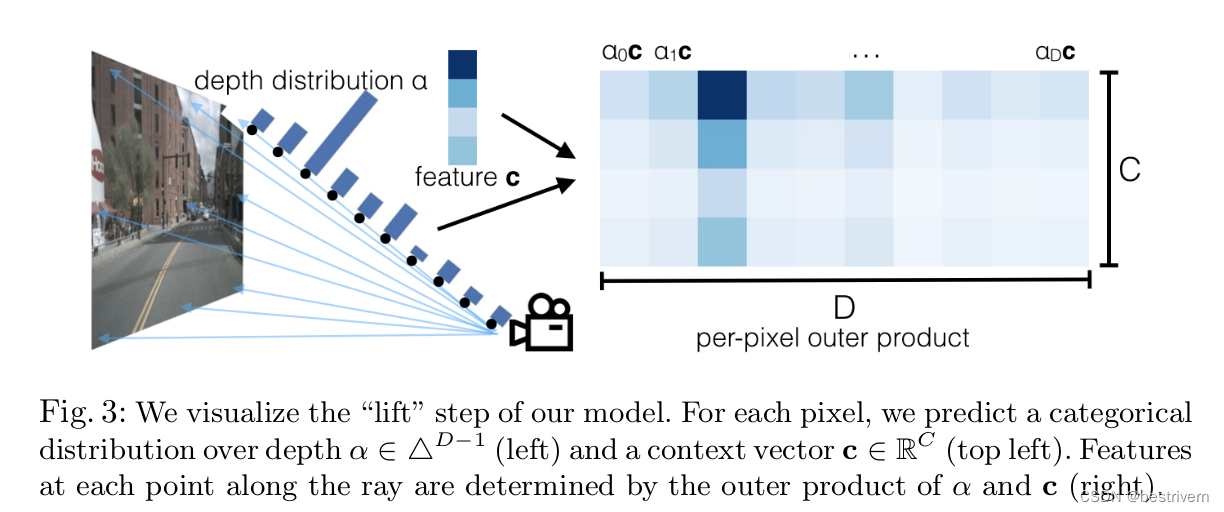
图像的2D特征是c*h*w维度的,也就是每一个像素点的特征都是c维的,然后每一个像素点具有d维的深度分布,那么这个点的三维特征是啥来,就由这c维图像特征和d维深度特征联合表示,也就是每一个点的特征是一个d,c,h,w的四维向量
图像中每一个像素点对应着世界坐标中的一条射线,那么这个像素点对应的深度应该是多少呢,按照1米的距离划分格子,用概率值表示该像素的深度值处于这个1米的格子内部的概率。
这里的深度分布怎么表示呢,本文是用softmax的概率表示,用一个D维的向量经过softmax来表示,D表示4-45米范围内以1米为间隔的距离,也就是 D=41,这样的话D上每个位置就代表了该像素处于这个深度范围的概率值
怎么从2D图像特征得到3D的BEV特征呢,分为2步,如下:
def get_voxels(self, x, rots, trans, intrins, post_rots, post_trans):
        # [2, 5, 41, 8, 22, 3]
        geom = self.get_geometry(rots, trans, intrins, post_rots, post_trans)  # B x N x D x H/downsample x W/downsample x 3
        # 3代表x,y,d三个维度
        # 图像的维度是靠着卷积实现的
        x = self.get_cam_feats(x)  # [2, 5, 41, 8, 22, 64]  B x N x D x H/downsample x W/downsample x C
        # feature上一个16*16的区域,代表一个1*1*1的体素大小
        x = self.voxel_pooling(geom, x)

        return x
第一步是生成一个视锥点云,这个视锥点云的作用就是在splat阶段根据这个点云来显式的引导2D的图像特征生成3D的BEV特征。
首先得到一个D*fH*fW的frustum,这个视锥是以相机光心为中心,长为imgw/16,宽为imgh/16,高从4-45的一个立方体,然后通过相机外参将这个立体体转换到bev下。也就是类似于把相机的可视区域转换到bev下。
def create_frustum(self):
        # make grid in image plane
        ogfH, ogfW = self.data_aug_conf['final_dim']
        fH, fW = ogfH // self.downsample, ogfW // self.downsample
        ds = torch.arange(*self.grid_conf['dbound'], dtype=torch.float).view(-1, 1, 1).expand(-1, fH, fW)
        D, _, _ = ds.shape
        xs = torch.linspace(0, ogfW - 1, fW, dtype=torch.float).view(1, 1, fW).expand(D, fH, fW)
        ys = torch.linspace(0, ogfH - 1, fH, dtype=torch.float).view(1, fH, 1).expand(D, fH, fW)

        # D x H x W x 3
        frustum = torch.stack((xs, ys, ds), -1)
        return nn.Parameter(frustum, requires_grad=False)

def get_geometry(self, rots, trans, intrins, post_rots, post_trans):
        """Determine the (x,y,z) locations (in the ego frame)
        of the points in the point cloud.
        Returns B x N x D x H/downsample x W/downsample x 3
        """
        B, N, _ = trans.shape

        # undo post-transformation
        # B x N x D x H x W x 3
        points = self.frustum - post_trans.view(B, N, 1, 1, 1, 3)
        points = torch.inverse(post_rots).view(B, N, 1, 1, 1, 3, 3).matmul(points.unsqueeze(-1))

        # cam_to_ego
        points = torch.cat((points[:, :, :, :, :, :2] * points[:, :, :, :, :, 2:3],
                            points[:, :, :, :, :, 2:3]
                            ), 5)
        combine = rots.matmul(torch.inverse(intrins))
        points = combine.view(B, N, 1, 1, 1, 3, 3).matmul(points).squeeze(-1)
        points += trans.view(B, N, 1, 1, 1, 3)

        return points
第二步是将输入图像通过网络得到特征,这一步比较简单
def get_cam_feats(self, x):
        """Return B x N x D x H/downsample x W/downsample x C
        """
        B, N, C, imH, imW = x.shape  # N cameras

        x = x.view(B*N, C, imH, imW)
        x = self.camencode(x)
        x = x.view(B, N, self.camC, self.D, imH//self.downsample, imW//self.downsample)
        x = x.permute(0, 1, 3, 4, 5, 2)

        return x
这个camencode比较显然,代码如下:
class CamEncode(nn.Module):
    def __init__(self, D, C, downsample):
        super(CamEncode, self).__init__()
        self.D = D
        self.C = C

        self.trunk = EfficientNet.from_pretrained("efficientnet-b0")

        self.up1 = Up(320+112, 512)
        self.depthnet = nn.Conv2d(512, self.D + self.C, kernel_size=1, padding=0)

    def get_depth_dist(self, x, eps=1e-20):
        return x.softmax(dim=1)

    def get_depth_feat(self, x):
        x = self.get_eff_depth(x)
        # Depth
        x = self.depthnet(x)

        depth = self.get_depth_dist(x[:, :self.D])
        new_x = depth.unsqueeze(1) * x[:, self.D:(self.D + self.C)].unsqueeze(2)

        return depth, new_x

    def get_eff_depth(self, x):
        # adapted from https://github.com/lukemelas/EfficientNet-PyTorch/blob/master/efficientnet_pytorch/model.py#L231
        endpoints = dict()

        # Stem
        x = self.trunk._swish(self.trunk._bn0(self.trunk._conv_stem(x)))
        prev_x = x

        # Blocks
        for idx, block in enumerate(self.trunk._blocks):
            drop_connect_rate = self.trunk._global_params.drop_connect_rate
            if drop_connect_rate:
                drop_connect_rate *= float(idx) / len(self.trunk._blocks) # scale drop connect_rate
            x = block(x, drop_connect_rate=drop_connect_rate)
            if prev_x.size(2) > x.size(2):
                endpoints['reduction_{}'.format(len(endpoints)+1)] = prev_x
            prev_x = x

        # Head
        endpoints['reduction_{}'.format(len(endpoints)+1)] = x
        x = self.up1(endpoints['reduction_5'], endpoints['reduction_4'])
        return x

    def forward(self, x):
        depth, x = self.get_depth_feat(x)

        return x
2.splat
这部分就是视锥点云和图像特征的空间尺度是等大的,也就是位置有着一一对应的关系,视锥点云转换到bev下后,每个点都会被分配到bev的柱子里面,这个柱子就是bev空间每个grid都对应一个[dx,dy,无限高]的立方体,这样每一个grid的特征就是在里面所有点对应的图像特征求和来表示的
代码如下
self.dx = nn.Parameter(dx, requires_grad=False)  # tensor([ 0.5000,  0.5000, 20.0000]) bev空间中x,y,z方向的单位长度
self.bx = nn.Parameter(bx, requires_grad=False)  # tensor([-49.7500, -49.7500,   0.0000]) bev空间x,y,z方向的中心点
self.nx = nn.Parameter(nx, requires_grad=False)  # tensor([200, 200,   1]) bev区域的长宽高


def voxel_pooling(self, geom_feats, x):
        B, N, D, H, W, C = x.shape
        Nprime = B*N*D*H*W

        # flatten x
        x = x.reshape(Nprime, C)

        # flatten indices
        geom_feats = ((geom_feats - (self.bx - self.dx/2.)) / self.dx).long()
        geom_feats = geom_feats.view(Nprime, 3)
        batch_ix = torch.cat([torch.full([Nprime//B, 1], ix,
                             device=x.device, dtype=torch.long) for ix in range(B)])
        geom_feats = torch.cat((geom_feats, batch_ix), 1)

        # filter out points that are outside box
        kept = (geom_feats[:, 0] >= 0) & (geom_feats[:, 0] < self.nx[0])\
            & (geom_feats[:, 1] >= 0) & (geom_feats[:, 1] < self.nx[1])\
            & (geom_feats[:, 2] >= 0) & (geom_feats[:, 2] < self.nx[2])
        x = x[kept]
        geom_feats = geom_feats[kept]

        # get tensors from the same voxel next to each other
        ranks = geom_feats[:, 0] * (self.nx[1] * self.nx[2] * B)\
            + geom_feats[:, 1] * (self.nx[2] * B)\
            + geom_feats[:, 2] * B\
            + geom_feats[:, 3]
        sorts = ranks.argsort()
        x, geom_feats, ranks = x[sorts], geom_feats[sorts], ranks[sorts]

        # cumsum trick
        if not self.use_quickcumsum:
            x, geom_feats = cumsum_trick(x, geom_feats, ranks)
        else:
            x, geom_feats = QuickCumsum.apply(x, geom_feats, ranks)

        # griddify (B x C x Z x X x Y)
        final = torch.zeros((B, C, self.nx[2], self.nx[0], self.nx[1]), device=x.device)
        final[geom_feats[:, 3], :, geom_feats[:, 2], geom_feats[:, 0], geom_feats[:, 1]] = x

        # collapse Z
        final = torch.cat(final.unbind(dim=2), 1)

        return final


 831
831

 被折叠的 条评论
为什么被折叠?
被折叠的 条评论
为什么被折叠?
 到【灌水乐园】发言


