


目录
1.1 使用硬件加速( nvvidconv omxh264enc)
2.1 使用硬件加速( nvvidconv omxh264enc)
在上一篇中,我们使用gstreamer-rtsp-server ,实现了USB相机转RTSP网络流的基本功能,但是效果很一般,接下来我们需要做优化,以提升其整体性能。
在gstreamer-rtsp-server 测试中,代码test-launch.c 编译后,我们可以通过输入指令,就可以实现功能,例如下面的命令:
./test-launch "( videotestsrc ! x264enc ! rtph264pay name=pay0 pt=96 )"将视频源从videotestsrc换成了USB相机后的指令为:
./test-launch --gst-debug-level=3 "( v4l2src device=/dev/video0 ! videoconvert! videoscale ! video/x-raw, width=640, height=480, framerate=25/1 ! queue ! x264enc bitrate=2048 ! rtph264pay name=pay0 pt=96 )"从这两条命令的对比中,我们其实不难发现:gstreamer-rtsp-server 主要是实现了封装RTSP留,并提供网络服务的功能,具体的视频从哪来,如何构建管道,使用说明插件,其实还是需要gstreamer来实现,那么有没有一种方法可以让我们使用gst-launch-1.0 先测试纯粹的参数,之后在使用测试代码打包封装RTSP进行测试呢?
可以尝试一线:
0. gst-launch-1.0测试封装前的参数
videotestsrc ! x264enc ! rtph264pay name=pay0 pt=96单纯的上面的一行命令显示是不行的,我们可以参考之前的使用测试,做一下对比和逐步演进,首先需要有gst-launch-1.0
gst-launch-1.0 videotestsrc ! x264enc ! rtph264pay name=pay0 pt=96其中:
-
videotestsrc 测试视频源,我们之前用了很多比较熟悉。
-
x264enc 为编码压缩插件,其输入为 video/x-raw ,输出为video/x-h264
-
rtph264pay 是将 H264 video 封装到RTP的包
我们先看看执行这条指令会出现什么结果?
nvidia@nvidia-desktop:~$ gst-launch-1.0 videotestsrc ! x264enc ! rtph264pay name=pay0 pt=96
Setting pipeline to PAUSED ...
Pipeline is PREROLLED ...
Setting pipeline to PLAYING ...
New clock: GstSystemClock
Redistribute latency...
ERROR: from element /GstPipeline:pipeline0/GstVideoTestSrc:videotestsrc0: Internal data stream error.
Additional debug info:
gstbasesrc.c(3055): gst_base_src_loop (): /GstPipeline:pipeline0/GstVideoTestSrc:videotestsrc0:
streaming stopped, reason not-linked (-1)
Execution ended after 0:00:00.107965294
Setting pipeline to PAUSED ...
Setting pipeline to READY ...
Setting pipeline to NULL ...
Freeing pipeline ...
可以看到会保存,但是是报videotestsrc0: Internal data stream error,所以解决它
下面是一条我们之前已经跑成功的指令:
#x264enc 其输入为 video/x-raw ,输出为video/x-h264
# mp4mux MP4 文件格式封装插件
# filesink location 老朋友了,保存文件
gst-launch-1.0 videotestsrc num-buffers=100 \
! 'video/x-raw,format=YUY2,width=1280, height=720, framerate=25/1' \
! videoconvert  \
! x264enc ! mp4mux ! filesink location=/home/nvidia/Pictures/x264-video-1280-720-25.mp4
我们参考它来进行改造:
#增加数据源格式参数
#增加videoconvert做格式转换
gst-launch-1.0 videotestsrc \
! 'video/x-raw,format=YUY2,width=1280, height=720, framerate=25/1' \
! videoconvert  \
! x264enc ! rtph264pay name=pay0 pt=96
继续报同样的错误,那开始怀疑是rtph264pay 必须需要一个下游的消费端来承接数据,先做个测试:
gst-launch-1.0 videotestsrc \
! 'video/x-raw,format=YUY2,width=1280, height=720, framerate=25/1' \
! videoconvert  \
! x264enc ! fakesink sync=false
这个可以正常执行,继续作个测试
gst-launch-1.0 videotestsrc \
! 'video/x-raw,format=YUY2,width=1280, height=720, framerate=25/1' \
! videoconvert  \
! x264enc ! rtph264pay name=pay0 pt=96 \
! fakesink sync=false
这个也是可以的,所以,应该是gstreamer-rtsp-server 的测试程序中,封装了承接RTSP包的插件,就没有问题,如果我们单独测试这个指令,就需要一些辅助,这种时候fakesink 模拟节点就能辅助你完成命令测试。
1.使用硬件加速插件,替换CPU的插件
书接上回,我们模拟了一条命令,来测试我们可以优化的插件。
原始命令:
#CPU videoconvert 视频转换
# CPU x264enc 264压缩
# rtph264pay 封装RTSP包
gst-launch-1.0 videotestsrc \
! 'video/x-raw,format=YUY2,width=1280, height=720, framerate=25/1' \
! videoconvert  \
! x264enc ! rtph264pay name=pay0 pt=96 \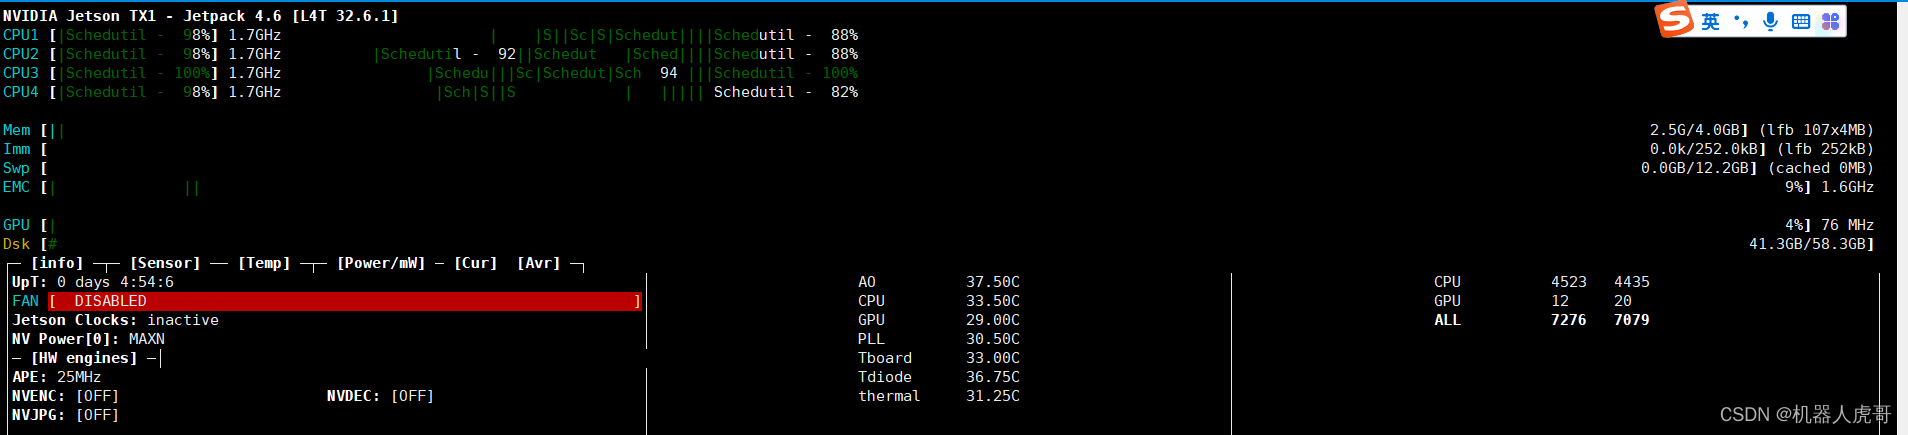
! fakesink sync=false我们在【GStreamer 】4-gstreamer 中在jeston TX1平台上的硬件编解码加速介绍_机器人虎哥的博客-CSDN博客介绍了TX1模组可以硬件加速的几个插件。我们现在来分别替换测试。
优化前的资源占用:
1.1 使用硬件加速( nvvidconv omxh264enc)
我们之前已经使用过这些插件,比如:
# omxh264enc 压缩,保存mp4文件
gst-launch-1.0 v4l2src device=/dev/video0 num-buffers=200 \
! 'video/x-raw,format=YUY2,width=640, height=480, framerate=25/1' \
! nvvidconv  \
! 'video/x-raw(memory:NVMM), format=(string)I420, width=640, height=480, framerate=25/1' \
! omxh264enc ! h264parse \
! mp4mux ! filesink location=/home/nvidia/Pictures/omxh264enc-video-640-480-25-1000.mp4 -e
我们 可以参考这个,来改一下条测试指令:
gst-launch-1.0 videotestsrc \
! 'video/x-raw,format=YUY2,width=1280, height=720, framerate=25/1' \
! nvvidconv  \
! 'video/x-raw(memory:NVMM), format=(string)I420, width=1280, height=720, framerate=25/1' \
! omxh264enc ! rtph264pay name=pay0 pt=96 \
! fakesink sync=false
改造后可以跑,看看资源占用情况:
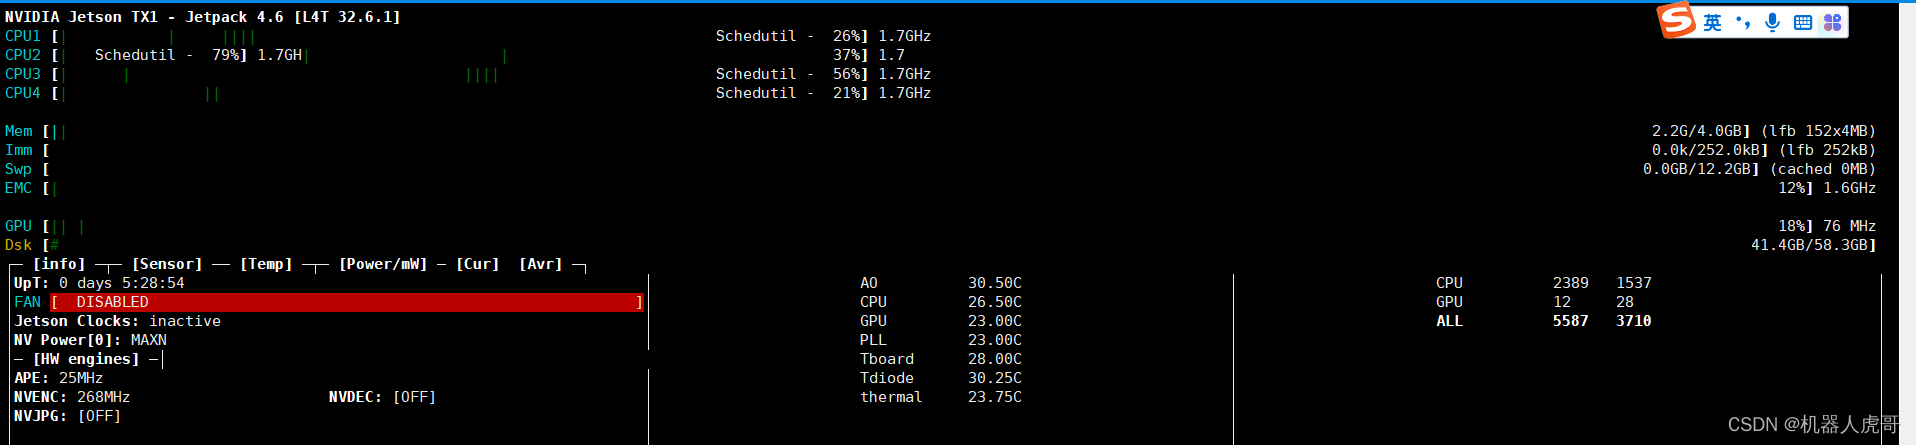
比起之前有优化.
这里我们主要使用了:
-
nvvidconv 做硬件转码加速,这个需要和omxh264enc配合使用
-
omxh264enc 硬件编码插件
2.使用硬件加速插件,实现USB转RTSP流
上一部分我们尝试改造了测试命令,现在我们使用加速插件,综合上面的测试,改造我们USB相机的指令。原始的指令为:
./test-launch --gst-debug-level=3 "( v4l2src device=/dev/video0 ! videoconvert! videoscale ! video/x-raw, width=640, height=480, framerate=25/1 ! queue ! x264enc bitrate=2048 ! rtph264pay name=pay0 pt=96 )"我们构造测试指令
gst-launch-1.0 v4l2src device=/dev/video0 \
! videoconvert ! videoscale  \
! video/x-raw, width=640, height=480, framerate=25/1 \
! queue ! x264enc bitrate=2048 !  rtph264pay name=pay0 pt=96
! fakesink sync=false
上面指令报错
nvidia@nvidia-desktop:~$ gst-launch-1.0 v4l2src device=/dev/video0 \
> ! videoconvert! videoscale  \
> ! video/x-raw, width=640, height=480, framerate=25/1 \
> ! queue ! x264enc bitrate=2048 !  rtph264pay name=pay0 pt=96
Setting pipeline to PAUSED ...
Pipeline is live and does not need PREROLL ...
Setting pipeline to PLAYING ...
New clock: GstSystemClock
Redistribute latency...
ERROR: from element /GstPipeline:pipeline0/GstV4l2Src:v4l2src0: Internal data stream error.
Additional debug info:
gstbasesrc.c(3055): gst_base_src_loop (): /GstPipeline:pipeline0/GstV4l2Src:v4l2src0:
streaming stopped, reason not-linked (-1)
Execution ended after 0:00:02.738632666
Setting pipeline to PAUSED ...
Setting pipeline to READY ...
Setting pipeline to NULL ...
Freeing pipeline ...
这种错误,一般是格式匹配问题。
gst-launch-1.0 v4l2src device=/dev/video0 \
! 'video/x-raw,format=YUY2,width=640, height=480, framerate=25/1' \
! videoconvert  \
!  x264enc bitrate=2048 !  rtph264pay name=pay0 pt=96   \
! fakesink sync=false


gst-launch-1.0 v4l2src device=/dev/video0 \
! 'video/x-raw,format=YUY2,width=640, height=480, framerate=25/1' \
! videoconvert  ! videoscale \
!  x264enc bitrate=2048 !  rtph264pay name=pay0 pt=96   \
! fakesink sync=false


gst-launch-1.0 v4l2src device=/dev/video0 \
! 'video/x-raw,format=YUY2,width=640, height=480, framerate=25/1' \
! videoconvert  ! videoscale \
! queue !  x264enc bitrate=2048 !  rtph264pay name=pay0 pt=96   \
! fakesink sync=false
以上都是可以正常跑起来的命令,我们在此基础上进行优化
2.1 使用硬件加速( nvvidconv omxh264enc)
参考之前的测试又换,我们下面这条命令基础上进行优化:
gst-launch-1.0 v4l2src device=/dev/video0 \
! 'video/x-raw,format=YUY2,width=640, height=480, framerate=25/1' \
! videoconvert ! videoscale \
! queue ! x264enc bitrate=2048 ! rtph264pay name=pay0 pt=96 \
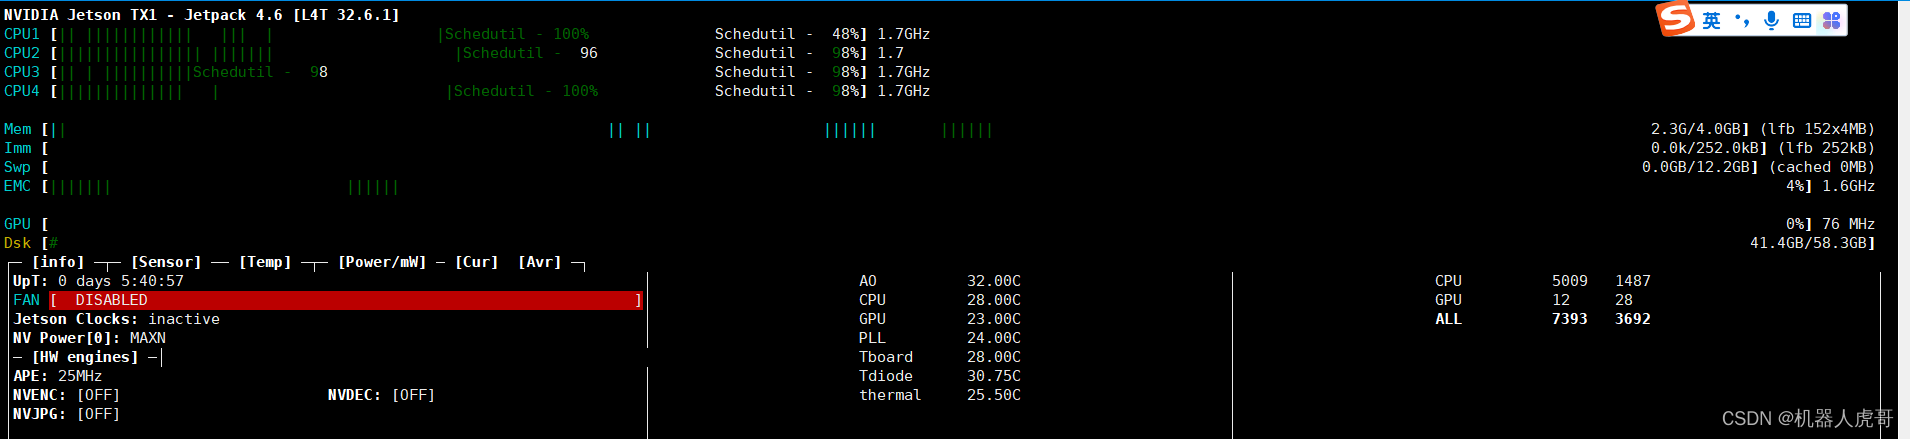
! fakesink sync=false优化前的CPU占用:
优化命令:
gst-launch-1.0 v4l2src device=/dev/video0 \
! 'video/x-raw,format=YUY2,width=640, height=480, framerate=25/1' \
! nvvidconv \
! 'video/x-raw(memory:NVMM), format=(string)I420, width=640, height=480, framerate=25/1' \
! queue ! omxh264enc bitrate=2048 ! rtph264pay name=pay0 pt=96 \
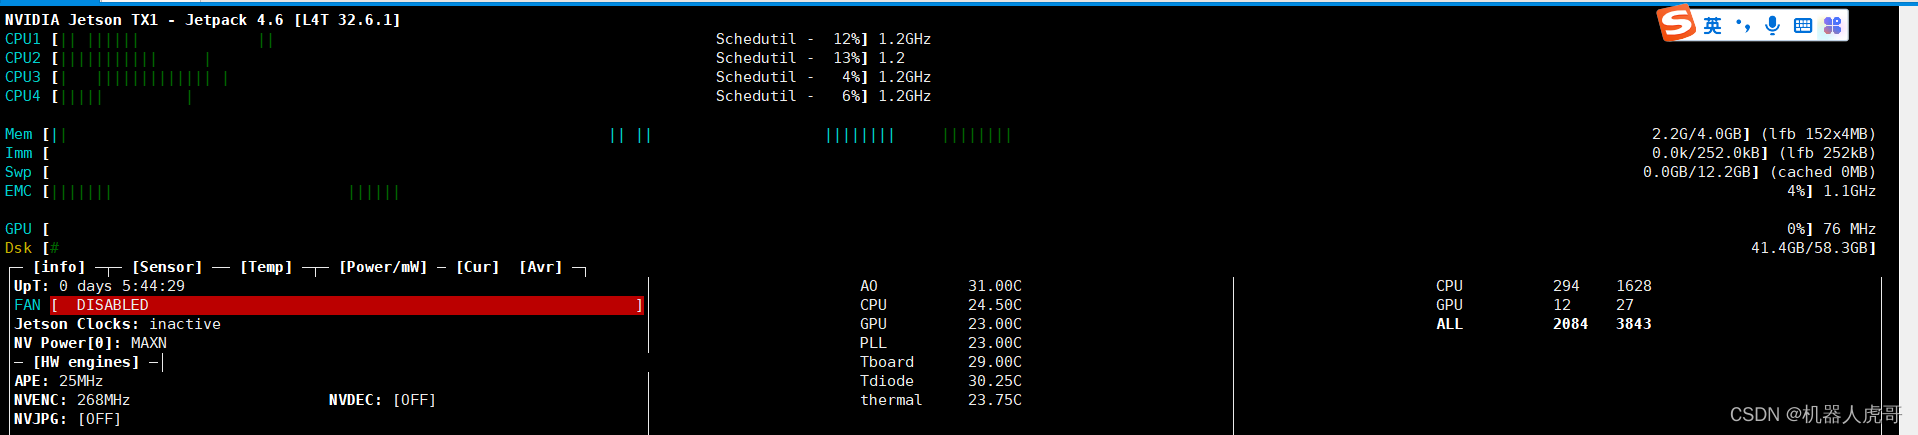
! fakesink sync=false优化后的资源占用:
gst-launch-1.0 v4l2src device=/dev/video0 \
! 'video/x-raw,format=YUY2,width=640, height=480, framerate=25/1' \
! videoconvert  ! videoscale \
! omxh264enc bitrate=2048 !  rtph264pay name=pay0 pt=96   \
! fakesink sync=false
2.2 使用优化后的命令重新构建RTSP服务器
上面,我们测试发现优化效果还算满意,接下来我们利用优化完的指令进行分装RTSP服务器。
原始的为:
./test-launch --gst-debug-level=3 "( v4l2src device=/dev/video0 ! videoconvert! videoscale ! video/x-raw, width=640, height=480, framerate=25/1 ! queue ! x264enc bitrate=2048 ! rtph264pay name=pay0 pt=96 )"优化后:
./test-launch --gst-debug-level=3 "( v4l2src device=/dev/video0 ! 'video/x-raw,format=YUY2,width=640, height=480, framerate=25/1' ! nvvidconv ! 'video/x-raw(memory:NVMM), format=(string)I420, width=640, height=480, framerate=25/1' ! queue ! omxh264enc bitrate=2048 ! rtph264pay name=pay0 pt=96 )"# 进入测试目录
cd /home/nvidia/Downloads/gst-rtsp-server/examples
#执行指令
./test-launch --gst-debug-level=3 "( v4l2src device=/dev/video0 ! 'video/x-raw,format=YUY2,width=640, height=480, framerate=25/1' ! nvvidconv ! 'video/x-raw(memory:NVMM), format=(string)I420, width=640, height=480, framerate=25/1' ! videoscale ! queue ! omxh264enc bitrate=2048 ! rtph264pay name=pay0 pt=96 )"播放rtsp流:
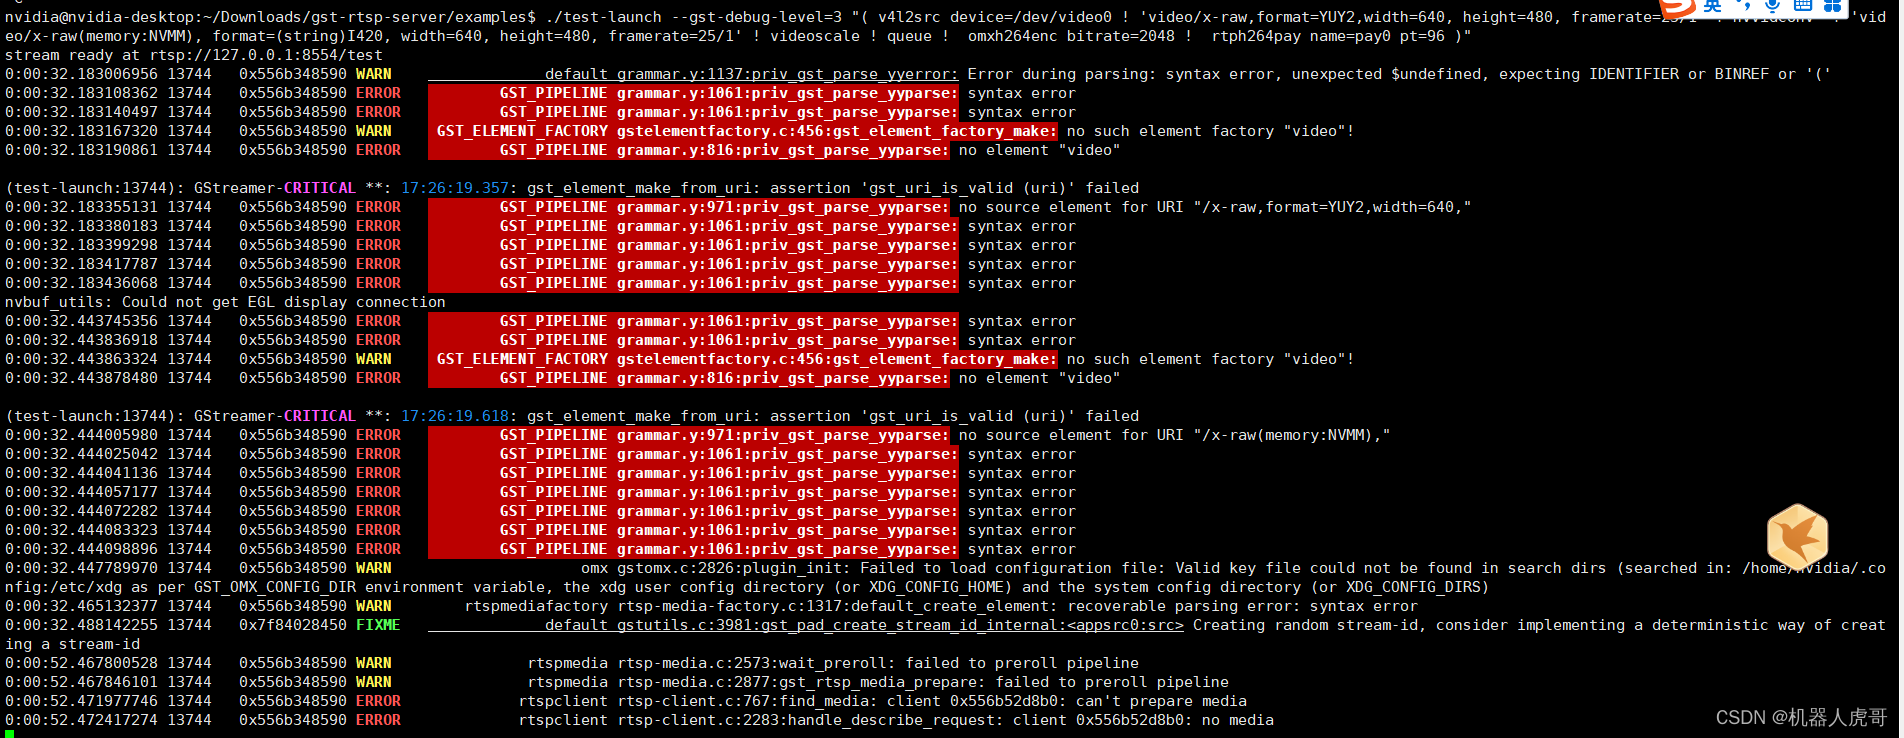
大片报错,说明还是有点问题,使用下面命令优化:
v4l2src device=/dev/video0 ! 'video/x-raw,format=YUY2,width=640, height=480, framerate=25/1' ! videoconvert ! videoscale ! omxh264enc bitrate=2048 ! rtph264pay name=pay0 pt=96 #执行指令
./test-launch --gst-debug-level=3 "(v4l2src device=/dev/video0 ! video/x-raw,format=YUY2,width=640, height=480, framerate=25/1 ! videoconvert ! videoscale ! omxh264enc bitrate=2048 ! rtph264pay name=pay0 pt=96 )"# 进入测试目录
cd /home/nvidia/Downloads/gst-rtsp-server/examples
#执行指令
./test-launch --gst-debug-level=3 "( v4l2src device=/dev/video0 ! video/x-raw,format=YUY2,width=640, height=480, framerate=25/1 ! nvvidconv ! video/x-raw(memory:NVMM), format=(string)I420, width=640, height=480, framerate=25/1 ! queue ! omxh264enc bitrate=2048 ! rtph264pay name=pay0 pt=96 )"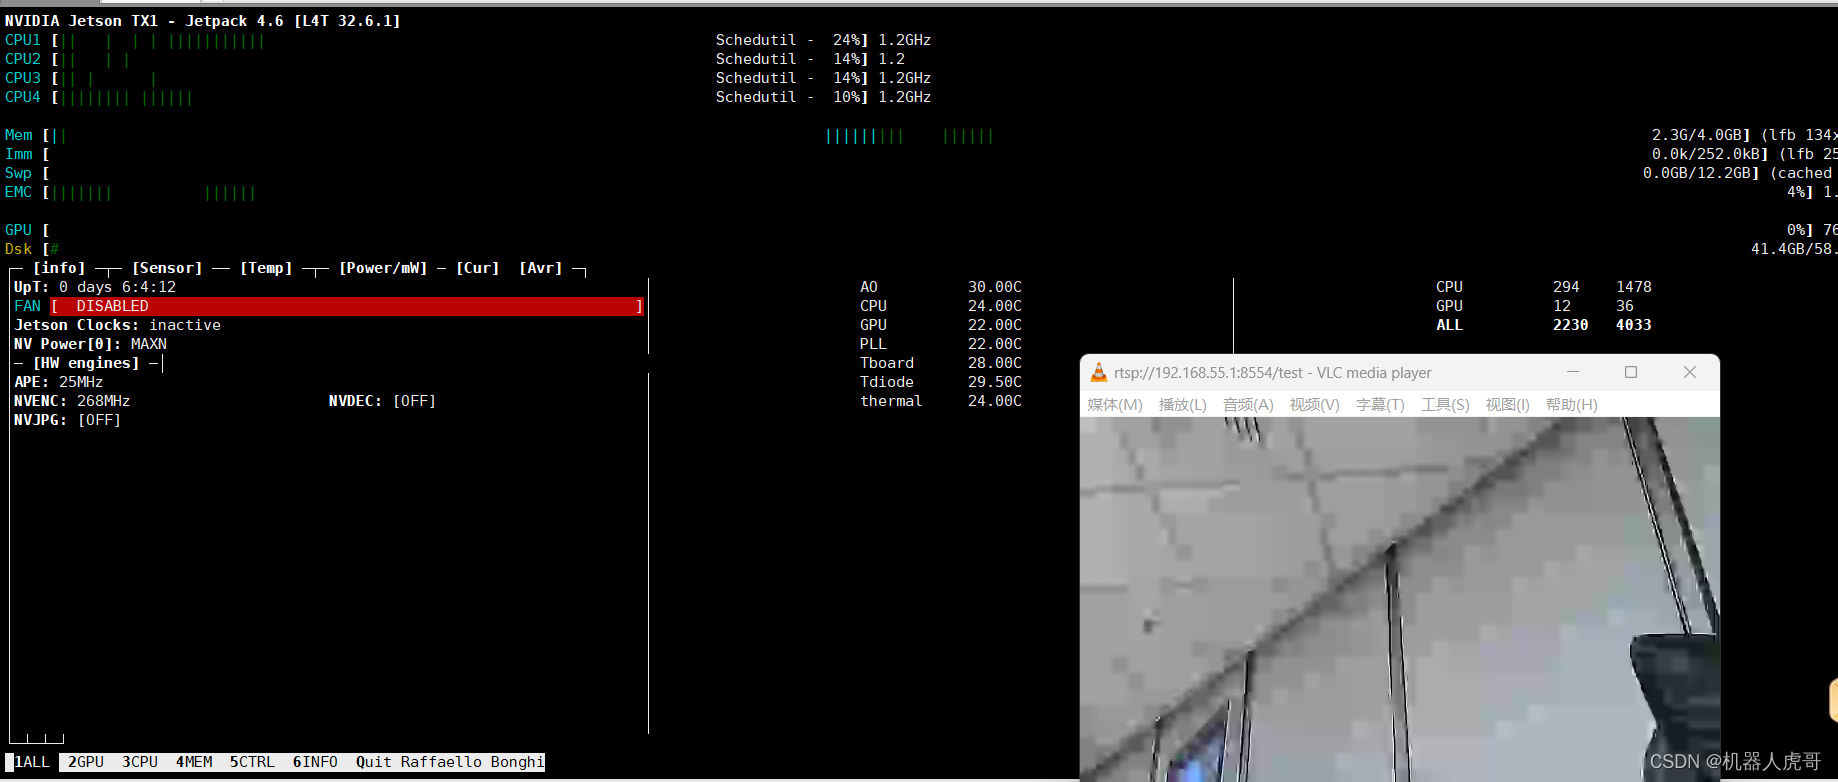
另外注意:目前只支持1路RTSP网络流。
虽然资源占用率是下降了,但是明显感觉,视频质量也变差了。所以换种格式输入看看。
# 进入测试目录
cd /home/nvidia/Downloads/gst-rtsp-server/examples
#执行指令
./test-launch --gst-debug-level=3 "( v4l2src device=/dev/video0 ! video/x-raw,format=YUY2,width=640, height=480, framerate=25/1 ! nvvidconv ! video/x-raw(memory:NVMM), format=(string)NV12, width=640, height=480, framerate=25/1 ! queue ! omxh264enc bitrate=2048 ! rtph264pay name=pay0 pt=96 )"
./test-launch --gst-debug-level=3 "( v4l2src device=/dev/video0 ! video/x-raw,format=YUY2,width=640, height=480, framerate=25/1 ! nvvidconv ! video/x-raw(memory:NVMM), format=(string)NV12 ! queue ! omxh264enc bitrate=2048 ! rtph264pay name=pay0 pt=96 )"换个格式,也还是一样,图像质量一般
后续我们的主要工作就是分两点:
-
详细了解rtph264pay omxh264enc 编解码压缩的细节,看看是不是可以优化延时和视频的清晰度
-
增加并发访问的路数,至少应该支持到20路才是一个比较合理的情况


 2488
2488


 被折叠的 条评论
为什么被折叠?
被折叠的 条评论
为什么被折叠?
 到【灌水乐园】发言


