


unity .shader
With the release of 2018.3, Shader Graph introduces a new Master Node for the High Definition Render Pipeline (HDRP). This new Master Node (called Lit Master) makes many of the advanced shading features found in HDRP accessible in Shader Graph!
随着2018.3的发布,Shader Graph引入了新的用于高清渲染管线(HDRP)的主节点。 这个新的主节点(称为Lit Master)使可在Shader Graph中访问HDRP中的许多高级着色功能!
These HD Lit Advanced Features, or HD Lit AF, include coat-mask, iridescence, translucency, subsurface scattering, and anisotropy.
这些HD Lit高级功能或HD Lit AF,包括掩膜,虹彩,半透明,表面下散射和各向异性。
This blog post will introduce you to some of these advanced features, and show you how to use them to create beautiful assets in HDRP using Shader Graph. You can download the sample project created for this blog post from GitHub. This simple project contains a bonsai tree and butterfly that make heavy use of iridescence and translucency.
这篇博客文章将向您介绍其中一些高级功能,并向您展示如何使用它们使用Shader Graph在HDRP中创建漂亮的资产。 您可以 从GitHub 下载为此博客文章创建的示例项目 。 这个简单的项目包含大量使用虹彩和半透明的盆景树和蝴蝶。
入门 (Getting Started)
Before you start creating your absurdly beautiful scenes, there are a few important clauses to be aware of. First, this master node only works within the HDRP. Second, there are no shading equivalents in the Lightweight Render Pipeline (LWRP) for the advanced shading options you will find on this node. If you only need the basic inputs for a PBR surface, we recommend sticking to the PBR master node.
在开始创建荒谬的美丽场景之前,需要注意一些重要的条款。 首先,此主节点仅在HDRP中工作。 其次,“轻量级渲染管线”(LWRP)中没有等效于您在此节点上找到的高级着色选项的着色。 如果只需要PBR曲面的基本输入,建议您坚持使用PBR主节点。
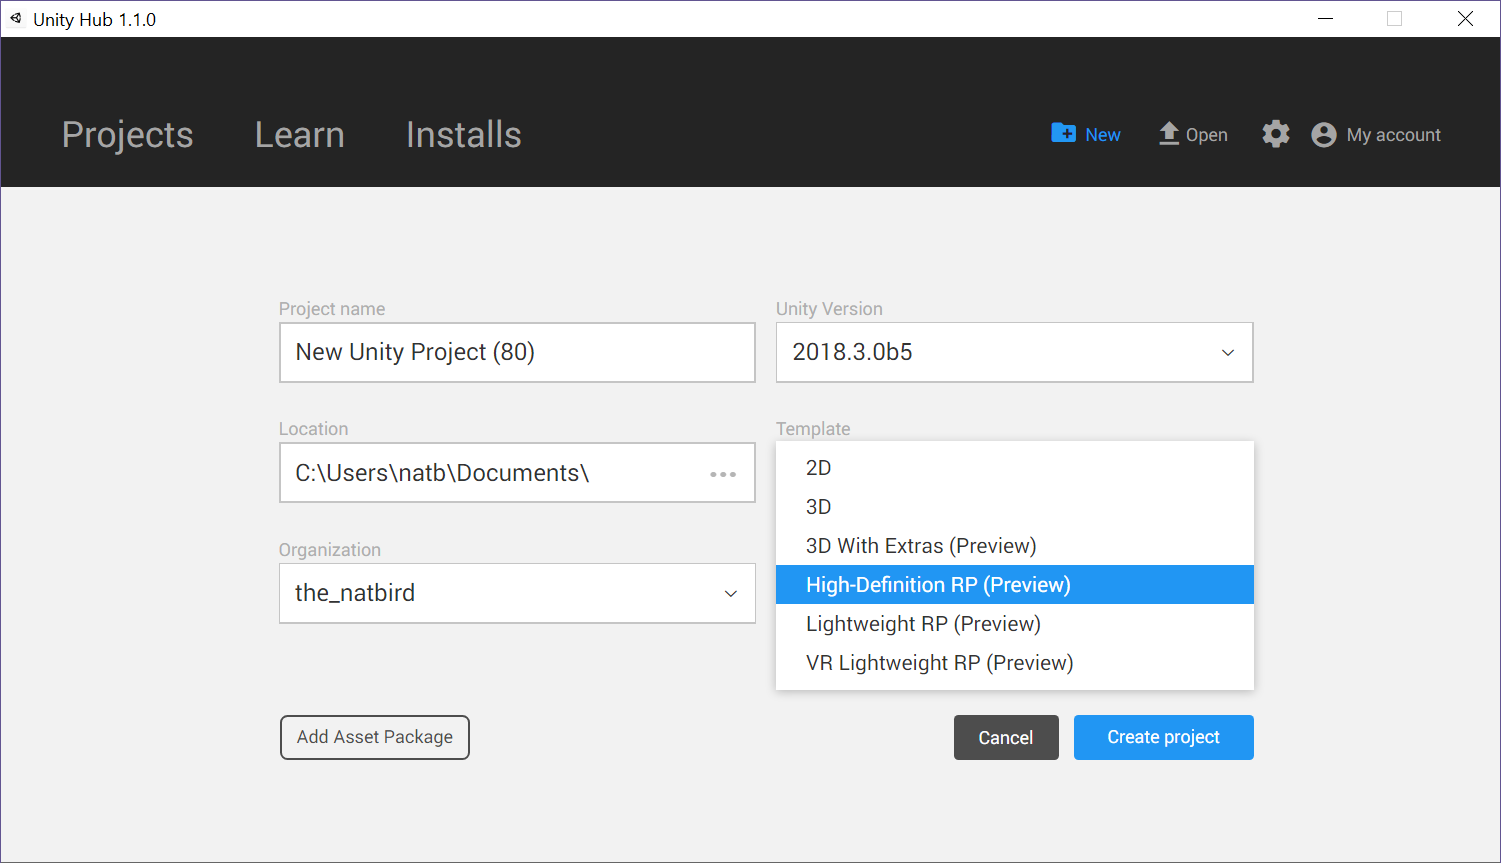
The quickest way to launch into HDRP is to select the High-Definition RP template from the launcher or Unity Hub. The example butterfly project also uses HDRP.
启动到HDRP的最快方法是 从启动器或Unity Hub中 选择 High-Definition RP 模板。 示例蝴蝶项目也使用HDRP。
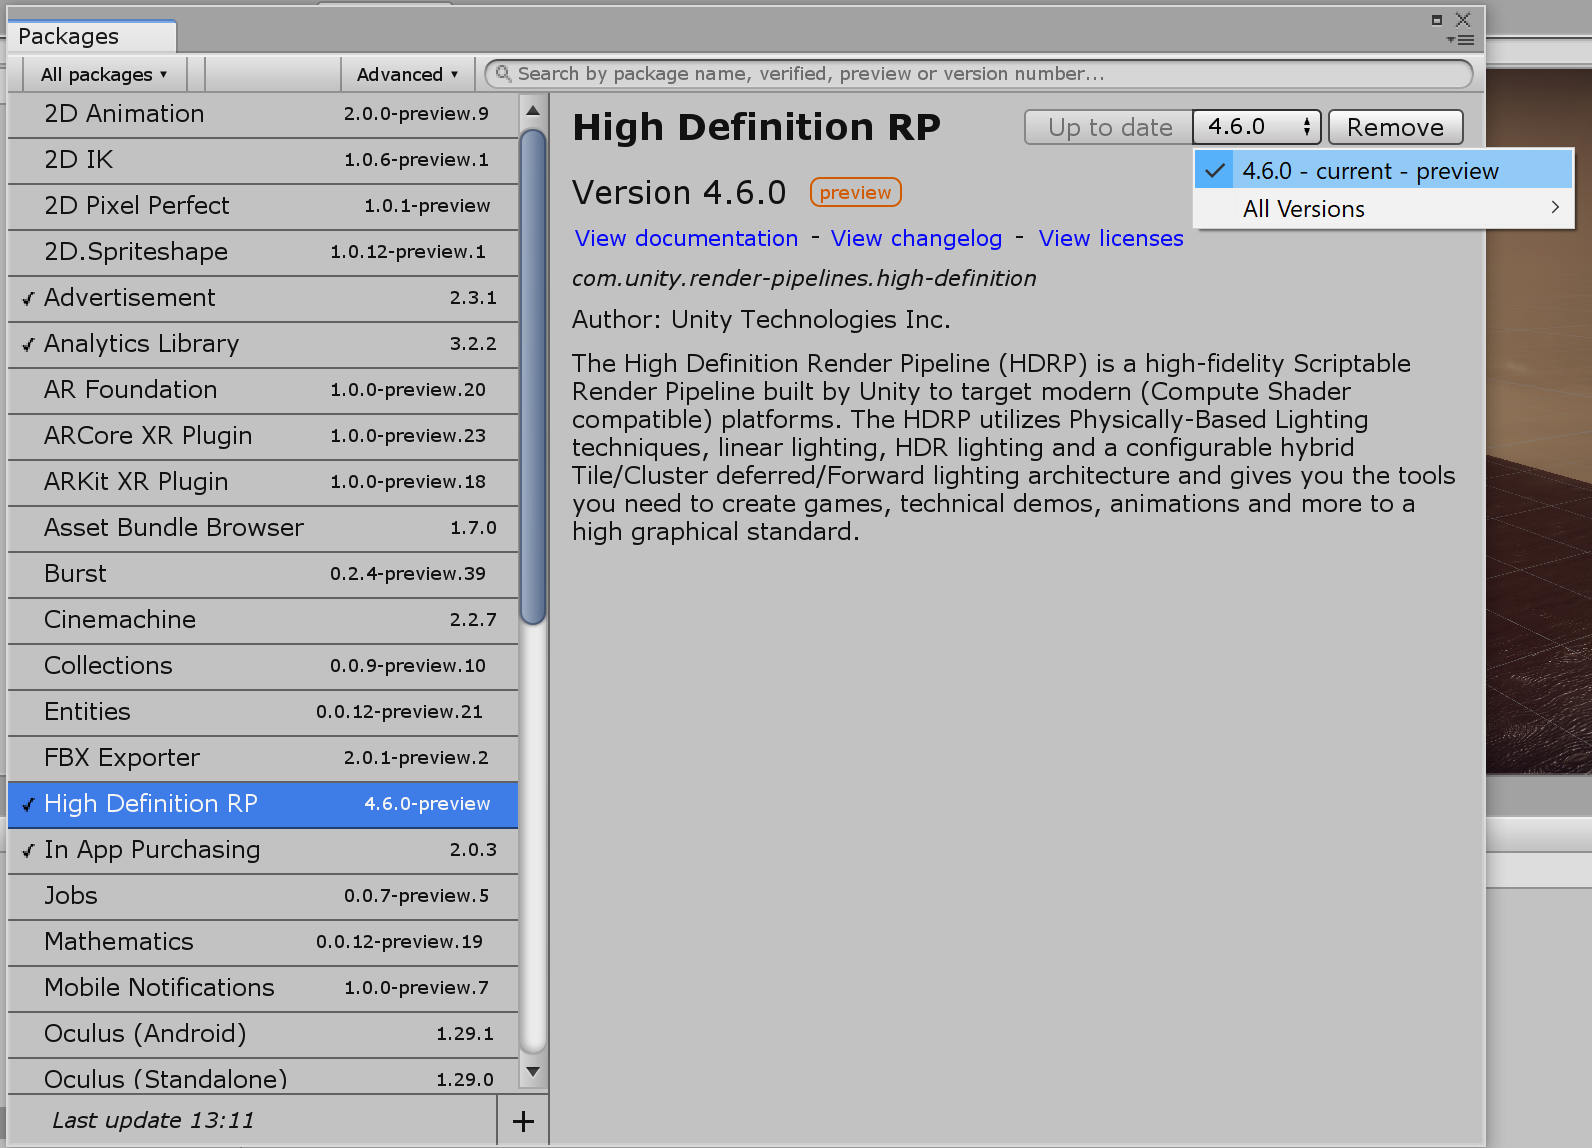
If you are creating a new project with the High-Definition RP template, we recommend you update the version of HDRP in the project from 4.1.0-preview to 4.6.0-preview. To update the version of HDRP, launch the Package Manager from Window > Package Manager. Select the High Definition RP package from the package list. In the top right, you will see an Update to button. Make sure the version to the right of that is 4.6.0, and then hit the Update to button.
如果要使用High-Definition RP模板创建新项目,建议将项目中HDRP的版本从4.1.0-preview更新到4.6.0-preview。 要更新HDRP的版本,请从 窗口 > 软件包管理器 启动软件包管理 器 。 从软件包列表中 选择“ High Definition RP ”软件包。 在右上角,您将看到“ 更新到” 按钮。 确保右侧的版本是 4.6.0 ,然后单击“ 更新到” 按钮。
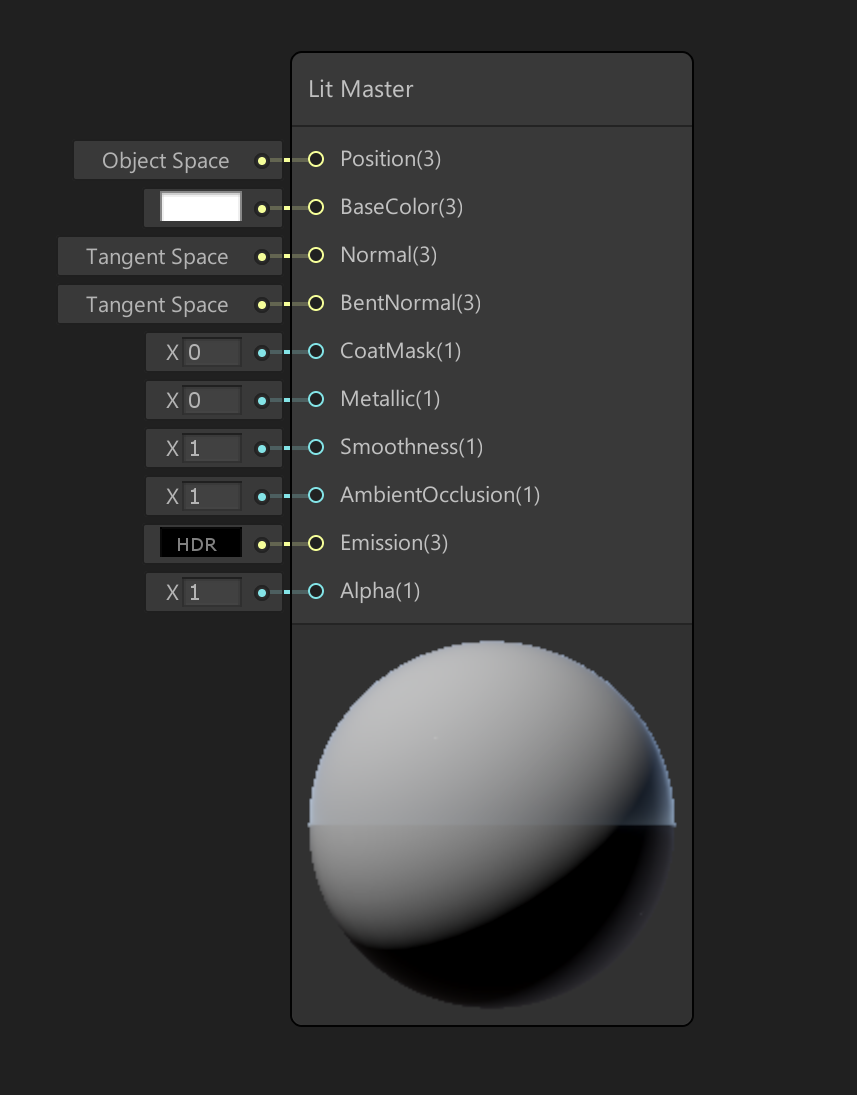
Once you’re working in an HDRP Project, you can create a new HD Lit Shader Graph from Create > Shader > Lit Graph. Right away, you will see some of the new input options available. If you have used the HD Lit material in HDRP, this should look more or less the same, but if you haven’t, BentNormal and CoatMask may be unfamiliar terms to you.
在HDRP项目中工作后,可以从“ 创建” >“ 着色器” >“ 点亮图” 创建 新的HD点亮着色 器 图 。 立即,您将看到一些可用的新输入选项。 如果您在HDRP中使用了HD Lit材质,则外观应该大致相同,但是如果您没有使用它, BentNormal 和 CoatMask 可能对您来说并不熟悉。
Increasing the CoatMask value past 0 (up to a max of 1) will add a clear “coat” effect to your surface. This means your object will look like it has a thin transparent layer of shiny sealant on top of it. Imagine painting an epoxy coating onto your mesh. One popular use of Coat Mask is when creating materials to simulate the look of car paint.
将 CoatMask 值 增加到 0以上(最大为1)将为您的表面添加清晰的“涂层”效果。 这意味着您的对象看起来像是在其顶部具有透明密封剂的透明薄层。 想象一下将环氧涂料涂到您的网格上。 涂层面膜的一种流行用法是在创建模拟汽车漆外观的材料时。
The material assigned to this apple is transitioning between CoatMask value 0 to 1.
分配给该苹果的物料正在CoatMask值0到1之间转换。
Even though CoatMask is a default input on the Lit Master Node, make sure you only use it if it is important for creating the look you are going for. Increasing Coat Mask to anything past 0 will increase the cost of your Shader.
即使 CoatMask 是“点亮主节点”上的默认输入,也请确保仅在对创建所需外观很重要时才使用它。 将“蒙版蒙版”增加到0以上将增加着色器的成本。
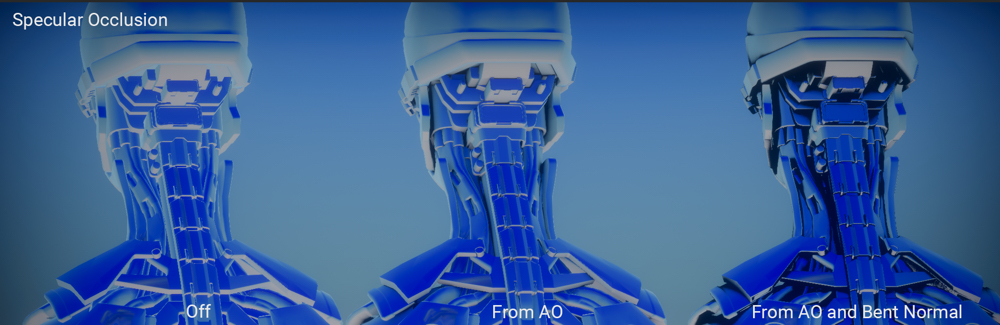
BentNormal allows for input of a special type of map that improves the indirect lighting (GI) for your asset. When used in combination with an AO map it can also provide specular occlusion, which means that you can add occlusion into the reflection on your mesh. You can generate bent normal maps from applications such as Substance Designer, XNormal, or Knald. (However, for your bent normal maps to work correctly, make sure you use Cosine distribution when generating them.)
BentNormal 允许输入特殊类型的地图,以改善资产的间接照明(GI)。 与AO贴图结合使用时,它还可以提供镜面遮挡,这意味着您可以将遮挡添加到网格的反射中。 您可以从Substance Designer,XNormal或Knald等应用程序生成弯曲法线贴图。 (但是,为使弯曲的法线贴图正常工作,请确保在生成它们时使用余弦分布。)
To use your bent normal map for Specular Occlusion, you must set the Specular Occlusion Mode in the shader settings to From AO And Bent Normal. You can access these settings by selecting the gear icon in the top right corner of the Shader Graph Master Node.
要将弯曲的法线贴图用于“镜面反射”,必须在着色器设置中将“镜面反射模式”设置为“ 从AO和弯曲法线” 。 您可以通过选择“ Shader Graph Master”节点右上角的齿轮图标来访问这些设置。
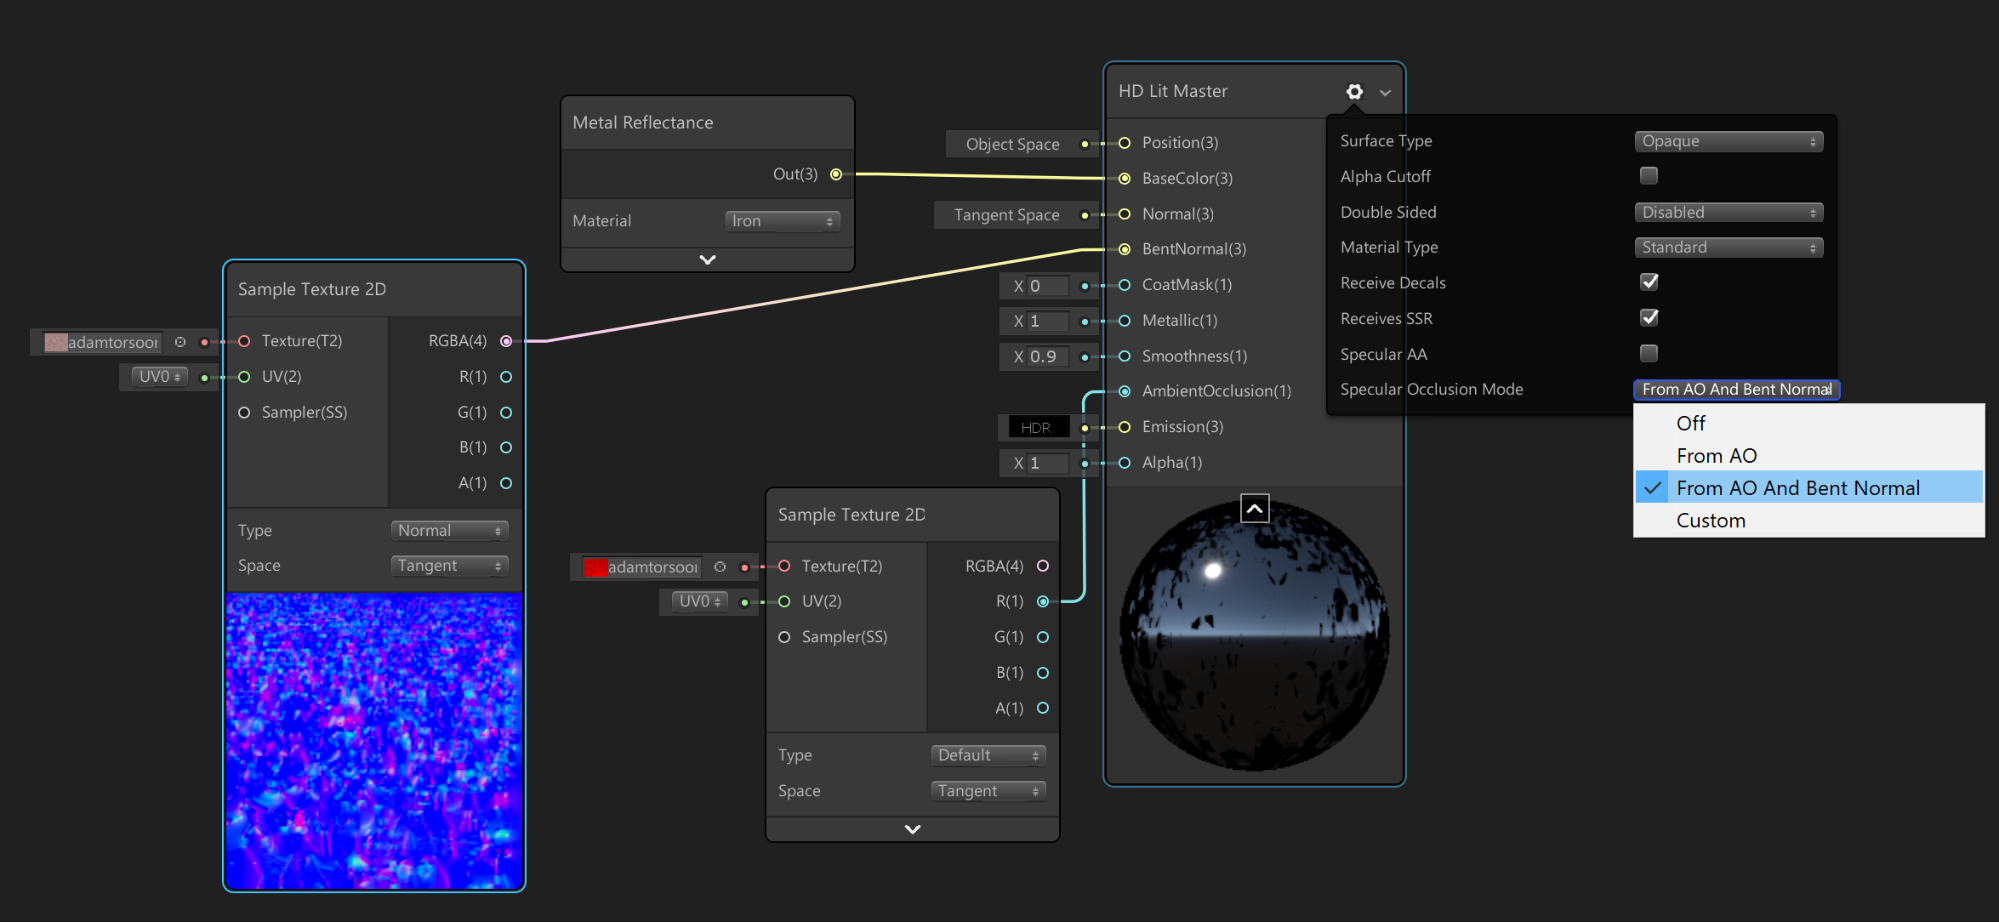
There are four options available for Specular Occlusion: Off, From AO only, From AO and Bent Normal, and Custom.
“镜面反射遮挡”有四个可用选项:“ 关” ,“ 仅 来自AO” ,“ 来自AO和弯曲法线 ”和“ 自定义” 。
Selecting Custom creates a new input on the Master Node, giving full Specular Occlusion control to the user. For example, plugging zero into this input will disable all reflections.
选择“ 自定义 ”将在主节点上创建一个新输入,从而为用户提供完全的“镜面反射”控制。 例如,将零插入此输入将禁用所有反射。
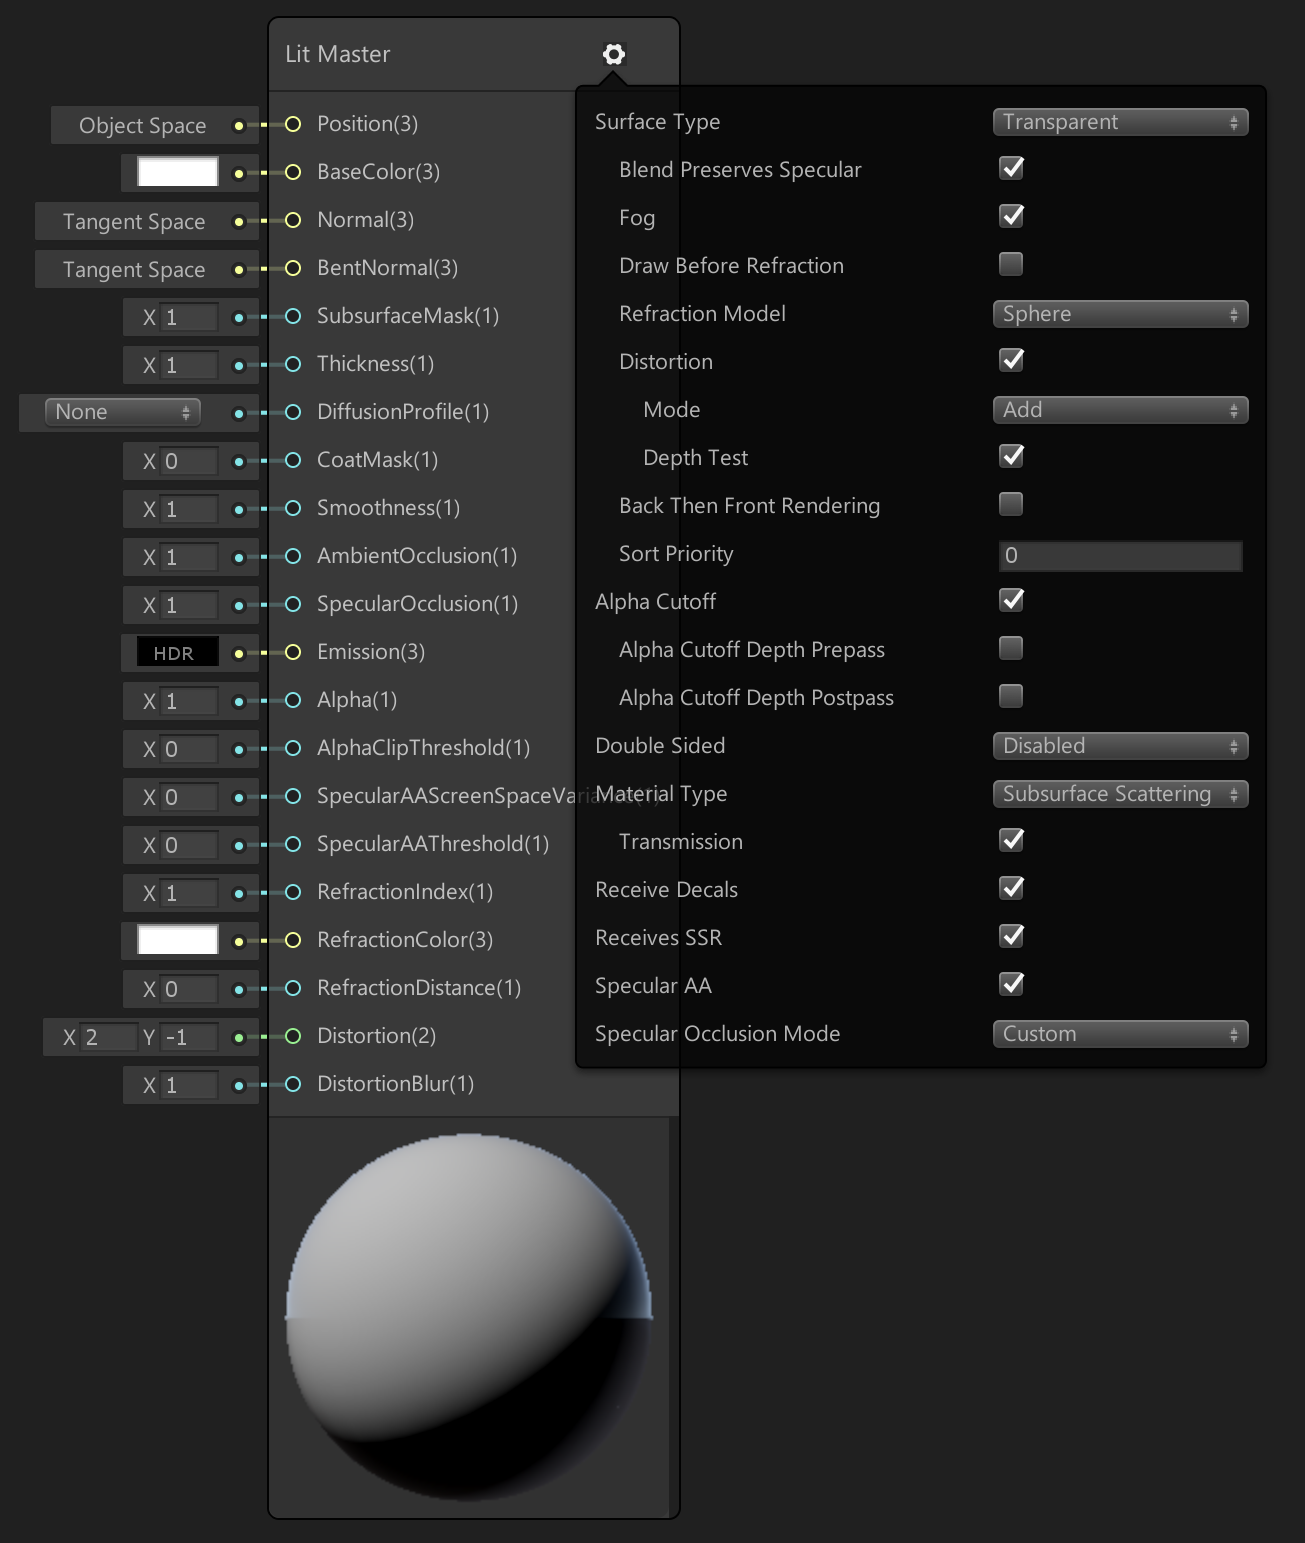
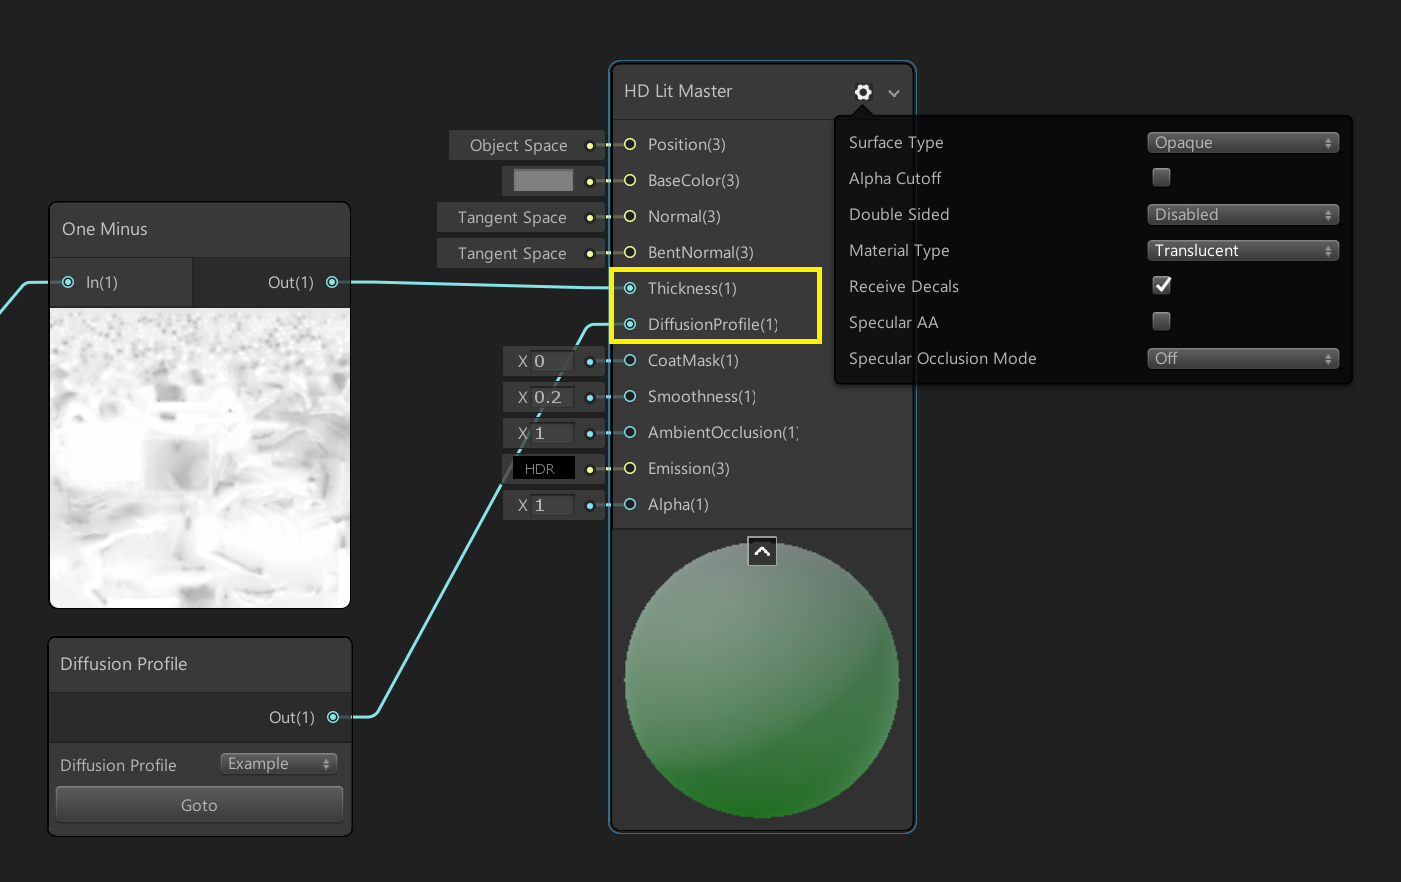
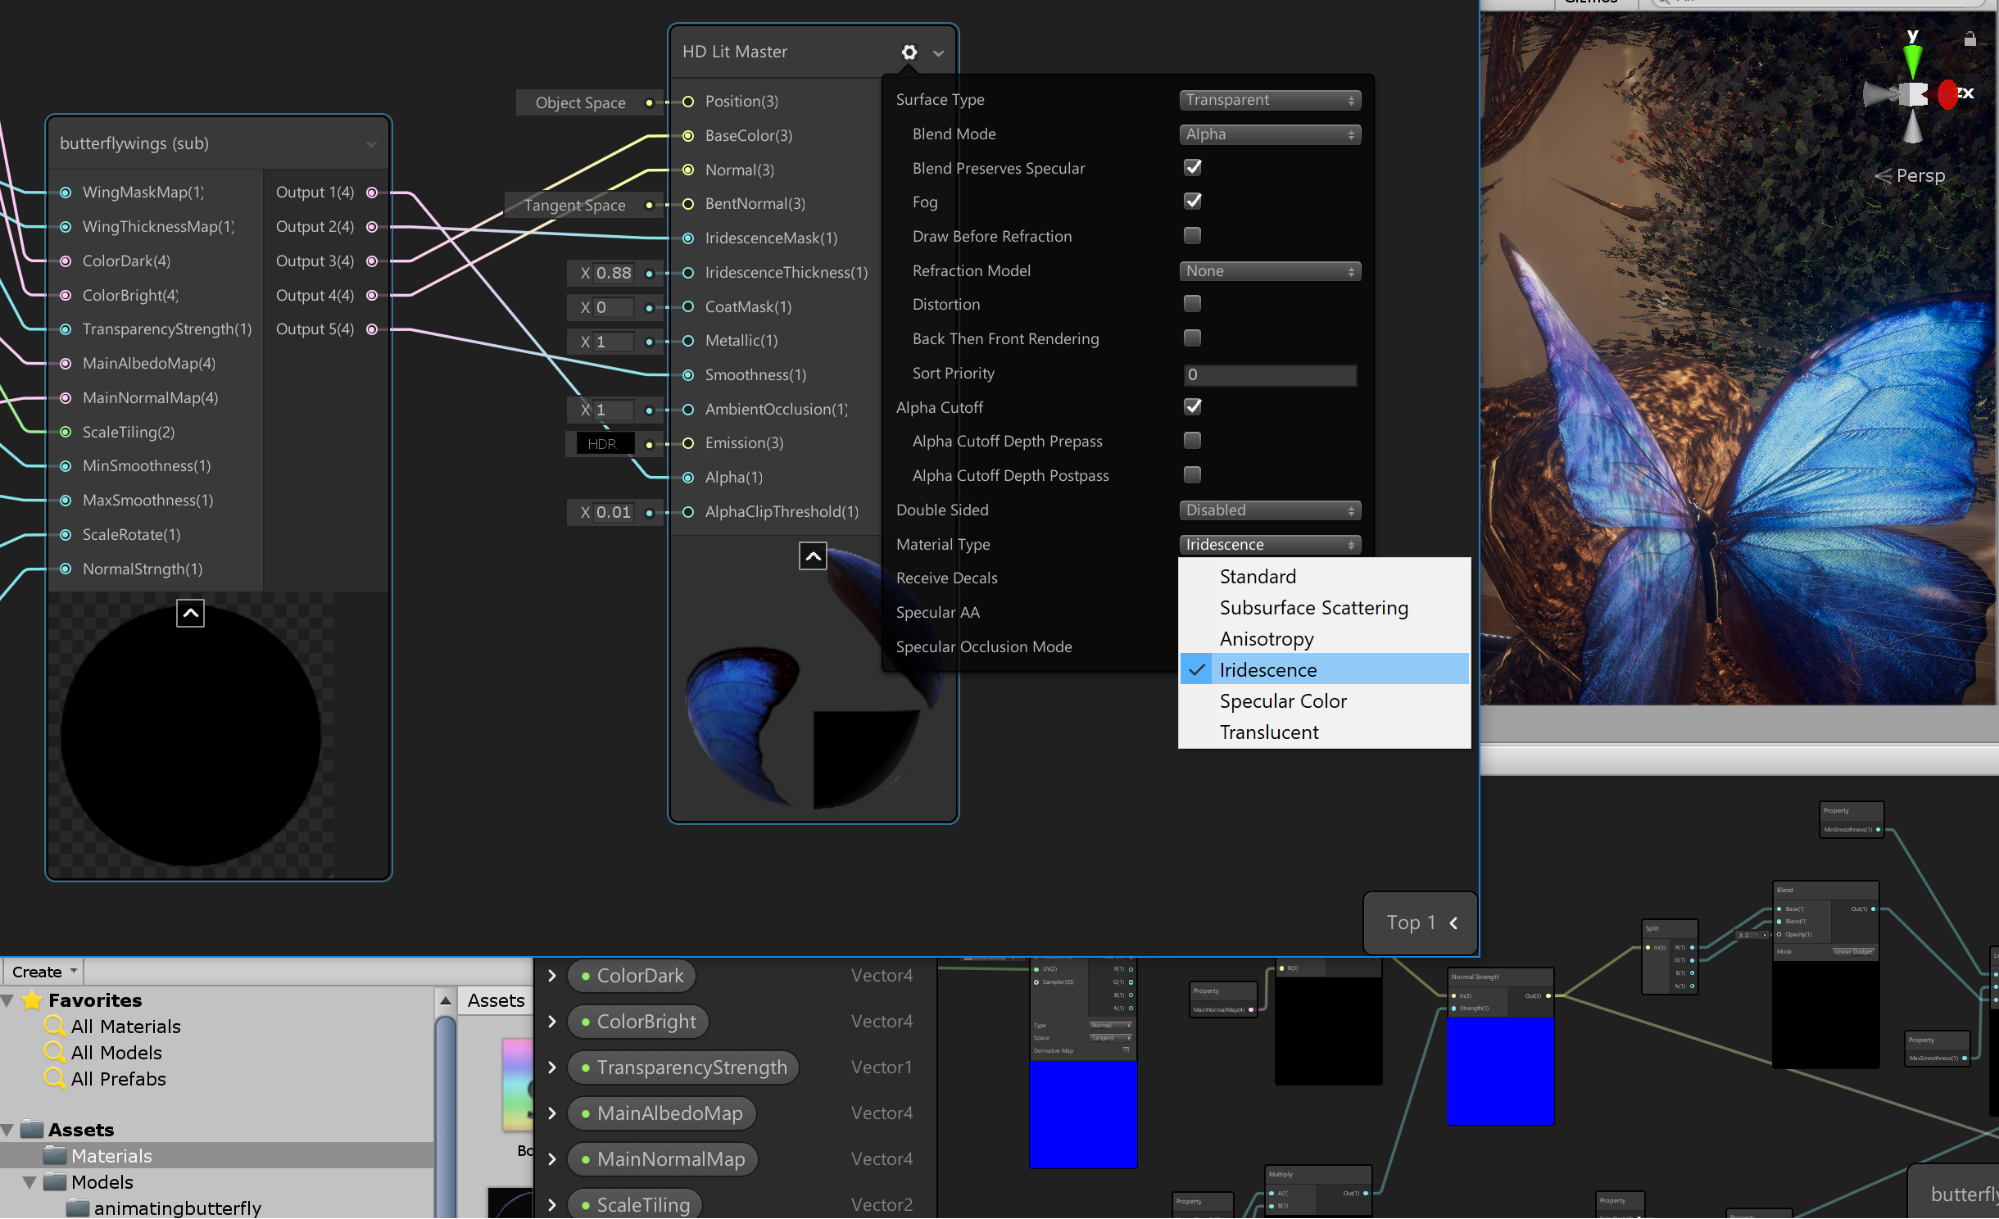
The settings menu on the Master Node is loaded with Lit AF options. It is where you can select which advanced material type you plan to utilize in your Shader Graph, as well as set other useful surface information, such as whether the surface is opaque or transparent.
主节点上的设置菜单加载了自动AF选项。 在这里,您可以选择计划在Shader Graph中使用的高级材料类型,以及设置其他有用的表面信息,例如表面是不透明的还是透明的。

Changing these settings can add additional input options to your Master Node and, depending on the combination of settings you enable, you may end up with a very large node (and an extremely expensive shader).
更改这些设置可以向您的主节点添加其他输入选项,并且取决于您启用的设置的组合,您最终可能会遇到一个非常大的节点(和极其昂贵的着色器)。
Now that’s Lit AF!
现在就是自动对焦!
演示项目中的高级材料 (Advanced materials in the demo project)
The sample butterfly project makes heavy use of the Iridescence and Translucency advanced Material Types.
蝴蝶样例项目大量使用了“虹彩”和“半透明”高级材料类型。
Let’s start by taking a look at the butterfly!
让我们开始看看蝴蝶!
A butterfly’s wing is a complicated surface made up of multiple layers of tiny scales; these make butterfly wings appear dusty to the human eye. The scales have a high amount of reflectivity and lay on top of a layer of chitin — a transparent protein, which is the main building block of exoskeletons.
蝴蝶的翅膀是由多层微小鳞片组成的复杂表面。 这些使蝴蝶的翅膀在人眼看来显得尘土飞扬。 这些鳞片具有很高的反射率,并位于 几丁质(一种透明蛋白质)的 顶部 ,几丁质是透明骨骼的主要组成部分 。
This biological information, when translated to our shading model, means the butterfly wing is transparent, iridescent, and metal!
将此生物学信息转换为我们的阴影模型后,就意味着蝴蝶的翅膀是透明的,虹彩的和金属的!
Iridescence is the phenomenon of certain surfaces gradually changing color as the angle of illumination on their surface changes. It is one of the advanced shading features only available in the HDRP.
虹彩现象是某些表面随着其表面上的照明角度变化而逐渐改变颜色的现象。 它是仅HDRP中可用的高级着色功能之一。
This video illustrates iridescence in action: our use of iridescence changes the color of our butterfly’s wings as it flaps:
该视频演示了活动中的虹彩:我们使用虹彩会在蝴蝶拍打时改变其翅膀的颜色:
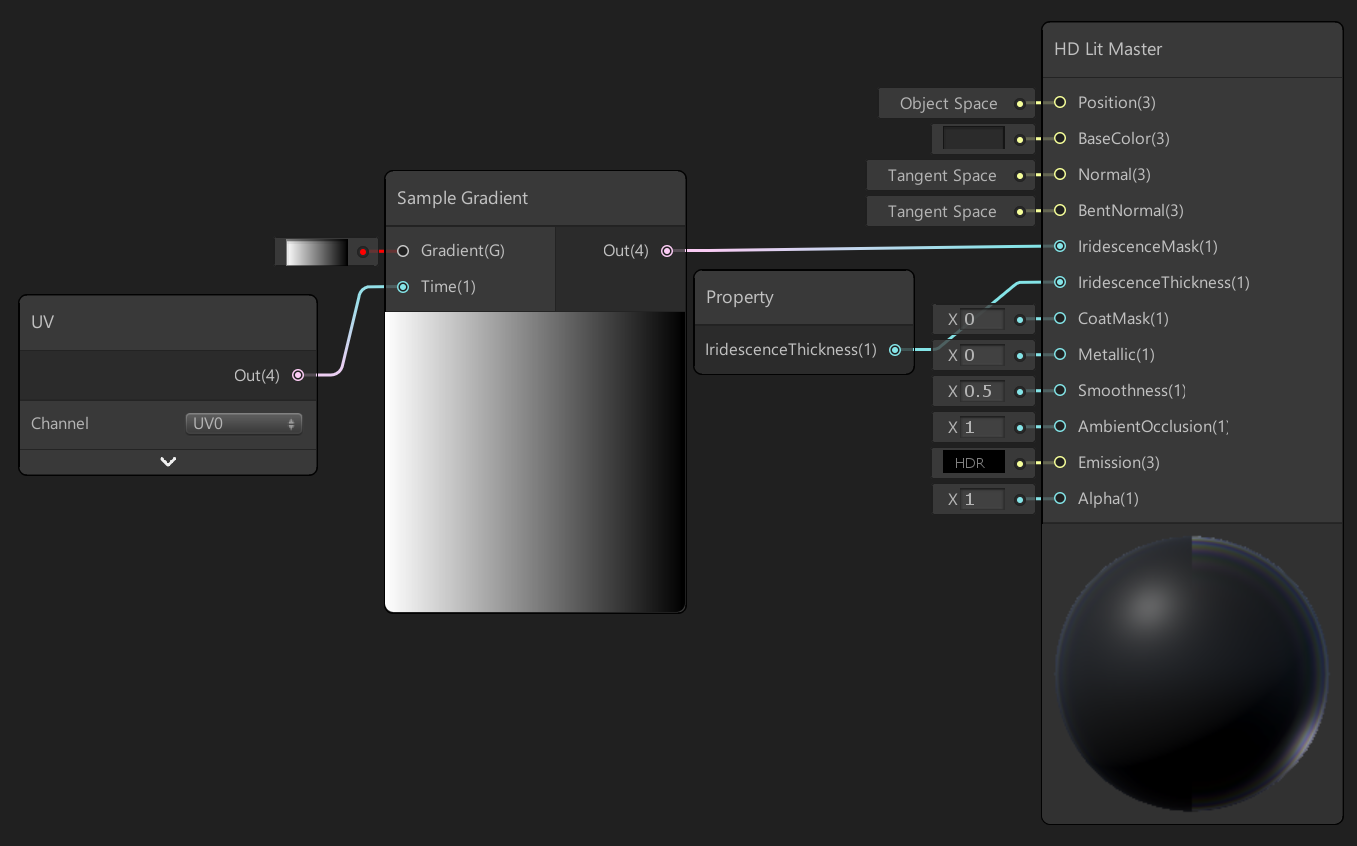
When you switch to Material Type Iridescence, two new options will appear on the material node: IridescenceMask and IridescenceThickness.
当您切换到“ 材质类型彩虹”时 ,两个新选项将出现在材质节点上: IridescenceMask 和 IridescenceThickness 。

You can use this simple graph to easily see the effect of these two new inputs.
您可以使用此简单图形轻松查看这两个新输入的效果。
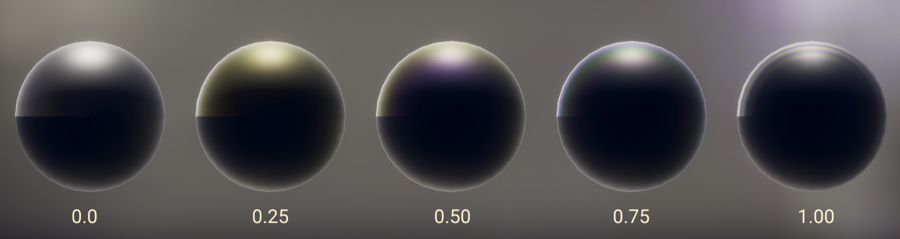
Increasing the property value of Iridescent Thickness
增加彩虹色厚度的属性值
From these images, you can see how the Iridescence Mask modulates the intensity of the iridescence effect from 0 to 1 (black to white), and how the Iridescent Thickness changes the color gradient created by the Iridescence effect.
从这些图像中,您可以看到“彩虹蒙版”如何将彩虹效果的强度从0调制为1(从黑到白),以及“彩虹厚度”如何更改由“彩虹”效果创建的颜色渐变。
If you wish to be physically accurate when using Iridescence, it is helpful to know that IridescenceThickness is an nm value. The 0 – 1 range from the connected input remaps to 0 – 3000nm.
如果希望使用Iridescence时在物理上准确无误,则了解 IridescenceThickness 是一个nm值 将很有帮助 。 从连接的输入重映射到0至3000nm的0至1范围。
This specific butterfly is a Morpho butterfly, thus the backside of its wings are actually a totally different color and pattern.
这种特定的蝴蝶是Morpho蝴蝶,因此其翅膀的背面实际上是完全不同的颜色和图案。
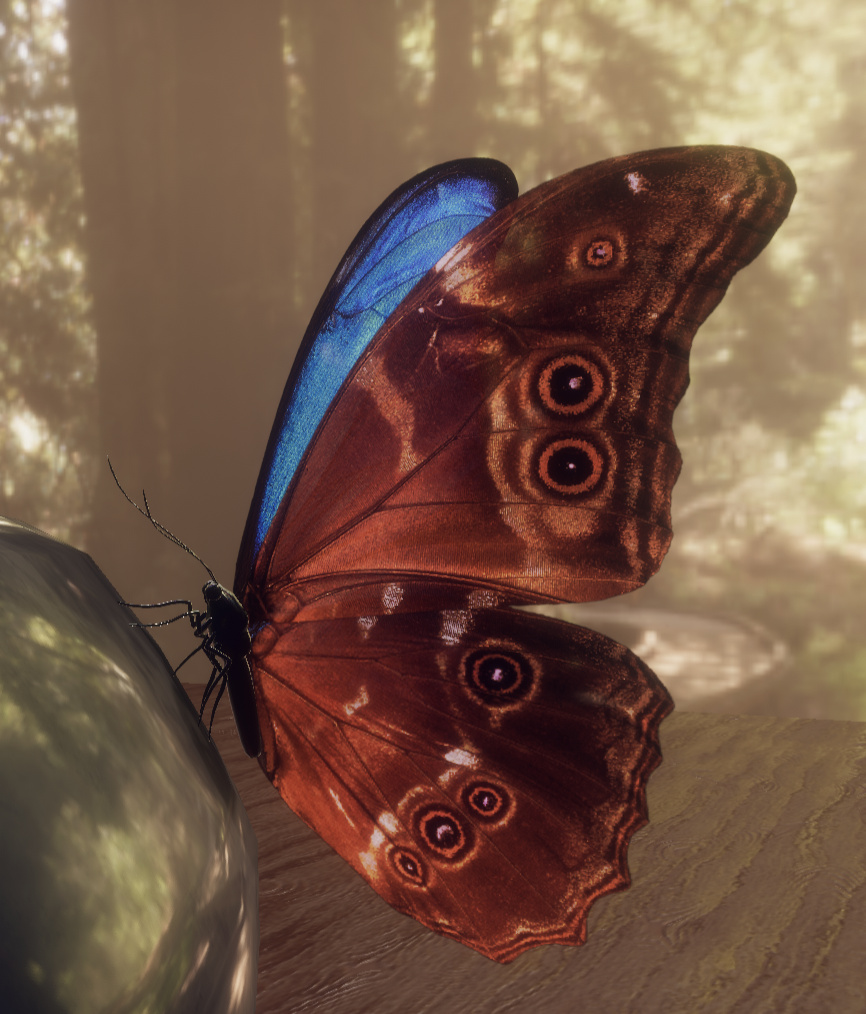
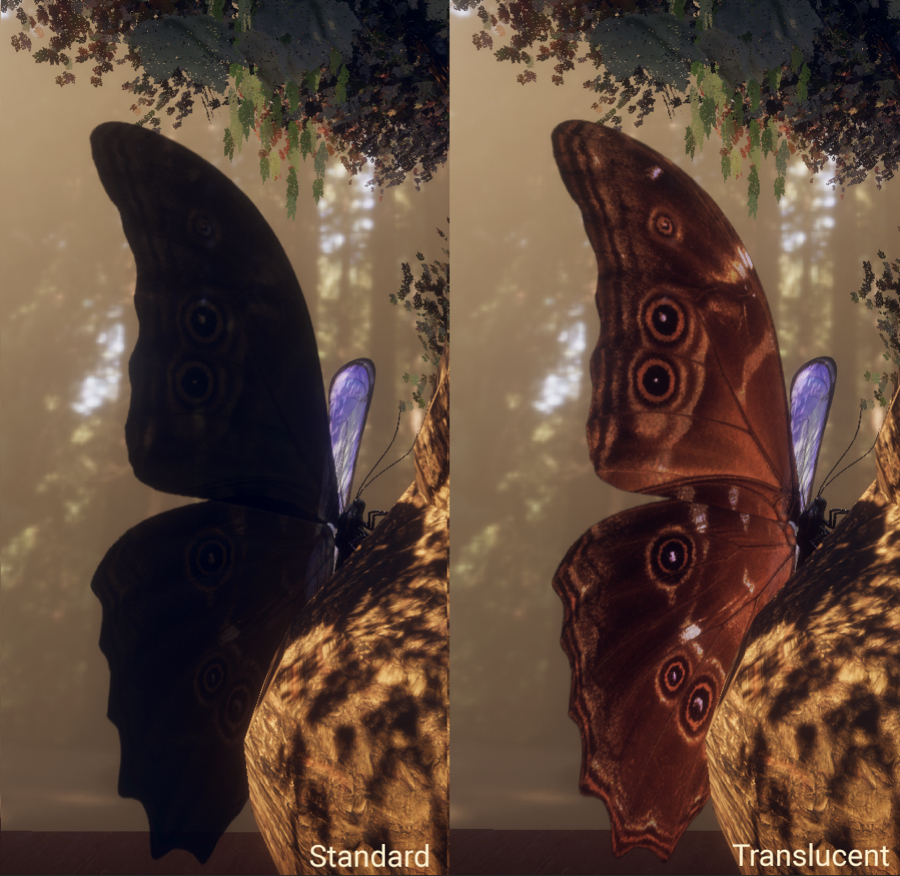
To achieve this effect, there are two sets of wings with normals facing opposite directions. To create the effect that light is traveling through the wings, these bottom faces are shaded using the translucent material type.
为了实现此效果,有两组法线朝向相反方向的机翼。 为了产生光线穿过机翼的效果,这些底面使用半透明材质类型进行了阴影处理。
A translucent material simulates light passing through a surface and varies the strength of that light using a thickness map and diffusion profile.
半透明材料模拟通过表面的光,并使用厚度图和扩散轮廓来改变该光的强度。
There are three “flavors” of material types that use a Diffusion Profile: Subsurface Scattering, Subsurface Scattering with Transmission, and Translucent (which is just transmission).
使用扩散分布的材料类型共有三种“风味”:次表面 散射 , 具有透射率的次表面散射 和 半透明 (即透射)。

Transmission means that the light is able to fully penetrate the object and exit through the other side (used on the butterfly). Materials utilizing Transmission have an option to add a thickness map to modulate the intensity of light passing through the surface.
透射意味着光能够完全穿透物体并从另一侧出射(用于蝴蝶)。 利用“透射”的材料可以选择添加厚度贴图,以调制通过表面的光的强度。
To understand how to use the diffusion profile, it is helpful to have knowledge of Subsurface Scattering and how to use it.
要了解如何使用扩散剖面,了解地下散射及其使用方法将很有帮助。
Subsurface Scattering is used for surfaces that are somewhat translucent. Many surface types fall into this category including foliage, fruits and vegetables, precious stones, fabric, teeth, eyes, and skin. When light enters the surface of these materials, it scatters around inside the materials and then exists the surface, potentially at a different point from where it entered.
次表面散射用于有些半透明的表面。 许多表面类型都属于此类,包括树叶,水果和蔬菜,宝石,织物,牙齿,眼睛和皮肤。 当光进入这些材料的表面时,它会在材料内部四处散射,然后存在于该表面中,可能存在于与入射位置不同的位置。
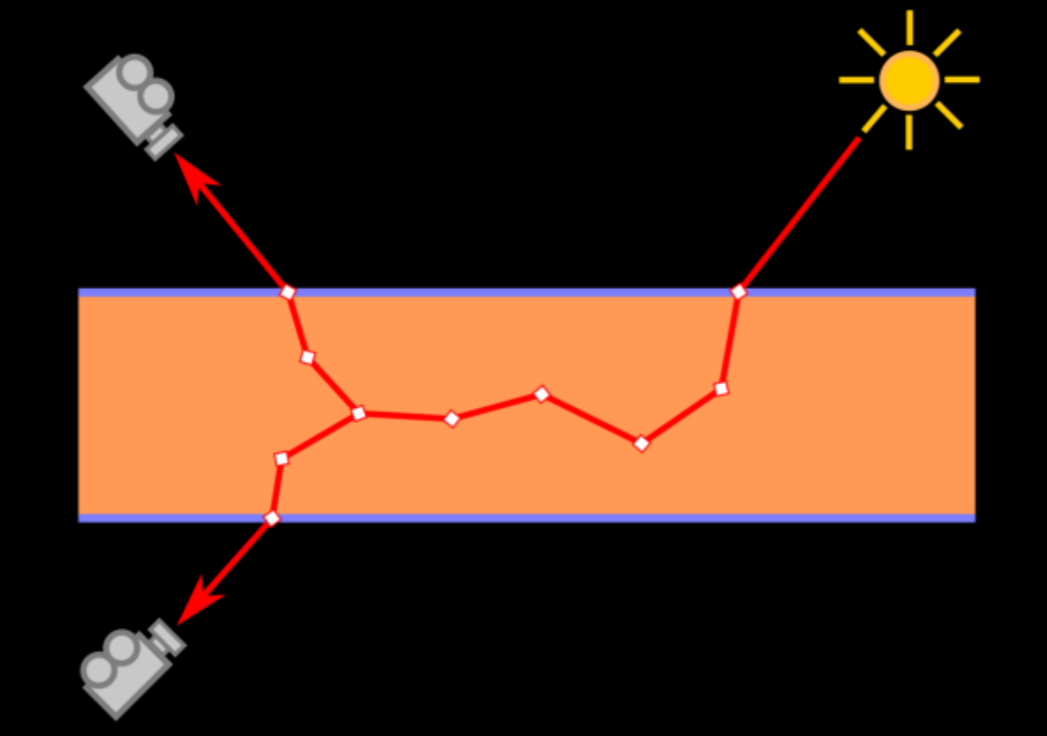
Surfaces utilizing Subsurface Scattering will exhibit a softening of the overall lighting effect, bleeding of light into neighboring areas, and blurring of small surface details.
利用次表面散射的表面将表现出整体照明效果的柔化,光线渗入相邻区域以及小的表面细节模糊。
The further light penetrates into the object, the more the lighting becomes attenuated and diffused. This “distance” that the light can penetrate is a value controlled by the thickness map, whereby the thinner your values (closer to black in the map), the more apparent the effect of Subsurface Scattering becomes.
光线越深入物体,光线的衰减和扩散就越多。 光线可以穿透的“距离”是由厚度贴图控制的值,因此,值越细(贴图中的黑色越接近),次表面散射的效果就越明显。
You can paint a thickness map by hand, or generate one in an external application such as Substance Designer or Maya. To generate a map, invert your mesh surface normals, bake ambient occlusion, and then invert the ambient occlusion map.
您可以手工绘制厚度图,也可以在外部应用程序(例如Substance Designer或Maya)中生成一个厚度图。 要生成贴图,请反转网格曲面法线,烘烤环境光遮挡,然后反转环境光遮挡图。
The total amount and angle of the scatter, as well as the resulting color (and color seen from the light bleeding), is controlled by the Diffusion Profile.
散射的总量和角度,以及由此产生的颜色(以及从光渗漏中看到的颜色),由扩散配置文件控制。
In the HDRP, Diffusion Profile Settings is a unique type of asset that houses Diffusion Profiles.
在HDRP中, 扩散配置文件设置是容纳扩散配置文件的唯一资产类型。
If you are using the sample project or launched into an HD project using the project template, you will already have a Diffusion Profile Settings asset. If you need to create a new one, you can do so with Create > Rendering > Diffusion Profile Settings. You will also need to assign it to your HD Render Pipeline Asset. You can easily locate your HD asset from Project Settings > Graphics > Scriptable Render Pipeline Settings.
如果您正在使用样本项目或使用项目模板启动到HD项目,则您将已经具有“ 扩散配置文件设置” 资产。 如果您需要创建一个新文件,可以使用 创建 > 渲染 > 扩散配置文件设置进行 。 您还需要将其分配给 HD Render Pipeline资产 。 您可以从 Project Settings > Graphics > Scriptable Render Pipeline Settings 轻松找到HD资源 。


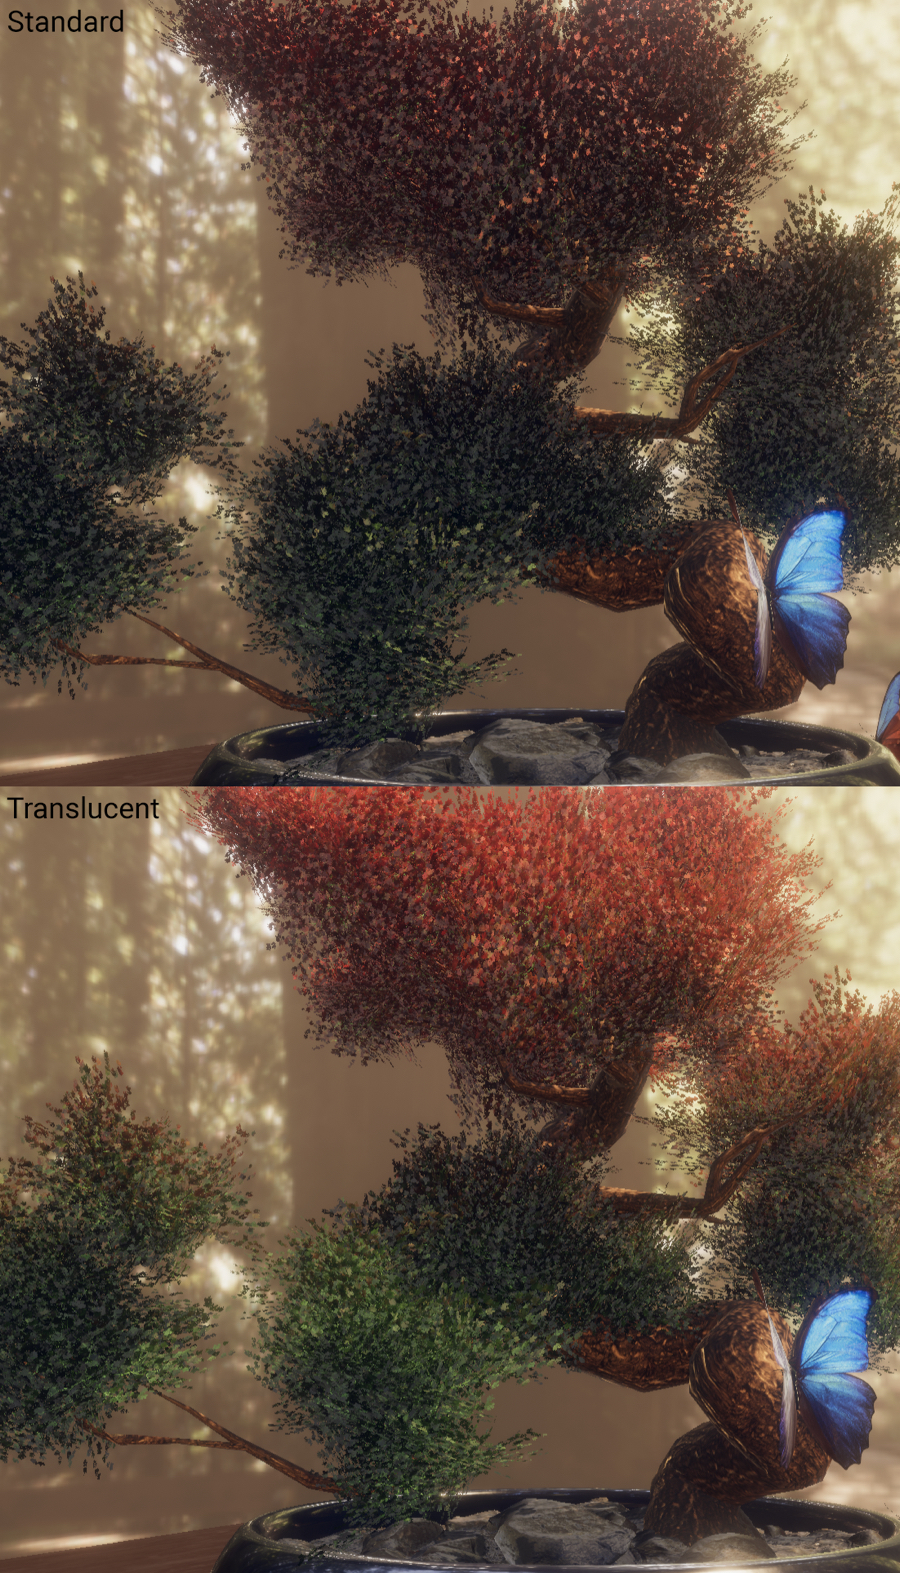
The butterfly project contains two custom Diffusion Profiles — one for the back faces of the wings, and one for the leaves on the tree.
蝴蝶项目包含两个自定义扩散配置文件-一个用于机翼的背面,另一个用于树上的叶子。
The Diffusion Profile contains a number of customization options to allow control over how lighting scatters through the mesh.
扩散配置文件包含许多自定义选项,以允许控制照明如何通过网格散射。
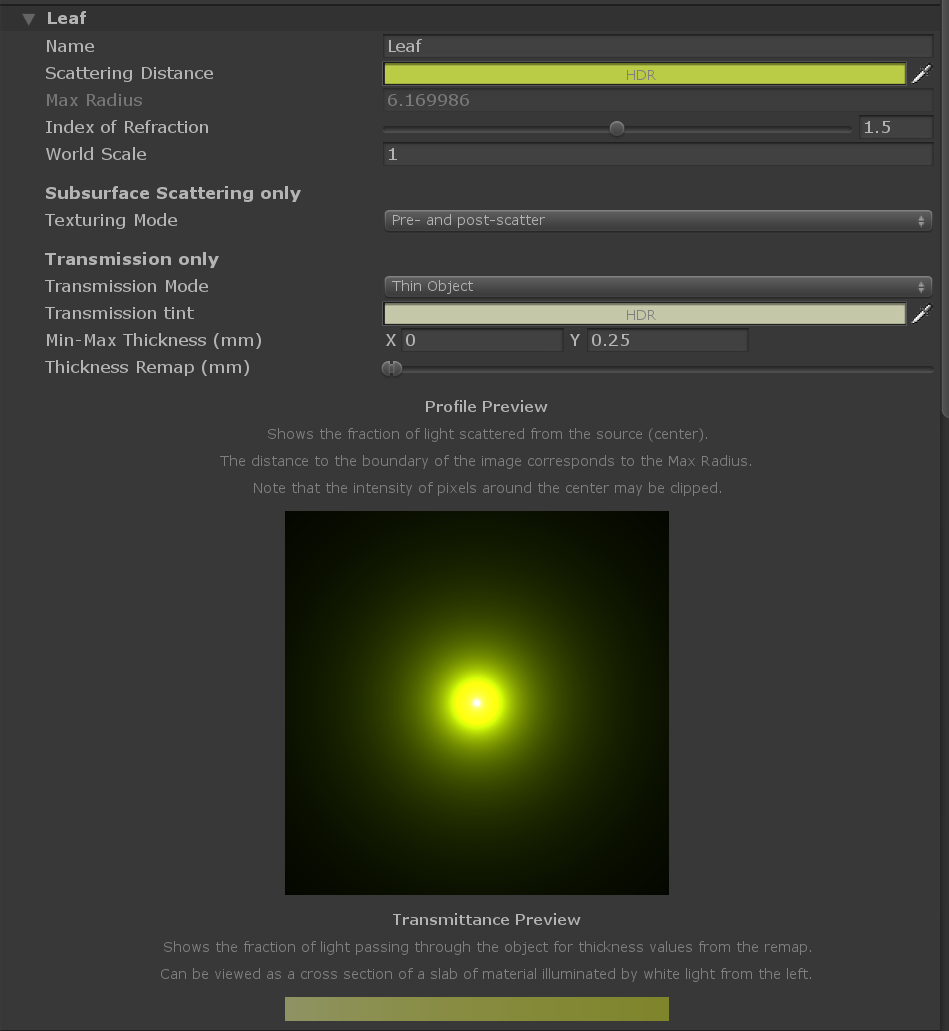
The Scattering Distance controls the intensity of the light scatter as well as the color. Put simply, this allows you to control how much from each color channel the light absorbs or reflects, based on the material of the object. For example, human skin can have a reddish color because as light scatters, it becomes colored by blood and tissue beneath the skin.
的 飞散距离 控制所述光散射的强度以及颜色。 简而言之,这使您可以根据对象的材料控制光从每个颜色通道吸收或反射的量。 例如,人的皮肤可能会带红色,因为随着光的散射,它会被皮肤下面的血液和组织着色。
The Index of Refraction relates to the angle at which light bends as it enters the surface. This is a measurable value, and there are many online resources documenting the IOR of common materials. For example, the IOR is 1.4 for human skin, and between 1.3 and 1.5 for many other materials.
折射率 涉及在光弯曲,因为它进入所述表面的角度。 这是一个可衡量的价值,并且有 许多在线资源 记录了常见材料的IOR。 例如,人类皮肤的IOR为1.4,许多其他材料的IOR为1.3至1.5。
Texturing Mode will only work on objects using Subsurface Scattering. In most cases, you will use pre/post-scatter as it will blur your albedo, thus softening the look of your lighting. However, if your albedo already contains softening due to existing Subsurface Scattering (such as that existing on a scan or photograph), you can use post-scatter only.
纹理模式 仅适用于使用次表面散射的对象。 在大多数情况下,您将使用前/后散射,因为这会使您的反照率模糊,从而使照明的外观变得柔和。 但是,如果由于 现有的次表面 散射(例如扫描或照片中存在的散射) 而使反射率已经包含软化作用 ,则只能使用后散射。
The remaining options only work when using Transmission (Translucent or Subsurface Scattering with Transmission). Changing the Transmission Mode changes the logic used for shadowing. You should usually only use Thin for extremely thin objects such as leaves, and Regular for all other cases.
其余选项仅在使用透射时有效(透射中的 半透明 或 地下散射 )。 更改 传输模式会 更改用于阴影的逻辑。 通常,只应将 Thin 用于极薄的物体(例如树叶),而将 Regular 用于所有其他情况。
Transmission Tint is an additional color for exiting light that blends with the existing scatter color. The thickness remap lets you remap your 0 to 1 thickness map to a range appropriate for your asset.
透射 色是用于出射光的另一种颜色,与现有散射颜色混合。 厚度重新映射使您可以将0到1厚度映射重新映射到适合您的资产的范围。
For thin objects, such as the butterfly wing and our tree leaves, simple Translucency (Transmission only) is fine. For larger or thicker objects, it becomes important to also simulate the effect of light scattering and exiting at different points across the surface (not just the light transmitting through it). This is where Subsurface Scattering or Subsurface Scattering with Transmission should be applied.
对于较薄的物体,例如蝴蝶的翅膀和我们的树叶,简单的 半透明(仅透射) 就可以了。 对于更大或更厚的物体,同样重要的是还要模拟光散射并在整个表面上的不同点出射的效果(不仅仅是通过它的光)。 在此处 应应用 地下散射 或 带有透射的地下散射 。
使用Shader Graph改善创作工作流程 (Improving authoring workflow with Shader Graph)
Using Shader Graph to implement these advanced shading techniques drastically reduces iteration time. Tweaking and adjusting your visuals can require numerous iterations, but Shader Graph’s quick workflow makes this easier.
使用Shader Graph实施这些高级着色技术可以大大减少迭代时间。 调整和调整视觉效果可能需要多次迭代,但是Shader Graph的快速工作流程使此过程变得更加容易。
Because Shader Graph can relieve much of the burden of specific texture requirements, I was able to achieve the desired visuals using only three textures: the diffuse map, a main body normal map, and a tiling detail normal map. With Shader Graph and some experimentation, I discovered I could reuse channels from my diffuse map and reuse my normal data to drive the smoothness values, without having to author additional textures. Beyond the inherent freedom of quicker iteration and experimentation that comes with not having to write code, the ability to easily move back and forth between properties and in-line values proved powerful for iteration. For example, if I find that I am frequently changing a value, I can right-click and select Convert to Property. Now, when I save my shader, that property is available in the Inspector of any material I create from that shader.
因为Shader Graph可以减轻特定纹理要求的大部分负担,所以我仅使用三种纹理即可实现所需的视觉效果:漫反射贴图,主体法线贴图和拼贴细节法线贴图。 通过使用Shader Graph和一些实验,我发现我可以重用我的漫反射贴图中的通道并重用我的法线数据来驱动平滑度值,而不必编写其他纹理。 除了不必编写代码而具有更快的迭代和实验固有的自由性之外,在属性和内联值之间轻松地来回移动的能力证明了对迭代的强大功能。 例如,如果发现我经常更改值,则可以右键单击并选择“ 转换为属性” 。 现在,当我保存材质球时,该属性将在我从该材质球创建的任何材质的“检查器”中可用。
During the iteration process on the appearance of my butterfly, I ended up exposing many in-line values as properties. This allowed me to fine-tune my butterfly in the game view, with accurate and correct lighting, post-processing, and animation (which proved essential for achieving my desired iridescent look).
在蝴蝶外观的迭代过程中,我最终公开了许多嵌入式值作为属性。 这使我可以在游戏视图中微调蝴蝶,并具有正确和正确的照明,后处理和动画(这对于实现所需的彩虹色外观至关重要)。
Here, you can see how easy it is to change the visual appearance of the butterfly based on the parameters exposed.
在这里,您可以看到根据公开的参数更改蝴蝶的外观是多么容易。
Lastly, because both sides of the butterfly wings are similar but need to use different material types and textures, I converted the wing logic into a subgraph, while leaving my customizable properties as inputs. This allowed me to edit both faces of the wings simultaneously even though they were two different advanced material types.
最后,由于蝶形翼的两侧相似,但需要使用不同的材质类型和纹理,因此我将翼逻辑转换为子图,同时保留了可自定义的属性作为输入。 这使我可以同时编辑机翼的两个面,即使它们是两种不同的高级材质类型也是如此。
As another example of how Shader Graph allows for quick iteration, we can look at the leaves on the bonsai tree. I changed my mind a lot when choosing the colors I wanted for the leaves of my bonsai tree. It was Fall when I built this scene, and it felt fitting to give the scene a Fall vibe.
作为着色器图如何实现快速迭代的另一个示例,我们可以看看盆景树上的叶子。 选择盆景树叶子所需的颜色时,我改变了主意。 当我构建此场景时是Fall,感觉很适合给场景营造一个Fall氛围。
After trying various colors, I eventually decided that I wanted to create a green-to-orange transition, as though the tree was in the process of changing color. However, I didn’t want to edit my leaf texture. Luckily, using Shader Graph, I was able to change the color using a gradient that changes based on the world position of the tree’s geometry. Leaves at different heights would receive different colors from the gradient. I also added noise to break up the uniformity of the gradient, making it more natural and organic in appearance. All these changes were possible without having to jump back into my texture authoring software.
在尝试了各种颜色之后,我最终决定要创建一个绿色到橙色的过渡,就好像树正在改变颜色一样。 但是,我不想编辑我的叶子纹理。 幸运的是,使用Shader Graph,我能够使用渐变来更改颜色,该渐变根据树的几何图形的世界位置而变化。 不同高度的叶子将从渐变中获得不同的颜色。 我还添加了噪音以破坏渐变的均匀性,使其外观更自然和有机。 所有这些更改都是可能的,而不必跳回我的纹理创作软件。
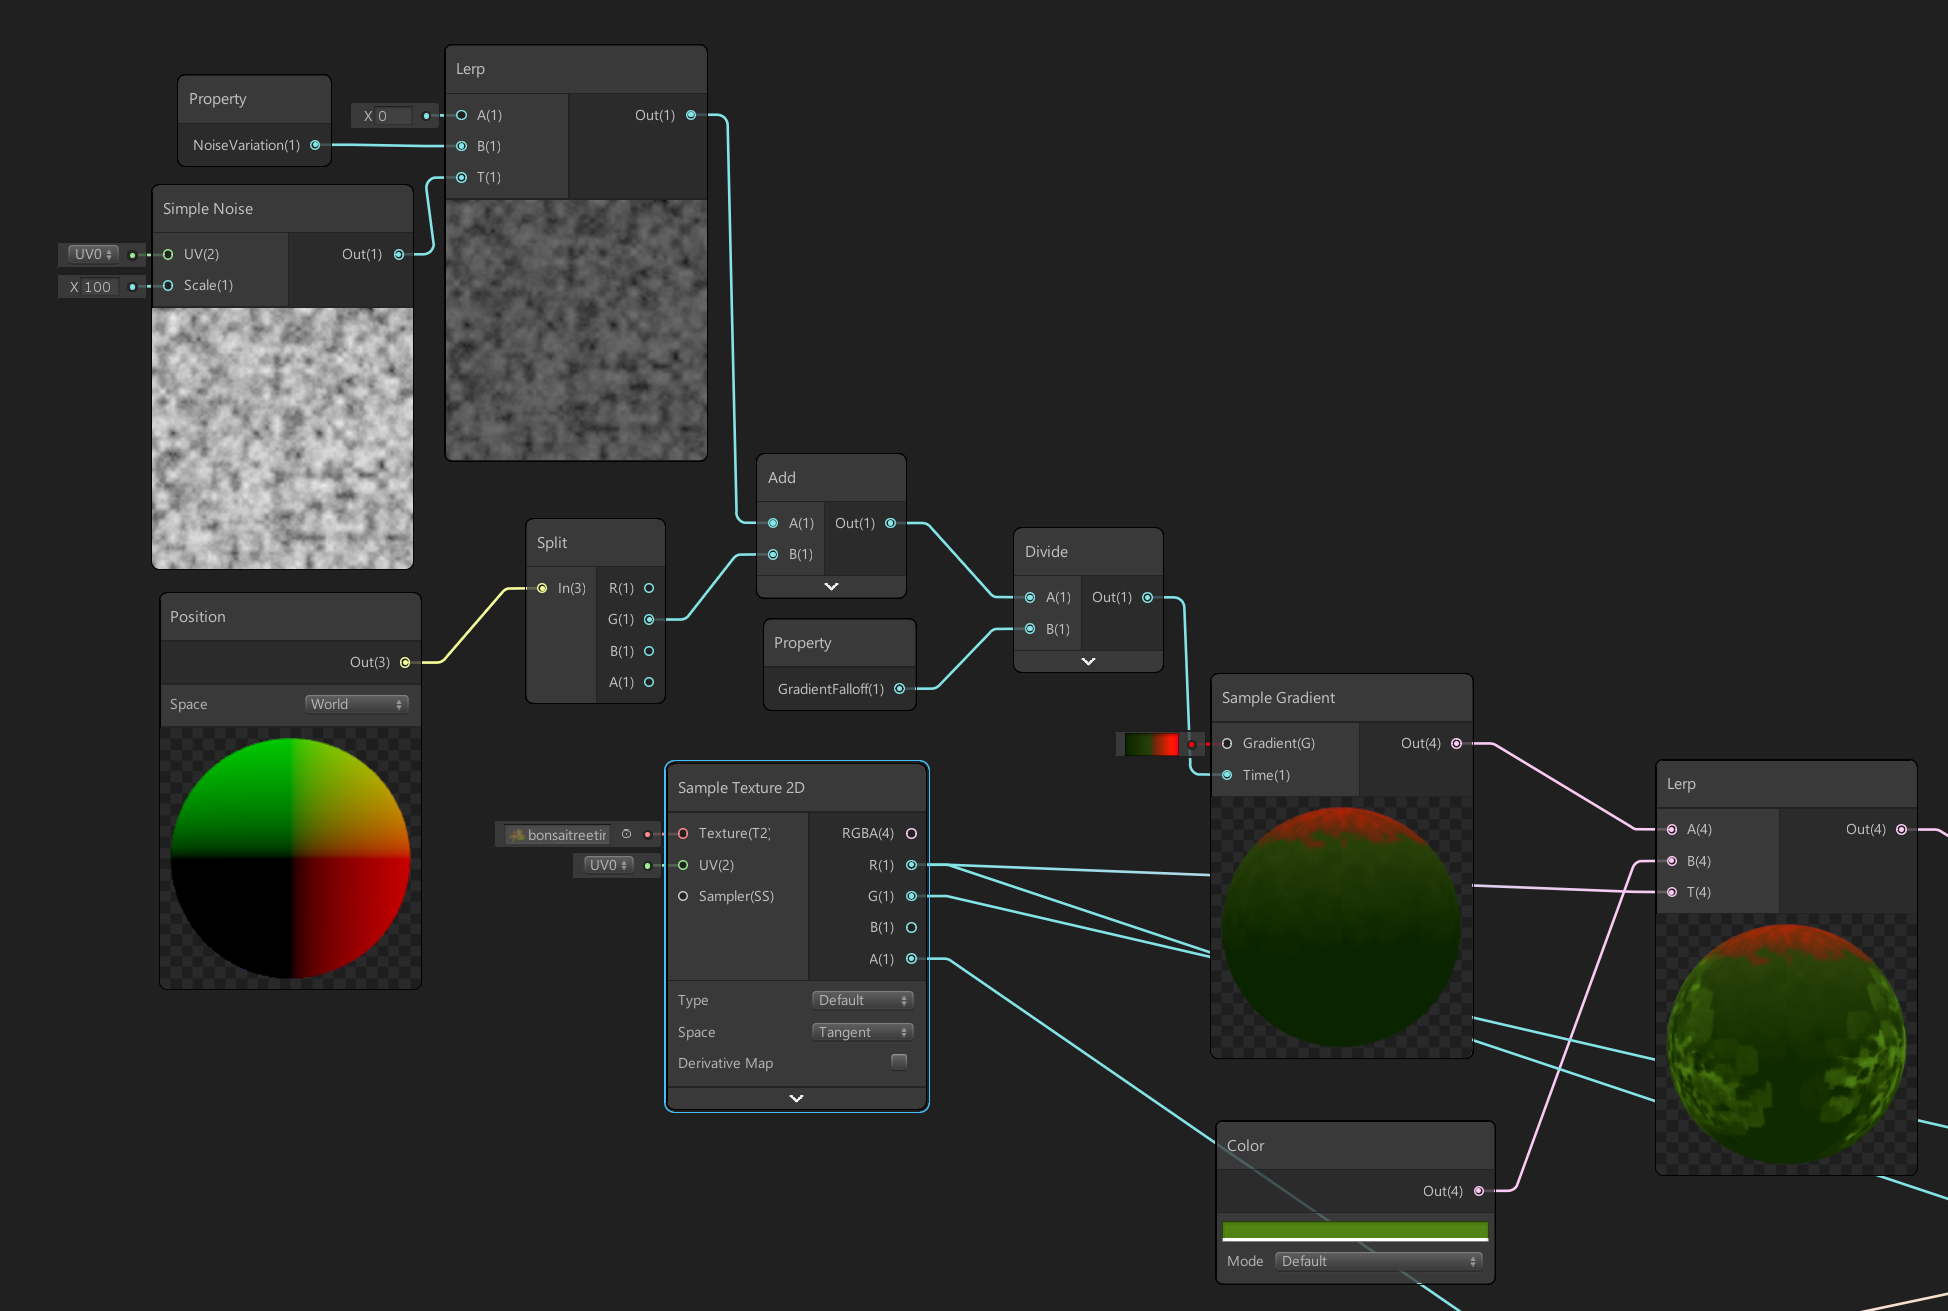
It also meant that I didn’t need to bake the color into my texture map, and was able to reuse other channels in the map for grayscale texture requirements, such as the translucency thickness map.
这也意味着我不需要将颜色烘焙到我的纹理贴图中,并且能够重用该贴图中的其他通道来满足灰度纹理要求,例如半透明厚度贴图。
Furthermore, if I enabled control over my leaf gradient through properties, I was able animate the leaves changing color over a period of time.
此外,如果启用了通过属性控制叶子渐变的功能,则可以使叶子在一段时间内变色的动画。
总结思想 (Closing Thoughts)
The HD Lit Shader Graph Master Node will open up new possibilities for creating surfaces that utilize the Advanced Shading options found in HDRP. We can’t wait to see the visual potential of your scenes elevated with these new HD Lit AF options that are now exposed in the user-friendly Shader Graph workflow. Keep your eyes open for other new Shader Graph updates! The Unity Shader Graph team is excited to continue empowering our artists in making beautiful content.
HD Lit Shader Graph主节点将为利用HDRP中的“高级着色”选项创建曲面提供新的可能性。 我们迫不及待地希望通过这些新的HD Lit AF选项提高您的场景的视觉潜力,这些选项现在已在用户友好的Shader Graph工作流程中公开。 睁开眼睛查看其他新的Shader Graph更新! Unity Shader Graph团队很高兴继续赋予我们的艺术家创作精美内容的能力。
If you are interested in learning more technical details about the HD Render Pipeline, check out the presentation from SIGGRAPH here.
如果您想了解有关HD Render Pipeline的更多技术细节,请在此处查看SIGGRAPH的演示文稿。
翻译自: https://blogs.unity3d.com/2018/12/19/unity-2018-3-shader-graph-update-lit-master-node/
unity .shader


 514
514

 被折叠的 条评论
为什么被折叠?
被折叠的 条评论
为什么被折叠?
 到【灌水乐园】发言


