孙广东 2018.5.13
Unity AssetStore中关于Node节点 编辑器相关的插件可是数不胜数, 状态机,行为树,Shader 可视化等等。
Unity自己也有 Animator的窗口使用, 还有新的Shader Graph。
现在Unity的编辑器代码已经开源了,还没有时间看。
第一部分, 创建界面 功能
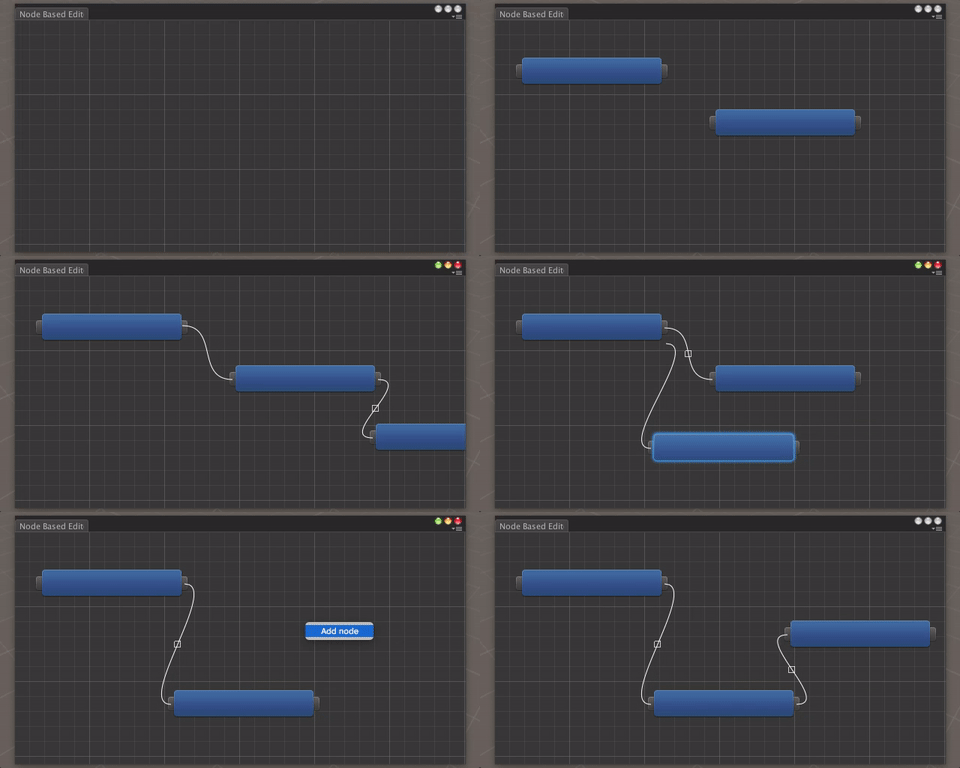
在这篇博文中,我们将在Unity中创建我们自己的基于节点的编辑器。 是一个简单的节点编辑器,您可以进行改进。

我们将在这篇文章中创建这个窗口(点击查看gif的动作)
创建窗口
我们先创建一个简单的编辑器窗口。 代码的结构与我们在之前的文章中开发的控制台克隆类似:首先绘制元素,然后处理输入,并且如果由于输入事件而改变GUI,则强制窗口重绘。
|
using
UnityEngine
;
using
UnityEditor
;
using
System
.
Collections
.
Generic
;
public
class
NodeBasedEditor
:
EditorWindow
{
[
MenuItem
(
"Window/Node Based Editor"
)]
private
static
void
OpenWindow
()
{
NodeBasedEditor
window
=
GetWindow
<
NodeBasedEditor
>
();
window
.
titleContent
=
new
GUIContent
(
"Node Based Editor"
);
}
private
void
OnGUI
()
{
DrawNodes
();
ProcessEvents
(
Event
.
current
);
if
(
GUI
.
changed
)
Repaint
();
}
private
void
DrawNodes
()
{
}
private
void
ProcessEvents
(
Event
e
)
{
}
}
|
绘制节点
那么,因为这是一个节点编辑器,它应该包含一个节点列表,这就要求我们定义一个
List<Node>。 但首先我们应该定义Node类。 节点将负责绘制自己并处理自己的事件。 与
NodeBasedEditor中的
ProcessEvents(Event e)
不同,Node中的
ProcessEvents(Event e)
将返回一个布尔值,以便我们检查是否应该重新绘制GUI。
|
using
System
;
using
UnityEditor
;
using
UnityEngine
;
public
class
Node
{
public
Rect
rect
;
public
string
title
;
public
GUIStyle
style
;
public
Node
(
Vector2
position
,
float
width
,
float
height
,
GUIStyle
nodeStyle
)
{
rect
=
new
Rect
(
position
.
x
,
position
.
y
,
width
,
height
);
style
=
nodeStyle
;
}
public
void
Drag
(
Vector2
delta
)
{
rect
.
position
+=
delta
;
}
public
void
Draw
()
{
GUI
.
Box
(
rect
,
title
,
style
);
}
public
bool
ProcessEvents
(
Event
e
)
{
return
false
;
}
}
|
|
using
UnityEngine
;
using
UnityEditor
;
using
System
.
Collections
.
Generic
;
public
class
NodeBasedEditor
:
EditorWindow
{
private
List
<
Node
>
nodes
;
[
MenuItem
(
"Window/Node Based Editor"
)]
private
static
void
OpenWindow
()
{
NodeBasedEditor
window
=
GetWindow
<
NodeBasedEditor
>
();
window
.
titleContent
=
new
GUIContent
(
"Node Based Editor"
);
}
private
void
OnGUI
()
{
DrawNodes
();
ProcessEvents
(
Event
.
current
);
if
(
GUI
.
changed
)
Repaint
();
}
private
void
DrawNodes
()
{
if
(
nodes
!=
null
)
{
for
(
int
i
=
0
;
i
<
nodes
.
Count
;
i
++
)
{
nodes
[
i
].
Draw
();
}
}
}
private
void
ProcessEvents
(
Event
e
)
{
}
}
|
创建节点
节点现在在编辑器中绘制,但如果我们不创建节点,则无法看到它们。 当用户在编辑器中点击右键时,我们应该显示一个带有“
Add node”项的上下文菜单。 当用户点击“
Add node”时,我们将创建一个节点并将其添加到节点列表中,以便绘制它。 节点需要位置,宽度,高度和样式; 位置将是鼠标的当前位置,宽度将是200,高度将是50(是的,我不喜欢在代码中使用
magic numbers,但这将是一个简单的编辑器),我们将复制Animator窗口的节点样式进行造型。
|
using
UnityEngine
;
using
UnityEditor
;
using
System
.
Collections
.
Generic
;
public
class
NodeBasedEditor
:
EditorWindow
{
private
List
<
Node
>
nodes
;
private
GUIStyle
nodeStyle
;
[
MenuItem
(
"Window/Node Based Editor"
)]
private
static
void
OpenWindow
()
{
NodeBasedEditor
window
=
GetWindow
<
NodeBasedEditor
>
();
window
.
titleContent
=
new
GUIContent
(
"Node Based Editor"
);
}
private
void
OnEnable
()
{
nodeStyle
=
new
GUIStyle
();
nodeStyle
.
normal
.
background
=
EditorGUIUtility
.
Load
(
"builtin skins/darkskin/images/node1.png"
)
as
Texture2D
;
nodeStyle
.
border
=
new
RectOffset
(
12
,
12
,
12
,
12
);
}
private
void
OnGUI
()
{
DrawNodes
();
ProcessEvents
(
Event
.
current
);
if
(
GUI
.
changed
)
Repaint
();
}
private
void
DrawNodes
()
{
if
(
nodes
!=
null
)
{
for
(
int
i
=
0
;
i
<
nodes
.
Count
;
i
++
)
{
nodes
[
i
].
Draw
();
}
}
}
private
void
ProcessEvents
(
Event
e
)
{
switch
(
e
.
type
)
{
case
EventType
.
MouseDown
:
if
(
e
.
button
==
1
)
{
ProcessContextMenu
(
e
.
mousePosition
);
}
break
;
}
}
private
void
ProcessContextMenu
(
Vector2
mousePosition
)
{
GenericMenu
genericMenu
=
new
GenericMenu
();
genericMenu
.
AddItem
(
new
GUIContent
(
"Add node"
),
false
,
()
=>
OnClickAddNode
(
mousePosition
));
genericMenu
.
ShowAsContext
();
}
private
void
OnClickAddNode
(
Vector2
mousePosition
)
{
if
(
nodes
==
null
)
{
nodes
=
new
List
<
Node
>
();
}
nodes
.
Add
(
new
Node
(
mousePosition
,
200
,
50
,
nodeStyle
));
}
}
|
使节点可拖动
好的,现在我们可以添加节点了,但是我们不能拖动它们。 正如我前面提到的,节点将处理它们自己的事件,因此我们将在
Node类中处理拖动事件。 这里需要注意的一点是,我们应该使用
Use() 方法“
using”拖动事件。 稍后,我们将添加画布拖动,并且我们不希望同时拖动节点和整个画布(“
using”一个事件阻止它被其他过程使用,即停止事件冒泡)。 另请注意,
ProcessNodeEvents(Event e)中的for循环向后遍历节点列表,因为最后一个节点位于顶部,所以它应该首先处理事件。
|
using
System
;
using
UnityEditor
;
using
UnityEngine
;
public
class
Node
{
public
Rect
rect
;
public
string
title
;
public
bool
isDragged
;
public
GUIStyle
style
;
public
Node
(
Vector2
position
,
float
width
,
float
height
,
GUIStyle
nodeStyle
)
{
rect
=
new
Rect
(
position
.
x
,
position
.
y
,
width
,
height
);
style
=
nodeStyle
;
}
public
void
Drag
(
Vector2
delta
)
{
rect
.
position
+=
delta
;
}
public
void
Draw
()
{
GUI
.
Box
(
rect
,
title
,
style
);
}
public
bool
ProcessEvents
(
Event
e
)
{
switch
(
e
.
type
)
{
case
EventType
.
MouseDown
:
if
(
e
.
button
==
0
)
{
if
(
rect
.
Contains
(
e
.
mousePosition
))
{
isDragged
=
true
;
GUI
.
changed
=
true
;
}
else
{
GUI
.
changed
=
true
;
}
}
break
;
case
EventType
.
MouseUp
:
isDragged
=
false
;
break
;
case
EventType
.
MouseDrag
:
if
(
e
.
button
==
0
&&
isDragged
)
{
Drag
(
e
.
delta
);
e
.
Use
();
return
true
;
}
break
;
}
return
false
;
}
}
|
NodeBaseEditor.cs
|
private
void
OnGUI
()
{
DrawNodes
();
ProcessNodeEvents
(
Event
.
current
);
ProcessEvents
(
Event
.
current
);
if
(
GUI
.
changed
)
Repaint
();
}
private
void
DrawNodes
()
{
if
(
nodes
!=
null
)
{
for
(
int
i
=
0
;
i
<
nodes
.
Count
;
i
++
)
{
nodes
[
i
].
Draw
();
}
}
}
private
void
|


 最低0.47元/天 解锁文章


 3036
3036


 被折叠的 条评论
为什么被折叠?


