


unity模仿钟表
With the release of ML-Agents toolkit v0.3 Beta, there are lots of new ways to use Machine Learning in your projects. Whether you’re working on games, simulations, academic or any other sort of projects, your work can benefit from the use of neural networks in the virtual environment.
随着ML-Agents工具包v0.3 Beta的发布 ,有许多在项目中使用机器学习的新方法。 无论您是从事游戏,模拟,学术还是任何其他类型的项目,您的工作都可以受益于在虚拟环境中使用神经网络。
If you’ve been using ML-Agents tooklkit before this latest release, you will already be familiar with Reinforcement Learning. If not, I wrote a beginner’s guide to get you started. This blog post will help you get up to speed with one of the major features that represent an alternative to Reinforcement Learning: Imitation Learning.
如果您在此最新版本之前一直使用ML-Agents takelkit,则您将已经熟悉强化学习。 如果没有,我写了一个 初学者指南 来帮助您入门。 这篇博客文章将帮助您快速掌握代表强化学习的替代方法的主要功能之一: 模仿学习 。
开始之前 (Before we start)
As opposed to Reinforcement Learning, which works with a reward/punishment mechanism, Imitation Learning uses a system based on the interaction between a Teacher agent (performing the task) and a Student agent (imitating the teacher). This is very useful in situations where you don’t want your AI to have machine-like perfection, but want it to behave like a real person instead. We’ve shared the example that we will look at here at this year’s Unity at GDC Keynote.
与采用奖励/惩罚机制的强化学习相反,模仿学习使用基于 教师 代理(执行任务)和 学生 代理(模仿老师) 之间的交互作用的系统 。 这在您不希望AI具有类似于机器的完美但希望其表现像真实人的情况下非常有用 。 我们已经共享了一个示例,我们将在今年的GDC Keynote大会上看到这个示例。
What is good about using Machine Learning Agents toolkit rather than scripting a behavior is that they are adaptable and require almost no AI development knowledge.
使用机器学习代理工具包而不是编写行为脚本的好处是,它们具有适应性,几乎不需要AI开发知识。
If you’re using this post as a reference and you’re starting from a project that uses ML-Agents toolkit v0.1 or v0.2, make sure you’re aware of the changes in the semantics and that you align with v0.3. If you need help with setting up ML-Agents toolkit into a Unity environment, check out the ML-Agents Docs.
如果您以这篇文章作为参考,并且从使用ML-Agents工具包v0.1或v0.2的项目开始,请确保您了解语义上的更改并且 与v0保持一致.3 。 如果您需要将ML-Agents工具包设置到Unity环境中的帮助,请查看 ML-Agents Docs 。
任务 (The Task)
This example is based on the Hover Racer project developed by Unity using the assets from the game Antigraviator from Cybernetic Walrus. We will look at the same scene that you’ve seen at GDC, and understand how it works.
该示例基于Unity开发的Hover Racer项目,该项目使用了 Cybernetic Walrus的 Antigraviator 游戏中的资产 。 我们将看看您在GDC上看到的同一场景,并了解其工作原理。
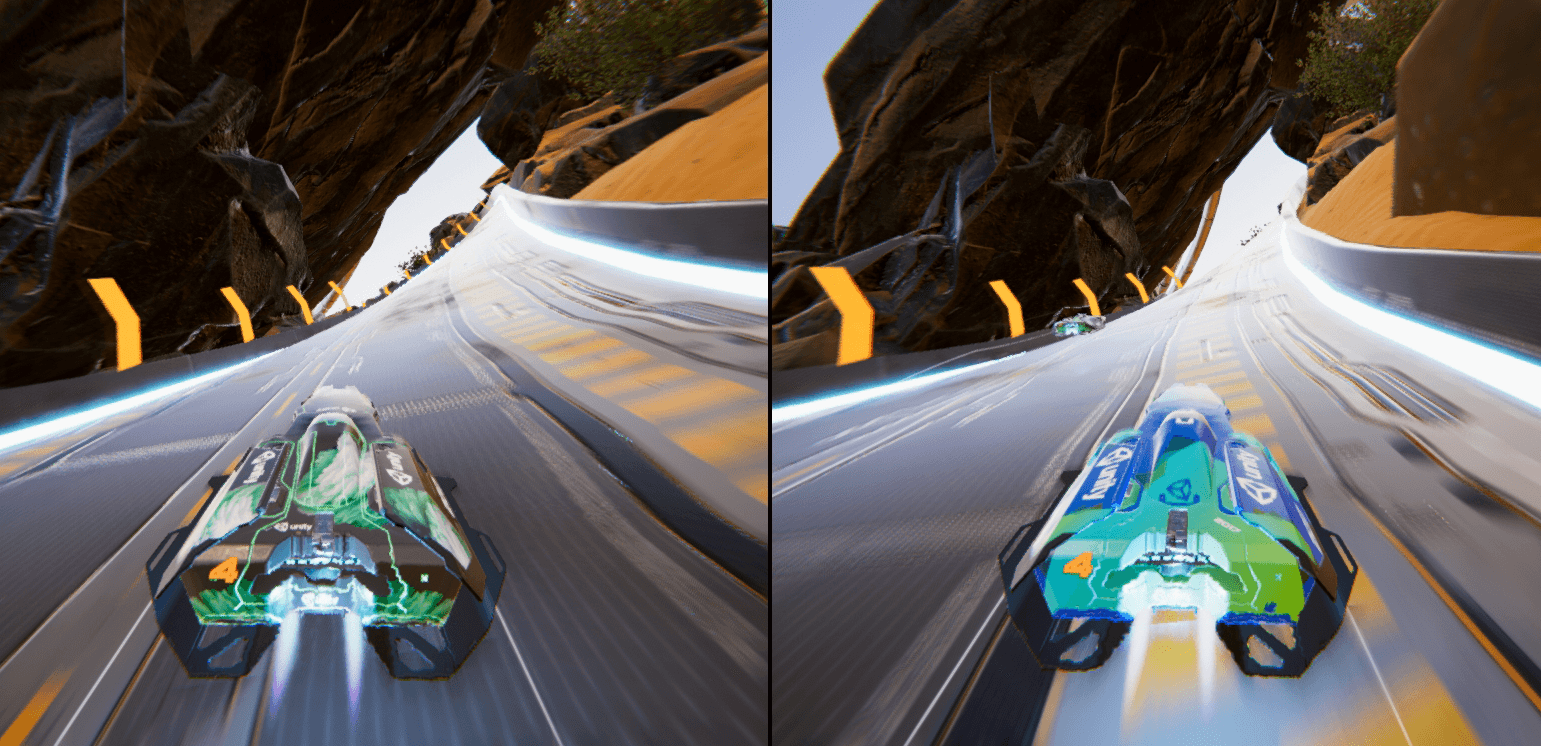
The task is to automate the movement of the opponent’s vehicle so that it’s fun for the player to race against it. The car, in this case, is the Agent. Since the AI cannot see, in the traditional sense, it needs a way to simulate vision to understand how the human is making their decisions. Therefore, both vehicles send out a series of raycasts around it to “see” where the walls are. In this way, the machine can see that the human is avoiding the walls so that it can begin to imitate the behavior. Of course, the human could always intentionally drive into walls or try to crash into other players in order to create an AI that wants to do that same, that’s all a part of the fun!
任务是使对手车辆的运动自动化,以使玩家与之竞争很有趣。 在这种情况下,汽车是 Agent 。 由于AI在传统意义上看不见,因此需要一种模拟视觉的方法来理解人类如何做出决定。 因此,两辆车都围绕着它发出一系列射线,以“看”墙壁的位置。 通过这种方式,机器可以看到人类正在避开墙壁,从而可以开始模仿行为。 当然,人类总是可以故意闯入墙壁或试图撞向其他玩家,以创建想要做到这一点的AI,这就是乐趣的一部分!
培训准备 (The Training Prep)
Now that the task is clear, we can start preparing for training. Top tip: have your task clear in mind (and practice) before you start training – it will save you a headache later on. You will be teaching the task to a student agent, and you cannot teach what you don’t know yourself!
现在任务很明确了,我们可以开始准备培训了。 最重要的提示: 开始训练 之前 ,请牢记您的任务(和练习) , 这将使您免于以后的头痛。 您将向学生代理教任务,并且您将无法教自己不认识的东西!
First, understand Observations and Actions. The former are the pieces of information that the agent needs to be trained properly. In our case, the agent has to know whether there is an obstacle around to avoid it. We will add this information in the CollectObservations() method. Raycast() is a simple method in the custom class ShipRaycaster that casts rays around the agent and returns the value of the distance from the wall with which the rays overlap, -1 otherwise. We pass the value of the distance from any wall it hits or a value of -1 if it hits nothing. Generally speaking, we should pass observations as normalized values from 0 to 1, so we need a way to tell the brain both how far the wall is, and whether or not the raycaster hit a wall at all. Therefore we will use two points of data for each raycast. For example, if our raycast distance was 20 units and a wall was hit 10 units away, we’d pass in the values .5f (half the distance) and 1f (yes, it hit). If the same ray didn’t hit any walls, we’d pass in 1f (max distance) and 0f (no, it didn’t hit).
首先,了解 观察 和 动作 。 前者是需要正确培训代理的信息。 在我们的情况下,代理商必须知道周围是否有障碍物可以避免。 我们将在 CollectObservations() 方法中 添加此信息 。 Raycast() 是自定义类 ShipRaycaster 中的一种简单方法,该方法 将射线投射到代理周围,并返回与射线重叠的墙之间的距离值,否则返回-1。 我们传递到 它碰到的任何墙壁的距离 的 值,或者如果它什么都没碰到,则 传递 -1的值。 一般而言,我们应该将观测值作为从0到1的归一化值进行传递,因此我们需要一种方法来告诉大脑壁有多远以及射线投射器是否完全撞到了壁。 因此,对于每个射线广播,我们将使用两个数据点。 例如,如果我们的光线投射距离是20个单位,而墙被击中10个单位,则我们将传入.5f(一半距离)和1f(是,它命中)值。 如果同一条射线没有击中任何墙壁,我们将以1f(最大距离)和0f(不,它没有击中)通过。
We also want to record the localVelocity and the Y value of localAngularVelocity for the neural network to be aware of.
我们还想记录 localVelocity 和 localAngularVelocity 的Y值, 以 供神经网络注意。
|
1
2
3
4
5
6
7
8
9
10
11
12
13
14
15
16
17
18
19
20
21
22
23
24
25
26
27
28
29
30
31
32
33
34
35
36
37
38
39
40
41
42
43
44
45
46
47
48
49
50
51
|
//Agent collecting the results of its actions
public override void CollectObservations()
{
//Ask each raycaster if it sees a wall
foreach (ShipRaycaster ray in rays)
{
float result = ray.Raycast();
if (result != -1)
{
AddVectorObs(result);
AddVectorObs(1f);
}
else
{
AddVectorObs(1f);
AddVectorObs(0f);
}
}
Vector3 localVelocity = transform.InverseTransformVector(rigidBody.velocity);
Vector3 localAngularVelocity = transform.InverseTransformVector(rigidBody.angularVelocity);
AddVectorObs(localVelocity.x);
AddVectorObs(localVelocity.y);
AddVectorObs(localVelocity.z);
AddVectorObs(localAngularVelocity.y);
}
|
|
1
2
3
4
5
6
7
8
9
10
11
12
13
14
15
16
17
18
19
20
21
22
23
24
25
26
27
28
29
30
31
32
33
34
35
36
37
38
39
40
41
42
43
44
45
46
47
48
49
50
51
|
//Agent collecting the results of its actions
public override void CollectObservations ( )
{
//Ask each raycaster if it sees a wall
foreach ( ShipRaycaster ray in rays )
{
float result = ray . Raycast ( ) ;
if ( result != - 1 )
{
AddVectorObs ( result ) ;
AddVectorObs ( 1f ) ;
}
else
{
AddVectorObs ( 1f ) ;
AddVectorObs ( 0f ) ;
}
}
Vector3 localVelocity = transform . InverseTransformVector ( rigidBody . velocity ) ;
Vector3 localAngularVelocity = transform . InverseTransformVector ( rigidBody . angularVelocity ) ;
AddVectorObs ( localVelocity . x ) ;
AddVectorObs ( localVelocity . y ) ;
AddVectorObs ( localVelocity . z ) ;
AddVectorObs ( localAngularVelocity . y ) ;
}
|
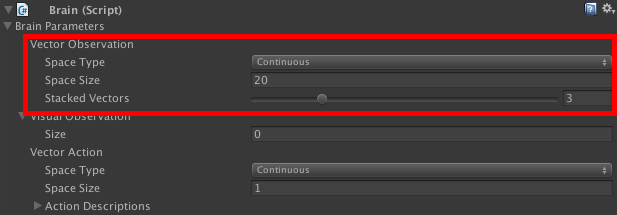
Now we communicate this information to the Brain Inspector Window. At this stage, the Brain needs to know how many observations we’re collecting and whether they’re Discrete or Continuous. In this case, we collect 20 observations as the rays array contains 8 raycasts, which is 16 total observations (since we add 2 for each ray). We add 4 additional observations for localVelocity (X, Y and Z axes), and localAngularVelocity (Y axis).
现在,我们将此信息传达给“大脑检查器”窗口。 在此阶段,大脑需要知道我们正在收集多少个观测值,以及它们是离散的还是连续的。 在这种情况下,我们收集了20个观测值,因为射线阵列包含8个射线投射,总共16个观测值(因为我们为每个射线添加2个)。 我们为localVelocity (X,Y和Z轴)和localAngularVelocity (Y轴)添加了4个附加观察值。
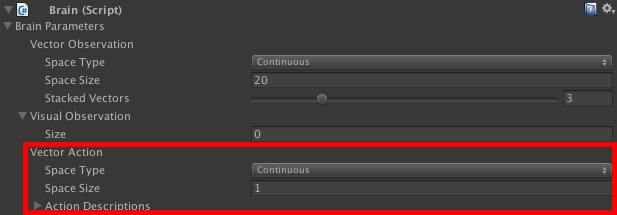
The Actions are the actions that the agent can perform during both training and testing (Play mode). They can be either Discrete or Continuous. In this case, there is only one Continuous action: steering. This can have a negative (steer left) or positive (steer right) value. We can script this in the AgentAction() method. Additionally, we can include a small reward that works as a visual feedback for the human trainer. The reward does not affect the training, but it will notify the trainer that the Agent is actually learning (as it outputs to the console during training).
动作是座席在培训和测试(播放模式)中可以执行的动作。 它们可以是离散的也可以是连续的。 在这种情况下,只有一个连续动作:转向。 这可以具有负值(向左转向)或正值(向右转向)。 我们可以在 AgentAction() 方法中 编写脚本 。 此外,我们可以包括一个小的奖励,作为对人类教练的视觉反馈。 奖励不会影响培训,但会通知培训人员代理实际上正在学习(因为它在培训期间输出到控制台)。
|
1
2
3
4
5
6
7
8
9
10
11
12
|
//Agent making a decision
public override void AgentAction(float[] act, string txt)
{
movement.input.rudder = Mathf.Clamp(act[0], -1, 1);
AddReward(.1f);
}
|
|
1
2
3
4
5
6
7
8
9
10
11
12
|
//Agent making a decision
public override void AgentAction ( float [ ] act , string txt )
{
movement . input . rudder = Mathf . Clamp ( act [ 0 ] , - 1 , 1 ) ;
AddReward ( . 1f ) ;
}
|
Again, we transfer this information to the Brain Inspector Window.
同样,我们将此信息传输到“大脑检查器”窗口。
What your agent knows and what it can do needs to be clear from the beginning. Scripting your Agent class and filling in the variables of your Brain component go hand in hand here.
您的代理知道什么以及可以做什么从一开始就需要弄清楚。 在此处编写脚本,编写Agent类并填写Brain组件的变量。
Before leaving the scripting side of our Agent, we want to make sure that the simulation gets restarted when the vehicle hits an obstacle. To do this, we check for collision with a wall. When Done() is called, the AgentReset() method takes care of resetting the agent so that it can start learning again. This means moving the vehicle back to the closest waypoint and clearing out any velocities it might have.
在离开Agent的脚本编写端之前,我们要确保当车辆撞到障碍物时重新启动仿真。 为此,我们检查是否与墙壁碰撞。 当 完成() 被调用时,AgentReset() 方法 重置代理,以便它可以重新开始学习 护理 。 这意味着将车辆移回最接近的航路点并清除可能的速度 。
|
1
2
3
4
5
6
7
8
9
10
11
12
13
14
15
16
|
//Agent has collided with the wall and needs to be restarted on the track
public override void AgentReset()
{
transform.position = spawnPosition;
transform.rotation = spawnRotation;
rigidBody.velocity = Vector3.zero;
rigidBody.angularVelocity = Vector3.zero;
}
|
|
1
2
3
4
5
6
7
8
9
10
11
12
13
14
15
16
|
//Agent has collided with the wall and needs to be restarted on the track
public override void AgentReset ( )
{
transform . position = spawnPosition ;
transform . rotation = spawnRotation ;
rigidBody . velocity = Vector3 . zero ;
rigidBody . angularVelocity = Vector3 . zero ;
}
|
老师和学生代理 (Teacher and Student Agents)
We want to train a Student racer to play like a Teacher racer. Therefore, we need to implement a Student Brain and a Teacher Brain to associate with the two agents, respectively. We can simply duplicate the Brain that is currently in the scene, as the variables in the Inspector have to be the same for both. At this stage, it’s important to give relevant names to the Game Objects to which the Brains are attached, as this will matter later. “StudentBrain” and “TeacherBrain” are adequate names.
我们想训练学生赛车手像老师赛车手一样比赛。 因此,我们需要实现学生大脑和教师大脑分别与这两个代理相关联。 我们可以简单地复制当前场景中的Brain,因为Inspector中的变量必须都相同。 在此阶段,重要的是给与大脑相连的游戏对象赋予相关名称,因为这将在以后发生。 “ StudentBrain”和“ TeacherBrain”是适当的名称。

|
|
|
The Teacher Brain Type is “Player”, as it uses the inputs coming from the Player. Here, we set up the steer inputs as per defined in the logic of the game. In this case, A is steer left (value -1), and D is steer right (value 1). The “Broadcasting” checkbox will ensure that the actions performed by the player are visible to the Student brain so that it can learn to imitate.
老师的大脑类型是“玩家”,因为它使用来自播放器的输入。 在这里,我们根据游戏逻辑定义了转向输入。 在这种情况下,A向左转向(值-1),D向右转向(值1)。 “广播”复选框将确保玩家大脑可以看到玩家执行的动作,以便学生可以学习模仿。
The Student Brain is the one that will receive the training. Its Type will be “External“, which means that its behavior will be decided by the AI brain while we are playing.
学生大脑是将接受培训的人。 它的类型将为“外部”,这意味着它的行为将由我们在玩游戏时由AI大脑决定。
We can customize the training configuration (hyperparameters) by editing the trainer_config.yaml file in the python folder or we can choose to use the default values. When training starts, the configuration for each brain is found by name in this file. That is why it’s important to pay attention to the Brain’s Game Object name in the editor. This is what the StudentBrain in the trainer_config.yaml file looks like:
我们可以通过编辑 python文件夹中 的 trainer_config.yaml 文件来自 定义训练配置(超参数), 也可以选择使用默认值。 训练开始时,将在该文件中按名称找到每个大脑的配置。 这就是为什么在编辑器中注意“大脑的游戏对象”名称很重要的原因。 这是 trainer_config.yaml 文件 中的 StudentBrain 看起来像这样:
|
1
2
3
4
5
6
7
8
9
10
11
12
13
14
15
16
17
18
19
20
21
22
23
|
StudentBrain:
trainer: imitation
max_steps: 10000
summary_freq: 1000
brain_to_imitate: TeacherBrain
batch_size: 16
batches_per_epoch: 5
num_layers: 4
hidden_units: 64
use_recurrent: false
sequence_length: 16
buffer_size: 128
|
|
1
2
3
4
5
6
7
8
9
10
11
12
13
14
15
16
17
18
19
20
21
22
23
|
StudentBrain :
trainer : imitation
max_steps : 10000
summary_freq : 1000
brain_to_imitate : TeacherBrain
batch_size : 16
batches_per_epoch : 5
num_layers : 4
hidden_units : 64
use_recurrent : false
sequence_length : 16
buffer_size : 128
|
培训过程 (The Training Process)
The next step is to launch the training and start teaching your agent. First, build your Unity executable into the python folder. Then, from your terminal window, navigate to the python folder and run python3 learn.py <env_name> –train –slow, where <env_name> is the name of your Unity executable. A window will pop up and will allow you to play as the Teacher Agent. Keep training until your Student Agent seems to have understood how to perform the task by itself (for this task or any of a similar difficulty, ~4-5 minutes should be enough).
下一步是启动培训并开始教您的代理。 首先,将您的Unity可执行文件构建到python文件夹中。 然后,在终端窗口中,导航到python文件夹并运行 python3 learning.py <env_name> –train –slow ,其中 <env_name> 是Unity可执行文件的名称。 将会弹出一个窗口,您可以作为教师代理来玩。 继续训练,直到您的学生代理似乎已经了解如何独自执行任务(对于此任务或任何类似的困难,大约4-5分钟就足够了)。
Once the training is completed, press CTRL+C to stop the simulation. The program outputs a .bytes file that contains the trained model: the action to perform given an observation. We import back this file into the editor by changing the Student Brain Type to “Internal”. At the end, the agent should act like at minute 0:32 of this video.
训练完成后,请按 CTRL + C 停止模拟。 程序输出一个.bytes文件,其中包含训练后的模型:给定观察值要执行的操作。 通过将学生脑部类型更改为“内部”,我们将该文件导入回编辑器。 最后,代理应 在此视频的0:32分钟前 采取行动 。
总结一下 (To sum up)
There is a lot going on in the world of Machine Learning at the moment, and Unity is working hard on empowering developers to leverage it fast and easy! Hopefully, this post provided some insightful tips to get started with your own projects or to begin to understand what is possible in the world of Machine Learning in Unity.
目前,机器学习世界正在发生着很多事情,Unity正在努力使开发人员能够快速,轻松地利用它! 希望 这篇文章提供了一些有见地的技巧,以帮助您开始自己的项目或开始了解Unity中机器学习的世界。
I would absolutely love to see what you’re working on, so if you found this useful please let me know by leaving a comment, and make sure to check-out the Machine Learning portal.
我绝对希望看到您在做什么,因此,如果您觉得这很有用,请在评论中告知我,并确保签出 Machine Learning门户 。
要 联合柏林 ? 不要错过有关机器学习的课程! (Going to Unite Berlin? Don’t miss sessions on Machine Learning!)
Get an intro on our toolkit from “Democratize Machine Learning: ML-Agents Toolkit Explained” by Vincent-Pierre Berges (day 3, breakout 3). Vincent-Pierre is also hosting a Hands-On Lab on Machine Learning (day 3, breakout 2). If you’re working on marketing your game, you should also check out a talk titled “Maximize user acquisition spend with immersive ad formats and machine learning” by Juho Metsovuori (day 2, breakout 4).
从 Vincent-Pierre Berges的 “民主化机器学习:ML-Agents工具包 介绍 ”中 获得我们工具箱的简介 (第3天,突破3)。 Vincent-Pierre还主持了 机器学习动手实验 (第3天,分组2)。 如果您正在从事游戏的营销工作,还应该查看 Juho Metsovuori的演讲 “ 通过 沉浸式广告格式和机器学习最大程度地提高用户获取支出” (第2天,突破4)。
翻译自: https://blogs.unity3d.com/2018/05/24/imitation-learning-in-unity-the-workflow/
unity模仿钟表


 1353
1353


 被折叠的 条评论
为什么被折叠?
被折叠的 条评论
为什么被折叠?
 到【灌水乐园】发言


