


shader graph
With the release of Unity Editor 2019.1, the Shader Graph package officially came out of preview! Now, in 2019.2, we’re bringing even more features and functionality to Shader Graph.
随着Unity Editor 2019.1的发布,Shader Graph包正式退出预览! 现在,在2019.2中,我们将为Shader Graph带来更多功能。
2019年有何变化? (What’s Changed in 2019?)
自定义功能和子图升级 (Custom Function and Sub Graph Upgrades)
To maintain custom code inside of your Shader Graph, you can now use our new Custom Function node. This node allows you to define your own custom inputs and outputs, reorder them, and inject custom functions either directly into the node itself, or by referencing an external file.
要在“着色器图”中维护自定义代码,现在可以使用我们新的“自定义功能”节点。 该节点允许您定义自己的自定义输入和输出,对其进行重新排序,以及将自定义函数直接注入节点本身或通过引用外部文件。
Sub Graphs have also received an upgrade: you can now define your own outputs for Sub Graphs, with different types, custom names, and reorderable ports. Additionally, the Blackboard for Sub Graphs now supports all data types that the main graph supports.
子图也得到了升级:现在,您可以为子图定义自己的输出,具有不同的类型,自定义名称和可重新排序的端口。 此外,Blackboard for Sub Graphs现在支持主图支持的所有数据类型。
色彩模式和精度模式 (Color Modes and Precision Modes)
Using the Shader Graph to create powerful and optimized shaders just got a little easier. In 2019.2, you can now manually set the precision of calculations in your graph, either graph-wide or on a per-node basis. Our new Color Modes make it fast and easy to visualize the flow of Precision, the category of nodes, or display custom colors for your own use!
使用“ Shader Graph”创建功能强大且经过优化的着色器变得更加容易。 在2019.2中,您现在可以在图形范围内或在每个节点的基础上手动设置图形中的计算精度。 我们新的色彩模式使您可以快速,轻松地查看Precision的流程,节点类别或显示自定义颜色供您自己使用!
See the Shader Graph documentation for more information about these new features.
有关这些新功能的更多信息, 请参见 Shader Graph文档 。
样例项目 (Sample Project)
To help you get started with the new custom function workflow, we’ve created an example project together with step-by-step instructions. Download the project from our repository and follow along! This project will show you how to use the Custom Function node to write custom lighting shaders for the Lightweight Render Pipeline (LWRP). If you want to follow along using a fresh project, make sure you’re using the 2019.2 Editor and LWRP package version 6.9.1 or higher.
为了帮助您开始使用新的自定义功能工作流程,我们创建了一个示例项目以及逐步说明。 从我们的资源库 下载项目 ,然后继续! 该项目将向您展示如何使用“自定义功能”节点为“轻量级渲染管道”(LWRP)编写自定义照明着色器。 如果要继续使用新项目,请确保使用的是2019.2编辑器和LWRP软件包6.9.1或更高版本。
从主光源获取数据 (Getting Data from the Main Light)
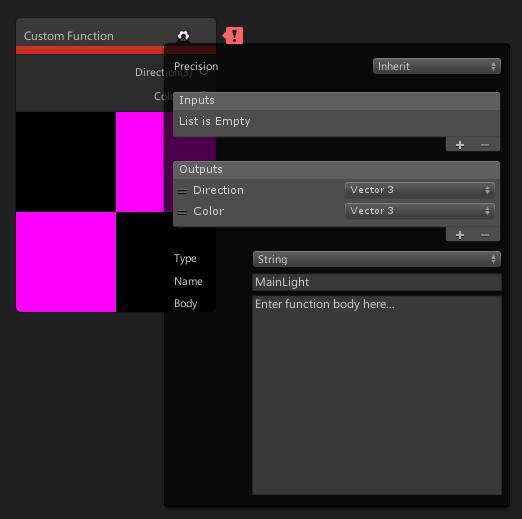
To get started, we need to get information from the main light in our Scene. Start by selecting Create > Shader > Unlit Graph to create a new Unlit Shader Graph. In the Create Node menu, locate the new Custom Function node, and click the gear icon on the top right to open the node menu.
首先,我们需要从场景中的主光源获取信息。 首先选择“ 创建”>“着色器”>“非照明图” 以创建一个新的“非照明着色器图”。 在“创建节点”菜单中,找到新的“自定义功能”节点,然后单击右上角的齿轮图标以打开节点菜单。
In this menu, you can add inputs and outputs. Add two output ports for Direction and Color, and select Vector 3 for both. If you see an “undeclared identifier” error flag, don’t be worried; this will go away when we start to add our code. In the Type dropdown menu, select String. Update your function name — in this example, we’re using “MainLight”. Now, we can start adding our custom code in the text box.
在此菜单中,您可以添加输入和输出。 为 Direction 和 Color 添加两个输出端口 ,然后 为两个都 选择 Vector 3 。 如果看到“未声明的标识符”错误标志,请不要担心。 当我们开始添加代码时,这将消失。 在 类型 下拉菜单中,选择 字符串 。 更新您的函数名称-在此示例中,我们使用“ MainLight”。 现在,我们可以开始在文本框中添加我们的自定义代码。
First, we’re going to use a flag called #ifdef SHADERGRAPH_PREVIEW. Because the preview boxes on nodes don’t have access to light data, we need to tell the node what to display on the in-graph preview boxes. #ifdef tells the compiler to use different code in different situations. Start by defining your fallback values for the output ports.
首先,我们将使用一个名为#ifdef SHADERGRAPH_PREVIEW的标志。 由于节点上的预览框无法访问光照数据,因此我们需要告诉节点在图形内预览框中显示的内容。 #ifdef告诉编译器在不同情况下使用不同的代码。 首先定义输出端口的后备值。
|
1
2
3
|
#if SHADERGRAPH_PREVIEW
Direction = half3(0.5, 0.5, 0);
Color = 1;
|
|
1
2
3
|
#if SHADERGRAPH_PREVIEW
Direction = half3 ( 0.5 , 0.5 , 0 ) ;
Color = 1 ;
|
Next, we’ll use #else to tell the compiler what to do when not in a preview. This is where we actually get our light data. Use the built-in function GetMainLight() from the LWRP package. We can use this information to assign the Direction and Color outputs. Your custom function should now look like this:
接下来,我们将使用#else告诉编译器不在预览时的操作。 这是我们实际获取灯光数据的地方。 使用LWRP包中的内置函数GetMainLight() 。 我们可以使用此信息来分配“ 方向” 和“ 颜色” 输出。 您的自定义函数现在应如下所示:
|
1
2
3
4
5
6
7
8
|
#if SHADERGRAPH_PREVIEW
Direction = half3(0.5, 0.5, 0);
Color = 1;
#else
Light light = GetMainLight();
Direction = light.direction;
Color = light.color;
#endif
|
|
1
2
3
4
5
6
7
8
|
|
 最低0.47元/天 解锁文章


 5835
5835


 被折叠的 条评论
为什么被折叠?
被折叠的 条评论
为什么被折叠?
 到【灌水乐园】发言


