


Welcome to Cloud Content Delivery (CCD)#
Cloud Content Delivery (CCD) is Unity's managed cloud service that hosts and delivers content to your application’s users worldwide without having to reinstall a new version of the application. The service is fully integrated into the Unity development platform, saving you months of building and maintaining your own similar service. CCD is most valuable for content-rich, live games or applications that require content updates on a regular basis.
CCD interfaces#
There are multiple ways to integrate your application content with Cloud Content Delivery (CCD):
The command-line interface (CLI) is the recommended interface for interacting with CCD because it is the main mechanism by which you would upload content into a bucket (you can also upload content using the dashboard or the API).
The Dashboard provides the same functionality as the CLI.
The Content Delivery Management API and Content Delivery Client API allow you to manage application content through programming.
The CCD Management SDK allows you to manage your CCD content from inside the editor. This pairs with the Addressables package, and allows you to build and release from a single location.
CCD organization#
In CCD, you organize your content into buckets per environment to create a clear workflow for your project. A typical workflow example could be having separate buckets per platform (for example, an iOS bucket and an Android bucket), across multiple environments. You start with a production environment, but you can add other environments such as development and staging.
Within a given bucket, you group specific versions of each asset to create a release. As these versions change, or you add and remove entries, you designate new releases as required.
A release can also have a unique identifier associated with it, called a badge. Give this badge a meaningful name, then use it to query content, and move it between releases to add flexibility to your workflow.
Environments#
You can create environments in the Unity Dashboard. A project can contain multiple environments (such as production, staging and development), but only one of them is the default one. By default, every project has a production environment.
Buckets#
Using Cloud Content Delivery, you organize your content into buckets to create a clear workflow for your project. A bucket is a single context for publishing content. A typical workflow example could be having separate buckets for different platforms, with names such as ios and android. The buckets could be in different environments, such as the production and development environments. A bucket can be private or public. Private buckets protect read access to buckets with an access token, so only those users with that access token can retrieve content from that bucket. You can also mark a bucket as "promotion only" to restrict write access to that bucket and prevent mistakes such as uploading incorrect content to the wrong bucket. The image below shows a sample bucket as it appears in CCD, including its bucket ID, Promotion Only setting, Privacy setting, description, and the details for a release within the bucket.
An example of buckets in CCD

|
You can create and edit buckets either in the Dashboard or through the CLI.
Entry#
An entry is a single unit of content within a bucket. Entries support labels and metadata. Creating a release captures the current state of all the entries in the bucket, similar to a versioning process.
An example of entries and their details within a bucket

|
Uploading entries to a bucket pushes a local folder’s contents to the remote bucket, which automatically adds, updates, and deletes contents in the bucket, as necessary. CCD supports entries of many file types, the most popular being .gzip, .txt and .bundle (AssetBundles).
Each entry has the following information:
ID: The identification string of this entry.
Path: The location of this entry.
Content type: This field is set via the API.
Content hash: The MD5sum hash value for this entry.
Content version: Every time an entry changes (for example, when you upload a new version of this file, add metadata), the entry gains a new content version string. Using older version strings ensures you still have access to older, overwritten files.
Release#
When you create a release, CCD takes a snapshot of all the entries (at their current versions) contained in a bucket at that specific point in time. To remove, update, or add entries, you must create a new release in order to deliver the new or changed entries. You can move releases between buckets by a process called promotion.
Creating or promoting a new release does not create copies of the entries in a bucket.
Badge#
Badges enable you to select which release your application uses. You can assign a unique badge to a release, and request the badged content using that badge’s name. The image below shows how badges appear in CCD.
An example of badges in a bucket

|
You can move this badge between releases, adding more flexibility to content workflows. Moving a badge removes it from the previous release that it was associated with. You can only assign a badge to a single release at a time, but you can associate multiple different badges to a release.
By default, an automatically generated badge named latest is assigned to the latest release.
/
CCD command-line interface (CLI)#
The command-line interface (CLI) is the recommended method of interacting with Cloud Content Delivery (CCD). With this tool, you can use the command line to control every aspect of your project, from file management to organizing your release pipeline..
You can perform many similar functions in the Dashboard, but you need to use the CLI to copy files to your bucket, or synchronize entire folders.
Getting started#
To set up CCD for CLI:
If you already have a project, go to the next step. Otherwise, if you are using Unity services for the first time:
Create a Unity ID account (if you don’t already have one).
Log into the Unity Dashboard.
Click the Projects dropdown, then Create project. In the Create project window, fill in the required details.
In the Main Menu of the Dashboard, click Explore Services (if not already selected).
In the main window, under either the All Solutions or LiveOps tabs, click on Cloud Content Delivery.
Click Download CLI on the left.
To download the CLI, locate the version of your operating system, then select the download icon.
In the left-side navigation bar, go to the API Key section.
Copy your API key.
Run the CLI on the machine from which you are uploading content.
Log into the CLI using your API key via the auth command.
CCD is now ready for you to use.
CLI usage#
The basic form of a CCD command in the CLI is as follows:
$ ucd [command]
Be sure to enter -h or --help at the end of any command to display any further parameters and flags for that command that might be available.
To see the version of the CLI you are currently using, add the --version flag:
$ ucd --version
You can add the following global flags after any command:
--apikey string: User-specified API key for accessing Content Delivery.
-h, --help: Displays any further parameters and flags for a given command.
-q, --quiet: Disables the display of operations performed by the specified command.
-v, --verbose: Displays error information.
For CLI versions greater than 0.11.0, you need to add the --environment flag to most commands. See CLI examples and Using CCD via the CLI.
The available commands are:
auth#
Authenticates with CCD.
Usage: ucd auth [command]
Available commands:
info: Display current user info.
login [apikey]: Log in to access project data and content delivery services.
logout: Log out of current account.
badges#
Manages badges for a release.
Usage: ucd badges [command]
Available commands:
add [badge_name] [release_id]: Add a badge to a release.
list: List badges in the current bucket.
remove [badge_name]: Remove a badge.
buckets#
Manages buckets for a project.
Usage: ucd buckets [command]
Available commands:
create [project_guid] [bucket name]: Create bucket for a project.
delete [bucket_id]: Delete bucket.
info [bucket_id]: Get bucket information.
list [project_guid]: List buckets for a project.
config#
Manages options for setting and identifying the current bucket.
Usage: ucd config [command]
Available commands:
clear: Clear all local configuration options.
set environment [environment_id] --project=[project_id]: Set environment as current.
set bucket [bucket_id] [flags]: Set the specified bucket as the current (active) bucket.
show: Show current local configuration.
entries#
Manages entries for the current bucket.
Usage: ucd entries [command]
Available commands:
copy [local_path] [entry file name]: Create entry for current bucket from a local file.
delete [entry file name]: Delete entry from the current bucket.
download [entry file name]: Download entry content from current bucket.
info [entry file name]: Get entry info from current bucket.
list: List entries for current bucket.
sync [local_dir_path]: Sync entries from local directory for current bucket.
update [entry file name]: Update entry for current bucket.
To cancel an entries sync command, press Ctrl+C during the process. Any entries synced prior to cancellation remain uploaded, so you must delete them from your bucket.
releases#
Manages the releases for the current bucket.
Usage: ucd releases [command]
Available commands:
create: Create release from latest version of current bucket.
info [release_id]: Get release info for specific release.
list: List releases for current bucket.
promote [release_id] --target_bucket [bucket_id]: Promote specified release to another bucket. An optional -n, --notes flag adds a note string.
update [release_id]: Update an existing release. An optional -n, --notes flag adds a note string.
Bucket and entry names are case-sensitive.
bucket_name is only a label you assign to a bucket upon creation. All other commands require the bucket_ID, which you can find using the buckets list command, or in the Dashboard.
CLI examples#
To create a bucket:
$ ucd buckets create [project_id] [bucket_name]
To delete a bucket:
$ ucd buckets delete [bucket_id]
To list all buckets for a project, including their bucket_id:
$ ucd buckets list [project_id]
To set the current bucket as the active bucket:
$ ucd config set bucket [bucket_id]
To synchronize a local folder with the current bucket:
$ ucd entries sync [local_dir_path]
To view a list of all entries in the current bucket:
$ ucd entries list
For CLI versions greater than 0.11.0, you need to add the --environment flag to most commands.
Example:
ucd buckets list --environment=[environment_id] [PROJECT_ID]
You can also save an environment to be used in all future commands by using the config environment command:
ucd config set environment [environment_id] --project=[project_id]
If you set the environment in config, you don’t need to add the --environment flag.
For a sequential example of how to use the command-line interface, see Using CCD via the CLI.
CCD Management SDK#
Prerequisites#
Unity Cloud Project
Unity Editor (2019.4 and later)
Installation#
The first thing to do is validate that your cloud project is connected to the Unity Editor. See Setting up your project for Unity Services.
Installation with Addressables#
If your project uses Addressables (1.19.19 and later), you can use Addressables to install the CCD Management SDK in two ways within Unity Editor:
Enable Window > Asset Management > Addressables > Settings > Cloud Content Delivery > Enable Experimental CCD Features.
Use path pairs. Go to Window > Asset Management > Addressables > Profiles and select Cloud Content Delivery in the relevant dropdown list. If your project does not already contain a valid version of the CCD Management SDK, it offers to install it.
Certain versions of Addressables only work with certain versions of the CCD SDK. If you’re using this SDK with Addressables, install it from Addressables within Unity Editor to ensure compatibility.
Addressables version | CCD compatible version | Unity supported version |
1.19.18 | 1.0.0-pre.2 | 2019.4+ |
1.19.19 | 1.0.0-pre.2 | 2019.4+ |
1.20.0 | 2.0.4 | 2019.4+ |
1.20.3 | 2.1.0 | 2019.4+ |
Installation without Addressables#
There are multiple ways to install the CCD Management SDK without Addressables:
Unity Dashboard
Go to Projects > Project Settings > SDK Download.
A list of available Unity Gaming Services packages appears. Select Generate Code Snippet to create a code snippet that you can copy and paste into your manifest.json in your Unity project.
Package Manager
Within Unity Editor, select Window > Package Manager.
In the Packages dropdown list, select Unity Registry.
Search for Cloud Content Delivery Management API.
Select Install.
Editing the Manifest
You can edit the manifest.json within your project to install the project manually.
Add "com.unity.services.ccd.management": "2.1.0" to the list of dependencies in your manifest.
Getting started#
See the Documentation for Content Delivery Management API to learn about starting up the sample window, and about what is possible with this SDK, with examples. The sample window within the package gives examples of how to list, create, and delete buckets, entries, and badges. For more information, see the scripting API documentation.
CCD Dashboard#
You can use Cloud Content Delivery (CCD) in the Unity Dashboard to create and maintain buckets, entries, badges and releases.
As an example scenario, you could use the Dashboard to interactively manage an application’s assets using a more visual user interface than the CLI provides.
To access CCD in the Unity Dashboard:
If you already have a project, go to the next step. Otherwise, if you are using Unity services for the first time:
Create a Unity ID account (if you don’t already have one).
Log into the Unity Dashboard.
Click the projects dropdown, then Create project. In the Create project window, fill in the required details.
In the Main Menu of the Dashboard, click Explore Services (if not already selected).
In the main window, under either the All Solutions or LiveOps tabs, click on Cloud Content Delivery.
Click Buckets.
Select the project you want to use with CCD from the projects dropdown.
By default, the production environment should be selected. However, you can switch environments using the Environments dropdown at the top of the Buckets page. We encourage our users to have at least a production and a development environment.
Buckets#
In the Cloud Content Delivery page for your project, you need to create buckets to host your content.
To add a bucket:
Click Create Bucket.
In the Create Bucket window, give the bucket a name and an optional description.
Specify whether you want to restrict write access to this bucket. Choose between:
Open to all: Anyone can modify content in this bucket.
Promotion only: Owners and managers can modify content through promotion from another bucket. No one can directly upload to or delete content from this bucket.
To restrict read access to this bucket, select Enable Bucket Privacy. Private buckets only allow users with an access token to read the content.
You cannot change the bucket privacy settings after you create the bucket.
You can select the environments in which you want your bucket to be created. You can specify different privacy and write access settings for each bucket.
Bucket creation in CCD Dashboard

|

|
If the environment you’re in doesn’t have any buckets, but you have another environment with buckets, you can duplicate your buckets' setup from that environment by selecting Copy from Environment.

Then, in the dialog, take the following steps:
Select the Environment from which you want to duplicate the buckets' setup using the Source Environment dropdown.
Select Next.
Select the buckets you want to duplicate (this duplicates the bucket with its settings, but it won’t duplicate its content).
Enable the confirmation checkbox.
Select Finish.
In the bucket list view, you can see the selected environment at the top, and then a list of all buckets from that environment. Each bucket has a details row that contains the following information:
The bucket name
An icon with a tooltip indicating whether the bucket is open to all (open box icon) or eligible for promotions only (closed box icon)
The Bucket ID
If the bucket is Private, a label with a closed lock image and the text "Private Bucket"
The description of the bucket
A snapshot of the current state.
The release number of the current release, or notification of unreleased changes.
The date at which the last change was made to the bucket.
The user name of the person who made the latest changes, or the name of the source for automated changes.
An example of buckets in CCD

|
To see more information about a bucket, click its name in the list view. In the bucket details screen, there are the following tabs:
Latest: Shows the current state of the bucket, and the latest versions of all its content. From here, you can create a release. The asset list is paginated, searchable, and contains a filter. If your bucket does not have any unreleased changes, you can move a release from this bucket to another using the Promote Release button.
Releases: Displays all the releases you have created for this project.
Badges: Lists all the badges available for the releases of this bucket.
Targeting: Lists all game overrides using one of the bucket's badges.
Settings:
Displays the following details: Bucket name, Description, Bucket write conditions, Bucket privacy.
If the bucket is private, you can create, view, edit and delete the bucket access tokens of the bucket here. You can create a maximum of 20 access tokens per bucket.
You can delete a bucket by clicking on the Delete Bucket button, which appears in the header of the bucket details screen.
Entries#
Buckets require content in order to create releases. This content comes in the form of entries (files) that you upload from a local source.
To add entries via the Dashboard:
Select a bucket from the bucket view list.
From the Latest tab, click Upload using the dashboard if the bucket is empty, or Upload Content if the bucket already contains entries.
Drag files into the designated space, or click Browse and select the files you want to add.
Click Upload Files.
Files are uploaded at the root of the bucket. To update files in a child directory, you can either update the files manually in the entries list, or drag and drop your root directory, which will update all nested directories and files already in your bucket.
Entries in a bucket after upload

|
To cancel an entries sync command, press Cancel during the process. Any entries synced prior to cancellation remain uploaded, so you must delete them from your bucket.
After uploading your files, a box appears summarizing the process. Click Refresh Page to update the status of the bucket's information.
Click on the name of an entry to view its details. A dialog opens displaying the following information:
The entry ID
The entry's file path
The type of content (set via the API)
The MD5sum content hash value
The current version of this entry in a format required for the Addressable URL
The Addressable URL of this entry\
If you are using the Unity Addressables packages with your project, you can use this URL for your remote load paths.
A Copy to clipboard button appears to easily copy the Addressable URL.
Click the More Items menu (⋮) at the end of an entry's row to gain access to two buttons:
Download file: Downloads the entry file to your local machine.
Update file: Opens a dialog to replace the content of that entry with another file.
After changing your entries, each entry receives one of the following labels: Added, Modified, Unchanged, Removed. You can sort through any of these labels by using the dropdown found in the Current Entries list.
Releases#
You can manage the releases you have created for your project on the Releases tab.
To create a release:
Select a bucket from the Content Delivery Buckets page that contains unreleased changes.
In the bucket’s page, select the Latest tab.
Select the Create Release button.
In the Create Release dialog box, enter optional release notes and click Next.
On the next page, choose the badges that you want to assign to this release (removing them from their current releases), and select Next.
Review your changes, then select Submit to finalize, or Back to continue editing. The Unreleased Changes notification changes to reflect the new status.
After you create a release, it appears in the list in the Releases tab, with its creation date and any associated badges. You can assign a badge and edit the release notes of a release via the More Items menu (⋮) at the end of a release’s row.
When you click on the Release # of a release in the list, you see the following information:
The GUIDs related to that release:
Project ID
Bucket ID
Release ID
The Addressable remote path URLs for that release and its related badges\
If you are using the Unity Addressables packages with your project, you can use this URL for your remote load paths.
Useful CLI commands that you can easily copy to clipboard using the available button
Some situations in your project’s release pipeline might require you to move a release from one bucket to another, which is a process called promotion. If your bucket does not have any unreleased changes, you can see the Promote Release button in your release’s details row.
To promote a release:
Click the Release # of the release you want to promote in the Releases tab.
In the release summary, click Promote Release.
In the Promote Release window, select the environment in the Target Environment dropdown, and then the bucket from that environment to which you want to promote the release in the Target Bucket dropdown.
Add any optional release notes, and select Next.
On the next page, choose the badges that you want to assign to this release (removing them from their current releases), and select Next.
Review your changes, then select Promote Release to finalize, or Back to continue editing.
Badges#
Attaching a badge to a release allows your application to load content from whichever release the badge is assigned to.
To create a badge:
Select a bucket from the Cloud Content Delivery Buckets page.
Select the Badges tab.
Select Add New.
In the Add New Badge window, give the badge a unique name, and select its release from the releases table.
Select Submit.
The badge now appears in the badge list in the Badges tab.
In the Badges table, you can see the following information:
The badge name
The release to which the badge is assigned
The Addressables URL of the badge\
If you are using the Unity Addressables packages with your project, you can use this URL for your remote load paths.
A button to quickly copy the Addressables URL
You can edit a badge’s associated release, or delete the badge via the More Items menu (⋮) at the end of a badge’s row. You can only assign a badge to a single release at a time, but you can associate multiple different badges to a release.
CCD + Addressables walkthrough#
This section demonstrates how to set up an actual Unity game project with Cloud Content Delivery (CCD) and Addressables, allowing you to easily integrate a pipeline of assets from Unity Editor into CCD.
The Addressables Asset System isn’t required for using CCD.
Using a very simple mobile game called Loady Dungeons, you will learn how to:
After reading this walkthrough, you will know how to effectively serve content to your users, and how to use the Addressable Asset system in Unity with CCD.
This walkthrough uses Unity 2021.3.18f1.
Download the project#
The first thing you need to do to follow along with this walkthrough is to download the latest version of our sample game from GitHub, Loady Dungeons.
Test the project#
Open Unity Editor.
Open the Loady Dungeons project.
Open the MainMenu scene.
Click on the Game tab.
In the Aspect dropdown, click +.
Create a new aspect of Type "Aspect Ratio", with a Width and Height of 9 and 16, respectively. This makes the game preview look more like it's running on a phone.
Click OK.
Deselect Low Resolution Aspect Ratios.
Press the Editor's Play button to try the game.
Playing the game in its initial state means you can't load the first level. Progressing through this walkthrough fixes this limitation by associating the required assets to use CCD with Addressables.
Install the Addressable Assets package#
In order to mark assets as addressable, you need to install the Addressables package directly in Unity Editor.
This project already has an Addressables package pre-installed, but if you are following along with a custom project or want to upgrade to a newer verified version, install the Addressables package through the Package Manager.
Select Window > Package Manager.
Search for the latest version of Addressables verified for the version of Unity Editor you’re using. This example uses version 1.16.19.
Select the version you need, then Install.
Configure game assets as addressable#
Addressable assets provide an easy way to handle asset management overload by loading assets by address. Now that you have the Addressables package installed, it’s time to mark your game assets as addressable.
Open the Scenes folder in the Project window.
Select the following assets:
Level_00
Level_01
Level_02
Level_03
In the Inspector window, select Addressable for each.
Open the Addressables Groups window from Window > Asset Management > Addressables > Groups.
Create the following new groups using Create > Group > Packed Assets:
Level 00
Level 01
Level 02
Level 03
Hats
Drag the Scenes assets from the default group into their corresponding groups. For example, drag the Level_01 scene from the default group into the new Level 01 group you created.
Drag the entire contents from the Hats folder (not the folder itself) in the Project window (Prefabs > Hats) into the Hats group.
Select each of the assets from the Addressables Groups window, and rename their lengthy Addressable field to something simpler in the Inspector window. You can select all the assets, right-click > Simplify Addressable Names to automatically rename them.
For the scene asset Level_00, rename its Addressable field from Assets/Scenes/Level_00.unity to Level_00.
Rename scene asset Level_00’s Addressable field to Level_00
Rename scene asset Level_01’s Addressable field to Level_01
Rename scene asset Level_02’s Addressable field to Level_02
Rename scene asset Level_03’s Addressable field to Level_03
Rename prefab asset Hat00’s Addressable field to Hat00
Rename prefab asset Hat01’s Addressable field to Hat01
Rename prefab asset Hat02’s Addressable field to Hat02
Rename prefab asset Hat03’s Addressable field to Hat03
Configure profiles and building AssetBundles#
At this stage, create a new Addressables profile to save all the associated settings related to development of the game to this development profile:
Click Windows > Asset Management > Addressables > Groups.
Select Profile > Manage Profiles from the dropdown.
In the resulting Addressables Profiles window, select Create > Profile.
A profile named New Profile appears. Right-click it and select Rename Profile. Name it “Development Profile”.
Right-click Development Profile > Set Active. This sets the Development Profile as the current profile in use.
Now, build your AssetBundle, which is an archive file that contains non-code assets for your game. This is so that the Editor’s play mode uses our AssetBundles instead of local assets.
Click Window > Asset Management > Addressables > Groups.
Select Build > New Build > Default Build Script from the dropdown.
Select Play Mode Script > Use Existing Build from the dropdown.
Get started with CCD#
Now you are ready to hook this game into the Cloud Content Delivery (CCD) service, ultimately leveraging Addressables and AssetBundles. The benefit of CCD is that it is a managed cloud service that hosts and delivers content to your application’s users worldwide without having to reinstall a new version of the application.
To get started with CCD:
Go to the Unity Dashboard.
Sign in using your Unity ID.
From the projects dropdown, click Create Project.
Name it “Loady Dungeons Workshop”.
Click Create project.
Click on Project Settings (gear icon) for Loady Dungeons Workshop. Take note of the Project ID.
On the left, select Environments.
If you don't already have a development environment, create one.
From the Dashboard landing page, locate and select Cloud Content Delivery.
The Command-line interface (optional)#
If you prefer to use the optional command-line interface (CLI) to manage your project:
Download the CLI for your operating system.
Make sure to include the CLI’s folder in your computer’s Environment Variables.
Open the command line and navigate to your project’s folder.
Type the following command to make sure the CLI is successfully configured: ucd help
See CCD Command-line interface (CLI).
Buckets#
At this point, it is time to create buckets to assist in the different stages of creation for this project.
Create buckets#
From the CCD landing page, click Buckets on the left.
Select Loady Dungeons Workshop from the projects dropdown (if not already selected).
Click Create Bucket.
Name the bucket “Loady Dungeons Sample”.
Give the bucket an optional description.
Choose whether this bucket is:
Open to all: Anyone can modify content in this bucket.
Promotion only: Owners and managers can modify content through promotion. No one can upload to or delete content from this bucket.
To restrict read access to this bucket, select Enable Bucket Privacy. Private buckets only allow users with an access token to read the content.\
You cannot change the bucket privacy settings after you create the bucket.
Select Next.
Make sure both production and development environments are checked.
Select Create.
The Loady Dungeons Sample bucket should now appear on the Cloud Content Delivery Buckets page in the dashboard, for both development and production environments. You can switch between environments using the environments dropdown at the top of the page. Take note of the buckets’ Bucket ID in both environments because you need to use them later in your remote load path.
Generate AssetBundles and upload content manually#
Generate AssetBundles#
An AssetBundle is an archive file that contains platform-specific non-code assets that Unity can load at run time.
To generate AssetBundles:
In your Unity Editor project, click Window > Asset Management > Addressables > Groups.
In the Profile dropdown, make sure that Development Profile is selected. If it isn’t, select it now.
In the Profile dropdown, select Manage Profiles.
With Development Profile selected, set the following:
RemoteBuildPath: AssetBundles/[BuildTarget], where [BuildTarget] is the default subfolder.
RemoteLoadPath: https://PROJECT_ID.client-api.unity3dusercontent.com/client_api/v1/buckets/BUCKET_ID/release_by_badge/latest/entry_by_path/content/?path=
Replace PROJECT_ID with the ID of your project. If you didn’t take note of your Project ID earlier, find it by clicking on your user name in the corner of the Dashboard, then Account > Project Management > Loady Dungeons Workshop.
Replace BUCKET_ID in the path with the ID of the bucket you want to use, the Loady Dungeons Sample bucket created in your development environment in this example. If you didn’t take note of its BUCKET_ID earlier, find it in your list of buckets in the CCD Dashboard..
The latest in the path refers to the badge called Latest, an automatically generated badge assigned to the most recent release.
Return to the Addressables Groups window.
Select Hats.
In the Inspector panel, set:
Build Path: RemoteBuildPath
Load Path: RemoteLoadPath
Repeat for Level 00, Level 01, Level 02, and Level 03
This sets the build path and load paths for these four sets of assets to the paths we specified for the Development Profile.
Still in the Groups window, click on the Build dropdown, then select New Build > Default Build Script. This saves the AssetBundles at the RemoteBuildPath location.
To use the build we just made as the basis for a playtest, click on the Play Mode Script > Use Existing Build.
Click the Play button in Unity Editor to test the game.
Press Start in the game. Notice how the game is now stuck.
Upload the content#
At this point, we want to upload this content into the Development bucket we set up in CCD earlier.
Select the Loady Dungeons Sample bucket in your development environment from the dashboard.
Select Upload using the dashboard if the bucket is empty, or Upload Content if the bucket already contains entries.
Drag and drop, or select the Browse button to upload content from the folder where you built your AssetBundles to your CCD Development bucket. Your files are in the folder specified as the RemoteBuildPath from earlier.
Select Upload 5 Files (four levels and Hats).
After the upload process, select Refresh Page to update the status of the bucket's information. The entries appear as Unreleased Changes. This means that the entries are present in the bucket but have not yet been wrapped up in a Release.
To make a release, select Create Release. This takes the AssetBundles you uploaded to the Loady Dungeons Sample bucket in your development environment and binds them into a Release. Follow the onscreen prompts to finish the process.
Notice that CCD automatically applies the automatically created latest badge to this release, marking it as the newest release created in this bucket.
You can also upload content using the CLI.
Generate AssetBundles and upload content with CCD Management package#
The CCD Management package with Addressables 1.19.15+ facilitates building, uploading and releasing Addressable content.
You need to upgrade the Addressables versions and install the CCD Management package through the Package Manager.
Select Window > Package Manager.
Search for Addressables, select the version 1.19.15+, then Install.
Search for CCD Management, select the version 2.0.1+, then Install.
Generate AssetBundles#
In your Unity Editor project, click Window > Asset Management > Addressables > Groups.
In the Profile dropdown, make sure that Development Profile is selected.
In the Profile dropdown, select Manage Profiles.
In the Profiles window, select Development Profile, then change the Remote dropdown to use Cloud Content Delivery.
At this point if you don't already have the CCD Management package installed, Unity Editor prompts you to add it. Click on the Install CCD Management SDK Package button to install it.
In the next list of options, choose the Loady Dungeons Sample bucket created earlier.
In the subsequent list, choose the Latest badge.
Return to the Addressables Groups window.
Select Hats.
In the Inspector panel, under Content Packaging & Loading:
Set Build and Load Paths: Remote
Repeat for Level 00, Level 01, Level 02, and Level 0
This sets the build path and load paths for these four sets of assets to the paths pairs specified for the Development Profile. See Profile for more information on path pairs.
In the Groups window, click on the Build dropdown, then select New Build > Default Build Script. This saves the AssetBundles at the RemoteBuildPath location.
To use the build we made as the basis for a playtest, click on the Play Mode Script > Use Existing Build.
Select the Play button in Unity Editor to test the game.
Select Start in the game. Notice how the game is now stuck.
Upload the content#
To generate, upload, and release this content into the Loady Dungeons Sample bucket we set up in CCD earlier:
In your Unity Editor project, click Window > Asset Management > Addressables > Groups.
Select Build & Release.
The CCD Management package uses the default build script behavior to generate the Addressable bundles. Then, the management package uploads all groups associated with the path pair that is connected to the Loady Dungeons Sample bucket and latest badge that we set up earlier to those remote targets. Finally, the management package creates a release for those remote targets and updates their badge to latest.
Promote the release#
After you’ve uploaded your assets to the Loady Dungeons Sample bucket in your development environment and you tie those assets into a release, you can put these latest changes out for public consumption. That’s why we also created the bucket in your production environment. The buckets in your production environment contain releases ready for your players. This means moving the release from the bucket in your development environment to the one in your production environment by a process called promotion.
To promote the release from the bucket in your development environment to the one in your production environment:
If not already there, in the Unity Dashboard, go to the Loady Dungeons Workshop CCD project, make sure the development environment is selected in the environments dropdown, and select the Loady Dungeons Sample bucket.
Select Promote Release.
In the Target Environment dropdown, select production.
In the Target Bucket dropdown, select Loady Dungeons Sample.
Add optional release notes.
Select Next and follow the onscreen prompts.
Select Promote Release.
Again, notice that CCD automatically applies the automatically created latest badge to this release, marking it as the newest release created in this bucket.
Before you test the game, you need to modify the profile variables to point to the correct bucket. There are two ways to do this:
You can have a different player build per environment. Your Development build would have debug symbols and the bucket_id variable set to your bucket from the development environment, and your Production build would have debug symbols disabled and the bucket_id variable set to your bucket from the production environment, but they would use the same content.
Use static properties in a profile variable or TransformInternalId to dynamically change the bucket the catalog is reaching out to at runtime. For more about the static profile variables and transforming internal IDs in Addressables, see Transforming resource URLs.
Test the game:
In Unity Editor, press the Editor's Play button.
Press Start in-game.
Press Play in-game. You can now play the game within Unity Editor.
You’ve now successfully moved the release and all its assets from Development to Production, ready to deploy to your users.
Using Addressables with private buckets#
To read the data from private buckets, you need to have a valid Bucket Access Token.
As of Addressables 1.19.4, you can use the WebRequestOverride feature to add Bucket Access Token as a header to the request, which the following example demonstrates.
void Start(){ textComponent = GetComponent<Text>(); Addressables.WebRequestOverride = webRequest => { webRequest.SetRequestHeader("Authorization", token); // Debug.Log($"Fetching: {webRequest.url}"); }; Addressables.LoadAssetAsync<TextAsset>("Assets/one.txt").Completed += handle => { textComponent.text = handle.Result.text; // Debug.Log($"Text is now: {handle.Result.text}"); };}
In this example, token is the base64 encoded Bucket Access Token value.
Application size reduction with CCD#
To entice players to download your game, a good practice is to keep the initial size of your application small, then have the players download files for new levels and assets as needed later.
This section uses an example project to take you through the process of reducing the size of your application by using CCD and Addressables together.
Reduce application size summary#
Below is a summary of the application reduction process. Each step is expanded upon later in the document.
Install Addressables and CCD Management packages.
Configure a bucket in CCD.
Create a new scene for your game, or use an existing level to be sent through CCD.
Configure your assets in Unity Editor.
Set up the script that calls your content through Addressables.
Release new assets to the CCD Dashboard.
To complete these steps, you need the following:
Unity Editor 2019.4 or above
Addressables (latest version; this example uses version 1.19.15)
CCD Management (latest version; this example uses version 2.0.1)
Install required packages#
First, make sure you have installed the required Addressables and CCD Management packages.
In the Unity Editor, select Window > Package Manager.
Search for Addressables, select the version 1.19.15+, then Install.
Search for CCD Management, select the version 2.0.1+, then Install.
Configure a bucket in CCD#
The following steps show you how to create and configure a bucket in the Unity Gaming Services Dashboard.
Complete the CCD Dashboard instructions to access buckets within CCD.
Complete the Buckets instructions to create a bucket.
Make sure to set the Bucket write conditions to Open to all.
When choosing the Environment, set it to production.
Select Create to create the bucket.
Select the bucket from your list of buckets.
Select Upload Content, and upload any file from your computer.\
This step is only to create and retrieve a URL for your bucket. You can delete this file once you create your initial release.
Refresh the page then create a release.
Select the release from the Releases tab.
Select the Addressable Remote Path URLs tab.
Copy the Badge: Latest URL for use later in the Unity Editor.

Configure the Unity Editor#
Continue the app size reduction process by setting the following in the Unity Editor.
Go to Window > Asset Management > Addressables > Groups.
If you have not used Addressable Assets before, you must select Create Addressables Settings.

Select Profile > Manage Profiles in the Addressables Groups window.
Select the Default profile.
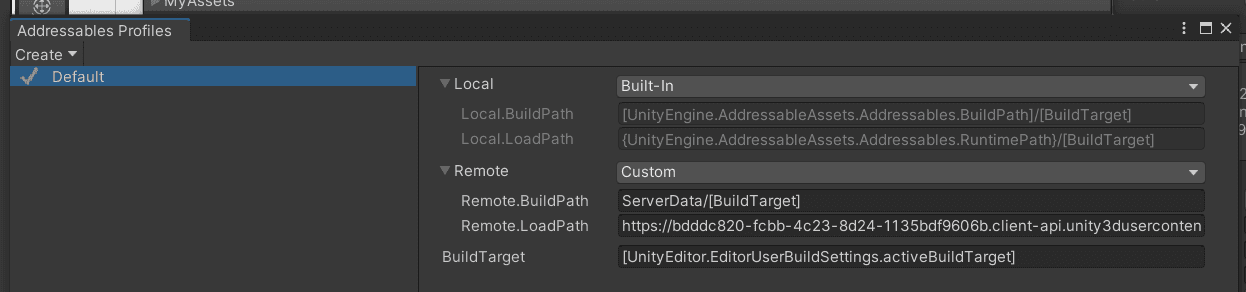
Set Remote to Custom.
Expand the Remote field, and set Remote.LoadPath to the URL you saved earlier.
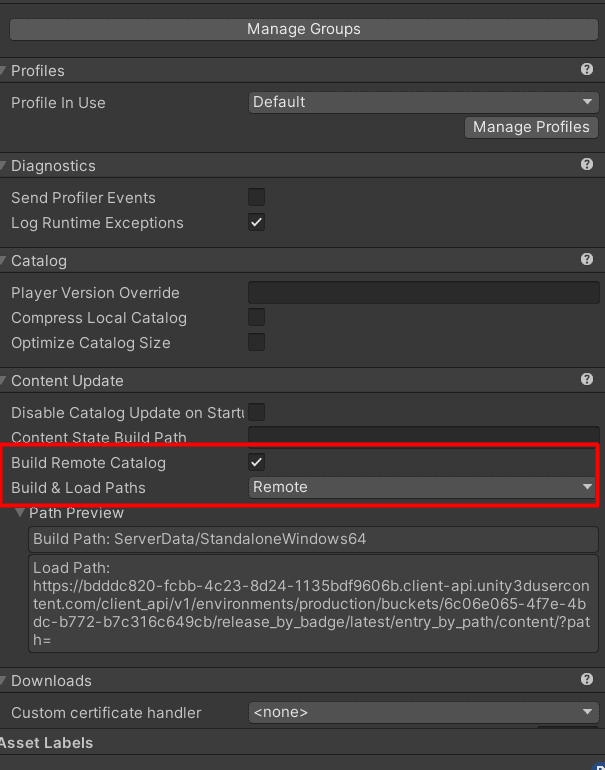
From the Unity Editor main window, select Window > Asset Management > Addressables > Settings.
Enable Build Remote Catalog.
Set Build & Load Paths to Remote.
Prepare the scenes#
Next, prepare the scene or scenes to load through CCD. Make sure you have at least one scene that is different from the initial level.
Scene creation is outside the scope of this use case. See the Unity Manual: Scenes documentation for more information.
In the Unity Editor, find your scene among your assets in the Project tab.
In the Inspector tab, enable Addressable.

Alternatively, drag the scene from the Project tab into the Addressables Groups tab’s Default Local Group.
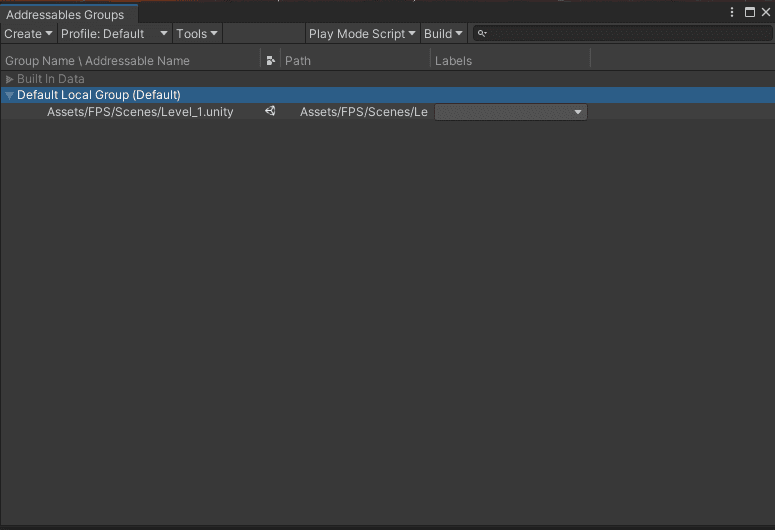
Within the Addressables Groups tab, right-click on the asset and select Simplify Addressable Names for easier readability.
Select the Default Local Group.
In the Inspector:
Set Build & Load Paths to <custom>.
Set Build Path to RemoteBuildPath.
Set Load Path to RemoteLoadPath.
Back in the Addressables Groups window, select Build > New Build > Default Build Script.
If you have previously already run a build, you can update it by selecting Build > Update a Previous Build, then selecting the build’s .bin file.
Compare builds (optional)#
In this optional step, compare build size by building the application once with the scene, and once without the scene. In this test application, there is a roughly 30 MB difference. In larger applications with more levels and assets, the size savings would be greater.

|

|
The size of the release with the scene and the assets included (left) versus the size of the release without the scene (right). | |
Configure your script#
In the main scene (the scene to be built with the project), make sure to add a button or an event within the game that loads the next level.
Be sure to exclude from your build any scenes that you are sending through CCD to avoid conflicts.
You can attach the following example script to a button in your game. Be sure to fill in the addressable name (sceneName in this example) in the Inspector.
C#
using UnityEngine;using UnityEngine.EventSystems;using UnityEngine.SceneManagement;using UnityEngine.AddressableAssets; public class LoadSceneCCD : MonoBehaviour{ public string sceneName = ""; public void LoadTargetScene() { Addressables.LoadSceneAsync(sceneName, UnityEngine.SceneManagement.LoadSceneMode.Single, true); }}
Prepare AssetBundle for Dashboard upload#
Prepare your scene assets to upload to the Dashboard by completing these steps:
In the Unity Editor, select Window > Asset Management > Addressables > Groups.
Select Build > New Build > Default Build Script.
Once the build is complete, on your local drive, go to your project folder, then ServerData\StandaloneWindows64. Note that this folder may vary depending on the platform you are building for.
Take note of the files ending in .hash and .bundle.
Upload to the Dashboard#
Upload the recently built .hash and .bundle files that you generated from the previous step. If this is your first upload, select and upload all files.
Return to the buckets page of the CCD Dashboard.
Select the bucket you created.
Within the Latest tab, under Entries, select the Upload Content tab.
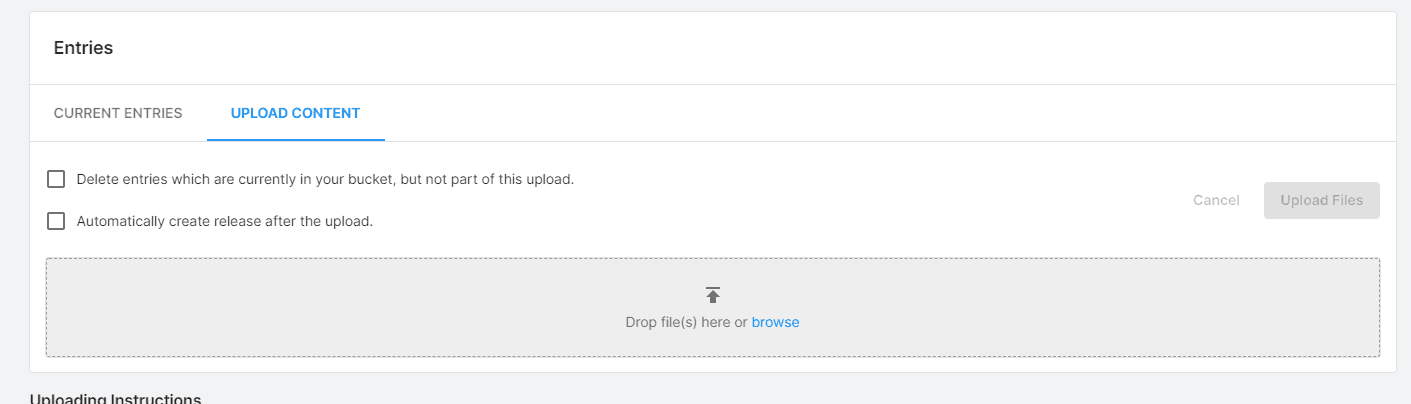
Browse and select the files you build in the previous step.
Select Upload Files.
Select Refresh Page once the upload is complete.
Select Create Release, applying the Latest badge for your new content.
Test your build#
You can test your build by clicking on the button or action that triggers loading the CCD scene. If everything went correctly, your CCD scene should load after a small delay. Your build should only contain the main scene and not the level you want to load through CCD, otherwise you haven’t reduced the size of your application.
/
Game Overrides integration with CCD#
Game Overrides allow you to target content to specific audiences, for example, by running A/B tests, and customizing content to geographical location and specific periods of time. Badges identify the intended content, and Remote Config tests that content without affecting live players, while also distributing badged content to specific players.
To integrate Game Overrides, complete the following steps:
Create an Override to target content by using your CCD badges
Install the Remote Config package#
For information about installing packages, see Package Manager.
These steps may vary depending on which version of the Unity Editor you’re using.
In the Unity Editor, select Window > Package Manager.
In the Packages List View, select Remote Config.
In the Package Specific Detail View, select and install the version you need to import Remote Config into your project.
Link your Project ID#
If you haven’t done so already, you must link your Unity project to a Project ID.
To link your project from the Unity Editor:
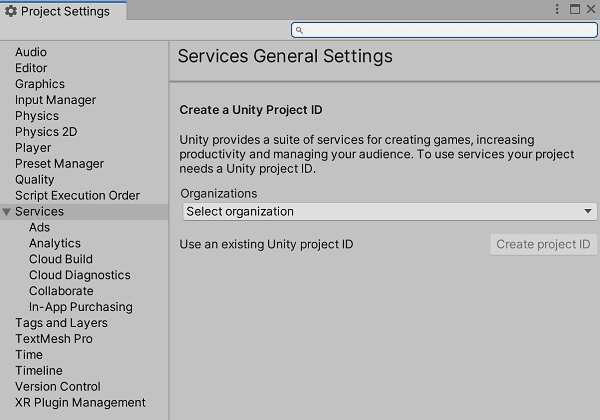
Open the Services window (Window > General > Services).
Select General settings.
In the Services section of the Project settings menu, select your Organization from the dropdown. You must be signed in to Unity Hub to view a list of associated Organizations.
Select Use an existing Unity project ID to link a project to an ID that you previously created on the developer dashboard, or Create project ID to link your project to a new ID.
Create an Override#
You can create an Override on the Unity Dashboard either from the Game Overrides service or from the Cloud Content Delivery service. See Create an Override.
Go to the Game Overrides service by selecting LiveOps in the navigation bar, and then in the secondary navigation bar, select Game Overrides > Overrides.
You can alternatively navigate to the Overview page by selecting Create Override in the Targeting tab of your bucket in the Cloud Content Delivery service itself.
Select Create Override.
Give your Override a name and select Next.
Choose which players to target by specifying a JEXL condition, and then specify what percentage of these players to target. Select Next.
Select + Choose content type, and then select Cloud Content Delivery > Release Badge. Select Done.
To create an Override by using a regular Remote Config configuration instead of targeting a CCD badge, select Config Overrides. See Remote Config.
Select Choose a bucket, and then pick the bucket you want to use.
Select Choose your badge, and then pick the badge you want to use. Select Choose, then select Next.
Choose the Start and End Date to run your Override. Select Finish.
Select Enable to activate your Override.
Integrate Remote Config into your game code#
The RemoteConfig API is included in the Unity.Services namespace, which you must include in your game script. For more information on its classes and methods, see the Remote Config Scripting API documentation.
The Remote Config service has an accessible RemoteConfigService instance to handle fetching and applying your configuration at runtime. In this example, you use it to fetch the key-value pair for your CCD configuration defined by your Override. The key for this pair is the static string CCD_CONFIG_KEY. You then invoke your ApplyCcdConfig function when the retrieval succeeds. ApplyCcdConfig takes a ConfigResponse struct, which represents the response to a fetch request.
C#
public struct userAttributes {}public struct appAttributes {} async Task InitializeRemoteConfigAsync(){ // initialize handlers for unity game services await UnityServices.InitializeAsync(); // remote config requires authentication for managing environment information if (!AuthenticationService.Instance.IsSignedIn) { await AuthenticationService.Instance.SignInAnonymouslyAsync(); }} async void Start(){ if (Utilities.CheckForInternetConnection()) { await InitializeRemoteConfigAsync(); } RemoteConfigService.Instance.appConfig = RemoteConfigService.Instance.GetConfig("ccd"); RemoteConfigService.Instance.FetchCompleted += ApplyCcdConfig; RemoteConfigService.Instance.FetchConfigs("ccd", new userAttributes(), new appAttributes());} void ApplyCcdConfig(ConfigResponse configResponse){ switch (configResponse.requestOrigin) { case ConfigOrigin.Default: Debug.Log("Default values will be returned"); break; case ConfigOrigin.Cached: Debug.Log("Cached values loaded"); break; case ConfigOrigin.Remote: Debug.Log("Remote Values changed"); if (RemoteConfigService.Instance.appConfig.HasKey("CCD_CONFIG_KEY")) { // get the correct key-value pair for CCD (the key will always be "CCD_CONFIG_KEY") string jsonValue = RemoteConfigService.Instance.appConfig.GetJson("CCD_CONFIG_KEY"); // you will use jsonValue in the next step } break; }}
Retrieve the appropriate assets from CCD#
After you have successfully fetched the CCD configuration, you can then extract your bucket information and badge name to retrieve the appropriate assets from CCD.
Start by defining a CcdConfig class.
C#
public class CcdConfig{ public string bucketId; public string bucketName; public string badgeName;}
In your ApplyCcdConfig function, you can then extract these values from the fetched CCD configuration and use them to retrieve the appropriate assets from CCD.
C#
// extract the config values that you have defined when creating your OverrideCcdConfig ccdConfig = JsonUtility.FromJson<CcdConfig>(jsonValue); // the bucketId and badgeName are required to fetch the appropriate assetsvar bucketId = ccdConfig.bucketId;var badgeName = ccdConfig.badgeName; // fetch the entry from CCD// Note that for a dynamic file path, a config override can be used in order to fetch// the correct file path for your assetJObject entry = CcdManager.Instance.GetEntry(bucketId, badgeName, "YOUR_ASSET_FILEPATH_HERE");// fetch the entry's content from CCDvar content = CcdManager.Instance.GetContent(bucketId, entry["entryid"].ToString()); // use your asset(s) as needed// YOUR CODE HERE
The CCDManager class uses CCD’s client API to fetch the asset. You must attach the CCDManager to a game object in each scene.
If your assets are large, consider fetching them asynchronously.
Your CCDManager class might look something like the following code sample:
C#
using System.Collections;using System.Collections.Generic;using UnityEngine;using System.Threading.Tasks;using Unity.RemoteConfig; using System.Net;using System;using System.IO; public class CcdManager : MonoBehaviour{ private static string projectId = "YOUR_PROJECT_ID_HERE"; private static string ccdBaseUrl = $"https://{projectId}.client-api.unity3dusercontent.com/client_api/v1/"; private static CcdManager m_Instance; public static CcdManager Instance { get { return m_Instance; } } private void Awake() { if (m_Instance != null && m_Instance != this) { Destroy(this.gameObject); return; } m_Instance = this; DontDestroyOnLoad(this.gameObject); } public JObject GetEntry(string bucketId, string badgename, string entrypath) { var entryUrl = $"{ccdBaseUrl}/buckets/{bucketId}/release_by_badge/{badgename}/entry_by_path/?path={entrypath}"; HttpWebRequest request = (HttpWebRequest)WebRequest.Create(entryUrl); HttpWebResponse response = (HttpWebResponse)request.GetResponse(); StreamReader reader = new StreamReader(response.GetResponseStream()); string jsonResponse = reader.ReadToEnd(); JObject ccdEntry = JObject.Parse(jsonResponse); return ccdEntry; } public string GetContent(string bucketId, string entryid) { var contentUrl = $"{ccdBaseUrl}/buckets/{bucketId}/entries/{entryid}/content/"; HttpWebRequest request = (HttpWebRequest)WebRequest.Create(String.Format(contentUrl)); HttpWebResponse response = (HttpWebResponse)request.GetResponse(); StreamReader reader = new StreamReader(response.GetResponseStream()); string contentValue = reader.ReadToEnd(); return contentValue; }}
You have now successfully retrieved the assets defined by your Override.
CCD support#
If you ever have a question about our services or experience an issue, you have access to our dedicated support staff. The Cloud Content Delivery team is here to help with any feature or performance concerns.
There are several ways you can request help from the CCD team:
Raise a ticket through the CCD Service Desk, found in the Unity Dashboard (Help and Support > File a ticket > LiveOps > Cloud Content Delivery).
Create a post in the CCD Forums, detailing your concern, feature request, and/or any way to recreate your issue.
Contact your account manager or partner manager — availability varies.
CCD FAQ#
How should I set up my buckets?#
Unity recommends a bucket for every build target (for example, Android, iOS, Windows) across all environments (for example, development, staging, production). This means you would have buckets with the same name in different environments, such as an Android bucket both in your production and development environments.
What is a release promotion?#
Promoting a release means pushing that release from one bucket to another. It is best practice to promote to and from buckets of the same name in different environments (for example, development, staging, production) to best track content before it is live for your users.
What is the required content hash on entries?#
The Content Hash is an md5sum of the file you specify when you create the entry. It must match the md5sum of the content uploaded, and the file sizes must match as well. A file is set as complete once the md5sum and size match. Only when a file is complete can you add it to a release.
What is my "RemoteLoadPath" in the Addressable profile?#
You can find the RemoteLoadPath on the CCD Dashboard within the Addressable Remote Path URLs tab for each release. You can use the URL of either the release or the badge assigned to the release, though Unity recommends the latter. It should be of the format:
https://[projectID].client-api.unity3dusercontent.com/client_api/v1/buckets/[bucketID]/releases/[releaseID]/entry_by_path/content/?path=
https://[projectID].client-api.unity3dusercontent.com/client_api/v1/buckets/[bucketID]/release_by_badge/[badge]/entry_by_path/content/?path=
How do I get my CloudBuild builds to work with Addressables?#
Add a profile specifically for Addressables. The URL needs to include “...content/?path=ServerData/[BuildTarget]”.
Do I need to remove the slash after “path=/” from the Addressable Asset bundle when trying to download it?#
The leading slash should not have any effect on the path of your entry, and the system discards it.
Why are players experiencing connectivity issues when downloading content?#
A connectivity error, although rare, can exceptionally occur due to unstable client device connectivity. If there are connectivity errors, use the Unity Addressables group setting Retry Count, which is available in Content Packing & Loading > Advanced Options > Retry Count. This is a property that tells Addressables how many times to retry fetching the content in the event of a failure.
This property needs to be changed for every group for which you want to modify the retry count, and is not a global Addressables Settings property.
How do I check my bandwidth consumption and billing?#
You can view your bandwidth consumption on the Overview page of the CCD Dashboard. You can view your billing information on the Billing Overview, which is linked on the Overview page as well.
Does CCD support console?#
There aren't any known technical limitations for CCD console support, though some consoles might have specific restrictions around where you can pull content from. Accessing the API is platform-dependent; each platform has differing limitations to what remote content games can access.
CCD REST API#
Developers that do not use Unity can access APIs via web endpoints, or REST APIs. REST APIs provide more flexibility and allow you to automate your workflows by using your favorite language and game development engine.
Cloud Content Delivery provides the following REST APIs:


 1702
1702

 被折叠的 条评论
为什么被折叠?
被折叠的 条评论
为什么被折叠?
 到【灌水乐园】发言


