


Multi-agent
Multi-agent 翻译为多代理,在Agent中人们通常希望单个代理具备很高的职能与很强的推理能力,由于单Agent的能力受大语言模型限制与执行过程过于黑盒,没有足够精确的控制能力,应用效果往往达不到期望。多Agent则可以弥补这些缺点.
AotuGen是一个早于LangGraph出现的基于对话(Conversation)实现多代理的框架.而LangGraph是一个基于图论的多代理框架,在一个有向有环图中,节点可以是可执行函数或者runnable对象或者是一个Agent.与AotuGen的实现过程比较起来就复杂得多了.既要考虑图中的结构又要梳理图的逻辑.在实际应用中可能需要借助某些工具来梳理其中的关系(绘制图的物理模型与节点之间的关系).
在图的执行过程中借助langsmith可以更好的看到程序的执行过程与节点之间的关系
在LangGraph中实现多代理
使用LangGraph构建图比较简单,但在图中实现多代理,如何将Agent放入节点和如何实现节点间的方向关系以及图的状态机该如何定义是多代理的难点.
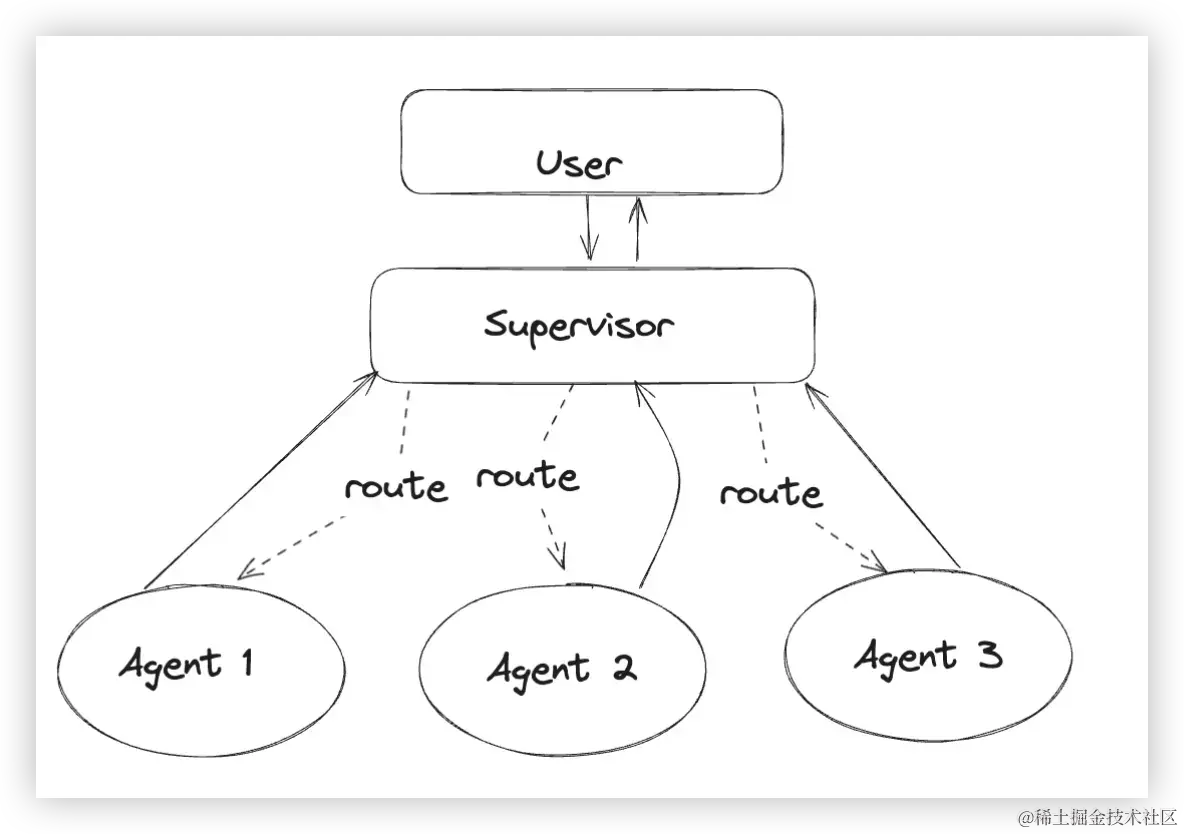
基于管理者的多代理
在多代理中,一个Agent只负责一件事情,那就是经过推理思考选择合适的工具进行解决问题(工具一般只配备一个).那么将这些Agent进行抽象看成是配备给管理者Agent的工具函数,管理者Agent通过推理思考选择合适的工具函数(Agent)进行解决问题,
再通过图的边将每个Agent与管理者Agent进行联系,每一次执行都要给管理者反馈,是否结束也是由管理者决定,这样就实现了一个简单的多代理.
具体实现
实现多代理必定要创建代理,那么先实现几个帮助函数来创建代理与代理节点
python
复制代码
#代理构造工具
def create_agent(llm: ChatOpenAI, tools: list, system_prompt: str):
    prompt = ChatPromptTemplate.from_messages(
        [
            (
                "system",
                system_prompt,
            ),
            MessagesPlaceholder(variable_name="messages"),
            MessagesPlaceholder(variable_name="agent_scratchpad"),
        ]
    )
    agent = create_openai_tools_agent(llm, tools, prompt)
    executor = AgentExecutor(agent=agent, tools=tools)
    return executor
#代理节点构造工具
def agent_node(state, agent, name):
    result = agent.invoke(state)
    return {"messages": [HumanMessage(content=result["output"], name=name)]}
使用create_openai_tools_agent代理构造方法,将必要的llm,prompt,tool作为参数传递给create_agent函数以及构建代理节点,"状态"将作为参数在图中进行流转传递执行工具函数与更新等操作.接下来就尝试构建这个图
- 创建图的状态机
状态接收一个消息并添加到消息列表中,同时还有一个next字段指定下一个节点.
python
复制代码
# The agent state is the input to each node in the graph
class AgentState(TypedDict):
    # The annotation tells the graph that new messages will always
    # be added to the current states
    messages: Annotated[Sequence[BaseMessage], operator.add]
    # The 'next' field indicates where to route to next
    next: str
- 创建Agent节点
创建Agent需要传入llm,tool,prompt等参数,再将Agent作为参数传入给Agent节点构造工具创建节点
python
复制代码
#构建图中的节点
research_agent = create_agent(llm, [tavily_tool], "You are a web researcher.")#创建一个代理,传入搜索工具
research_node = functools.partial(agent_node, agent=research_agent, name="Researcher")#通过partial函数,将代理和名字绑定在一起,创建出节点
partial 函数是 functools 模块中的一个工具函数,用于创建一个新的函数,该函数是对原函数进行部分应用(partial application)后得到的。部分应用是指固定函数的一部分参数,然后返回一个接受剩余参数的新函数。例如
python
复制代码
from functools import partial

def add(a, b):
    return a + b

increment = partial(add, 1)
result = increment(5)  # 等同于调用 add(1, 5)print(result)  # 输出 6
在这个例子中,partial(add, 1) 创建了一个新函数 increment,它是对原函数 add 进行了部分应用,固定了第一个参数为 1。然后,我们只需调用 increment(5),即可得到等同于调用 add(1, 5) 的结果,即 6
- 创建管理者节点
管理者节点更像是一个超级大脑,指挥身体的各部分工作.
python
复制代码
#创建管理者节点
members = ["Researcher", "[tool_name]"]#成员列表,节点的名字
system_prompt = (
    "You are a supervisor tasked with managing a conversation between the"
    " following workers:  {members}. Given the following user request,"
    " respond with the worker to act next. Each worker will perform a"
    " task and respond with their results and status. When finished,"
    " respond with FINISH."
)
# Our team supervisor is an LLM node. It just picks the next agent to process
# and decides when the work is completed
options = ["FINISH"] + members#选项列表
# Using openai function calling can make output parsing easier for us
function_def = {#定义的一个路由函数,用于决定下一个节点
    "name": "route",
    "description": "Select the next role.",
    "parameters": {
        "title": "routeSchema",
        "type": "object",
        "properties": {
            "next": {
                "title": "Next",
                "anyOf": [
                    {"enum": options},
                ],
            }
        },
        "required": ["next"],
    },
}
prompt = ChatPromptTemplate.from_messages(
    [
        ("system", system_prompt),
        MessagesPlaceholder(variable_name="messages"),#将历史消息存储到消息列表中
        (
            "system",
            "Given the conversation above, who should act next?"
            " Or should we FINISH? Select one of: {options}",#提示词,根据对话历史,选择下一个节点
        ),
    ]
).partial(options=str(options), members=", ".join(members))
- 设置管理者节点与普通节点
设置节点就正常使用add_node方法就行
python
复制代码
workflow.add_node("Researcher", research_node)#搜索节点
workflow.add_node("Coder", code_node)#编码节点
workflow.add_node("supervisor", supervisor_chain)#管理者节点
- 设置边的关系
所有的节点都要指向管理者节点,管理者节点有条件的指向其他节点
python
复制代码
#普通边
for member in members:#将所有的成员节点和管理者节点连接起来
    # 所有的节点完成工作后都需要向管理者节点进行反馈
    workflow.add_edge(member, "supervisor")
# 管理者节点根据结果的选择,选择下一个节点

#条件边
conditional_map = {k: k for k in members}
conditional_map["FINISH"] = END
workflow.add_conditional_edges("supervisor", #节点名称
                               lambda x: x["next"],#条件函数,根据输入的x,获取next字段的值也就是state中的next字段,state在这里被管理者节点更新
                                 conditional_map#映射关系,存储的下一个节点的信息
                                )
- 设置入口以及编译图
所有的输入都要经过管理者节点,管理者节点管理边的方向,所以入口节点就是管理者节点
ini
复制代码
workflow.set_entry_point("supervisor")#设置入口节点
#编译图
graph = workflow.compile()
- 运行图
LangGraph图在编译后同样是一个runnable对象,就可以使用invoke与stream方法执行.
arduino
复制代码
graph.invoke({"messages": [HumanMessage(content="LangGraph的最新信息")]})
完整流程
python
复制代码
import os
from dotenv import find_dotenv, load_dotenv
load_dotenv(find_dotenv())
OPENAI_API_BASE=os.environ['OPENAI_API_BASE']
OPENAI_API_KEY=os.environ['OPENAI_API_KEY']
TAVILY_API_KEY=os.environ['TAVILY_API_KEY']

#设置langSmith的环境变量
LANGCHAIN_TRACING_V2=os.environ['LANGCHAIN_TRACING_V2']
LANGCHAIN_ENDPOINT=os.environ['LANGCHAIN_ENDPOINT']
LANGCHAIN_API_KEY=os.environ['LANGCHAIN_API_KEY']

from langchain_openai import ChatOpenAI
from langchain_community.tools.tavily_search import TavilySearchResults
from langchain_core.tools import tool
from langchain_experimental.tools import PythonREPLTool
from langchain.agents import AgentExecutor, create_openai_tools_agent
from langchain_core.messages import BaseMessage, HumanMessage
from langchain_core.prompts import ChatPromptTemplate, MessagesPlaceholder
from langchain_core.prompts import ChatPromptTemplate, MessagesPlaceholder
from langchain_core.output_parsers.openai_functions import JsonOutputFunctionsParser
import operator
from typing import Annotated, Any, Dict, List, Optional, Sequence, TypedDict
import functools
from langgraph.graph import StateGraph, END

tavily_tool = TavilySearchResults(max_results=5)

python_repl_tool = PythonREPLTool()#Python交互工具

#代理构造工具
def create_agent(llm: ChatOpenAI, tools: list, system_prompt: str):
    prompt = ChatPromptTemplate.from_messages(
        [
            (
                "system",
                system_prompt,
            ),
            MessagesPlaceholder(variable_name="messages"),
            MessagesPlaceholder(variable_name="agent_scratchpad"),
        ]
    )
    agent = create_openai_tools_agent(llm, tools, prompt)
    executor = AgentExecutor(agent=agent, tools=tools)
    return executor
#代理节点构造工具
def agent_node(state, agent, name):
    result = agent.invoke(state)
    return {"messages": [HumanMessage(content=result["output"], name=name)]}

#创建管理者节点
members = ["Researcher", "Coder"]#成员列表,节点的名字
system_prompt = (
    "You are a supervisor tasked with managing a conversation between the"
    " following workers:  {members}. Given the following user request,"
    " respond with the worker to act next. Each worker will perform a"
    " task and respond with their results and status. When finished,"
    " respond with FINISH."
)
# Our team supervisor is an LLM node. It just picks the next agent to process
# and decides when the work is completed
options = ["FINISH"] + members#选项列表
# Using openai function calling can make output parsing easier for us
function_def = {#定义的一个路由函数,用于决定下一个节点
    "name": "route",
    "description": "Select the next role.",
    "parameters": {
        "title": "routeSchema",
        "type": "object",
        "properties": {
            "next": {
                "title": "Next",
                "anyOf": [
                    {"enum": options},
                ],
            }
        },
        "required": ["next"],
    },
}
prompt = ChatPromptTemplate.from_messages(
    [
        ("system", system_prompt),
        MessagesPlaceholder(variable_name="messages"),#将历史消息存储到消息列表中
        (
            "system",
            "Given the conversation above, who should act next?"
            " Or should we FINISH? Select one of: {options}",#提示词,根据对话历史,选择下一个节点
        ),
    ]
).partial(options=str(options), members=", ".join(members))

llm = ChatOpenAI()

supervisor_chain = (
    prompt
    | llm.bind_functions(functions=[function_def], function_call="route")
    | JsonOutputFunctionsParser()
)

'''构建图的状态机'''
# The agent state is the input to each node in the graph
class AgentState(TypedDict):
    # The annotation tells the graph that new messages will always
    # be added to the current states
    messages: Annotated[Sequence[BaseMessage], operator.add]
    # The 'next' field indicates where to route to next
    next: str

#构建图中的节点
research_agent = create_agent(llm, [tavily_tool], "You are a web researcher.")#创建一个代理,传入搜索工具
research_node = functools.partial(agent_node, agent=research_agent, name="Researcher")#通过partial函数,将代理和名字绑定在一起,创建出节点
#partial 函数是 functools 模块中的一个工具函数,用于创建一个新的函数,该函数是对原函数进行部分应用(partial application)后得到的。部分应用是指固定函数的一部分参数,然后返回一个接受剩余参数的新函数。

# NOTE: THIS PERFORMS ARBITRARY CODE EXECUTION. PROCEED WITH CAUTION警告信息
code_agent = create_agent(
    llm,
    [python_repl_tool],
    "You may generate safe python code to analyze data and generate charts using matplotlib.",
)
code_node = functools.partial(agent_node, agent=code_agent, name="Coder")

workflow = StateGraph(AgentState)
workflow.add_node("Researcher", research_node)#搜索节点
workflow.add_node("Coder", code_node)#编码节点
workflow.add_node("supervisor", supervisor_chain)#管理者节点

#创建边
for member in members:#将所有的成员节点和管理者节点连接起来
    # 所有的节点完成工作后都需要向管理者节点进行反馈
    workflow.add_edge(member, "supervisor")
# 管理者节点根据结果的选择,选择下一个节点

conditional_map = {k: k for k in members}
conditional_map["FINISH"] = END
workflow.add_conditional_edges("supervisor", #节点名称
                               lambda x: x["next"],#条件函数,根据输入的x,获取next字段的值也就是state中的next字段,state在这里被管理者节点更新
                                 conditional_map#映射关系,存储的下一个节点的信息
                                )
'''
    lamda x: x["next"]是一个函数,这个函数的作用是从输入的x中获取next字段的值
    这里的x是一个字典,包含了messages和next两个字段,也就是AgentState
'''

# Finally, add entrypoint
workflow.set_entry_point("supervisor")#设置入口节点
#编译图
graph = workflow.compile()

#执行图
res = graph.invoke({"messages": [HumanMessage(content="LangGraph最新资讯")]})
print(res["messages"][-1].content)
总结
多Agent在实现中要比单Agent的实现要复杂的多,但由于LangGraph还处于早期阶段,在后期发展中应该会把构建图的操作简化.AotuGen与LangGraph各自有各自的优劣,在实际应用或者学习中,需要根据需要进行选择
如何系统的去学习大模型LLM ?
作为一名热心肠的互联网老兵,我意识到有很多经验和知识值得分享给大家,也可以通过我们的能力和经验解答大家在人工智能学习中的很多困惑,所以在工作繁忙的情况下还是坚持各种整理和分享。
但苦于知识传播途径有限,很多互联网行业朋友无法获得正确的资料得到学习提升,故此将并将重要的 AI大模型资料 包括AI大模型入门学习思维导图、精品AI大模型学习书籍手册、视频教程、实战学习等录播视频免费分享出来。
所有资料 ⚡️ ,朋友们如果有需要全套 《LLM大模型入门+进阶学习资源包》,扫码获取~

一、全套AGI大模型学习路线
AI大模型时代的学习之旅:从基础到前沿,掌握人工智能的核心技能!
二、640套AI大模型报告合集
这套包含640份报告的合集,涵盖了AI大模型的理论研究、技术实现、行业应用等多个方面。无论您是科研人员、工程师,还是对AI大模型感兴趣的爱好者,这套报告合集都将为您提供宝贵的信息和启示。
三、AI大模型经典PDF籍
随着人工智能技术的飞速发展,AI大模型已经成为了当今科技领域的一大热点。这些大型预训练模型,如GPT-3、BERT、XLNet等,以其强大的语言理解和生成能力,正在改变我们对人工智能的认识。 那以下这些PDF籍就是非常不错的学习资源。

四、AI大模型商业化落地方案

阶段1:AI大模型时代的基础理解
- 目标:了解AI大模型的基本概念、发展历程和核心原理。
- 内容:
- L1.1 人工智能简述与大模型起源
- L1.2 大模型与通用人工智能
- L1.3 GPT模型的发展历程
- L1.4 模型工程
- L1.4.1 知识大模型
- L1.4.2 生产大模型
- L1.4.3 模型工程方法论
- L1.4.4 模型工程实践 - L1.5 GPT应用案例
阶段2:AI大模型API应用开发工程
- 目标:掌握AI大模型API的使用和开发,以及相关的编程技能。
- 内容:
- L2.1 API接口
- L2.1.1 OpenAI API接口
- L2.1.2 Python接口接入
- L2.1.3 BOT工具类框架
- L2.1.4 代码示例 - L2.2 Prompt框架
- L2.2.1 什么是Prompt
- L2.2.2 Prompt框架应用现状
- L2.2.3 基于GPTAS的Prompt框架
- L2.2.4 Prompt框架与Thought
- L2.2.5 Prompt框架与提示词 - L2.3 流水线工程
- L2.3.1 流水线工程的概念
- L2.3.2 流水线工程的优点
- L2.3.3 流水线工程的应用 - L2.4 总结与展望
- L2.1 API接口
阶段3:AI大模型应用架构实践
- 目标:深入理解AI大模型的应用架构,并能够进行私有化部署。
- 内容:
- L3.1 Agent模型框架
- L3.1.1 Agent模型框架的设计理念
- L3.1.2 Agent模型框架的核心组件
- L3.1.3 Agent模型框架的实现细节 - L3.2 MetaGPT
- L3.2.1 MetaGPT的基本概念
- L3.2.2 MetaGPT的工作原理
- L3.2.3 MetaGPT的应用场景 - L3.3 ChatGLM
- L3.3.1 ChatGLM的特点
- L3.3.2 ChatGLM的开发环境
- L3.3.3 ChatGLM的使用示例 - L3.4 LLAMA
- L3.4.1 LLAMA的特点
- L3.4.2 LLAMA的开发环境
- L3.4.3 LLAMA的使用示例 - L3.5 其他大模型介绍
- L3.1 Agent模型框架
阶段4:AI大模型私有化部署
- 目标:掌握多种AI大模型的私有化部署,包括多模态和特定领域模型。
- 内容:
- L4.1 模型私有化部署概述
- L4.2 模型私有化部署的关键技术
- L4.3 模型私有化部署的实施步骤
- L4.4 模型私有化部署的应用场景
学习计划:
- 阶段1:1-2个月,建立AI大模型的基础知识体系。
- 阶段2:2-3个月,专注于API应用开发能力的提升。
- 阶段3:3-4个月,深入实践AI大模型的应用架构和私有化部署。
- 阶段4:4-5个月,专注于高级模型的应用和部署。
这份完整版的所有 ⚡️ 大模型 LLM 学习资料已经上传CSDN,朋友们如果需要可以微信扫描下方CSDN官方认证二维码免费领取【保证100%免费】
全套 《LLM大模型入门+进阶学习资源包》↓↓↓ 获取~


 3258
3258

 被折叠的 条评论
为什么被折叠?
被折叠的 条评论
为什么被折叠?
 到【灌水乐园】发言


