


 本文围绕OpenIPC和WFB-NG展开,介绍了为配合GPU的AI运算进行视频图像分析的初步计划,详细阐述了OpenIPC和WFB-NG的安装与配置过程,还对OpenIPC性能进行了测试,最后就拓扑结构、4G LTE无人机和GPU运算能力等方面进行了补充讨论。
Ardupilot & OpenIPC & 基于WFB-NG构架分析和数据链路思考
1. 源由
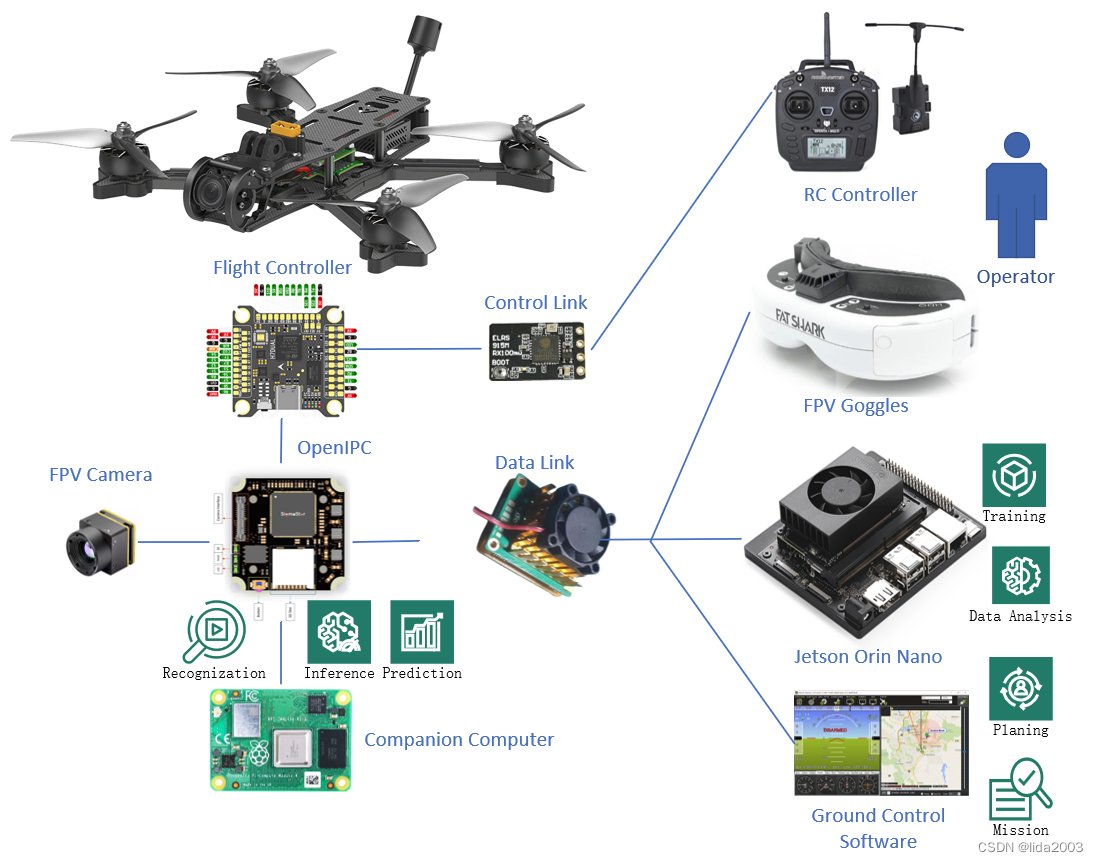
最近入手一套OpenIPC(SCC338Q+IMX415+Hi3536DV100+RTL8812AU),为了更好的配合GPU的AI运算,进行视频图像分析,初步计划如下:
- 天空端:视频(伴机电脑)
- 地面端:GPU视频分析/决策+遥控+地面站
为此,前面的准备工作:
- ArduPilot飞控之Gazebo + SITL + MP的Jetson Orin环境搭建
- ArduPilot开源飞控之lida2003套机+伴机电脑首飞
- ubuntu22.04@Jetson Orin Nano之OpenCV安装
- Linux 36.2@Jetson Orin Nano之Hello AI World!
- ubuntu22.04@laptop OpenCV Get Started
- Jammy@Jetson Orin - Tensorflow & Keras Get Started
- ExpressLRS硬件实测性能分析
当然,这些仅仅是已经做过的一些,对于上面的设想,远远不够,不过我们始终在靠近我们的愿景!
接下来,就将实时视频这块内容增加进来,已经知道的链路大概已经有很多条了,整理下:
a)【视频链路】IMX415 ==> SCC338Q ==> RTL8812AU ==> Hi3536DV100 ==> FPV Goggles/Display
b)【视频链路】IMX415 ==> SCC338Q ==> RTL8812AU ==> Hi3536DV100 ==> Ground Control Station
c)【视频链路】IMX415 ==> SCC338Q ==> RTL8812AU ==> Jetson Orin Nano (GPU/AI)
d)【视频链路】IMX415 ==> SCC338Q ==> Raspberry Pi3B+ (GPU/CPU/AI)
e)【控制链路】FC <== SCC338Q <== RTL8812AU <== Hi3536DV100 <== Ground Control Station
f)【控制链路】FC <== RC Receiver <== RC Transmitter <== RC Controller
e)【控制链路】FC <== SCC338Q <== RTL8812AU <== Jetson Orin Nano (GPU/AI)
g)【控制链路】FC <== SCC338Q <== RTL8812AU <== Raspberry Pi3B+ (GPU/CPU/AI)
注:这里不考虑中继等问题,因为中继进来,整个链路就更加复杂了。
2. OpenIPC安装
2.1 安装
略. 后续根据情况再做展开,目前可以看做是一个开源的黑匣子,它的底层实现依赖于WFB-NG。
2.2 配置
2.2.1 天空端配置文件
- /etc/wfb.conf
# cat /etc/wfb.conf
### unit: drone or gs
unit=drone

wlan=wlan0
region=00
### By default used channel number, but, you may set freq instead. For ex: 2387M
channel=64
frequency=
txpower=20
driver_txpower_override=20
bandwidth=20
stbc=0
ldpc=0
mcs_index=1
stream=0
link_id=7669206
udp_port=5600
rcv_buf=456000
frame_type=data
fec_k=8
fec_n=12
pool_timeout=0
guard_interval=long
- /etc/majestic.yaml
# cat /etc/majestic.yaml
system:
  staticDir: /var/www
  webPort: 80
  httpsPort: 443
  plugins: false
  buffer: 1024
isp:
  antiFlicker: disabled
  exposure: 20
  aGain: 40
  sensorConfig: /etc/sensors/imx415_fpv.bin
image:
  mirror: false
  flip: false
  rotate: 0
  contrast: 50
  hue: 50
  saturation: 50
  luminance: 50
video0:
  enabled: true
  codec: h265
  fps: 60
  bitrate: 2048
  rcMode: cbr
  gopSize: 1
  size: 1024x768
video1:
  enabled: false
  codec: h264
  size: 704x576
  fps: 15
jpeg:
  enabled: false
  qfactor: 50
  fps: 5
osd:
  enabled: false
  font: /usr/share/fonts/truetype/UbuntuMono-Regular.ttf
  template: "%d.%m.%Y %H:%M:%S"
  posX: 16
  posY: 16
audio:
  enabled: false
  volume: 30
  srate: 8000
  codec: opus
  outputEnabled: false
  outputVolume: 30
rtsp:
  enabled: true
  port: 554
nightMode:
  enabled: false
  irCutSingleInvert: false
  colorToGray: true
  irSensorPinInvert: false
motionDetect:
  enabled: false
  visualize: false
  debug: false
records:
  enabled: false
  path: /mnt/mmcblk0p1/%F/%H.mp4
  maxUsage: 95
outgoing:
  enabled: true
  server: udp://127.0.0.1:5600
  naluSize: 1200
watchdog:
  enabled: true
  timeout: 300
hls:
  enabled: false
onvif:
  enabled: false
ipeye:
  enabled: false
youtube:
  enabled: false
2.2.2 地面端配置文件
- /etc/wfb.conf
# cat /etc/wfb.conf
### unit: drone or gs
unit=gs

wlan=wlan0
region=00
### By default used channel number, but, you may set freq instead. For ex: 2387M
channel=64
frequency=
txpower=20
driver_txpower_override=20
stream=0
link_id=7669206
udp_addr=127.0.0.1
udp_port=5600
telemetry=true
- /etc/vdec.conf
# cat /etc/vdec.conf
### Port for video rx (default: 5000)

port=5600

### Codec: h264 or h265 (default: h264)

codec=h265

### Incoming data format: stream or frame (default: stream)

format=frame

### Screen output mode:
# 720p60       - 1280 x 720  @ 60 fps
# 1080p60      - 1920 x 1080 @ 60 fps
# 1024x768x60  - 1024 x 768  @ 60 fps
# 1366x768x60  - 1366 x 768  @ 60 fps
# 1280x1024x60 - 1280 x 1024 @ 60 fps
# 1600x1200x60 - 1600 x 1200 @ 60 fps
# 2560x1440x30 - 2560 x 1440 @ 30 fps

mode=1024x768x60

### Mavlink port for telemetry (default: 14750)

mavlink_port=14750

### Osd: none, simple or custom for use own lvgl based osd (custom osd binary need to be upload to /usr/bin directory) (default: simple)

osd=simple

### Records archive (Mount ssd, set up full path to records archive, file names generated automatically. example: /mnt/sda1/recorder)

records=

### Extra param (write in one line split by space):

#    --ar [mode]        - Aspect ratio mode               (Default: keep)
#      keep             - Keep stream aspect ratio
#      stretch          - Stretch to output resolution
#      manual           - Manual image size definition

#    --ar-bg-r [Value]  - Fill color red component      (Default: 0)
#    --ar-bg-g [Value]  - Fill color green component    (Default: 0)
#    --ar-bg-b [Value]  - Fill color blue component     (Default: 0)

#    --ar-x [Value]     - Image position X
#    --ar-y [Value]     - Image position Y
#    --ar-w [Value]     - Image width
#    --ar-h [Value]     - Image height

#    --bg-r [Value]     - Background color red      (Default: 0)
#    --bg-g [Value]     - Background color green    (Default: 96)
#    --bg-b [Value]     - Background color blue     (Default: 0)

extra="--bg-r 30 --bg-g 0 --bg-b 30"
2.3 当前配置选择
鉴于手头测试设备的限制,为了更好的使用,配置如下:
- 分辨率:1024x768 //配合一台VGA液晶显示器
- 编解码:H265 //SCC338Q & Hi3536DV100 支持
- 编码率:60FPS //Hi3536DV100 支持最高的解码率
- WiFi频点:
channel=64
注:H265编解码存在花屏现象,可能与底层分包组装有关,详见:How to configure 720P@120fps on wfb_gs on ubuntu(not OpenIPC gs)
#336
3. WFB-NG安装
3.1 RTL8812AU安装
3.1.1 驱动安装
$ sudo apt-get install dkms
$ git clone -b v5.2.20 git@github.com:svpcom/rtl8812au.git
$ cd rtl8812au/
$ sudo ./dkms-install.sh
3.1.2 定位设备
如果设备正确安装了,那么将会看到类似下面的输出:
$ nmcli

...
wlan1: unmanaged
        "Realtek RTL8812AU 802.11a/b/g/n/ac 2T2R"
        wifi (rtl88xxau_wfb), 20:0D:B0:32:DA:3A, hw, mtu 4052
...
注:这里笔者环境WiFi设备为Realtek RTL8812AU 802.11a/b/g/n/ac 2T2R 设备号:wlan1。
3.2 wfb-ng安装
3.2.1 传输层安装
之前已经定位WiFi设备为wlan1,安装地面站:
$ git clone -b stable git@github.com:svpcom/wfb-ng.git
$ cd wfb-ng
$ sudo ./scripts/install_gs.sh wlan1
注:Jetson Orin平台安装时,会存在问题,需要修复安装脚本,详见:[Jetson Orin] wfb-ng/env/bin/pip: No such file or directory
3.2.2 配置调整
- 调整通信频点与SCC338Q
channel=64一致
$ sudo cat /etc/wifibroadcast.cfg
[common]
wifi_channel = 64     # 161 -- radio channel @5825 MHz, range: 5815–5835 MHz, width 20MHz
                       # 1 -- radio channel @2412 Mhz,
                       # see https://en.wikipedia.org/wiki/List_of_WLAN_channels for reference
wifi_region = 'BO'     # Your country for CRDA (use BO or GY if you want max tx power)

[gs_mavlink]
peer = 'connect://127.0.0.1:14550'  # outgoing connection
# peer = 'listen://0.0.0.0:14550'   # incoming connection

[gs_video]
peer = 'connect://127.0.0.1:5600'  # outgoing connection for
                                   # video sink (QGroundControl on GS)
- 配置地面站与天空端的秘钥
$ wfb_keygen
Drone keypair (drone sec + gs pub) saved to drone.key
GS keypair (gs sec + drone pub) saved to gs.key

$ ls
drone.key  gs.key
drone.key--> 天空端/etc/drone.keygs.key--> 地面端/etc/gs.key
3.3 wfb-ng-osd安装
3.3.1 编译安装
$ sudo apt-get install libcairo2-dev gstreamer1.0-tools libgstreamer1.0-dev gstreamer1.0-plugins-base gstreamer1.0-plugins-bad gstreamer1.0-plugins-good gstreamer1.0-plugins-ugly libgstreamer-plugins-base1.0-dev
$ make osd
3.3.2 使用事项
$ ./osd --help
./osd: invalid option -- '-'
./osd [-p mavlink_port] [-P rtp_port] [ -R rtsp_url ] [-4] [-5] [-j rtp_jitter] [-x] [-a] [-w screen_width]
Default: mavlink_port=14551, rtp_port=5600, rtsp_url=none, codec=h264, rtp_jitter=5, screen_width=1920
WFB-ng OSD version 23.12.15.60076-1acd315d
WFB-ng home page: <http://wfb-ng.org>
- 鉴于当前OpenIPC使用venc/vdec进行编解码,所以无法被用于RTP相兼容的majectic streamer。
- 若真想要尝试使用,需要在调整OpenIPC的venc0_P0_MAIN/venc1_P0_MAIN进程,暂不深入分析。目前在Jetson Orin平台上可以使用gstDecoder解码。
3.4 video-viewer安装
鉴于前面谈到的编解码问题,若要在Jetson Orin平台上能够对OpenIPC现在venc编码视频流进行解码,可以简单使用video-viewer这个工具,但是性能上现在看来并不理想,因为平台使用了GPU和CPU来介入。也许切换到常规RTP编解码会有更好的效果。
关于工具的安装,这里不再展开,感兴趣的朋友可以自行阅读:Linux 36.2@Jetson Orin Nano之Hello AI World!
4. 总结
鉴于:
- 目前最新数据720P@120FPS响应时间35~40ms延迟,具备FPV四轴高速飞行要求
- wfb_ng是传输层代码,在进行视频传输的同时,具备小数据电传链路功能
- wfb_ng是加密传输,开源代码
以下链路分析:
-
相对传统链路:
a)【视频链路】IMX415 ==> SCC338Q ==> RTL8812AU ==> Hi3536DV100 ==> FPV Goggles/Display
b)【视频链路】IMX415 ==> SCC338Q ==> RTL8812AU ==> Hi3536DV100 ==> Ground Control Station
e)【控制链路】FC <== SCC338Q <== RTL8812AU <== Hi3536DV100 <== Ground Control Station
f)【控制链路】FC <== RC Receiver <== RC Transmitter <== RC Controller -
大数据分析链路:
c)【视频链路】IMX415 ==> SCC338Q ==> RTL8812AU ==> Jetson Orin Nano (GPU/AI)
d)【视频链路】IMX415 ==> SCC338Q ==> Raspberry Pi3B+ (GPU/CPU/AI)
e)【控制链路】FC <== SCC338Q <== RTL8812AU <== Jetson Orin Nano (GPU/AI)
g)【控制链路】FC <== SCC338Q <== RTL8812AU <== Raspberry Pi3B+ (GPU/CPU/AI)
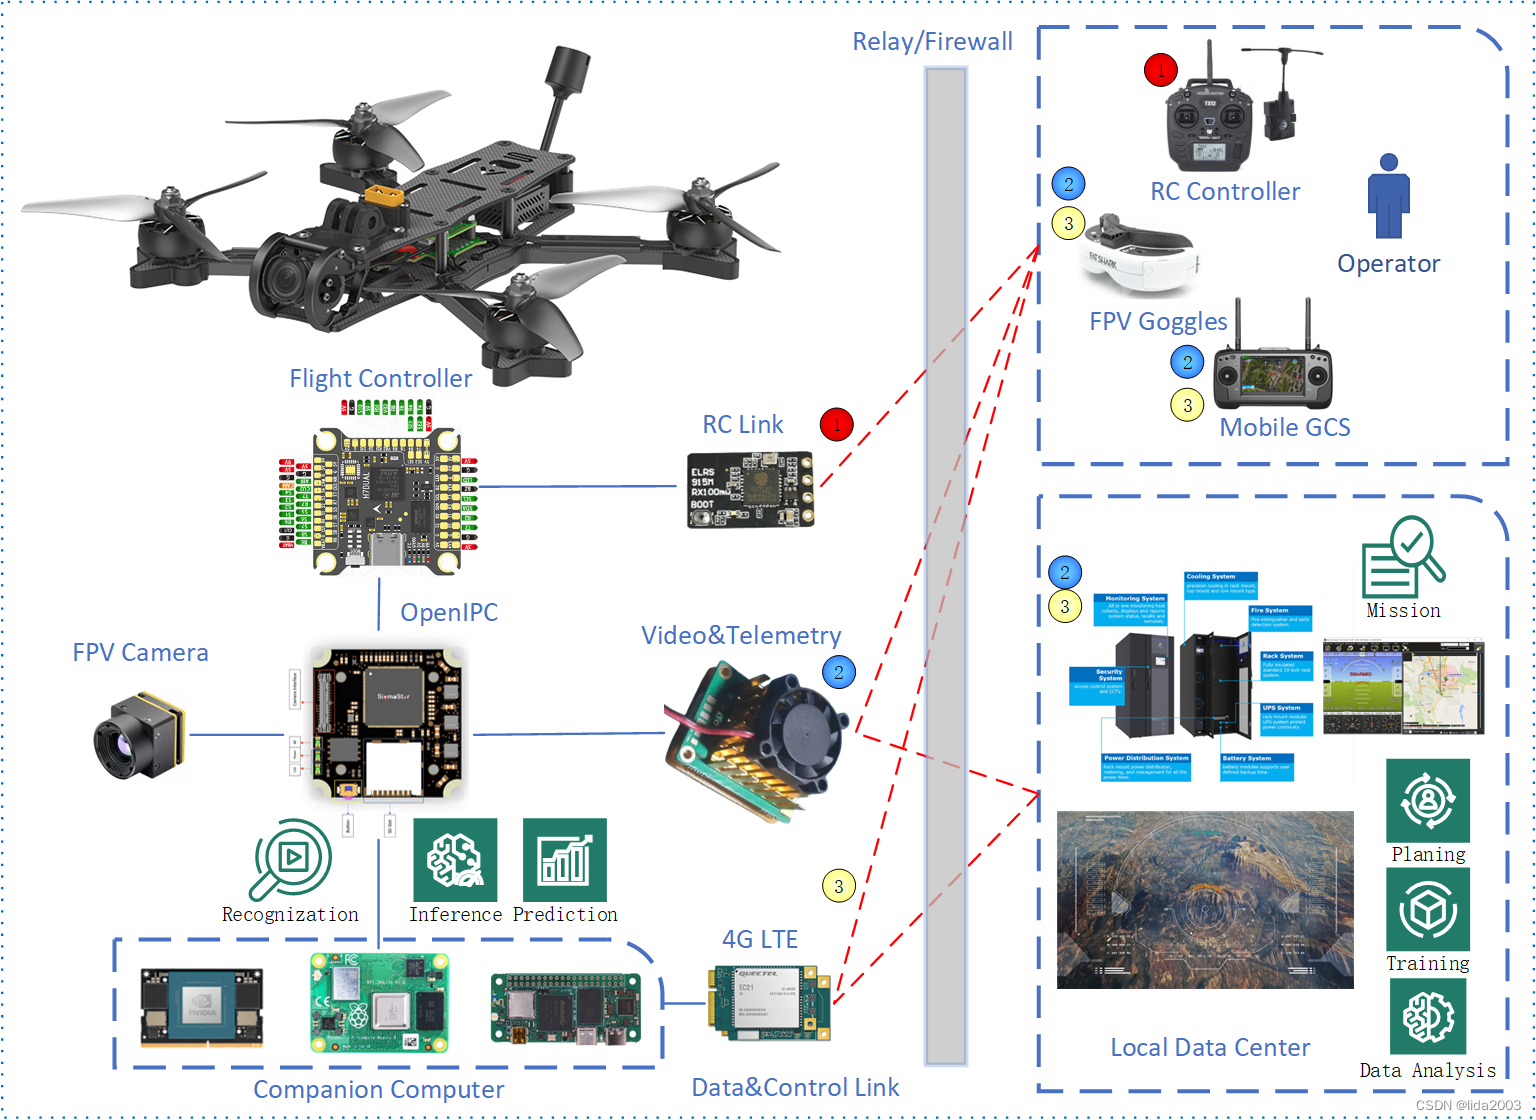
Raspberry Pi3B+(Companion Computer)和Jetson Orin(DataCenter) 组成了大数据决策和边缘AI的构架模型。
- DataCenter负责广域范围内的分析和决策
- CompanionComputer负责局域范围内的分析和决策
以上是根据FPV无人机方面的一些简单想法(实际应用还可以进行适当的调整部署,以适应实际应用需求)。
随着技术的发展,今后科技发展在各个领域都将会逐步形成细分的领域大数据决策和边缘AI应用,这也是为什么我们非常看好《一种部件生命期监测方法》在细分应用领域具有指导意义的重要原因。
好了,废话不多说,上点这套OpenIPC(SCC338Q+IMX415+Hi3536DV100+RTL8812AU) + Jetson Orin Nano的视频,感性认识下ubuntu22.04@Jetson Orin Nano安装WFB-NG&OpenIPC性能。
为什么说感性,因为测试环境配置都不高:(有过有朋友能提供更好的测试环境,那倒是可以考虑测下极限)
- 台式老显示器 1024x768@60Hz
- 裸奔测试屏幕1920x1080@60Hz
- 非高速拍摄&记录设备,使用老式小米手机
- 计时器显示屏幕2736x1824@59.96Hz (SurfacePro6)
注:受到venc/vdec编码器的影响,Jetson Orin似乎并不太支持这个解码流,效果不好。
OpenIPC(SCC338Q+IMX415+Hi3536DV100+RTL8812AU)性能测试
上述配置摄像头端(SCC338Q+IMX415+RTL8812AU)是能够满足720P@120FPS H265的,从延时报告的数据,大约能做到30~40ms。
实际看电视的效果,大家感受下:
ssc338q+imx415+nvr3536 OpenIPC看视频
5. 参考资料
【1】 wfb-ng Release 23.01镜像无头烧录&配置(1)
【2】 wfb-ng Release 23.01镜像无头烧录&配置(2)
【3】wfb-ng 锁定WiFi接口
【4】Linux 36.2@Jetson Orin Nano之基础环境构建
【5】Aocoda-RC H743Dual BMI270x2飞控,支持Ardupilot
【6】OpenIPC开源IPC之工程编译
【7】OpenIPC开源IPC之工程框架
6. 补充讨论
6.1 拓扑结构问题
有好多朋友问为什么拓扑是这样的?
其实并不一定需要这样,目前这个拓扑图是根据笔者手中的硬件(也是基于现在市面上大家能够拿到的硬件,可以马上DIY)。基于这套DIY的硬件和软件来画的一张简图。各位自己实际拓扑结构,还需要根据具体的软硬件部署来进行调整。
如果硬件还能自己整的话,定制程度就更高了。
综上所述,上面的拓扑图主要是一个示意,并非一定是这样。根据需求进行调整,根据实际软硬件部署进行定制。
比如:
- 伴机电脑,Onboard companion computer sharing camera resource #330
- 4G网络(最快可能可以做到150ms,但是切换网络会有影响),ZEROTIER for Virtual Network Configuration #1288
6.2 4G LTE无人机
关于4G LTE的问题,之前《ArduPilot开源飞控之lida2003套机+伴机电脑首飞》已经Ready。
固件/lida2003套机平台都支持,唯一缺少的是USB-4G模块,装上就可以直接4G远程控制。
Ardupilot 4.5.1 Mark4 + RaspberryPi3B + Rpanion
XY位置采用GPS+光流;高度采用GPS+Baro+激光,超级稳定:
Ardupilot 4.4.4 Mark4 + FuseAllVelocities + RaspberryPi3B+
6.3 GPU运算能力
鉴于GPU当前在边缘计算上的能力问题:
- 《Jammy@Jetson Orin - Tensorflow & Keras Get Started: Transfer Learning & Fine Tuning》
- 《Jammy@Jetson Orin Nano - Tensorflow GPU版本安装》
根据成本和应用的考量,硬件&软件可以根据应用做部署上的调整,进而满足需求:
注:下图将边缘计算前移;亦可以考虑:简单识别 - 智能识别 - 网络识别,分级部署。


 2653
2653

 被折叠的 条评论
为什么被折叠?
被折叠的 条评论
为什么被折叠?
 到【灌水乐园】发言


