


DeepSort_YOLO11
代码链接:deepsort_YOLO11_pytorch(我在别人基于YOLO5的基础上改的YOLO11代码,不过原作者已经将项目扩展的非常庞大了,有兴趣的可以去看一下boxmot)
论文链接:Simple Online and Realtime Tracking with a Deep Association Metric
官方链接:deep_sort
看这篇文章前需要了解目标检测的基本知识,我这里不说,只讲deepsort的部分。
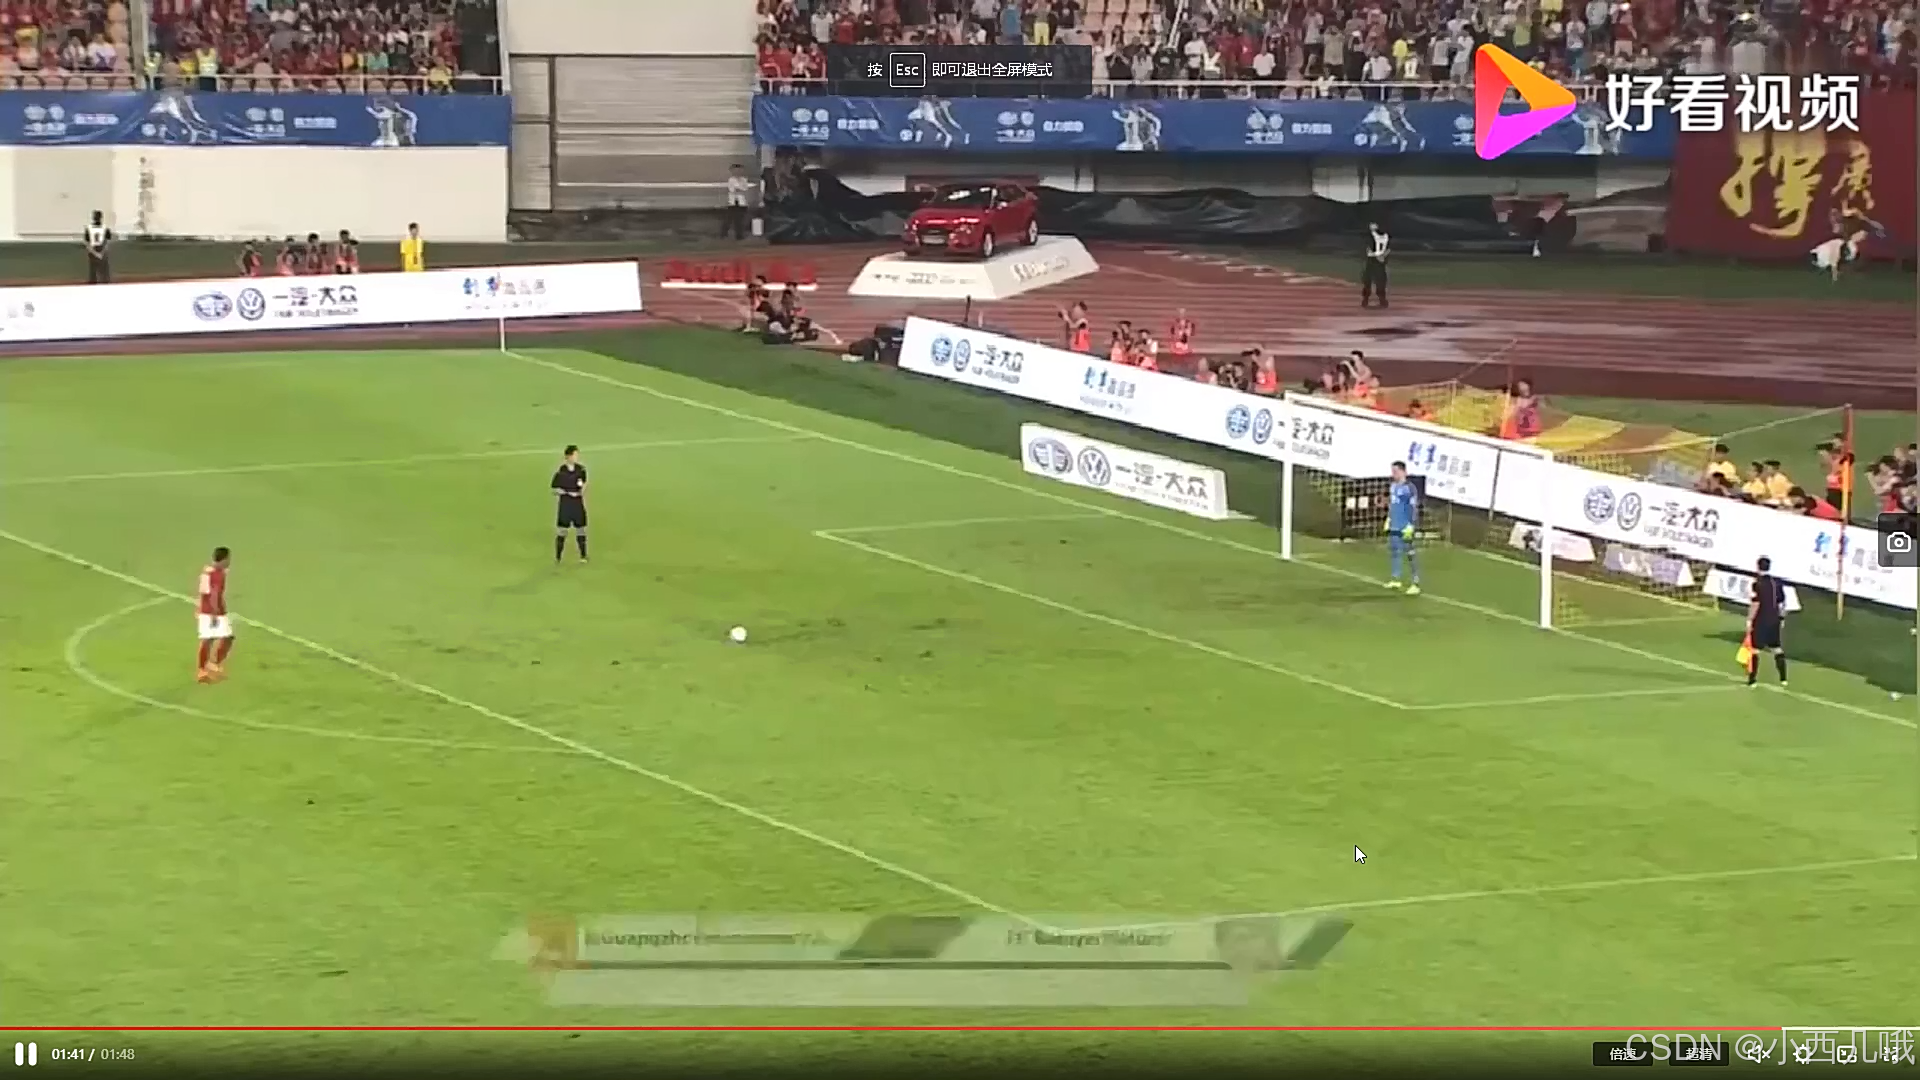
先看一下效果
DeepSort总体流程
YOLO部分我就不说了,着重讲解deepsort的部分。下图是deepsort整体的一个流程,我会结合图和代码一一讲解。
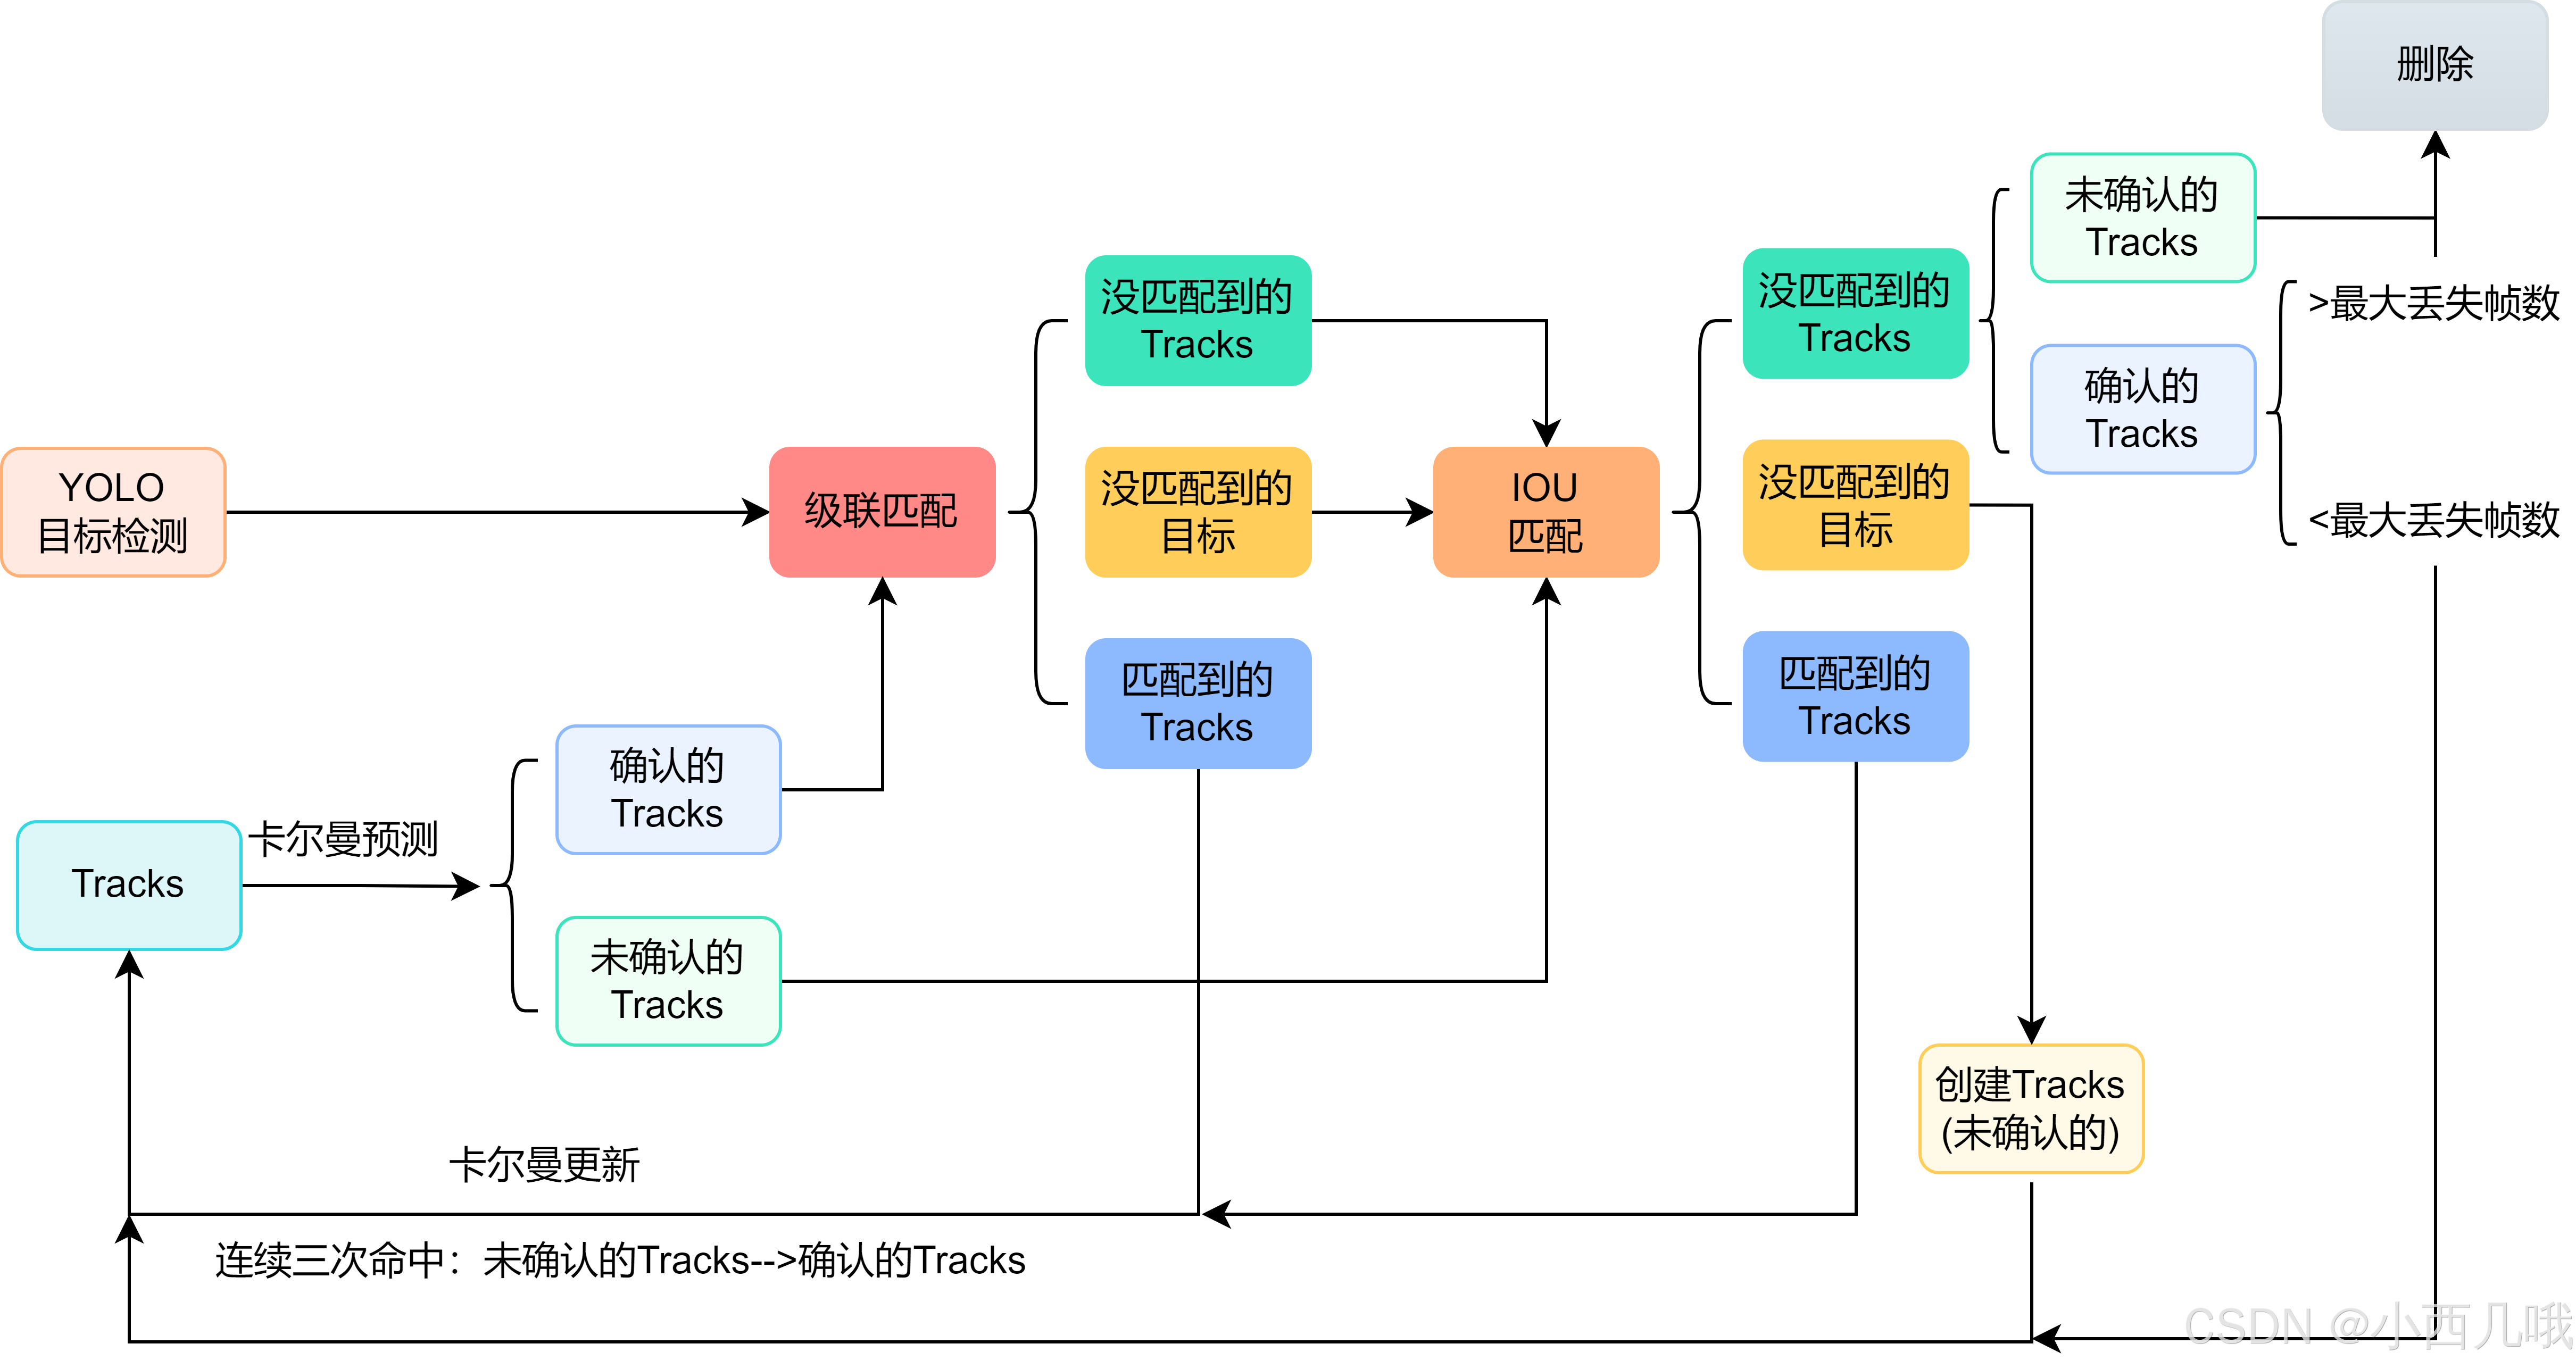
首先读取视频每一帧的图像逐个处理,调整图像大小、归一化等,适配YOLO模型的输入要求,推理出图像中的目标信息。基于这些目标信息做deepsort,所以如果目标检测的不好,你的deepsort也G。
第一帧初始化每个目标的track。比如第一帧YOLO检测到8个目标,就会生成8个track。下图可以看到在第一帧的时候没有任何框,即没有任何track,因为刚初始化。
因为确定状态需要连续命中三帧,所以在第二帧的时候只会计算IOU匹配的代价矩阵。
对于匹配到的track进行卡尔曼参数更新。比如踢球的红衣服在第一帧的时候创建了track,在第二帧的时候,YOLO检测到的目标位置和卡尔曼预测的位置匹配上了,那么将更新红衣服的卡尔曼用来预测下一帧数据。
对于没匹配到的目标,创建新的track。比如在第二帧球场上跑来了一个绿衣服的人,它在第一帧的时候没有出现(或者没有检测到),第二帧的时候检测到了绿衣服,将为其创建一个新的track。
当到第三帧的时候,因为此时还没有连续命中3次的track(第一帧只是创建了),所以还是没有确认的track,继续进行IOU匹配。当有track没有匹配上时,直接将其删除(再未确认的track情况下消失,直接干掉)。比如在第三帧的时候,第二帧的绿衣服退出了画面,他的track会直接删掉。
当到第四帧之后,对于连续命中三帧的目标进行级联匹配。级联匹配包括卡尔曼估计代价矩阵、本身特征代价矩阵(检测你当前特征跟之前特征是不是差不多。比如你上一帧框出来是个蓝衣服的人,下一帧用红衣服的人去做匹配,那这两个目标的特征肯定大不匹配)、IOU代价矩阵。
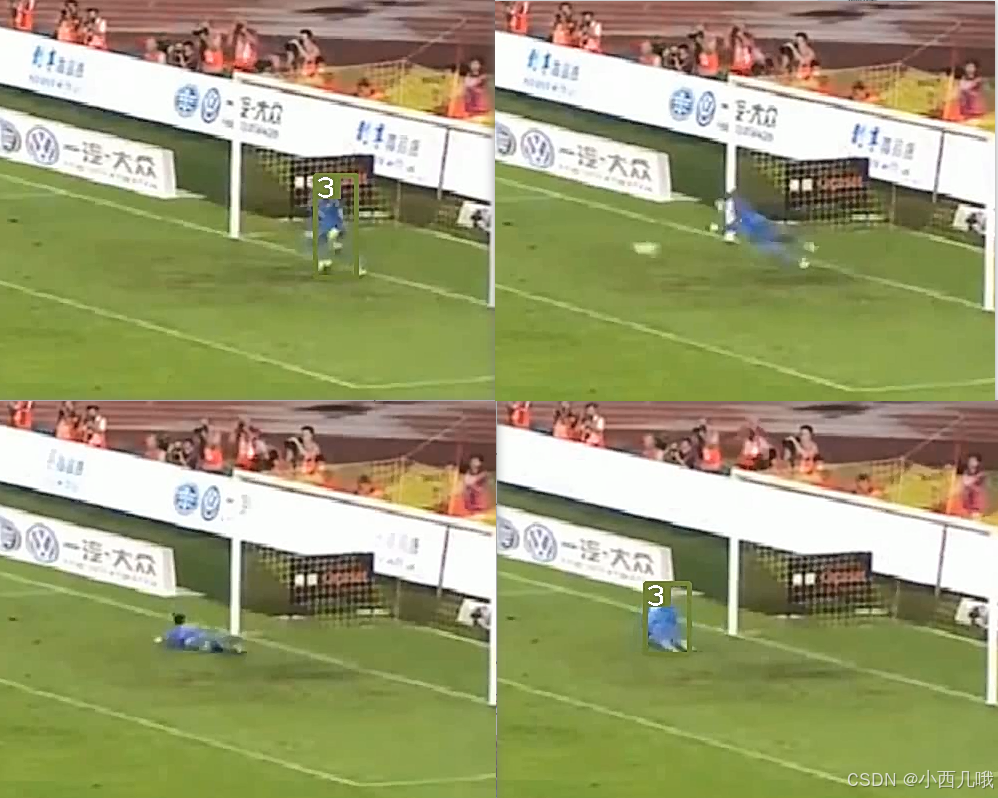
在级联匹配中,优先匹配缺失帧少的。一旦连续缺失,比如连续丢失了70帧都没匹配上,直接给这个track干掉,但在70帧内匹配到,还会给你这个track复活的机会。下面的图可以看到,守门员有几帧没检测到,再次被检测到的时候还是原来track_id。绿色的框有点看不清楚了。
代码部分
在track.py中,进入deepsort模块
outputs = deepsort.update(xywhs, confss, im0)
xywhs和confss都是YOLO目标检测的东西,分别是当前帧检测到的目标bbox和置信度,im0就是这帧的图像。debug进去看看。
def update(self, bbox_xywh, confidences, ori_img):
    self.height, self.width = ori_img.shape[:2]
    # generate detections
    features = self._get_features(bbox_xywh, ori_img)  # 获取当前bbox的特征
    bbox_tlwh = self._xywh_to_tlwh(bbox_xywh)
    detections = [Detection(bbox_tlwh[i], conf, features[i]) for i, conf in enumerate(
        confidences) if conf > self.min_confidence]  # 筛选,大于min_confidence的才保留并构造成Detection对象,存储其坐标,置信度,人的特征

    # run on non-maximum supression
    boxes = np.array([d.tlwh for d in detections])
    scores = np.array([d.confidence for d in detections])

    # update tracker
    self.tracker.predict()
    self.tracker.update(detections)

    # output bbox identities
    outputs = []
    for track in self.tracker.tracks:
        if not track.is_confirmed() or track.time_since_update > 1:
            continue
        box = track.to_tlwh()
        x1, y1, x2, y2 = self._tlwh_to_xyxy(box)
        track_id = track.track_id
        outputs.append(np.array([x1, y1, x2, y2, track_id], dtype=int))
    if len(outputs) > 0:
        outputs = np.stack(outputs, axis=0)
    return outputs
self._get_features(bbox_xywh, ori_img)会根据bbox在原图中将目标图像抠出来,然后做一些卷积得到特征图像,官方术语就是Re-ID特征。detections是过滤后的bbox,将置信度低于self.min_confidenc的过滤掉,比如过滤掉低于0.3的bbox。
进入track预测阶段
self.tracker.predict()
debug进去看看
def predict(self, mean, covariance):
std_pos = [
self._std_weight_position * mean[3],
self._std_weight_position * mean[3],
1e-2,
self._std_weight_position * mean[3]]
std_vel = [
self._std_weight_velocity * mean[3],
self._std_weight_velocity * mean[3],
1e-5,
self._std_weight_velocity * mean[3]]
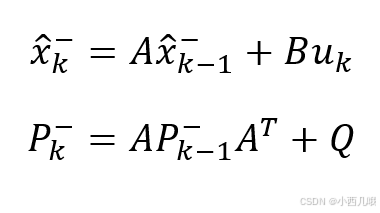
motion_cov = np.diag(np.square(np.r_[std_pos, std_vel])) # 初始化噪声矩阵Q
mean = np.dot(self._motion_mat, mean) # x' = Fx 得到预测状态
covariance = np.linalg.multi_dot(( # p' = FPF^T + Q
self._motion_mat, covariance, self._motion_mat.T)) + motion_cov
return mean, covariance
先初始化噪声矩阵。我们发现这里的噪声矩阵都是基于mean[3]。mean的内容为(x, y, a, h)和四个速度信息。其中xy是bbox的中心点位置,a是目标框的长宽比,h目标框的高度。mean[3]=h,可能是因为目标追踪最相关的数据为目标的高度,xy相关度不大,a的比例基本不变,而目标离的近h就大,离的远h就小,所以用h来做初始化(猜测)。
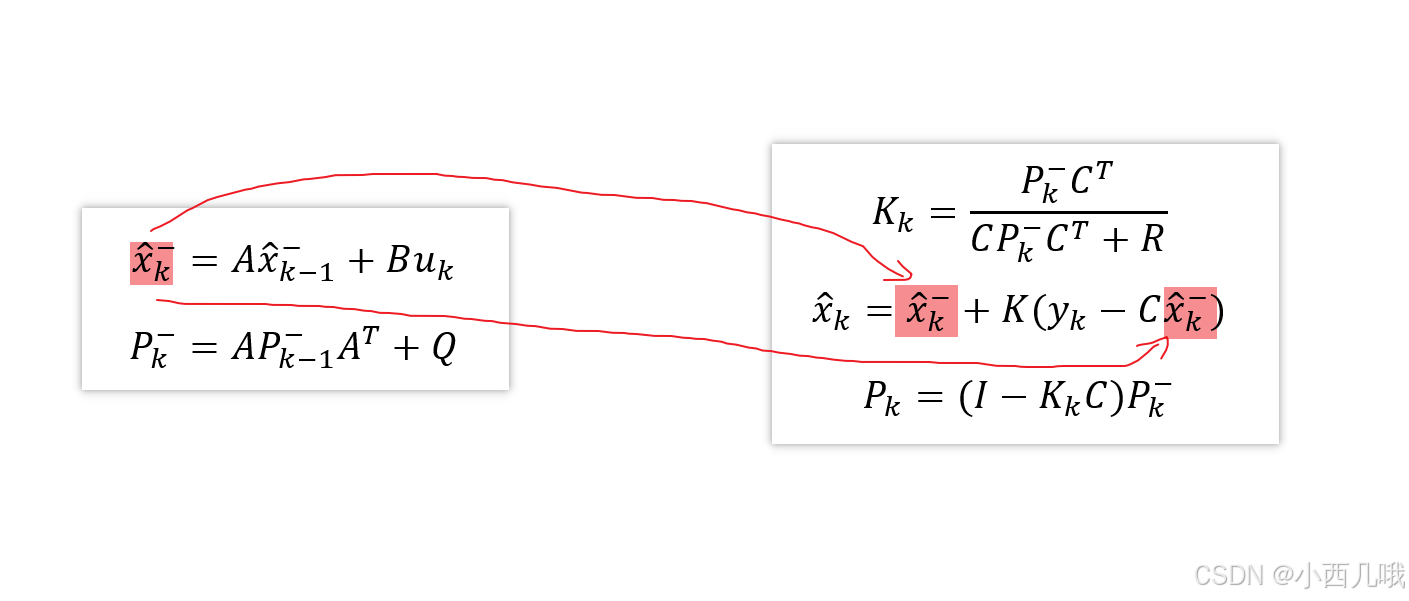
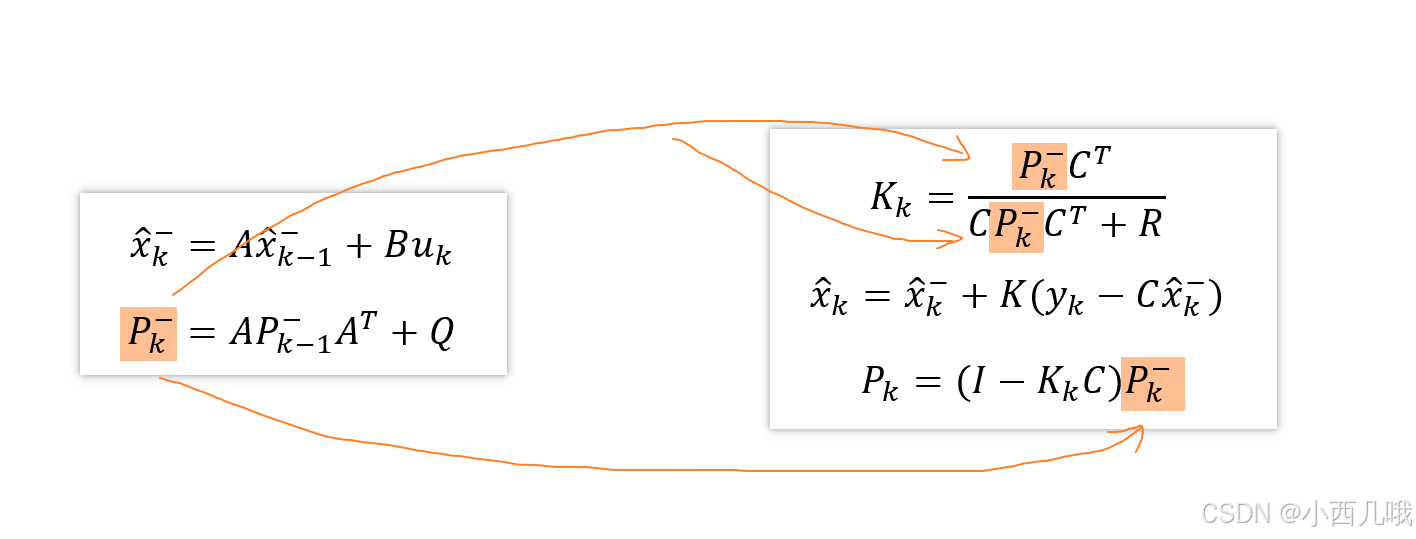
下面的mean和covariance都是基于卡尔曼公式的计算,我把公式列下面,如果你有兴趣的话可以看一看,没有的话可以学我,两眼一黑。
进入track更新阶段
self.tracker.update(detections)
debug进去看看
def update(self, detections):
    # Run matching cascade.
    matches, unmatched_tracks, unmatched_detections = self._match(detections)

    # Update track set.
    for track_idx, detection_idx in matches:  # 匹配到的需要做更新 卡尔曼滤波
        self.tracks[track_idx].update(
            self.kf, detections[detection_idx])
    for track_idx in unmatched_tracks:
        self.tracks[track_idx].mark_missed()
    for detection_idx in unmatched_detections:
        self._initiate_track(detections[detection_idx])  # 对未匹配的detection初始化
    self.tracks = [t for t in self.tracks if not t.is_deleted()]  # 确认的track连续70帧没匹配上删掉 没确认的没匹配上直接删掉

    # Update distance metric.
    active_targets = [t.track_id for t in self.tracks if t.is_confirmed()]
    features, targets = [], []
    for track in self.tracks:
        if not track.is_confirmed():
            continue
        features += track.features
        targets += [track.track_id for _ in track.features]
        track.features = []
    self.metric.partial_fit(  # 至多保留100个特征
        np.asarray(features), np.asarray(targets), active_targets)
最重要的就是这个self._match(detections),在这里面我们会进行级联匹配和IOU匹配。级联匹配会根据我们已经确认的track进行匹配,没确认的和级联没匹配上的track进行IOU匹配。我们debug进去看看
def gated_metric(tracks, dets, track_indices, detection_indices):
    features = np.array([dets[i].feature for i in detection_indices])
    targets = np.array([tracks[i].track_id for i in track_indices])
    # 会计算当前目标检测的特征与之前轨迹中存储的特征的差异 取差异最小的那个 (不是跟轨迹的最后一帧做计算 是之前的所有帧做计算)
    cost_matrix = self.metric.distance(features, targets)
    cost_matrix = linear_assignment.gate_cost_matrix(
        self.kf, cost_matrix, tracks, dets, track_indices,
        detection_indices)

    return cost_matrix


# Split track set into confirmed and unconfirmed tracks.
confirmed_tracks = [  # 当命中了3次以上会变为确认状态
    i for i, t in enumerate(self.tracks) if t.is_confirmed()]
unconfirmed_tracks = [
    i for i, t in enumerate(self.tracks) if not t.is_confirmed()]

# Associate confirmed tracks using appearance features. 优先进行级联匹配
matches_a, unmatched_tracks_a, unmatched_detections = \
    linear_assignment.matching_cascade(
        gated_metric, self.metric.matching_threshold, self.max_age,
        self.tracks, detections, confirmed_tracks)

# Associate remaining tracks together with unconfirmed tracks using IOU. IOU匹配(未确定的+没有普配上的)
iou_track_candidates = unconfirmed_tracks + [
    k for k in unmatched_tracks_a if
    self.tracks[k].time_since_update == 1]
unmatched_tracks_a = [
    k for k in unmatched_tracks_a if
    self.tracks[k].time_since_update != 1]
matches_b, unmatched_tracks_b, unmatched_detections = \
    linear_assignment.min_cost_matching(  # 级联匹配完还有一些剩的再进行IOU匹配 如刚进画面的目标
        iou_matching.iou_cost, self.max_iou_distance, self.tracks,
        detections, iou_track_candidates, unmatched_detections)

matches = matches_a + matches_b
unmatched_tracks = list(set(unmatched_tracks_a + unmatched_tracks_b))
return matches, unmatched_tracks, unmatched_detections
级联匹配
linear_assignment.matching_cascade()为级联匹配,我们debug进去看看。
def matching_cascade(distance_metric, max_distance, cascade_depth, tracks, detections, track_indices=None,
                     detection_indices=None):
    # 级联匹配:1.特征图信息 2.运动信息(基于卡尔曼滤波预测的track的位置)
    if track_indices is None:
        track_indices = list(range(len(tracks)))
    if detection_indices is None:
        detection_indices = list(range(len(detections)))

    unmatched_detections = detection_indices
    matches = []
    for level in range(cascade_depth):  # 因为最多允许你没有匹配70(cascade_depth)帧,如果你70帧都没匹配上就给你干掉
        if len(unmatched_detections) == 0:  # 如果都匹配上了直接跳出
            break

        track_indices_l = [
            k for k in track_indices
            if tracks[k].time_since_update == 1 + level
        ]
        if len(track_indices_l) == 0:  # Nothing to match at this level
            continue

        matches_l, _, unmatched_detections = min_cost_matching(distance_metric, max_distance, tracks, detections,
                                                               track_indices_l, unmatched_detections)
        matches += matches_l
    unmatched_tracks = list(set(track_indices) - set(k for k, _ in matches))
    return matches, unmatched_tracks, unmatched_detections
级联匹配:1.特征图信息(比较Re-ID特征) 2.运动信息(基于卡尔曼滤波预测的track的位置)
直接看matched_detection()计算,debug进去看看。
def min_cost_matching(distance_metric, max_distance, tracks, detections, track_indices=None, detection_indices=None):
    if track_indices is None:
        track_indices = np.arange(len(tracks))
    if detection_indices is None:
        detection_indices = np.arange(len(detections))

    if len(detection_indices) == 0 or len(track_indices) == 0:
        return [], track_indices, detection_indices  # Nothing to match.
    cost_matrix = distance_metric(tracks, detections, track_indices, detection_indices)
    cost_matrix[cost_matrix > max_distance] = max_distance + 1e-5  # 过滤掉那些基本没交上的

    row_indices, col_indices = linear_assignment(cost_matrix)  # 根据代价矩阵找到那些匹配上的

    matches, unmatched_tracks, unmatched_detections = [], [], []
    for col, detection_idx in enumerate(detection_indices):
        if col not in col_indices:  # 找那些没匹配上的目标 比如你刚检测到一个新目标还没track_id
            unmatched_detections.append(detection_idx)
    for row, track_idx in enumerate(track_indices):
        if row not in row_indices:  # 找那些没匹配上的轨迹 比如你的目标被遮挡住了 track找不到目标匹配
            unmatched_tracks.append(track_idx)
    for row, col in zip(row_indices, col_indices):
        track_idx = track_indices[row]
        detection_idx = detection_indices[col]
        if cost_matrix[row, col] > max_distance:  # 过滤
            unmatched_tracks.append(track_idx)
            unmatched_detections.append(detection_idx)
        else:
            matches.append((track_idx, detection_idx))
    return matches, unmatched_tracks, unmatched_detections
在这里我们会通过distance_metric方法计算代价矩阵cost_matrix,而这里传入的distance_metric方法就是上上上面那个代码的gated_metric,方便观看我再提出来。
def gated_metric(tracks, dets, track_indices, detection_indices):
    features = np.array([dets[i].feature for i in detection_indices])
    targets = np.array([tracks[i].track_id for i in track_indices])
    # 会计算当前目标检测的特征与之前轨迹中存储的特征的差异 取差异最小的那个 (不是跟轨迹的最后一帧做计算 是之前的所有帧做计算)
    cost_matrix = self.metric.distance(features, targets)
    cost_matrix = linear_assignment.gate_cost_matrix(
        self.kf, cost_matrix, tracks, dets, track_indices,
        detection_indices)

    return cost_matrix
我们之前不是说了嘛,每个track里面会存储匹配到的每帧的特征图。现在我们有n个det和m条track,计算每个det和每条track里的每个特征图的距离(不是计算最后一帧哦,之前存储的每一帧都要计算),然后取出距离最小的那个作为代价。计算的方法是余弦相似度或欧几里得距离。
计算完了这个,可以理解为det和track的相似度,接着我们计算卡尔曼的距离linear_assignment.gate_cost_matrix()。
def gate_cost_matrix(kf, cost_matrix, tracks, detections, track_indices, detection_indices, gated_cost=INFTY_COST,
                     only_position=False):
    gating_dim = 2 if only_position else 4
    gating_threshold = kalman_filter.chi2inv95[gating_dim]
    measurements = np.asarray(
        [detections[i].to_xyah() for i in detection_indices])
    for row, track_idx in enumerate(track_indices):  # 卡尔曼 我两眼一黑
        track = tracks[track_idx]
        gating_distance = kf.gating_distance(
            track.mean, track.covariance, measurements, only_position)
        cost_matrix[row, gating_distance > gating_threshold] = gated_cost
    return cost_matrix
我两眼又一黑。对于代价矩阵中的每一行(对应某一轨迹),获取其在检测中的门限距离。如果门限距离超过阈值,认为匹配不可行,将对应位置的代价设置为 gated_cost。
===================================================================================
跳出来,我们继续
IOU匹配
linear_assignment.min_cost_matching()帮助IOU匹配,min_cost_matching是不是很眼熟,因为上面级联用到了这个代码,不同的点是,它们计算cost_matrix的方法不一样。上面传入的distance_metric方法是gated_metric,而这里传入的方法是计算IOU的iou_matching.iou_cost,debug进去看看。
def iou_cost(tracks, detections, track_indices=None, detection_indices=None):
    # 计算track和detection之间的IOU距离
    if track_indices is None:
        track_indices = np.arange(len(tracks))
    if detection_indices is None:
        detection_indices = np.arange(len(detections))

    cost_matrix = np.zeros((len(track_indices), len(detection_indices)))
    for row, track_idx in enumerate(track_indices):
        if tracks[track_idx].time_since_update > 1:
            cost_matrix[row, :] = linear_assignment.INFTY_COST
            continue

        bbox = tracks[track_idx].to_tlwh()
        candidates = np.asarray(
            [detections[i].tlwh for i in detection_indices])
        cost_matrix[row, :] = 1. - iou(bbox, candidates)
    return cost_matrix
这里会计算当前帧检测到的det和当前存在的track的距离,或者说差异。IOU是计算重叠效果的,值越大重叠效果越好,这两越匹配。这里计算的是1-IOU,所有值越小说明他俩差异越小,越匹配。比如我们现在有6个det和7条track,我们得到如下代价矩阵。
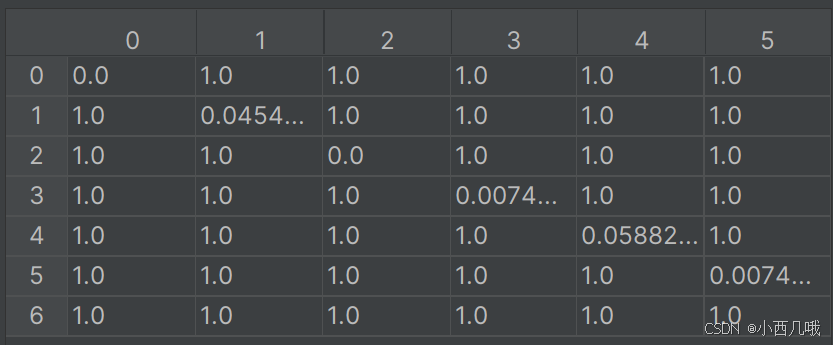
随便举个例子,比如(1,1)的位置为,第2条track与第2个det之间的IOU距离(1-IOU);(1,2)的位置为,第2条track与第3个det之间的IOU距离,可以看到为1,因为没交上,所以IOU为0,IOU距离为1-0=1。你可以理解为1就是完全不相关,值越小说明他俩越有可能是一个东西。
这些为1可以看出完全不搭噶,所以会设置一个阈值,当超过这个阈值(max_distance)就给过滤掉。
===================================================================================
跳出来,接着我们对两两匹配上的数据更新卡尔曼参数
for track_idx, detection_idx in matches:  # 匹配到的需要做更新 卡尔曼滤波
    self.tracks[track_idx].update(self.kf, detections[detection_idx])
再debug进去看看
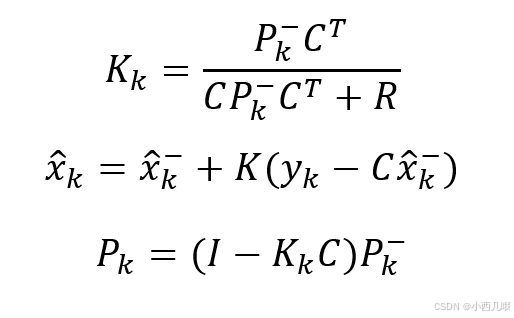
def update(self, kf, detection):
    self.mean, self.covariance = kf.update(self.mean, self.covariance, detection.to_xyah())
    self.features.append(detection.feature)  # 匹配上的每一帧都存起来 最多存100帧

    self.hits += 1  # 匹配上了 命中次数+1
    self.time_since_update = 0
    if self.state == TrackState.Tentative and self.hits >= self._n_init:
        self.state = TrackState.Confirmed  # 如果你命中次数大于3(_n_init),会将你的状态置为确定状态
kf.update()卡尔曼更新部分我不说,就是套公式更新。还是那句话,我把公式列下面,如果你有兴趣的话可以看一看,没有的话可以学我,两眼一黑。self.features会将每次匹配上的帧图像特征存储起来,最多存储100个,多了就将开头的删掉。每次匹配上了self.hits+1,当其大于3(_n_init)的时候就将track置为确认状态。
===================================================================================
跳出来,我们继续
for track_idx in unmatched_tracks:
    self.tracks[track_idx].mark_missed()
如果track为未确认状态就丢失了1帧,直接干掉。
for detection_idx in unmatched_detections:
    self._initiate_track(detections[detection_idx])
对未匹配到的目标创建track,即为新出现的目标创建初始track。debug进去看看
def _initiate_track(self, detection):
    mean, covariance = self.kf.initiate(detection.to_xyah())
    self.tracks.append(Track(mean, covariance, self._next_id, self.n_init, self.max_age, detection.feature))
    self._next_id += 1
mean, covarian是卡尔曼滤波需要的。self._next_id是当前track的id,比如上面的图,红色踢球的id是2,蓝色守门的id是3。self._next_id是命中次数的阈值,比如det连续三帧都匹配上了track,那么将其track转为确认状态。self.max_age是最大丢失帧数,比如连续丢失70帧就干掉它。detection.feature这就是目标特征,没啥讲的。
===================================================================================
跳出来,我们继续
self.tracks = [t for t in self.tracks if not t.is_deleted()]
这行代码就是,如果track为确认状态,并且连续丢失70帧,则干掉它。
self.metric.partial_fit(np.asarray(features), np.asarray(targets), active_targets)
这行代码就是,每个track最多存储100个特征图,多的就从头开始删。
最后将两两匹配的存储到matches,落单的track和det分别存储到unmatched_tracks和unmatched_detections。
上述流程对视频的每一帧重复执行,形成连续的目标跟踪。最终呢,会将每个目标的边界框、轨迹ID、运动轨迹绘制到图像或视频上。


 3540
3540

 被折叠的 条评论
为什么被折叠?
被折叠的 条评论
为什么被折叠?
 到【灌水乐园】发言


