


01.引言
经过了一年的不懈努力,今天通义千问团队对 Qwen-VL 模型进行重大更新——推出 Qwen2-VL。
Qwen2-VL 有什么新功能?
· 增强的图像理解能力:Qwen2-VL显著提高了模型理解和解释视觉信息的能力,为关键性能指标设定了新的基准
· 高级视频理解能力:Qwen2-VL具有卓越的在线流媒体功能,能够以很高的精度实时分析动态视频内容
· 集成的可视化agent功能:Qwen2-VL 现在无缝整合了复杂的系统集成,将 Qwen2-VL 转变为能够进行复杂推理和决策的强大可视化代理
· 扩展的多语言支持:Qwen2-VL 扩展了语言能力,以更好地服务于多样化的全球用户群,使 Qwen2-VL 在不同语言环境中更易于访问和有效
模型结构
- Qwen2-VL 的一项关键架构改进是实现了动态分辨率支持(Naive Dynamic Resolution support)。与上一代模型Qwen-VL不同,Qwen2-VL 可以处理任意分辨率的图像,而无需将其分割成块,从而确保模型输入与图像固有信息之间的一致性。这种方法更接近地模仿人类的视觉感知,使模型能够处理任何清晰度或大小的图像。
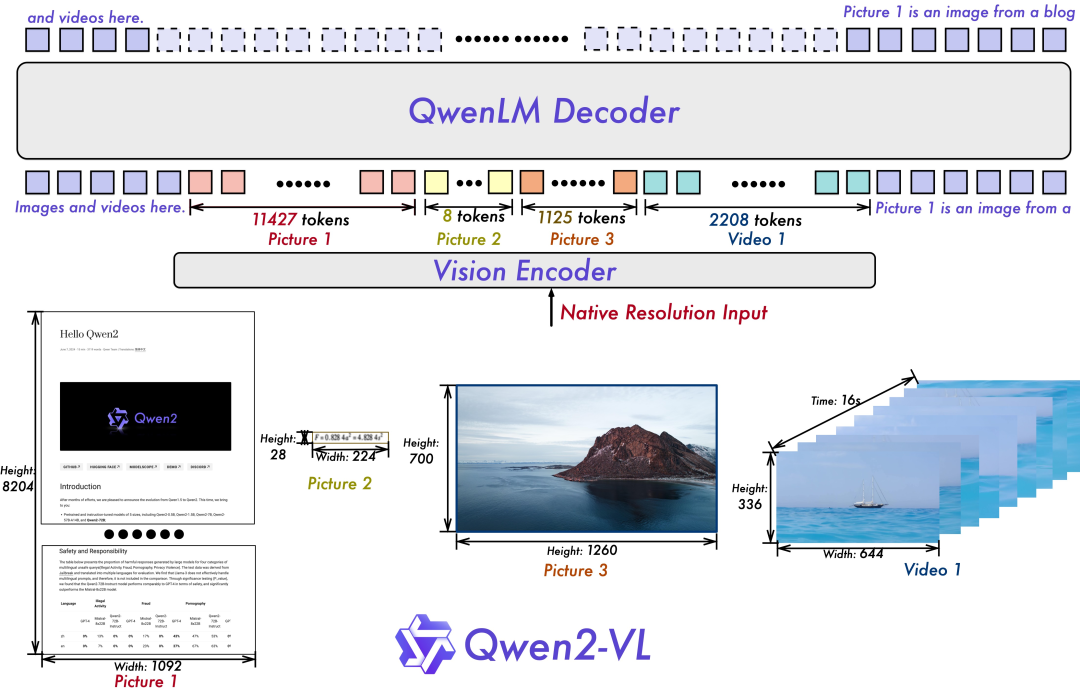
- 另一个关键的架构增强是Multimodal Rotary Position Embedding (M-ROPE) 的创新。通过将original rotary embedding分解为代表时间和空间(高度和宽度)信息的三个部分,M-ROPE 使 LLM 能够同时捕获和集成 1D 文本、2D视觉和 3D 视频位置信息。这使 LLM 能够充当强大的多模态处理器和推理器。

模型效果
在 7B 规模下,Qwen2-VL-7B成功保留了对图像、多图像和视频输入的支持,以更具成本效益的模型大小提供具有竞争力的性能。具体而言,Qwen2-VL-7B在文档理解任务(例如 DocVQA)和通过 MTVQA 评估的图像多语言文本理解方面表现出色,建立了非常优秀的性能。

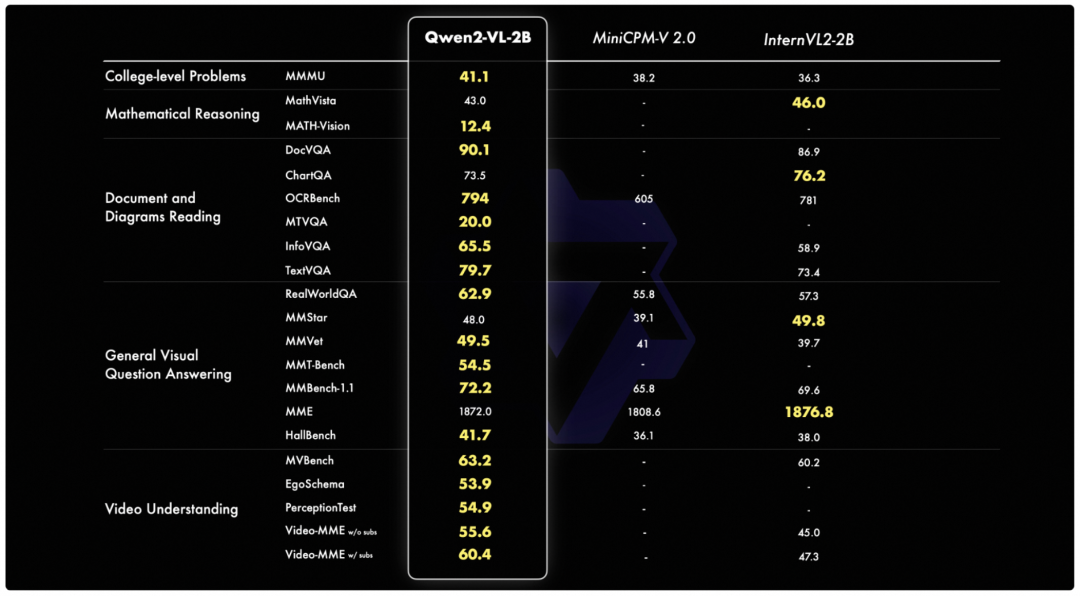
本次Qwen2-VL推出一款更小的 2B 模型,该模型针对潜在的移动部署进行了优化。尽管参数量只有2B,但该模型在图像、视频和多语言理解方面表现出色。与其他类似规模的模型相比,它在视频相关任务、文档理解和一般场景问答方面表现尤为出色。
02.模型下载
本次Qwen2-VL开源了两个尺寸的模型,Qwen2-VL-2B-Instruct 和 Qwen2-VL-7B-Instruct,以及其GPTQ和AWQ的量化版本。
模型链接:
Qwen2-VL-2B-Instruct:https://www.modelscope.cn/models/qwen/Qwen2-VL-2B-Instruct
Qwen2-VL-7B-Instruct:https://www.modelscope.cn/models/qwen/Qwen2-VL-7B-Instruct
推荐使用ModelScope CLI下载模型
modelscope download --model=qwen/Qwen2-VL-7B-Instruct --local_dir ./Qwen2-VL-7B-Instruct
03.模型体验
效果体验:
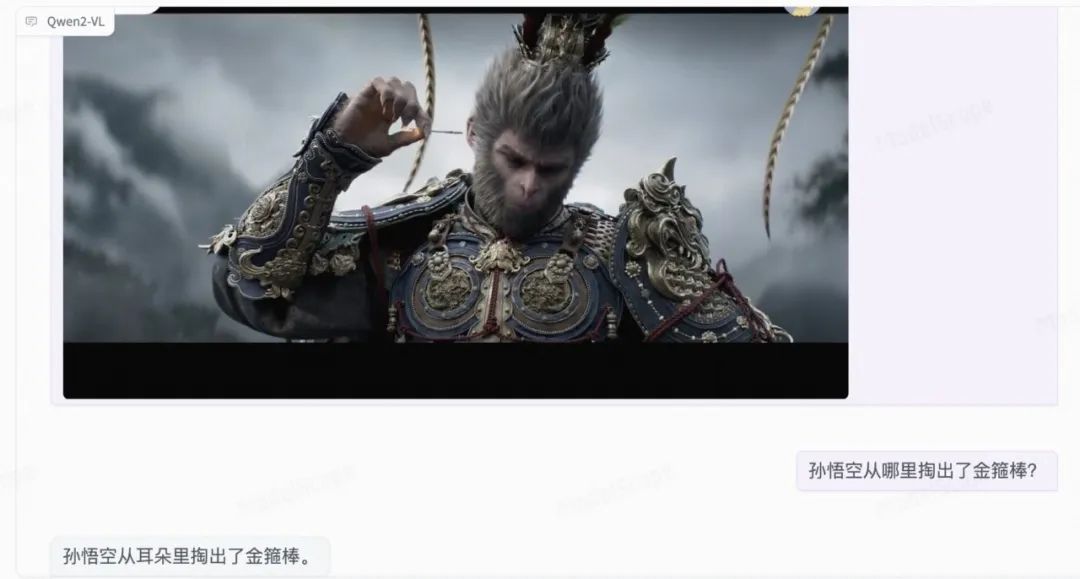
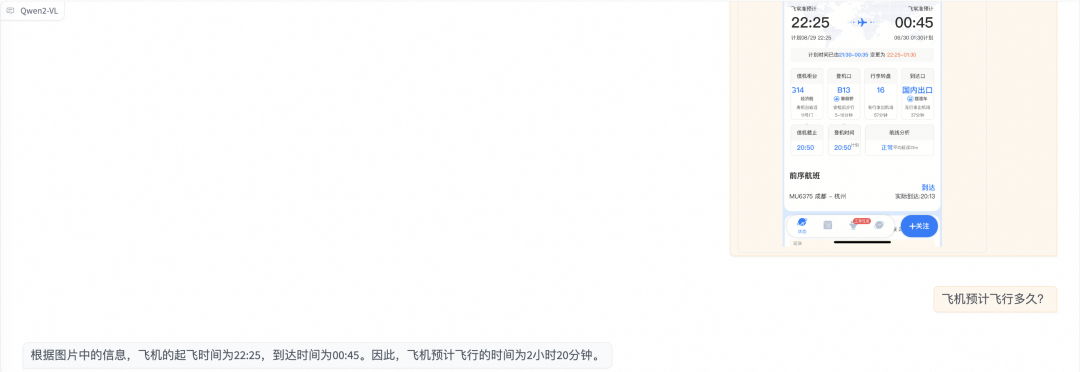
1 游戏视频理解:
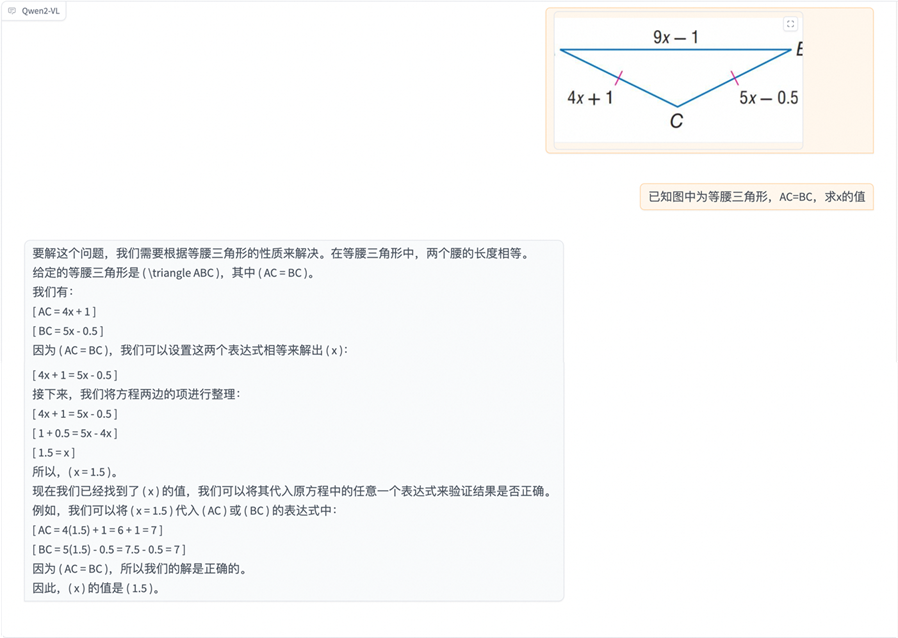
2 数学几何求解:
3 OCR识别
04.模型推理
transformers推理
安装依赖:
pip install git+https://github.com/huggingface/transformers``pip install qwen-vl-utils
模型推理代码-单图推理
from PIL import Image``import torch``from transformers import Qwen2VLForConditionalGeneration, AutoTokenizer, AutoProcessor``from qwen_vl_utils import process_vision_info``from modelscope import snapshot_download`` ``model_dir = "/mnt/workspace/Qwen2-VL-2B-Instruct"`` ``# Load the model in half-precision on the available device(s)``model = Qwen2VLForConditionalGeneration.from_pretrained(model_dir, device_map="auto", torch_dtype = torch.float16)``min_pixels = 256*28*28``max_pixels = 1280*28*28``processor = AutoProcessor.from_pretrained(model_dir, min_pixels=min_pixels, max_pixels=max_pixels)`` `` `` ``messages = [{"role": "user", "content": [{"type": "image", "image": "https://qianwen-res.oss-cn-beijing.aliyuncs.com/Qwen-VL/assets/demo.jpeg"}, {"type": "text", "text": "Describe this image."}]}]`` ``# Preparation for inference``text = processor.apply_chat_template(messages, tokenize=False, add_generation_prompt=True)``image_inputs, video_inputs = process_vision_info(messages)``inputs = processor(text=[text], images=image_inputs, videos=video_inputs, padding=True, return_tensors="pt")``inputs = inputs.to('cuda')`` ``# Inference: Generation of the output``generated_ids = model.generate(**inputs, max_new_tokens=128)``generated_ids_trimmed = [out_ids[len(in_ids):] for in_ids, out_ids in zip(inputs.input_ids, generated_ids)]``output_text = processor.batch_decode(generated_ids_trimmed, skip_special_tokens=True, clean_up_tokenization_spaces=False)``print(output_text)``
模型推理代码-多图推理
# Messages containing multiple images and a text query``messages = [{"role": "user", "content": [{"type": "image", "image": "file:///path/to/image1.jpg"}, {"type": "image", "image": "file:///path/to/image2.jpg"}, {"type": "text", "text": "Identify the similarities between these images."}]}]`` ``# Preparation for inference``text = processor.apply_chat_template(messages, tokenize=False, add_generation_prompt=True)``image_inputs, video_inputs = process_vision_info(messages)``inputs = processor(text=[text], images=image_inputs, videos=video_inputs, padding=True, return_tensors="pt")``inputs = inputs.to('cuda')`` ``# Inference``generated_ids = model.generate(**inputs, max_new_tokens=128)``generated_ids_trimmed = [out_ids[len(in_ids):] for in_ids, out_ids in zip(inputs.input_ids, generated_ids)]``output_text = processor.batch_decode(generated_ids_trimmed, skip_special_tokens=True, clean_up_tokenization_spaces=False)``print(output_text)``
模型推理代码-视频理解
# Messages containing a video and a text query``messages = [{"role": "user", "content": [{"type": "video", "video": "file:///path/to/video1.mp4", 'max_pixels': 360*420, 'fps': 1.0}, {"type": "text", "text": "Describe this video."}]}]`` ``# Preparation for inference``text = processor.apply_chat_template(messages, tokenize=False, add_generation_prompt=True)``image_inputs, video_inputs = process_vision_info(messages)``inputs = processor(text=[text], images=image_inputs, videos=video_inputs, padding=True, return_tensors="pt")``inputs = inputs.to('cuda')`` ``# Inference``generated_ids = model.generate(**inputs, max_new_tokens=128)``generated_ids_trimmed = [out_ids[len(in_ids):] for in_ids, out_ids in zip(inputs.input_ids, generated_ids)]``output_text = processor.batch_decode(generated_ids_trimmed, skip_special_tokens=True, clean_up_tokenization_spaces=False)``print(output_text)
vLLM推理
安装依赖
pip install git+https://github.com/fyabc/vllm.git@add_qwen2_vl_new
启动OpenAI接口服务
python -m vllm.entrypoints.openai.api_server --served-model-name Qwen2-VL-7B-Instruct --model model_path
调用服务-https
curl http://localhost:8000/v1/chat/completions \` `-H "Content-Type: application/json" \` `-d '{` `"model": "Qwen2-VL-7B-Instruct",` `"messages": [` `{"role": "system", "content": "You are a helpful assistant."},` `{"role": "user", "content": [` `{"type": "image_url", "image_url": {"url": "https://modelscope.oss-cn-beijing.aliyuncs.com/resource/qwen.png"}},` `{"type": "text", "text": "What is the text in the illustrate?"}` `]}` `]` `}'
调用服务-sdk
from openai import OpenAI``# Set OpenAI's API key and API base to use vLLM's API server.``openai_api_key = "EMPTY"``openai_api_base = "http://localhost:8000/v1"`` ``client = OpenAI(` `api_key=openai_api_key,` `base_url=openai_api_base,``)`` ``chat_response = client.chat.completions.create(` `model="Qwen2-7B-Instruct",` `messages=[` `{"role": "system", "content": "You are a helpful assistant."},` `{"role": "user", "content": [` `{"type": "image_url", "image_url": {"url": "https://modelscope.oss-cn-beijing.aliyuncs.com/resource/qwen.png"}},` `{"type": "text", "text": "What is the text in the illustrate?"},` `]},` `]``)``print("Chat response:", chat_response)
05.模型微调
我们使用swift对qwen2-vl-7b-instruct进行微调。swift是魔搭社区官方提供的大模型与多模态大模型微调推理框架。
swift开源地址:
https://github.com/modelscope/swift
通常,多模态大模型微调会使用自定义数据集进行微调。在这里,我们将展示可直接运行的demo。
在开始微调之前,请确保您的环境已准备妥当。
git clone https://github.com/modelscope/swift.git``cd swift``pip install -e .[llm]`` ``pip install pyav qwen_vl_utils
图像描述微调
我们使用 coco-en-mini 数据集进行微调,该数据集的任务是对图片内容进行描述。您可以在 modelscope 上找到该数据集:https://modelscope.cn/datasets/modelscope/coco_2014_caption/summary
# 默认会将lora_target_modules设置为llm的所有linear``CUDA_VISIBLE_DEVICES=0,1,2,3 NPROC_PER_NODE=4 swift sft \` `--model_type qwen2-vl-7b-instruct \` `--model_id_or_path qwen/Qwen2-VL-7B-Instruct \` `--sft_type lora \` `--dataset coco-en-mini#20000 \` `--deepspeed default-zero2
如果要使用自定义数据集,只需按以下方式进行指定:
`--dataset train.jsonl \` `--val_dataset val.jsonl \`
自定义数据集支持json和jsonl样式,以下是自定义数据集的样例:
{"query": "<image>55555", "response": "66666", "images": ["image_path"]}``{"query": "eeeee<image>eeeee<image>eeeee", "response": "fffff", "history": [], "images": ["image_path1", "image_path2"]}``{"query": "EEEEE", "response": "FFFFF", "history": [["query1", "response2"], ["query2", "response2"]], "images": []}
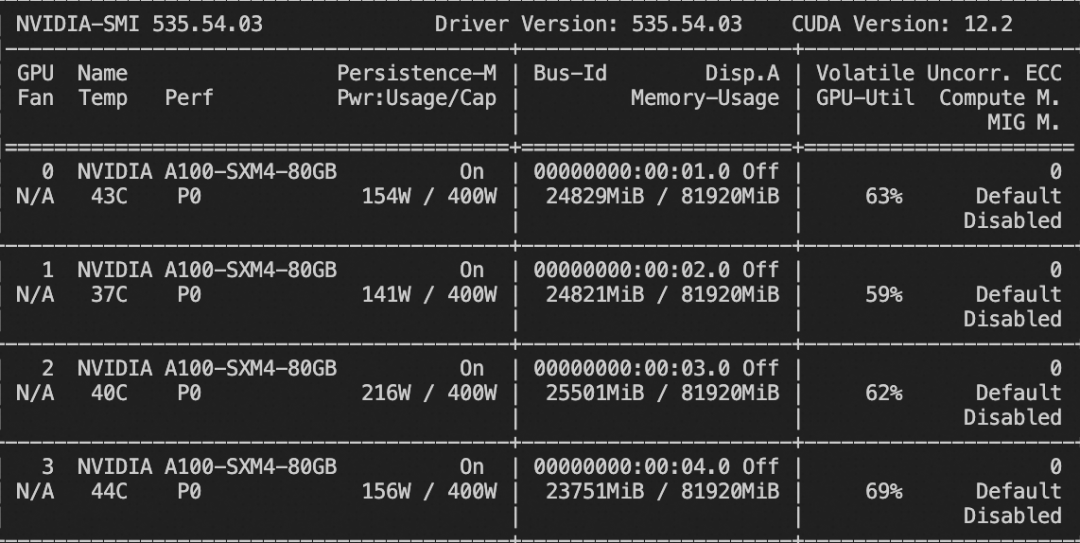
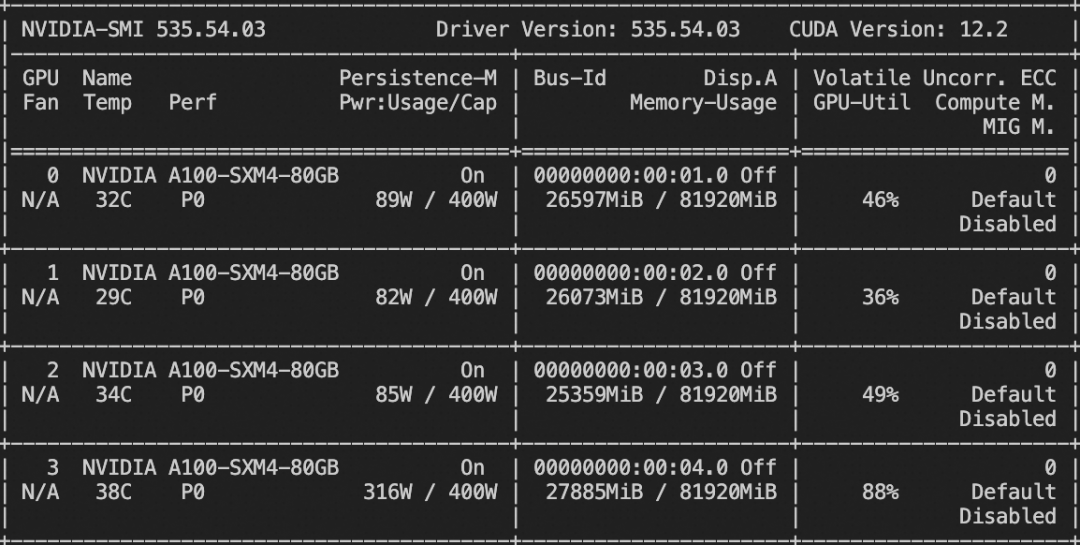
显存占用:
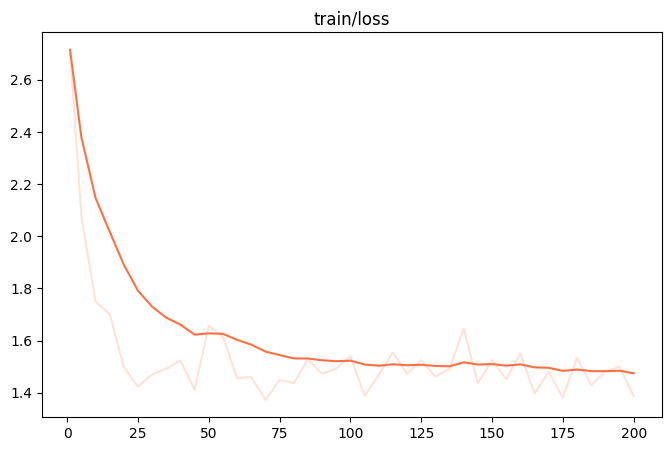
训练损失图(时间原因,只训练了200个step):
微调后推理脚本如下:
CUDA_VISIBLE_DEVICES=0 swift infer \` `--ckpt_dir output/qwen2-vl-7b-instruct/vx-xxx/checkpoint-xxx \` `--load_dataset_config true --merge_lora true
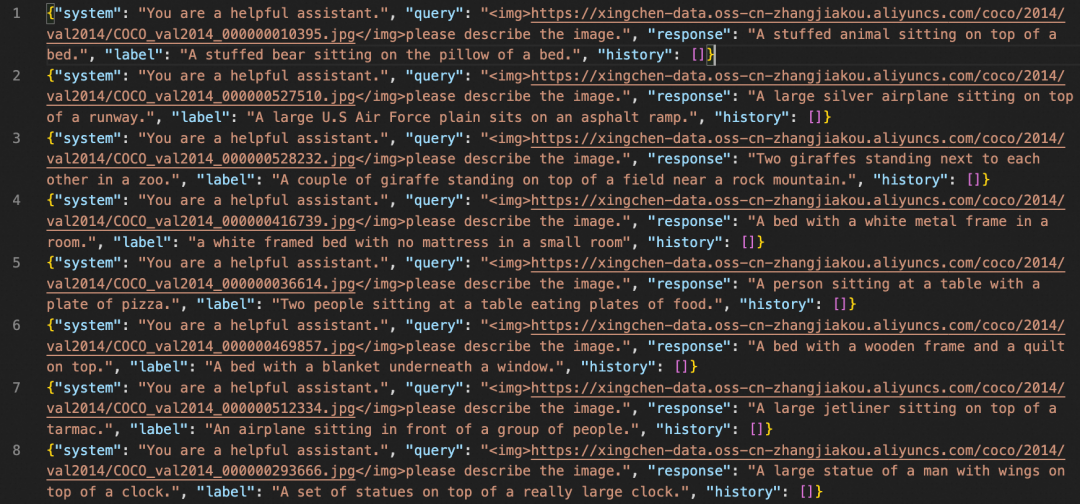
微调后模型对验证集进行推理的示例:
图像grounding微调
我们使用refcoco-unofficial-grounding数据集进行grounding微调,您可以在 modelscope 上找到该数据集:https://modelscope.cn/datasets/swift/refcoco
# 支持使用zero3进行微调``CUDA_VISIBLE_DEVICES=0,1,2,3 NPROC_PER_NODE=4 swift sft \` `--model_type qwen2-vl-7b-instruct \` `--model_id_or_path qwen/Qwen2-VL-7B-Instruct \` `--sft_type lora \` `--dataset refcoco-unofficial-grounding#20000 \` `--deepspeed default-zero3
用户可以使用如下自定义数据集格式:
# swift跨模型通用格式``{"query": "Find <bbox>", "response": "<ref-object>", "images": ["/coco2014/train2014/COCO_train2014_000000001507.jpg"], "objects": "[{\"caption\": \"guy in red\", \"bbox\": [138, 136, 235, 359], \"bbox_type\": \"real\", \"image\": 0}]" }``{"query": "Find <ref-object>", "response": "<bbox>", "images": ["/coco2014/train2014/COCO_train2014_000000001507.jpg"], "objects": "[{\"caption\": \"guy in red\", \"bbox\": [138, 136, 235, 359], \"bbox_type\": \"real\", \"image\": 0}]" }``# qwen2-vl-chat特定格式,注意特殊字符的存在``{"query": "Find <|object_ref_start|>the man<|object_ref_end|>", "response": "<|box_start|>(123,235),(324,546)<|box_end|>", "images": ["/coco2014/train2014/COCO_train2014_000000001507.jpg"]}
视频微调
我们使用 video-chatgpt 数据集进行微调,该数据集的任务是对视频内容进行描述。您可以在 modelscope 上找到该数据集:https://modelscope.cn/datasets/swift/VideoChatGPT
NFRAMES=24 MAX_PIXELS=100352 CUDA_VISIBLE_DEVICES=0,1,2,3 NPROC_PER_NODE=4 swift sft \` `--model_type qwen2-vl-7b-instruct \` `--model_id_or_path qwen/Qwen2-VL-7B-Instruct \` `--sft_type lora \` `--dataset video-chatgpt \` `--deepspeed default-zero2
自定义数据集支持json和jsonl样式,以下是自定义数据集的样例:
{"query": "<video>55555", "response": "66666", "videos": ["video_path"]}``{"query": "eeeee<video>eeeee<video>eeeee", "response": "fffff", "history": [], "videos": ["video_path1", "video_path2"]}``{"query": "EEEEE", "response": "FFFFF", "history": [["query1", "response2"], ["query2", "response2"]], "videos": []}
显存占用:
微调后推理脚本如下:
NFRAMES=24 MAX_PIXELS=100352 CUDA_VISIBLE_DEVICES=0 swift infer \` `--ckpt_dir output/qwen2-vl-7b-instruct/vx-xxx/checkpoint-xxx \` `--load_dataset_config true --merge_lora true
微调后模型对验证集进行推理的示例(时间原因,只训练了50个step):

如何学习大模型 AI ?
由于新岗位的生产效率,要优于被取代岗位的生产效率,所以实际上整个社会的生产效率是提升的。
但是具体到个人,只能说是:
“最先掌握AI的人,将会比较晚掌握AI的人有竞争优势”。
这句话,放在计算机、互联网、移动互联网的开局时期,都是一样的道理。
我在一线互联网企业工作十余年里,指导过不少同行后辈。帮助很多人得到了学习和成长。
我意识到有很多经验和知识值得分享给大家,也可以通过我们的能力和经验解答大家在人工智能学习中的很多困惑,所以在工作繁忙的情况下还是坚持各种整理和分享。但苦于知识传播途径有限,很多互联网行业朋友无法获得正确的资料得到学习提升,故此将并将重要的AI大模型资料包括AI大模型入门学习思维导图、精品AI大模型学习书籍手册、视频教程、实战学习等录播视频免费分享出来。

第一阶段(10天):初阶应用
该阶段让大家对大模型 AI有一个最前沿的认识,对大模型 AI 的理解超过 95% 的人,可以在相关讨论时发表高级、不跟风、又接地气的见解,别人只会和 AI 聊天,而你能调教 AI,并能用代码将大模型和业务衔接。
- 大模型 AI 能干什么?
- 大模型是怎样获得「智能」的?
- 用好 AI 的核心心法
- 大模型应用业务架构
- 大模型应用技术架构
- 代码示例:向 GPT-3.5 灌入新知识
- 提示工程的意义和核心思想
- Prompt 典型构成
- 指令调优方法论
- 思维链和思维树
- Prompt 攻击和防范
- …
第二阶段(30天):高阶应用
该阶段我们正式进入大模型 AI 进阶实战学习,学会构造私有知识库,扩展 AI 的能力。快速开发一个完整的基于 agent 对话机器人。掌握功能最强的大模型开发框架,抓住最新的技术进展,适合 Python 和 JavaScript 程序员。
- 为什么要做 RAG
- 搭建一个简单的 ChatPDF
- 检索的基础概念
- 什么是向量表示(Embeddings)
- 向量数据库与向量检索
- 基于向量检索的 RAG
- 搭建 RAG 系统的扩展知识
- 混合检索与 RAG-Fusion 简介
- 向量模型本地部署
- …
第三阶段(30天):模型训练
恭喜你,如果学到这里,你基本可以找到一份大模型 AI相关的工作,自己也能训练 GPT 了!通过微调,训练自己的垂直大模型,能独立训练开源多模态大模型,掌握更多技术方案。
到此为止,大概2个月的时间。你已经成为了一名“AI小子”。那么你还想往下探索吗?
- 为什么要做 RAG
- 什么是模型
- 什么是模型训练
- 求解器 & 损失函数简介
- 小实验2:手写一个简单的神经网络并训练它
- 什么是训练/预训练/微调/轻量化微调
- Transformer结构简介
- 轻量化微调
- 实验数据集的构建
- …
第四阶段(20天):商业闭环
对全球大模型从性能、吞吐量、成本等方面有一定的认知,可以在云端和本地等多种环境下部署大模型,找到适合自己的项目/创业方向,做一名被 AI 武装的产品经理。
- 硬件选型
- 带你了解全球大模型
- 使用国产大模型服务
- 搭建 OpenAI 代理
- 热身:基于阿里云 PAI 部署 Stable Diffusion
- 在本地计算机运行大模型
- 大模型的私有化部署
- 基于 vLLM 部署大模型
- 案例:如何优雅地在阿里云私有部署开源大模型
- 部署一套开源 LLM 项目
- 内容安全
- 互联网信息服务算法备案
- …
学习是一个过程,只要学习就会有挑战。天道酬勤,你越努力,就会成为越优秀的自己。
如果你能在15天内完成所有的任务,那你堪称天才。然而,如果你能完成 60-70% 的内容,你就已经开始具备成为一名大模型 AI 的正确特征了。
这份完整版的大模型 AI 学习资料已经上传CSDN,朋友们如果需要可以微信扫描下方CSDN官方认证二维码免费领取【保证100%免费】


 3517
3517

 被折叠的 条评论
为什么被折叠?
被折叠的 条评论
为什么被折叠?
 到【灌水乐园】发言


