


相信大家对于这一部分才是最感兴趣的,能够实实在在的看到效果。这里我们就只需要两个.py文件(deeplab.py、predict_img.py)。
创建DeeplabV3类
deeplab.py的作用是为了创建一个DeeplabV3类,提供一个检测图片的方法,而predict_img.py则是为了单独检测图片的效果。
在这里我需要一个defaults字典用来包含我在这个类要使用的变量,而需要把数据类型转换成字典数据再做存储,这时候就需要用到类的内置属性__dict__。
这里简单说一下字典defaults的key和value。
1、model_path=model_date/deeplab_mobilenetv2.pth
此文件是基于VOC拓展数据集训练的权重,放心使用,附上下载地址的权值文件。
2、num_classes=2
对于需要区分的类数+1,比如我这里是识别裂缝,所以我的num_classes为1+1,再比如经典的猫狗分类问题,那么它们的num_classes为2+1=3。
3、backbone=mobilenet
这里是使用的主干网络,有mobilenet和xception可供选择。
4、input_shape=[512,512]
输入图片的大小
5、downsample_factor=16
下采样的倍数,可选的有8和16,但8训练要求更大的内存,这里要与训练时相同。
6、mix_type=0
0代表原图与生成的图进行混合;1代表仅保留生成的图;2代表扣去背景,仅保留原图中的目标。
7、cude=False
有cuda就是Ture,没有就用cpu。
在这里,请看detect_image函数里面,首先要用cvtColor函数对图片进行一个转化,因为RGB图像才有权重。
在对图像的大小修改时,需要增添一个灰度框,想想这样的请况,如果图像比输入大小小就会使图像被强行放大,可能会伸长也可能会扩展。那么为了避免这种请况,所以要添加这个灰度边界,后期因为要与原图大小匹配,会将这部分去掉。
然后,对图像的每个像素点进行分类。
# deeplab.py

import colorsys
import copy

import cv2
import numpy as np
import torch
import torch.nn.functional as F
from PIL import Image
from torch import nn

from Deeplabv3_plus.deeplabv3plus import DeepLab
from utily.utils import cvtColor, preprocess_input, resize_image, show_config


class DeeplabV3(object):
    defaults = {
        "model_path": 'model_data/deeplab_mobilenetv2.pth',
        "num_classes": 2,
        "backbone": "mobilenet",
        "input_shape": [512, 512],
        "downsample_factor": 16,
        "mix_type": 0,
        "cuda": False
    }

    def __init__(self, **kwargs):
        self.__dict__.update(self.defaults)
        for name, value in kwargs.items():
            setattr(self, name, value)

        if self.num_classes <= 21:
            self.colors = [ (0, 0, 0), (128, 0, 0), (0, 128, 0), (128, 128, 0), (0, 0, 128), (128, 0, 128), (0, 128, 128),
                            (128, 128, 128), (64, 0, 0), (192, 0, 0), (64, 128, 0), (192, 128, 0), (64, 0, 128), (192, 0, 128),
                            (64, 128, 128), (192, 128, 128), (0, 64, 0), (128, 64, 0), (0, 192, 0), (128, 192, 0), (0, 64, 128),
                            (128, 64, 12)]
            # 画框设置不同的颜色
        else:
            hsv_tuples = [(x / self.num_classes, 1., 1.) for x in range(self.num_classes)]
            self.colors = list(map(lambda x: colorsys.hsv_to_rgb(*x), hsv_tuples))
            self.colors = list(map(lambda x: (int(x[0] * 255), int(x[1] * 255), int(x[2] * 255)), self.colors))

        # 获得模型
        self.generate()
        show_config(**self.defaults)

    # 获得所有的分类
    def generate(self, onnx=False):
        # 载入模型与权值
        self.net = DeepLab(num_classes=self.num_classes, backbone=self.backbone, downsample_factor=self.downsample_factor, pretrained=False)

        device = torch.device('cuda' if torch.cuda.is_available() else 'cpu')

        self.net.load_state_dict(torch.load(self.model_path, map_location=device))
        self.net = self.net.eval()
        print('{} model, and classes loaded.'.format(self.model_path))
        if not onnx:
            if self.cuda:
                self.net = nn.DataParallel(self.net)
                self.net = self.net.cuda()

    def detect_image(self, image, count=False, name_classes=None):
        """
        * 在这里将图像转换成RGB图像,防止灰度图在预测时报错。
        * 代码仅仅支持RGB图像的预测,所以其它类型的图像都会转化成RGB
        :param image: 图片
        :param count: 计数
        :param name_classes:
        :return:
        """
        image = cvtColor(image)

        # 对输入图像进行一个备份,后面用于绘图
        old_img = copy.deepcopy(image)
        orininal_h = np.array(image).shape[0]
        orininal_w = np.array(image).shape[1]

        # 给图像增加灰条,实现不失真的resize
        # 也可以直接resize进行识别
        image_data, nw, nh  = resize_image(image, (self.input_shape[1],self.input_shape[0]))

        # 添加上batch_size维度
        image_data  = np.expand_dims(np.transpose(preprocess_input(np.array(image_data, np.float32)), (2, 0, 1)), 0)

        with torch.no_grad():
            images = torch.from_numpy(image_data)
            if self.cuda:
                images = images.cuda()

            # 图片传入网络进行预测
            pr = self.net(images)[0]

            # 取出每一个像素点的种类
            pr = F.softmax(pr.permute(1,2,0),dim = -1).cpu().numpy()

            # 将灰条部分截取掉
            pr = pr[int((self.input_shape[0] - nh) // 2) : int((self.input_shape[0] - nh) // 2 + nh), \
                    int((self.input_shape[1] - nw) // 2) : int((self.input_shape[1] - nw) // 2 + nw)]

            # 进行图片的resize
            pr = cv2.resize(pr, (orininal_w, orininal_h), interpolation = cv2.INTER_LINEAR)

            # 取出每一个像素点的种类
            pr = pr.argmax(axis=-1)

        if count:
            classes_nums        = np.zeros([self.num_classes])
            total_points_num    = orininal_h * orininal_w
            print('-' * 63)
            print("|%25s | %15s | %15s|"%("Key", "Value", "Ratio"))
            print('-' * 63)
            for i in range(self.num_classes):
                num     = np.sum(pr == i)
                ratio   = num / total_points_num * 100
                if num > 0:
                    print("|%25s | %15s | %14.2f%%|"%(str(name_classes[i]), str(num), ratio))
                    print('-' * 63)
                classes_nums[i] = num
            print("classes_nums:", classes_nums)

        if self.mix_type == 0:
            # seg_img = np.zeros((np.shape(pr)[0], np.shape(pr)[1], 3))
            # for c in range(self.num_classes):
            #     seg_img[:, :, 0] += ((pr[:, :] == c ) * self.colors[c][0]).astype('uint8')
            #     seg_img[:, :, 1] += ((pr[:, :] == c ) * self.colors[c][1]).astype('uint8')
            #     seg_img[:, :, 2] += ((pr[:, :] == c ) * self.colors[c][2]).astype('uint8')
            seg_img = np.reshape(np.array(self.colors, np.uint8)[np.reshape(pr, [-1])], [orininal_h, orininal_w, -1])

            # 将新图片转换成Image的形式
            image   = Image.fromarray(np.uint8(seg_img))

            # 将新图与原图及进行混合
            image   = Image.blend(old_img, image, 0.7)

        elif self.mix_type == 1:
            # seg_img = np.zeros((np.shape(pr)[0], np.shape(pr)[1], 3))
            # for c in range(self.num_classes):
            #     seg_img[:, :, 0] += ((pr[:, :] == c ) * self.colors[c][0]).astype('uint8')
            #     seg_img[:, :, 1] += ((pr[:, :] == c ) * self.colors[c][1]).astype('uint8')
            #     seg_img[:, :, 2] += ((pr[:, :] == c ) * self.colors[c][2]).astype('uint8')
            seg_img = np.reshape(np.array(self.colors, np.uint8)[np.reshape(pr, [-1])], [orininal_h, orininal_w, -1])

            # 将新图片转换成Image的形式
            image   = Image.fromarray(np.uint8(seg_img))

        elif self.mix_type == 2:
            seg_img = (np.expand_dims(pr != 0, -1) * np.array(old_img, np.float32)).astype('uint8')

            # 将新图片转换成Image的形式
            image = Image.fromarray(np.uint8(seg_img))

        return image
单张图片的预测
由于我想要将图片放在PyQt5设计的ui中,所以要单张单张的显示。
from PIL import Image
from deeplab import DeeplabV3
if __name__ == "__main__":
deeplab = DeeplabV3()
mode = "predict"
count = False #指定了是否进行目标的像素点计数(即面积)与比例计算
# name_classes = ["background","aeroplane", "bicycle", "bird", "boat", "bottle", "bus", "car", "cat", "chair", "cow", "diningtable", "dog", "horse", "motorbike", "person", "pottedplant", "sheep", "sofa", "train", "tvmonitor"]
name_classes = ["background","crack"]
if mode == "predict":
while True:
img = input('Input image filename:')
try:
image = Image.open(img)
except:
print('Open Error! Try again!')
continue
else:
r_image = deeplab.detect_image(image, count=count, name_classes=name_classes)
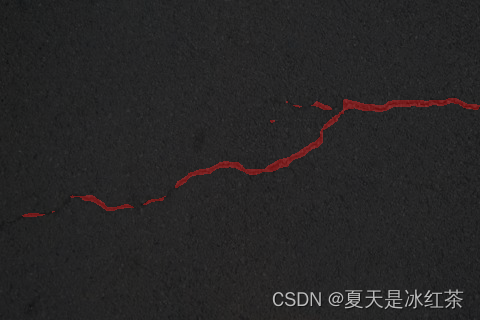
r_image.show()我们来看看效果:
原图

效果图


 5436
5436


 被折叠的 条评论
为什么被折叠?
被折叠的 条评论
为什么被折叠?
 到【灌水乐园】发言


