


CenterFusion算法环境配置与demo运行
1.论文简介
CenterFusion: Center-based Radar and Camera Fusion for 3D Object Detection. Ramin Nabati, Hairong Qi
论文链接:https://arxiv.org/pdf/2011.04841v1.pdf
项目链接:https://github.com/mrnabati/CenterFusion
该文作者信息:
作者来自田纳西大学诺克斯维尔分校。
激光雷达使用发射的激光测距进行环境感知,而雷达使用无线电发射进行探测。
3D目标检测在自动驾驶领域应用广泛,而激光雷达(Lidar)和摄像头数据的融合常用来进行高精度的3D目标检测,但其仍有一些缺点。比如对远处目标检测不精确、对天气敏感(雨雪大雾天气等),而且不能直接得到目标的速度。
而低成本的雷达则相对具有天然优势:无惧恶劣天气,长远距离检测能力强(200M也OK),且天然还有目标速度信息。
但雷达数据更加稀疏,不能直接将激光雷达的方法直接套用,数据在输入层和后处理部分的融合不能取得很好的效果。
该文将摄像头采集的图像数据和雷达数据进行中间特征层的融合,以达到精确的3D目标检测。
该文算法流程图:
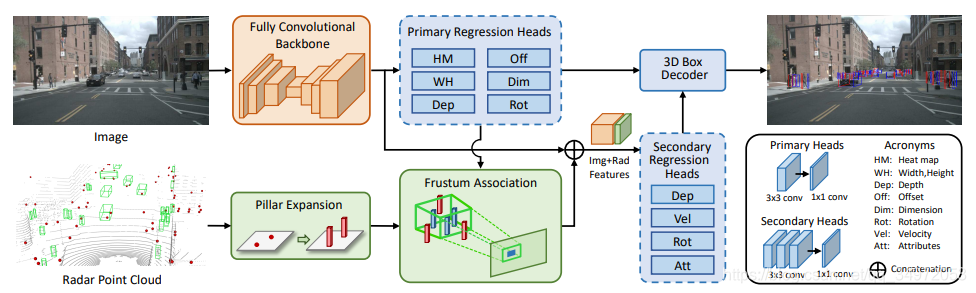
CenterFusion 网络架构
算法流程:
-
首先使用CenterNet算法进利用摄像头数据预测目标的中心点,并回归得到目标的3D坐标、深度、旋转等信息
-
然后作者将雷达检测到的目标数据和上面检测到的目标中心点进行关联,作者了视锥的方法
-
将关联后的目标的特征和雷达数据检测到的深度和速度信息组成的特征图并联,在进行3D目标深度、旋转、速度和属性的回归。
感谢提供论文信息的博主@我爱计算机视觉,以上引用自 https://blog.csdn.net/moxibingdao/article/details/109733768
2.环境配置
使用anaconda进行安装的方式详见我的另一篇博客Centerfusion算法环境配置及模型训练
跟随官方安装方式进行环境配置及安装
项目链接:https://github.com/mrnabati/CenterFusion
1.安装pytorch
官方源太慢更换豆瓣源
pip install -i https://pypi.douban.com/simple/ torch torchvision
2.安装cocoapi
github太慢更换码云镜像,以及更换豆瓣源
pip install -i https://pypi.douban.com/simple/ cython
pip install -i https://pypi.douban.com/simple/ -U 'git+https://gitee.com/monkeycc/cocoapi.git#subdirectory=PythonAPI'
3.克隆CenterFusion的github库
cd ~
git clone https://github.com/mrnabati/CenterFusion.git
4.安装依赖工具包
pip 没有对应版本,使用pip3安装,异常不顺利,出现很多错误
pip3 install -i https://pypi.douban.com/simple/ -r requirements.txt
pip3 install scikit-learn==0.21.0
pip3 install opencv-python==4.0.0.21
pip3 install Cython==0.29.21
sudo pip3 install numba==0.49.1
pip3 install progress==1.5
pip3 install matplotlib==3.3.3
pip3 install easydict==1.9
pip3 install scipy==1.5.4
pip3 install pyquaternion==0.9.9
pip3 install nuscenes-devkit==1.0.5 opencv-python==4.0.0.21 numpy==1.19.4
pip3 install pyyaml==5.3.1
pip3 install motmetrics==1.1.3
pip3 install tensorboardx==2.1
为避免以下问题,采用上面的命令
遇到问题ModuleNotFoundError: No module named ‘skbuild’
pip install scikit-build
再次遇到问题Failed building wheel for ‘XXX’
sudo apt-get upgrade python-wheel
sudo apt-get upgrade
RuntimeError: llvm-config failed executing, please point LLVM_CONFIG to the path for llvm-config
没有安装LLVM
sudo apt-get install llvm
使用该命令安装后版本为6.0.0,与所需要版本不符合,出现以下错误
RuntimeError: Building llvmlite requires LLVM 10.0.x or 9.0.x, got ‘6.0.0’. Be sure to set LLVM_CONFIG to the right executable path.
安装10.0.x版本,参考@wang.wenchao https://blog.csdn.net/wwchao2012/article/details/105888776?utm_medium=distribute.pc_relevant.none-task-blog-BlogCommendFromMachineLearnPai2-1.control&depth_1-utm_source=distribute.pc_relevant.none-task-blog-BlogCommendFromMachineLearnPai2-1.control
git clone https://gitee.com/wangwenchaonj/llvm-project.git
cd llvm-project
git checkout release/10.x
mkdir build
cd build
cmake -G "Unix Makefiles" -DCMAKE_BUILD_TYPE=Release --enable-optimized --enable-targets=host-only  ../llvm -DLLVM_ENABLE_PROJECTS="clang;libcxx;libcxxabi;compiler-rt;clang-tools-extra;openmp;lldb;lld"
make -j2
sudo make install
clang++ -v //查看是否安装成功
最后再执行了一次,此部分成功完成
pip3 install -i https://pypi.douban.com/simple/ -r requirements.txt
5.克隆DCNv2
更换码云镜像,克隆位置CenterFusion/src/lib/model/networks
cd CenterFusion/src/lib/model/networks
git clone https://gitee.com/niyayu/dcnv2.git
git clone https://github.com/CharlesShang/DCNv2/  //原github仓库
6.构建可变形卷积库
cd CenterFusion/src/lib/model/networks/DCNv2
./make.sh
出现错误ImportError: No module named builtins,安装下面的库
pip install future
Perhaps your account does not have write access to this directory? If the
installation directory is a system-owned directory, you may need to sign in
as the administrator or “root” account.
权限不够,加上sudo
sudo ./make.sh
至此安装工作完成
3.数据集下载
从nuScenes网站下载nuScenes数据集。
或百度云盘链接: https://pan.baidu.com/s/18XEvDtzrFjHA9XD5vy_uyQ 密码: wu7h
需要注册账号,注册后进入看到以下画面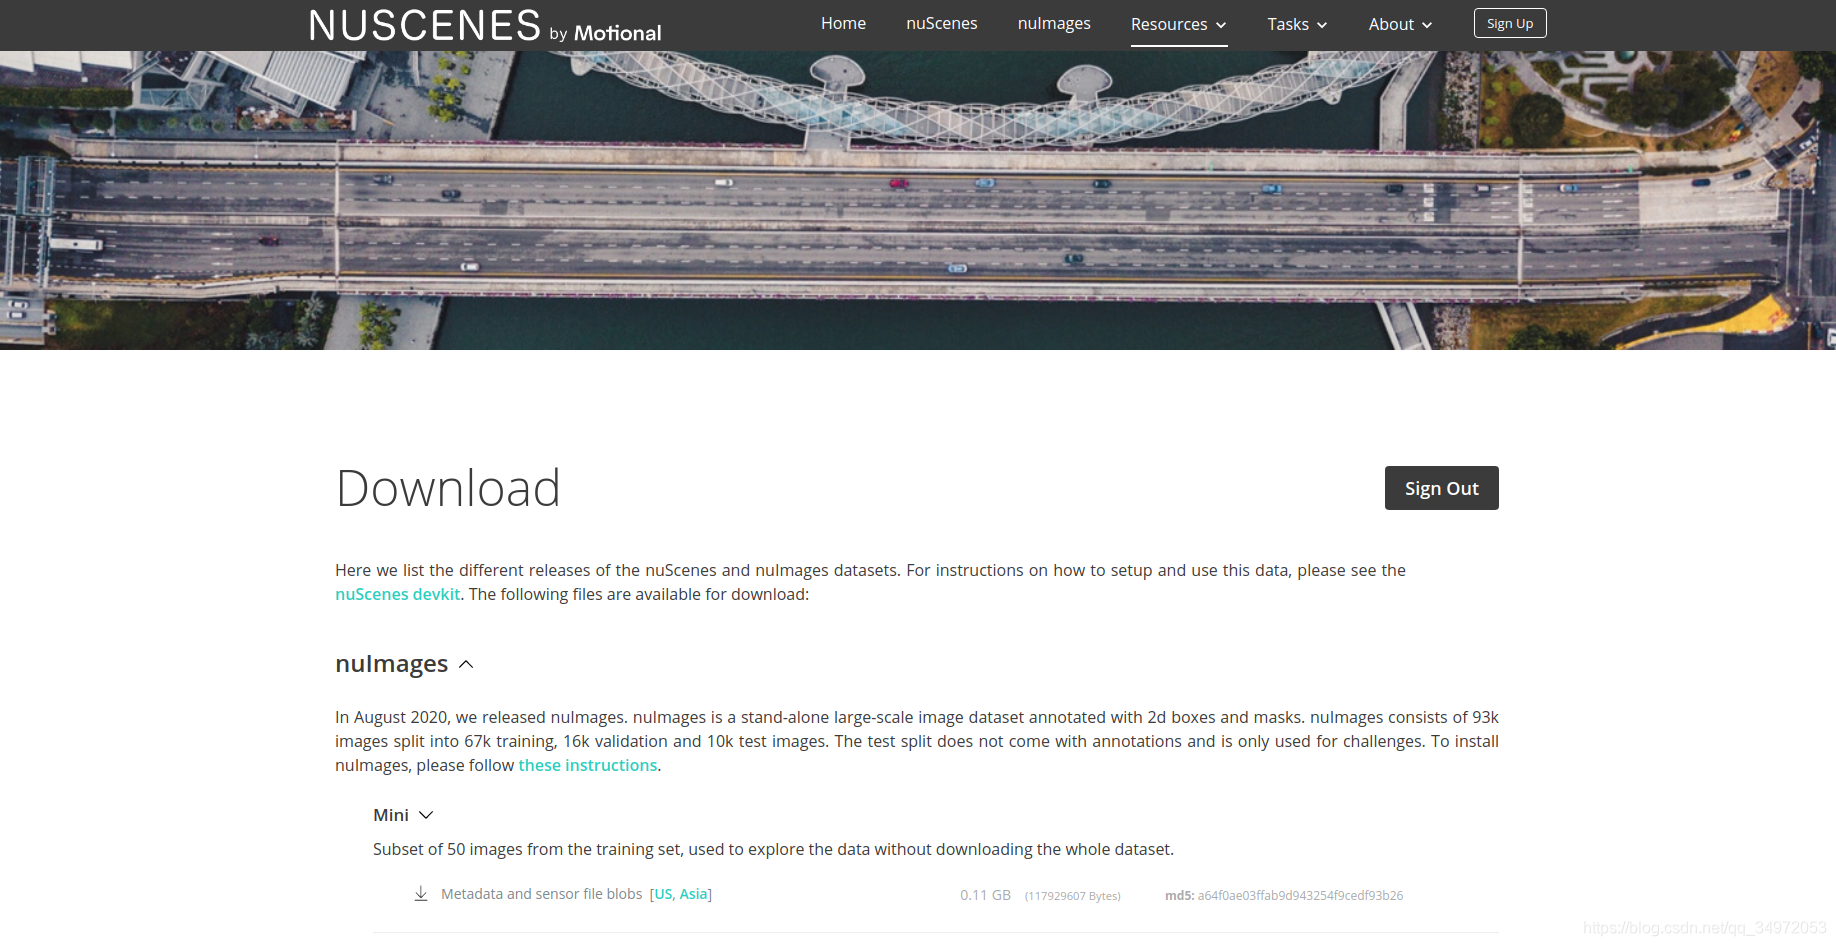
下拉至Full dataset (v1.0)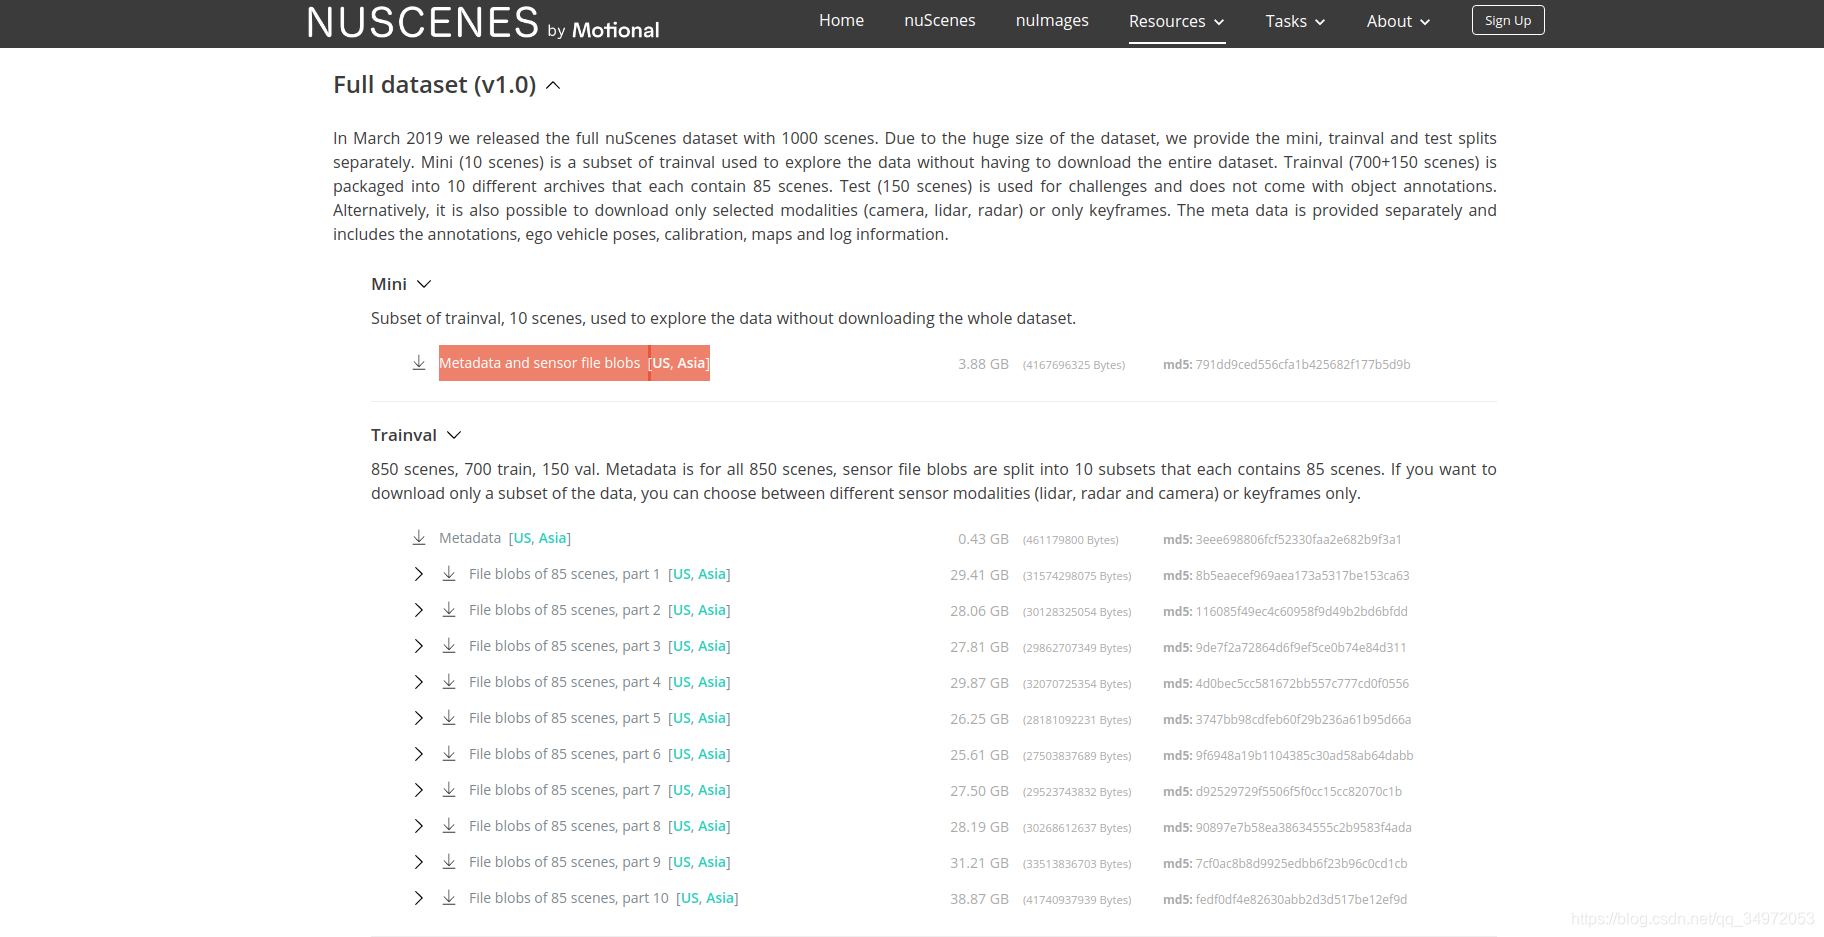
下载上图高亮所示Metadata and sensor file blobs [US, Asia]
点击Asia,即可下载
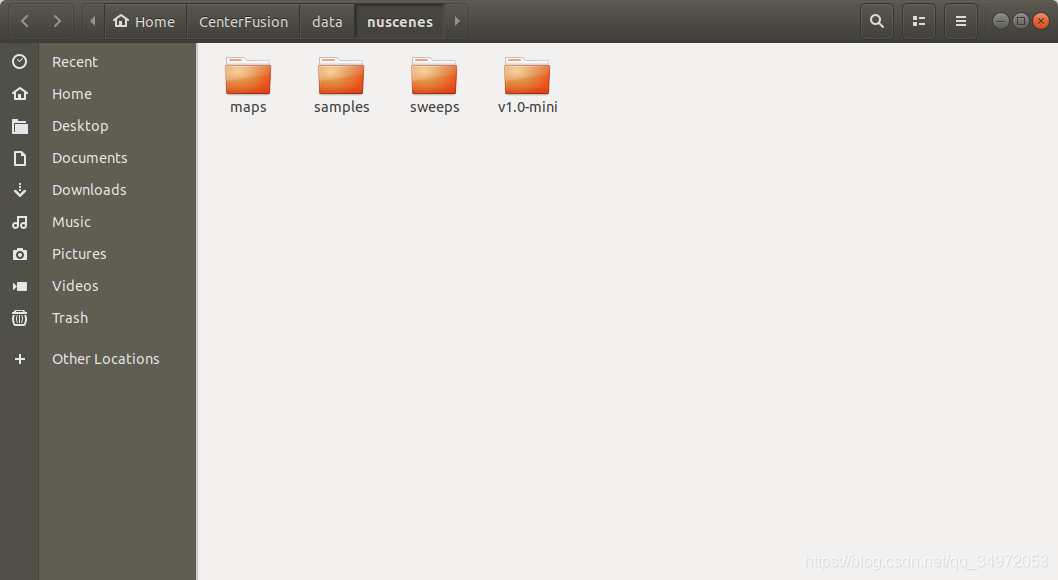
将下载的文件解压到CenterFusion\data\nuscenes目录中。如下图所示
转换数据集格式为COCO格式
cd CenterFusion/src/tools
python convert_nuScenes.py
ImportError: No module named nuscenes.nuscenes,未安装nuscenes-devkit
pip3 install nuscenes-devkit
运行py文件要使用python3
python3 convert_nuScenes.py
成功转换
4.预训练模型文件下载
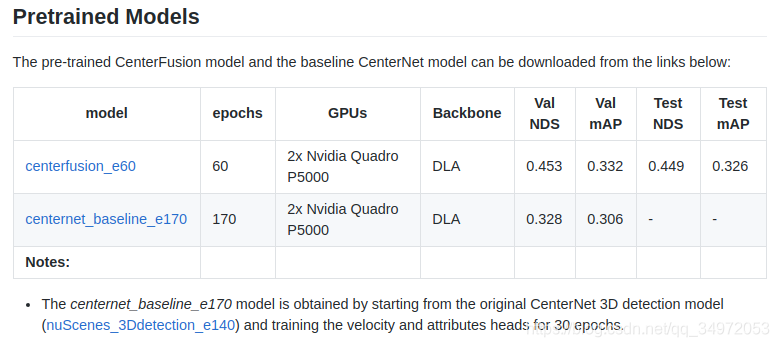
作者提供文件在google drive
centerfusion_e60
centernet_baseline_e170
百度云盘链接: https://pan.baidu.com/s/1j_M5AzD2chkAPNjCrEq7Zg 密码: veup
下载后放入/CenterFusion/models文件夹下
5.damo运行
首先修改experiment/test.sh换为python3
sudo bash experiments/test.sh
Warning: No ImageNet pretrain!!
Traceback (most recent call last):
File “test.py”, line 215, in
prefetch_test(opt)
File “test.py”, line 79, in prefetch_test
detector = Detector(opt)
File “/home/vincent/CenterFusion/src/lib/detector.py”, line 34, in init
opt.arch, opt.heads, opt.head_conv, opt=opt)
File “/home/vincent/CenterFusion/src/lib/model/model.py”, line 28, in create_model
model = model_class(num_layers, heads=head, head_convs=head_conv, opt=opt)
File “/home/vincent/CenterFusion/src/lib/model/networks/dla.py”, line 611, in init
node_type=self.node_type)
File “/home/vincent/CenterFusion/src/lib/model/networks/dla.py”, line 564, in init
node_type=node_type))
File “/home/vincent/CenterFusion/src/lib/model/networks/dla.py”, line 526, in init
proj = node_type[0](c, o)
File “/home/vincent/CenterFusion/src/lib/model/networks/dla.py”, line 513, in init
self.conv = DCN(chi, cho, kernel_size=(3,3), stride=1, padding=1, dilation=1, deformable_groups=1)
TypeError: ‘NoneType’ object is not callable
DCNv2安装问题./make.sh之前先修改文件内容换为python3
cd $CF_ROOT/src/lib/model/networks
rm -rf DCNv2
git clone https://github.com/CharlesShang/DCNv2/
cd DCNv2
./make.sh
error: ‘THFloatBlas_gemv’ was not declared in this scope下面命令可以解决
同样./make.sh之前先修改文件内容换为python3
cd $CF_ROOT/src/lib/model/networks
rm -rf DCNv2
git clone https://github.com/lbin/DCNv2.git
cd DCNv2
./make.sh
experiments/test.sh: line 20: 8344 Aborted (core dumped)
如果只有一张显卡,这个问题一定会出现,这个问题是由于test.sh中的export CUDA_VISIBLE_DEVICES=1中的数字不对,用gedit打开该文件export CUDA_VISIBLE_DEVICES=0即可解决
python: can’t open file ‘tools/nuscenes-devkit/python-sdk/nuscenes/eval/detection/evaluate.py’: [Errno 2] No such file or directory
下载nuscenes-devkit包放入对应位置https://github.com/nutonomy/nuscenes-devkit
cd ~/CenterFusion/src/tools
rm -rf nuscenes-devkit/
git clone https://github.com/nutonomy/nuscenes-devkit.git
File “tools/nuscenes-devkit/python-sdk/nuscenes/eval/detection/evaluate.py”, line 45
nusc: NuScenes,
^
SyntaxError: invalid syntax
修改python默认版本,更换为3.*https://blog.csdn.net/qq_40663855/article/details/98895570
Traceback (most recent call last):
File “tools/nuscenes-devkit/python-sdk/nuscenes/eval/detection/evaluate.py”, line 14, in
from nuscenes.eval.common.config import config_factory
ModuleNotFoundError: No module named ‘nuscenes.eval.common’
更换nuscenes-devkit版本,1.0.5版本才开始有eval.common
pip3 install nuscenes-devkit==1.0.5 opencv-python==4.0.0.21
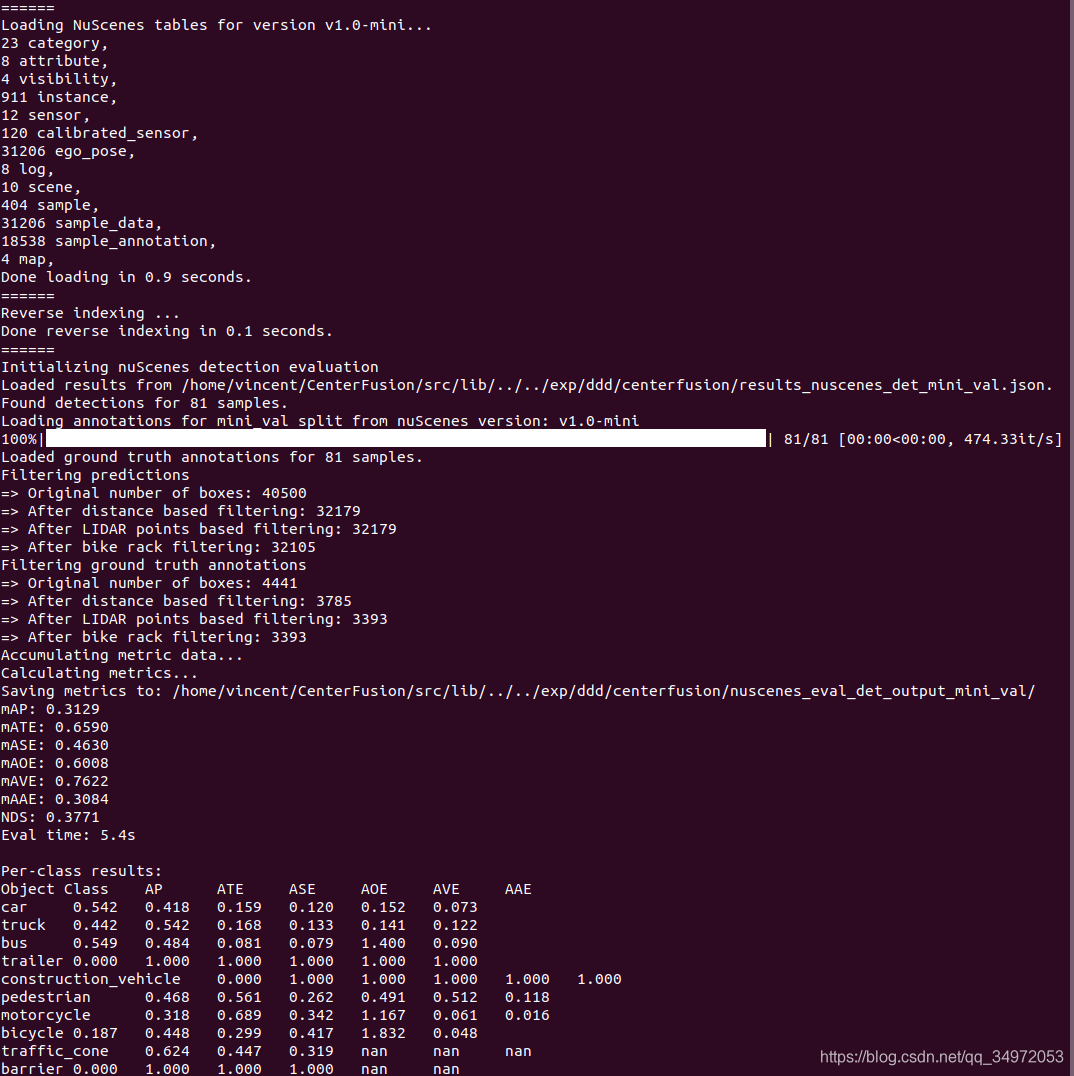
至此所有错误均解决,成功运行sudo bash experiments/test.sh,运行结果如下


 1013
1013


 到【灌水乐园】发言


