


1.CAA介绍

1.1 摘要
摘要:遥感图像中的目标检测面临着越来越多的挑战,包括目标尺度的变化和背景的多样性。先前的方法试图通过扩大骨干的空间感受野来解决这些挑战,无论是通过大核卷积还是扩张卷积。然而,前者通常会引入相当大的背景噪声,而后者则会产生过于稀疏的特征表示。在本文中,我们引入了多核初始网络(PKINet)来应对上述挑战。PKINet采用无膨胀的多尺度卷积核来提取不同尺度的对象特征并捕获局部上下文。此外,一个上下文锚注意(CAA)模块并行引入捕获远程上下文信息。这两个组件共同工作,以提高PKINet在四个具有挑战性的遥感检测基准上的性能,即DOTA-v1.0,DOTA-v1.5,HRSC 2016和DIOR-R。
1.2 简单描述
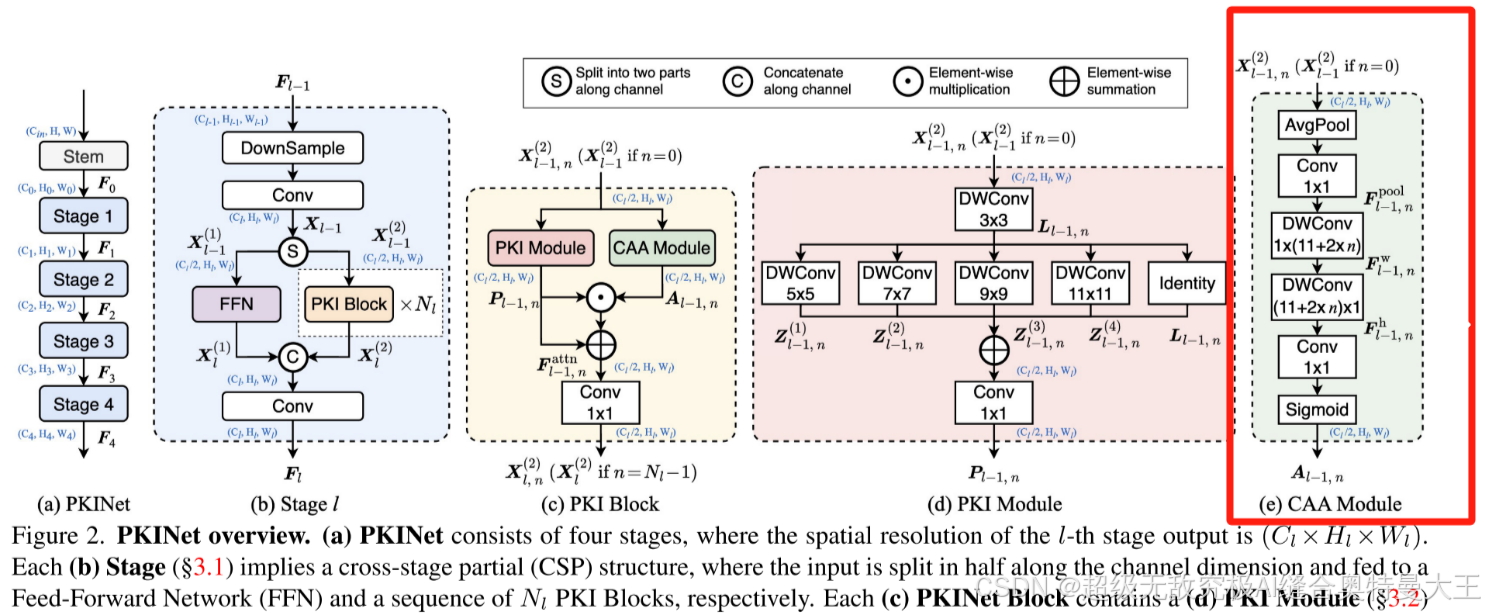
Context Anchor Attention (CAA) 模块用于捕获长距离的上下文信息。CAA 模块的核心思想是通过使用平均池化(average pooling)和1D条带卷积(1x1 convolution),来捕捉远距离像素之间的关系,并增强中心区域的特征。这种设计旨在帮助模型更好地理解和利用图像中不同位置之间的相互关系,从而提高对复杂场景的理解能力。
具体来说,CAA模块首先通过平均池化操作来获取局部区域的统计特征,然后通过1D条带卷积进一步提取和强化这些特征。这种设计有助于模型关注到图像中的关键区域,还能通过跨区域的特征融合,增强模型的泛化能力和性能。此外,通过采用深度可分离卷积(depth-wise strip convolutions),CAA模块在保持计算效率的同时,实现了与较大卷积核类似的效果,这对于遥感图像检测任务中的实时性和准确性要求尤为重要。
综上CAA模块通过结合局部和全局的上下文信息,有效地提升了遥感对象检测的性能和准确性。
1.3 模块结构
2.SpatialGroupEnhance代码
class CAA(nn.Module):
    def __init__(self, ch, h_kernel_size=11, v_kernel_size=11) -> None:
        super().__init__()

        self.avg_pool = nn.AvgPool2d(7, 1, 3)
        self.conv1 = Conv(ch, ch)
        self.h_conv = nn.Conv2d(ch, ch, (1, h_kernel_size), 1, (0, h_kernel_size // 2), 1, ch)
        self.v_conv = nn.Conv2d(ch, ch, (v_kernel_size, 1), 1, (v_kernel_size // 2, 0), 1, ch)
        self.conv2 = Conv(ch, ch)
        self.act = nn.Sigmoid()

    def forward(self, x):
        attn_factor = self.act(self.conv2(self.v_conv(self.h_conv(self.conv1(self.avg_pool(x))))))
        return attn_factor * x

class C2PSA_CAA(nn.Module):
    """
    C2PSA module with attention mechanism for enhanced feature extraction and processing.
    This module implements a convolutional block with attention mechanisms to enhance feature extraction and processing
    capabilities. It includes a series of PSABlock modules for self-attention and feed-forward operations.
    Attributes:
        c (int): Number of hidden channels.
        cv1 (Conv): 1x1 convolution layer to reduce the number of input channels to 2*c.
        cv2 (Conv): 1x1 convolution layer to reduce the number of output channels to c.
        m (nn.Sequential): Sequential container of PSABlock modules for attention and feed-forward operations.
    Methods:
        forward: Performs a forward pass through the C2PSA module, applying attention and feed-forward operations.
    Notes:
        This module essentially is the same as PSA module, but refactored to allow stacking more PSABlock modules.
    Examples:
        >>> c2psa = C2PSA(c1=256, c2=256, n=3, e=0.5)
        >>> input_tensor = torch.randn(1, 256, 64, 64)
        >>> output_tensor = c2psa(input_tensor)
    """

    def __init__(self, c1, c2, n=1, e=0.5):
        """Initializes the C2PSA module with specified input/output channels, number of layers, and expansion ratio."""
        super().__init__()
        assert c1 == c2
        self.c = int(c1 * e)
        self.cv1 = Conv(c1, 2 * self.c, 1, 1)
        self.cv2 = Conv(2 * self.c, c1, 1)

        self.m = nn.Sequential(*(PSABlock(self.c, attn_ratio=0.5, num_heads=self.c // 64) for _ in range(n)))

    def forward(self, x):
        """Processes the input tensor 'x' through a series of PSA blocks and returns the transformed tensor."""
        a, b = self.cv1(x).split((self.c, self.c), dim=1)
        b = self.m(b)
        return self.cv2(torch.cat((a, b), 1))
3.配置文件
# Ultralytics YOLO 🚀, AGPL-3.0 license
# YOLO11 object detection model with P3-P5 outputs. For Usage examples see https://docs.ultralytics.com/tasks/detect

# Parameters
nc: 80 # number of classes
scales: # model compound scaling constants, i.e. 'model=yolo11n.yaml' will call yolo11.yaml with scale 'n'
  # [depth, width, max_channels]
  n: [0.50, 0.25, 1024] # summary: 319 layers, 2624080 parameters, 2624064 gradients, 6.6 GFLOPs
  s: [0.50, 0.50, 1024] # summary: 319 layers, 9458752 parameters, 9458736 gradients, 21.7 GFLOPs
  m: [0.50, 1.00, 512] # summary: 409 layers, 20114688 parameters, 20114672 gradients, 68.5 GFLOPs
  l: [1.00, 1.00, 512] # summary: 631 layers, 25372160 parameters, 25372144 gradients, 87.6 GFLOPs
  x: [1.00, 1.50, 512] # summary: 631 layers, 56966176 parameters, 56966160 gradients, 196.0 GFLOPs

# YOLO11n backbone
backbone:
  # [from, repeats, module, args]
  - [-1, 1, Conv, [64, 3, 2]] # 0-P1/2
  - [-1, 1, Conv, [128, 3, 2]] # 1-P2/4
  - [-1, 2, C3k2, [256, False, 0.25]]
  - [-1, 1, Conv, [256, 3, 2]] # 3-P3/8
  - [-1, 2, C3k2, [512, False, 0.25]]
  - [-1, 1, Conv, [512, 3, 2]] # 5-P4/16
  - [-1, 2, C3k2, [512, True]]
  - [-1, 1, Conv, [1024, 3, 2]] # 7-P5/32
  - [-1, 2, C3k2, [1024, True]]
  - [-1, 1, SPPF, [1024, 5]] # 9
  - [-1, 2, C2PSA_CAA, [1024,1024]] # 这里输入输出通道根据你使用的模型进行计算,如果你使用的yolov11n就是(1024*0.25,1024*0.25),如果是s就*0.5

# YOLO11n head
head:
  - [-1, 1, nn.Upsample, [None, 2, "nearest"]]
  - [[-1, 6], 1, Concat, [1]] # cat backbone P4
  - [-1, 2, C3k2, [512, False]] # 13

  - [-1, 1, nn.Upsample, [None, 2, "nearest"]]
  - [[-1, 4], 1, Concat, [1]] # cat backbone P3
  - [-1, 2, C3k2, [256, False]] # 16 (P3/8-small)

  - [-1, 1, Conv, [256, 3, 2]]
  - [[-1, 13], 1, Concat, [1]] # cat head P4
  - [-1, 2, C3k2, [512, False]] # 19 (P4/16-medium)

  - [-1, 1, Conv, [512, 3, 2]]
  - [[-1, 10], 1, Concat, [1]] # cat head P5
  - [-1, 2, C3k2, [1024, True]] # 22 (P5/32-large)

  - [[16, 19, 22], 1, Detect, [nc]] # Detect(P3, P4, P5)
4.模型训练代码
import warnings
warnings.filterwarnings('ignore')
from ultralytics import YOLO


if __name__ == '__main__':n
    model = YOLO(r'?/ultralytics/cfg/mondels/11/yolo11n.yaml')//将?替换为yaml文件所在位置的绝对路径,下面data同理
    model.train(data=r'?/ultralytics/cfg/datasets/coco.yaml',
                cache=False,
                imgsz=640,
                epochs=300,
                single_cls=False,  # 是否是单类别检测
                batch=16,
                close_mosaic=10,
                workers=0,
                device='0',
                optimizer='SGD',
                amp=True,
                project='runs/train',
                name='exp',
                )
5.模型测试代码
from ultralytics import YOLO

model = YOLO('?/runs/train/exp/weights/best.pt')//将?替换为训练结果权重文件的绝对路径


# Train the model
results = model.val(data="coco.yaml",  imgsz=640, split='test')//只对数据集中的yaml文件中名字叫test文件夹下的数据集测试
6.总结
以上就是该模块添加到yolov11中的方法,你可以加在yolov11的任何位置(只要他能跑起来,你可以合理的解释它为什么出现这个位置)。
跑实验的过程是枯燥乏味的,希望我远在天边的朋友你能耐得住寂寞,早日跑出自己想要的结果!!!


 2880
2880

 被折叠的 条评论
为什么被折叠?
被折叠的 条评论
为什么被折叠?
 到【灌水乐园】发言


